Heartbeat学习笔记--HA高可用集群实现
2014-07-07 18:14
274 查看
一、部署环境:
服务器版本:CentOS6.5
双主热备模式:
VIP:192.168.3.30(MASTER上)VIP:192.168.3.32(BACKUP上)主机网络参数:
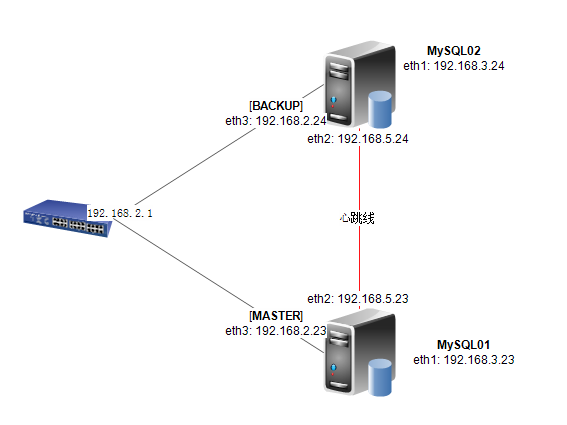
网络拓扑:
二、需求分析:
通过Heartbeat的高可用功能保证双主VIP同时在线。MySQL01默认绑定VIP:192.168.3.30,MySQL02默认绑定192.168.3.32。任一主机宕机后自动切换。
三、相关配置:
添加心跳线路由:
1)MySQL01端:
注:由于外网网段192.168.2.0中有DNS服务器,所以在这里就没配HOSTS文件:

如果没有DNS服务器的话需要手工添加HOST记录,主机名的查看方法:
1. ha.cf
1)MySQL01端:
四、参考博文:
CentOS 6.5 heartbeat高可用集群的详解实现以及工作流程
heartbeat mysql nfs 高可用mysql集群
本文出自 “小鬼的地盘” 博客,请务必保留此出处http://zhoufwind.blog.51cto.com/1029821/1435437
服务器版本:CentOS6.5
双主热备模式:
VIP:192.168.3.30(MASTER上)VIP:192.168.3.32(BACKUP上)主机网络参数:
| 接口 | MASTER | BACKUP | 说明 |
| eth1 | 192.168.3.23 | 192.168.3.24 | 内网管理IP |
| eth2 | 192.168.5.23 | 192.168.5.24 | 心跳线 |
| eth3 | 192.168.2.23 | 192.168.2.24 | 外网(临时下载文件用) |
二、需求分析:
通过Heartbeat的高可用功能保证双主VIP同时在线。MySQL01默认绑定VIP:192.168.3.30,MySQL02默认绑定192.168.3.32。任一主机宕机后自动切换。
三、相关配置:
添加心跳线路由:
1)MySQL01端:
route add -host 192.168.5.24 dev eth2
echo "route add -host 192.168.5.24 dev eth2" >>/etc/rc.local    # 加入到rc.local开机自启,也可修改默认静态路由现实
2)MySQL02端:
route add -host 192.168.5.23 dev eth2
echo "route add -host 192.168.5.23 dev eth2" >>/etc/rc.local
安装heartbeat:
[root@MySQL01 ~]# mkdir tools
[root@MySQL01 ~]# cd tools
[root@MySQL01 tools]# wget
[root@MySQL01 tools]# rpm -ivh epel-release-6-8.noarch.rpm
[root@MySQL01 tools]# yum install heartbeat -y
配置heartbeat:
[root@MySQL01 tools]# cd /usr/share/doc/heartbeat-3.0.4/
[root@MySQL01 heartbeat-3.0.4]# ls
[root@MySQL01 heartbeat-3.0.4]# cp ha.cf haresources authkeys /etc/ha.d/
[root@MySQL01 heartbeat-3.0.4]# ls -ls /etc/ha.d/
[root@MySQL01 heartbeat-3.0.4]# cd /etc/ha.d/
修改HOSTS文件或者配置DNS参数:
注:由于外网网段192.168.2.0中有DNS服务器,所以在这里就没配HOSTS文件:
如果没有DNS服务器的话需要手工添加HOST记录,主机名的查看方法:
[root@MySQL01 resource.d]# uname -n
MySQL01.stephenzhou.net
[root@MySQL01 ha.d]# cat /etc/hosts
127.0.0.1       localhost.localdomain   localhost.localdomain   localhost4      localhost4.localdomain4 localhost       MySQL01
::1     localhost.localdomain   localhost.localdomain   localhost6      localhost6.localdomain6 localhost       MySQL01
192.168.2.23 MySQL01.stpehenzhou.net
192.168.2.24 MySQL02.stpehenzhou.net
192.168.3.23 MySQL01.stpehenzhou.net
192.168.3.24 MySQL02.stpehenzhou.net
查看epel是否已经安装好:
[root@MySQL01 resource.d]# rpm -qa|grep epel
epel-release-6-8.noarch
配置heartbeat的三个主要配置文件(ha.cf/haresources/authkeys),完了过后复制到MySQL01及MySQL02的/etc/ha.d/目录下:
1. ha.cf
#created by stephen#2014-07-07
debugfile /var/log/ha-debug
logfile	/var/log/ha-log
logfacility	local0

keepalive 2
deadtime 30
warntime 10
initdead 60

serial	/dev/ttyS0	# Linux

mcast eth2 225.0.0.1 694 1 0    # 使用组/多播形式,通过eth2走心跳线传送,端口为:udp--694

auto_failback on
node	MySQL01.stephenzhou.net    # 此处必须使用与‘uname -n’一致的名字
node	MySQL02.stephenzhou.net
crm no
2. haresources
# stephen services

# 192.168.2.23 www.stephenzhou.net
# MySQL01.stephenzhou.net IPaddr::192.168.2.30/24/eth3
#MySQL01.stephenzhou.net IPaddr::192.168.2.30/24/eth3 httpd

# 192.168.2.24 bbs.stephenzhou.net
# MySQL02.stephenzhou.net IPaddr::192.168.2.32/24/eth3

# MySQL master mysqlm.stephenzhou.net
#MySQL01.stephenzhou.net IPaddr::192.168.3.30/24/eth1 mysqld
MySQL01.stephenzhou.net IPaddr::192.168.3.30/24/eth1    # 此处也必须使用与‘uname -n’一致的名字

# MySQL slave mysqls.stephenzhou.net
MySQL02.stephenzhou.net IPaddr::192.168.3.32/24/eth1
3. authkeys
auth 1
1 sha1 47e9336850f1db6fa58bc470bc9b7810eb397f04
配置防火墙规则已允许心跳流量(/etc/sysconfig/iptables):
[root@MySQL01 ha.d]# cat /etc/sysconfig/iptables
# Firewall configuration written by system-config-firewall
# Manual customization of this file is not recommended.
*filter
:INPUT ACCEPT [0:0]
:FORWARD ACCEPT [0:0]
:OUTPUT ACCEPT [0:0]
-A INPUT -p udp --dport 694 -j ACCEPT    # 允许端口UDP 694的流量进入
-A INPUT -m state --state ESTABLISHED,RELATED -j ACCEPT
-A INPUT -p icmp -j ACCEPT
-A INPUT -i lo -j ACCEPT
-A INPUT -m state --state NEW -m tcp -p tcp --dport 22 -j ACCEPT
-A INPUT -j REJECT --reject-with icmp-host-prohibited
-A FORWARD -j REJECT --reject-with icmp-host-prohibited
COMMIT
测试heartbeat是否配置成功:
1)MySQL01端:
[root@MySQL01 ha.d]# /etc/init.d/heartbeat start
Starting High-Availability services: INFO:  Resource is stopped
INFO:  Resource is stopped
Done.

[root@MySQL01 ha.d]# ip add|grep 192.168.3       # 发现VIP已经绑定
inet 192.168.3.23/24 brd 192.168.3.255 scope global eth1
inet 192.168.3.30/24 brd 192.168.3.255 scope global secondary eth1
[root@MySQL01 ha.d]# iptables -vL    # 看到udp端口已经有心跳流量了
Chain INPUT (policy ACCEPT 0 packets, 0 bytes)
pkts bytes target     prot opt in     out     source               destination
48 12296 ACCEPT     udp  --  any    any     anywhere             anywhere            udp dpt:ha-cluster
36  2376 ACCEPT     all  --  any    any     anywhere             anywhere            state RELATED,ESTABLISHED
0     0 ACCEPT     icmp --  any    any     anywhere             anywhere
0     0 ACCEPT     all  --  lo     any     anywhere             anywhere
0     0 ACCEPT     tcp  --  any    any     anywhere             anywhere            state NEW tcp dpt:ssh
1   229 REJECT     all  --  any    any     anywhere             anywhere            reject-with icmp-host-prohibited
[root@MySQL01 ha.d]# tcpdump -i eth2 udp -s 1500     # 对心跳线所在网卡udp端口抓包的话可以看到心跳流量
tcpdump: verbose output suppressed, use -v or -vv for full protocol decode
listening on eth2, link-type EN10MB (Ethernet), capture size 1500 bytes
16:55:16.399325 IP 192.168.5.23.35912 > 225.0.0.1.ha-cluster: UDP, length 226
16:55:17.216819 IP 192.168.5.24.53014 > 225.0.0.1.ha-cluster: UDP, length 226
16:55:17.371805 IP 192.168.5.23.35912 > 225.0.0.1.ha-cluster: UDP, length 239
16:55:18.399199 IP 192.168.5.23.35912 > 225.0.0.1.ha-cluster: UDP, length 226
16:55:19.222381 IP 192.168.5.24.53014 > 225.0.0.1.ha-cluster: UDP, length 226
...
^C
16 packets captured
16 packets received by filter
0 packets dropped by kernel
2)MySQL02端:
[root@MySQL02 ha.d]# /etc/init.d/heartbeat start
Starting High-Availability services: INFO:  Resource is stopped
INFO:  Resource is stopped
Done.

[root@MySQL02 ha.d]# ip add|grep 192.168.3
inet 192.168.3.24/24 brd 192.168.3.255 scope global eth1
inet 192.168.3.32/24 brd 192.168.3.255 scope global secondary eth1
四、参考博文:
CentOS 6.5 heartbeat高可用集群的详解实现以及工作流程
heartbeat mysql nfs 高可用mysql集群
本文出自 “小鬼的地盘” 博客,请务必保留此出处http://zhoufwind.blog.51cto.com/1029821/1435437

相关文章推荐
- Heartbeat学习笔记--HA高可用集群实现
- Spark学习笔记8-搭建spark的HA(用zookeeper实现spark的高可用)
- LVS学习笔记 8 crm实现Mysql高可用集群
- 学习笔记--HA高可用集群
- Mysql DBA 高级运维学习笔记-Heartbeat实现web服务的高可用案例及维护要点
- 学习笔记 Hadoop的job提交过程,shuffle过程以及HA机制的实现
- 孙鑫VC学习笔记:第十七讲 用命名管道实现进程间的通信
- 《面向对象基础:C++实现》学习笔记之五
- PetShop3.x学习笔记5-我读cocoboy79《MS PetShop 3.x 设计与实现——数据访问层》
- C#中实现事件的学习笔记
- 孙鑫VC学习笔记:第十七讲 用剪贴板实现进程间的通信
- 《面向对象基础:C++实现》学习笔记之四
- PetShop3.x学习笔记5-我读cocoboy79《MS PetShop 3.x 设计与实现——数据访问层》
- J2ME 3D学习笔记——实现简单的界面(附代码)
- 孙鑫VC学习笔记:第十五讲 增加互斥条件实现线程同步
- 孙鑫VC学习笔记:第十六讲 利用事件对象实现线程间的同步
- Community Server 2.0 学习笔记:如何实现在线人数?
- 设计模式学习笔记5:Singleton模式及其Delphi实现
- JDO学习笔记之Sun JDO参考实现篇
- PetShop3.x学习笔记10-购物车参考资料2-PetShop购物车实现