haproxy的高可用
2014-05-04 08:55
197 查看
一、简介
软件负载均衡一般通过两种方式来实现:基于操作系统的软负载实现和基于第三方应用的软负载实现。
LVS 就是基于 Linux 操作系统实现的一种软负载,HAProxy就是开源的并且基于第三应用实现的软负载。HAProxy 相比 LVS 的使用要简单很多,功能方面也很丰富。当前,HAProxy 支持两种主要的代理模式:"tcp"即 4 层(大多用于邮件服务器、内部协议通信服务器等)和 7 层(HTTP)在 4 层模式下, HAproxy仅在客户端和服务器之间转发双向流量。 7 层模式下, HAProxy 会分析协议,并且能通过允许、拒绝、交换、增加、修改或者删除请求(request)或者回应(response)里指定内容来控制协议,这种操作要基于特定规则。
详情可以HAProxy 官方网站(http://haproxy.1wt.eu)可以下载配置说明文档(configuration.txt)和架构文件(architecture.txt)作为参考。
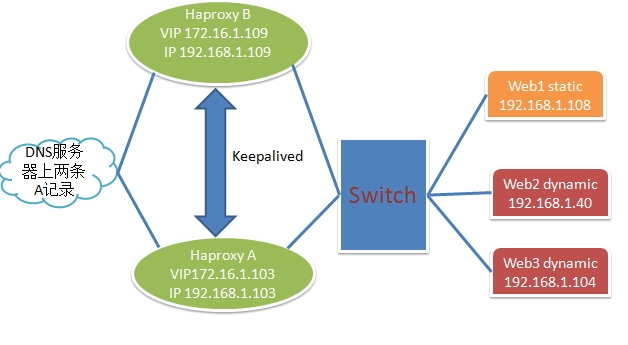
二、拓扑图
三、 配置过程
注:
OS:Centos 6.5x86_64
己经安装的包组 :
HAproxy A与B要做到
主机名解析
时间同步
无密钥登录
1、HAproxy A配置
安装keepalived、haproxy
编辑/etc/keepalived/keepalived.conf
编辑配置文件 /etc/haproxy/haproxy.cfg
2、HAproxy B的配置
安装keepalived、haproxy
HAproxy B 上面的ip地址
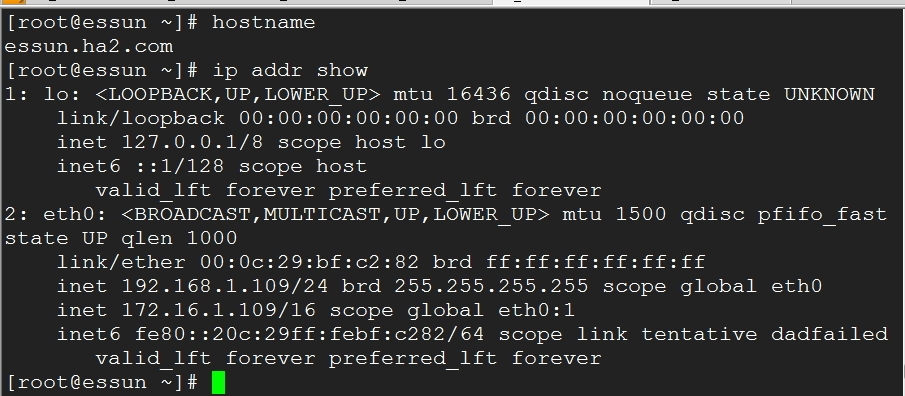
将ha2上的keepalived停止后,ip地址己经转移到了ha1上了
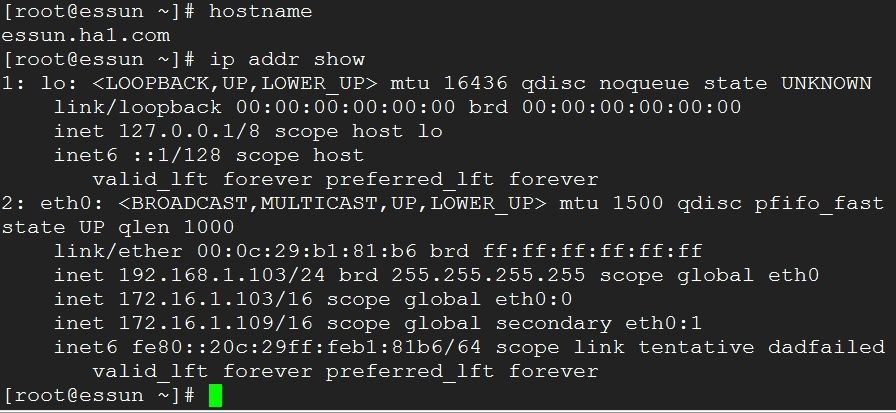
当ha2启动后,172.16.1.109还是会回到ha2上面。
4、安装后端的web服务
web1 静态页面 (192.168.1.108)
web2 动态页面 (192.168.1.40)
1、利用两个vip任意一个测试一下
静态页面测试
动态页面测试web2 (192.168.1.40)
动态页面测试 web3 (192.168.1.104)
监控页面,验证用户身份

验证通过后
其中一个keepalived宕机后完不会影响到服务的正常的运行
===================================完===================================================
本文出自 “和风细雨” 博客,请务必保留此出处http://essun.blog.51cto.com/721033/1405893
软件负载均衡一般通过两种方式来实现:基于操作系统的软负载实现和基于第三方应用的软负载实现。
LVS 就是基于 Linux 操作系统实现的一种软负载,HAProxy就是开源的并且基于第三应用实现的软负载。HAProxy 相比 LVS 的使用要简单很多,功能方面也很丰富。当前,HAProxy 支持两种主要的代理模式:"tcp"即 4 层(大多用于邮件服务器、内部协议通信服务器等)和 7 层(HTTP)在 4 层模式下, HAproxy仅在客户端和服务器之间转发双向流量。 7 层模式下, HAProxy 会分析协议,并且能通过允许、拒绝、交换、增加、修改或者删除请求(request)或者回应(response)里指定内容来控制协议,这种操作要基于特定规则。
详情可以HAProxy 官方网站(http://haproxy.1wt.eu)可以下载配置说明文档(configuration.txt)和架构文件(architecture.txt)作为参考。
二、拓扑图
三、 配置过程
注:
OS:Centos 6.5x86_64
己经安装的包组 :
#yum groupinstall -y "Development tools" "Server Platform Development"前提:
HAproxy A与B要做到
主机名解析
时间同步
无密钥登录
1、HAproxy A配置
安装keepalived、haproxy
#yum install -y keepalived haproxy配置keepalived
编辑/etc/keepalived/keepalived.conf
!  Configuration File for keepalived

global_defs {
notification_email {
root@localhost
essuninfo@localhost
}
notification_email_from essuninfo@localhost
smtp_connect_timeout 3
smtp_server 127.0.0.1
router_id LVS_DEVEL
}
vrrp_script chk_haproxy {
script "killall -0 haproxy"
interval 1
weight 2
}
vrrp_instance VI_1 {
interface eth0
state MASTER
priority 201
virtual_router_id 109
garp_master_delay 1

authentication {
auth_type PASS
auth_pass password
}
track_interface {
eth0
}
virtual_ipaddress {
172.16.1.103/16 dev eth0 label eth0:0
}
track_script {
chk_haproxy

}

notify_master "/etc/keepalived/notify.sh master"
notify_backup "/etc/keepalived/notify.sh backup"
notify_fault "/etc/keepalived/notify.sh fault"
}
vrrp_instance VI_2 {
interface eth0
state BACKUP
priority 99
virtual_router_id 52
garp_master_delay 1

authentication {
auth_type PASS
auth_pass password
}
track_interface {
eth0
}
virtual_ipaddress {
172.16.1.109/16 dev eth0 label eth0:1
}
track_script {
chk_haproxy
}
}通知脚本#!/bin/bash
# description: An example of notify script
#
vip=172.16.1.103
contact='root@localhost'
notify() {
mailsubject="`hostname` to be $1: $vip floating"
mailbody="`date '+%F\ %T'`: vrrp transition, `hostname` changed to be $1"
echo $mailbody | mail -s "$mailsubject" $contact
}
case "$1" in
master)
notify master
/etc/rc.d/init.d/haproxy start
exit 0
;;
backup)
notify backup
/etc/rc.d/init.d/haproxy stop
exit 0
;;
fault)
notify fault
/etc/rc.d/init.d/haproxy stop
exit 0
;;
*)
echo 'Usage: `basename $0` {master|backup|fault}'
exit 1
;;
esac
#chmod +x /etc/keepalived/notify.sh配置haproxy编辑配置文件 /etc/haproxy/haproxy.cfg
#---------------------------------------------------------------------
# Example configuration for a possible web application.  See the
# full configuration options online.
#
#   http://haproxy.1wt.eu/download/1.4/doc/configuration.txt #
#---------------------------------------------------------------------
#---------------------------------------------------------------------
# Global settings
#---------------------------------------------------------------------
global #全局配置区域
log         127.0.0.1 local2  #日志将通过rsyslog进行归档记录
chroot      /var/lib/haproxy #运行的安装路径
pidfile     /var/run/haproxy.pid #pid文件存放的位置
maxconn     4000  #最大连接
user        haproxy  #运行haproxy的用户
group       haproxy  #运行haprixy的组
daemon     #以后台模式运行haproxy
# turn on stats unix socket
stats socket /var/lib/haproxy/stats
#---------------------------------------------------------------------
# common defaults that all the 'listen' and 'backend' sections will
# use if not designated in their block
#---------------------------------------------------------------------
defaults
mode                    http  #工作模式
log                     global #记录日志
option                  httplog
option                  dontlognull #不记录健康检查的日志信息
option http-server-close  #启用服务器端主动关闭
option forwardfor       except 127.0.0.0/8 #传递客户端IP
option                  redispatch #当后端服务器组中的某一台主机故障后,能够自动将请求重定向到组内的其它主机
retries                 3 #请求重试次数
timeout http-request    10s #http请求超时时间
timeout queue           1m #一个请求在队列里的超时时间
timeout connect         10s #连接服务器超时时间
timeout client          1m #客户端超时时间
timeout server          1m #客户端超时时间
timeout http-keep-alive 10s
timeout check           10s #心跳检测超时时间
maxconn                 3000 #最大连接数
#---------------------------------------------------------------------
# main frontend which proxys to the backends
#---------------------------------------------------------------------
frontend  proxy *:80
acl url_static       path_beg       -i /static /images /javascript /stylesheets
acl url_static       path_end       -i .jpg .gif .png .css .js
use_backend static          if url_static
default_backend             dynamic
#---------------------------------------------------------------------
# static backend for serving up images, stylesheets and such
#---------------------------------------------------------------------
backend static  #后端调度
balance     roundrobin #调度算法
server      web2 192.168.1.108:80 inter 1500 rise 2 fall 3  check maxconn 5000
#----------------------------------------
listen statistics
mode http  # http 7 层模式
bind *:8080 #监听地址
stats enable #启用状态监控
stats auth admin:essun #验证的用户与密码
stats uri /admin?status #访问路径
stats admin if TRUE #如果验证通过了就允许登录
stats refresh 6s #每6秒刷新一次
acl allow src 172.16.1.0/24 #允许的IP地址
tcp-request content accept if allow #如果允许的地址段就允许访问
tcp-request content reject #拒绝非法连接
#---------------------------------------------------------------------
# round robin balancing between the various backends
#---------------------------------------------------------------------
backend dynamic
balance     roundrobin
server      web2 192.168.1.40:80 check inter 1500 rise 2 fall 3   maxconn 5000
#服务器定义,serverid为web2,check inter 1500是检测心跳频率
#rise 2是2次正确认为服务器可用
#fall 3是3次失败认为服务器不可用
#最大连接数据为5000
server  web3 192.168.1.104:80 check inter 1500 rise 2 fall 3   maxconn 5000
将此文件同时也复制到HAproxy B上一份
2、HAproxy B的配置
安装keepalived、haproxy
#yum install -y keepalived haproxy修改keepalived在配置文件(/etc/keepalived/keepalived.conf)
! Configuration File for keepalived

global_defs {
notification_email {
root@localhost
essuninfo@localhost
}
notification_email_from essuninfo@localhost
smtp_connect_timeout 3
smtp_server 127.0.0.1
router_id LVS_DEVEL
}
vrrp_script chk_haproxy {
script "killall -0 haproxy"
interval 1
weight 2
}
vrrp_instance VI_1 {
interface eth0
state BACKUP
priority 200
virtual_router_id 109
garp_master_delay 1

authentication {
auth_type PASS
auth_pass password
}
track_interface {
eth0
}
virtual_ipaddress {
172.16.1.103/16 dev eth0 label eth0:0
}
track_script {
chk_haproxy

}

}
vrrp_instance VI_2 {
interface eth0
state MASTER
priority 100
virtual_router_id 52
garp_master_delay 1

authentication {
auth_type PASS
auth_pass password
}
track_interface {
eth0
}
virtual_ipaddress {
172.16.1.109/16 dev eth0 label eth0:1
}
track_script {
chk_haproxy
}

notify_master "/etc/keepalived/notify.sh master"
notify_backup "/etc/keepalived/notify.sh backup"
notify_fault "/etc/keepalived/notify.sh fault"
}修改通知脚本#!/bin/bash
# description: An example of notify script
#
vip=172.16.1.109
contact='root@localhost'
notify() {
mailsubject="`hostname` to be $1: $vip floating"
mailbody="`date '+%F\ %T'`: vrrp transition, `hostname` changed to be $1"
echo $mailbody | mail -s "$mailsubject" $contact
}
case "$1" in
master)
notify master
/etc/rc.d/init.d/haproxy start
exit 0
;;
backup)
notify backup
/etc/rc.d/init.d/haproxy stop
exit 0
;;
fault)
notify fault
/etc/rc.d/init.d/haproxy stop
exit 0
;;
*)
echo 'Usage: `basename $0` {master|backup|fault}'
exit 1
;;
esac
#chmod +x /etc/keepalived/notify.sh由于HAproxy A中的haporxy配置与HAporxy B 的配置文件相同从HAproxy A中发过来一份放在同一目录下即可#scp -p /etc/haproxy/haproxy.cnf 192.168.1.109:/etc/haproxy/3、测试一下keepalived功能
HAproxy B 上面的ip地址
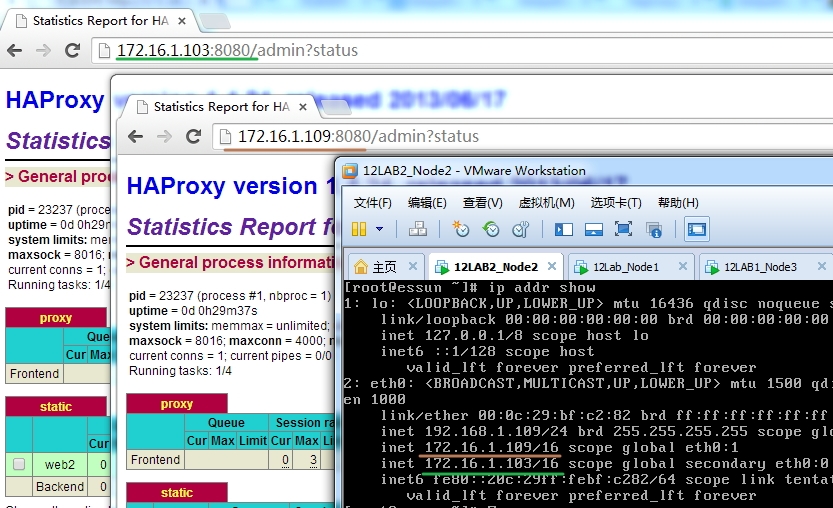
将ha2上的keepalived停止后,ip地址己经转移到了ha1上了
当ha2启动后,172.16.1.109还是会回到ha2上面。
4、安装后端的web服务
web1 静态页面 (192.168.1.108)
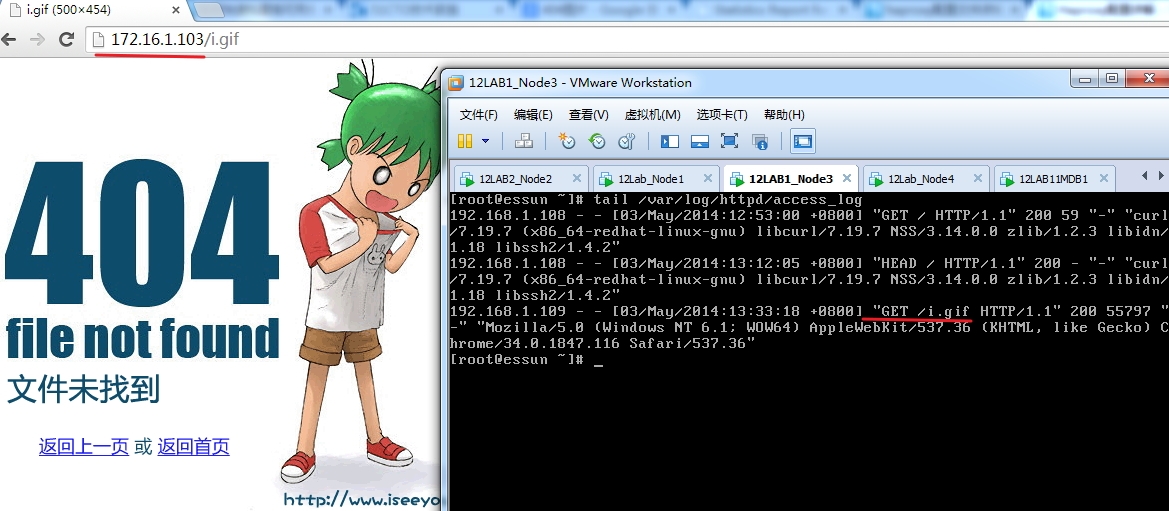
#yum install -y httpd
[root@essun ~]# cd /var/www/html/
[root@essun html]# echo "<h1>这是一个静态页面,地址为192.168.1.108</h1>" > index.html
[root@essun html]# ll
total 4
-rw-r--r-- 1 root root 59 May  3 12:50 index.html
[root@essun html]# cat index.html
<h1>这是一个静态页面,地址为192.168.1.108</h1>
[root@essun html]# service httpd start
Starting httpd: httpd: apr_sockaddr_info_get() failed for essun.node3.com
httpd: Could not reliably determine the server's fully qualified domain name, using 127.0.0.1 for ServerName
[  OK  ]
[root@essun html]# curl http://192.168.1.108 <h1>这是一个静态页面,地址为192.168.1.108</h1>
在/var/www/html中放一张图片,仅供测试
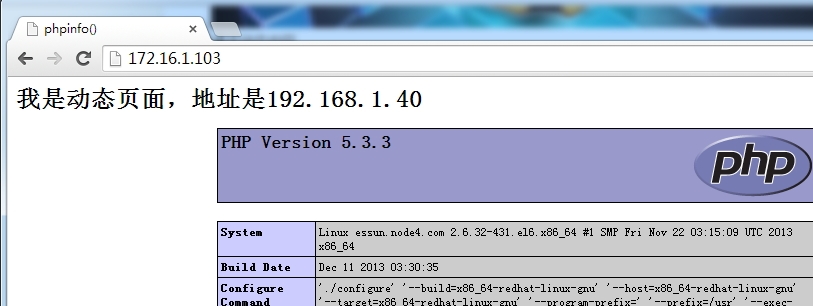
web2 动态页面 (192.168.1.40)
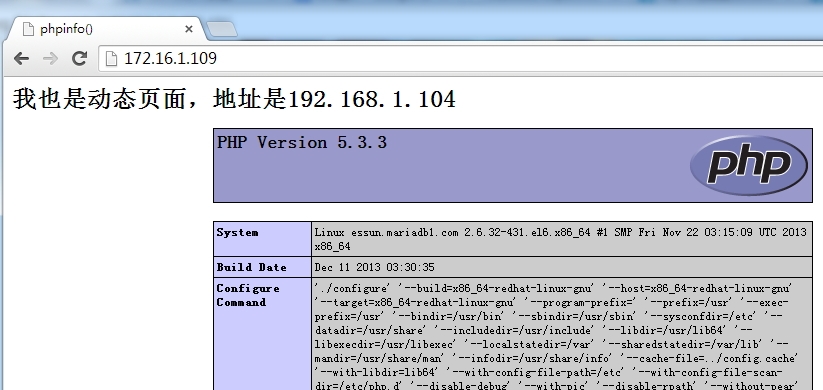
[root@essun yum.repos.d]# yum install -y  httpd php php-mysql mysql-server mysql-devel
[root@essun yum.repos.d]# cd /var/www/html/
[root@essun html]# vim index.php
[root@essun html]# service httpd restart
Stopping httpd:                                            [FAILED]
Starting httpd: httpd: apr_sockaddr_info_get() failed for essun.node4.com
httpd: Could not reliably determine the server's fully qualified domain name, using 127.0.0.1 for ServerName
[  OK  ]
[root@essun html]# cat index.php
<h1>我是动态页面,地址是192.168.1.40</h1>
<?php
phpinfo();
?>
[root@essun html]# curl  -I http://192.168.1.40/index.php HTTP/1.1 200 OK
Date: Sat, 03 May 2014 05:11:47 GMT
Server: Apache/2.2.15 (CentOS)
X-Powered-By: PHP/5.3.3
Connection: close
Content-Type: text/html; charset=UTF-8
web3 动态页面(192.168.1.104)
[root@essun yum.repos.d]# yum install -y  httpd php php-mysql mysql-server mysql-devel
[root@essun yum.repos.d]# cd /var/www/html/
[root@essun html]# vim index.php
[root@essun yum.repos.d]# service httpd restart
Stopping httpd:                                            [FAILED]
Starting httpd:                                            [  OK  ]
[root@essun html]# cat index.php
<h1>我也是动态页面,地址是192.168.1.104</h1>
<?php
phpinfo();
?>
[root@essun yum.repos.d]# curl -I http://192.168.1.104 HTTP/1.1 200 OK
Date: Sat, 03 May 2014 05:14:22 GMT
Server: Apache/2.2.15 (CentOS)
X-Powered-By: PHP/5.3.3
Connection: close
Content-Type: text/html; charset=UTF-8
四、测试
1、利用两个vip任意一个测试一下
静态页面测试
动态页面测试web2 (192.168.1.40)
动态页面测试 web3 (192.168.1.104)
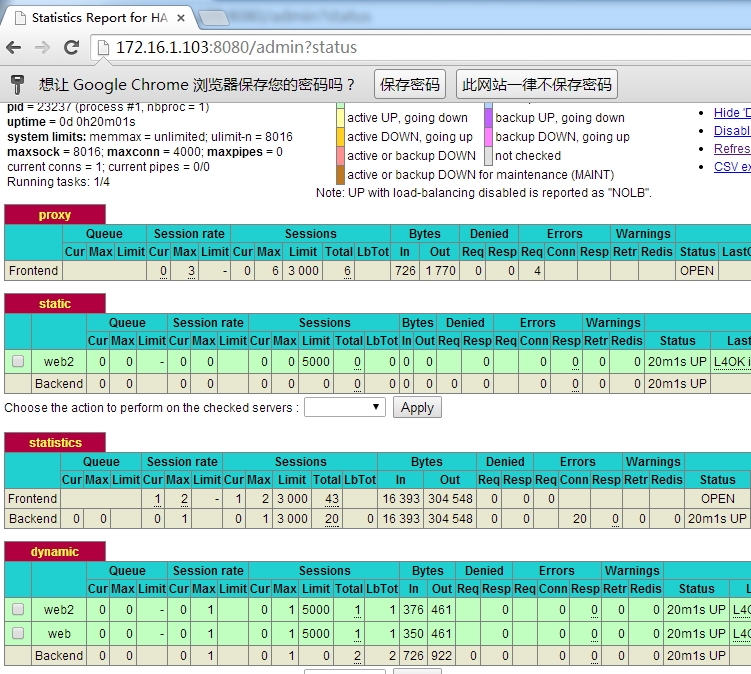
监控页面,验证用户身份
验证通过后
其中一个keepalived宕机后完不会影响到服务的正常的运行
===================================完===================================================
本文出自 “和风细雨” 博客,请务必保留此出处http://essun.blog.51cto.com/721033/1405893

相关文章推荐
- keepalived+haproxy-部署高可用负载均衡
- haproxy结合keepalived实现httpd的高可用服务
- Centos6下haproxy+keepalived构建高可用web集群
- keepalived+haproxy(SSL)实现web高可用(双主模式)
- 高可用Web架构Keepalived+Haproxy
- Haproxy+Keepalived高可用双机单活
- Web 负载均衡解决方案——HAproxy+keepalived实现高可用负载均衡 推荐
- haproxy+keepalived实现高可用负载均衡
- keepalived+haproxy实现web服务的高可用和负载均衡
- keepalived + haproxy 实现web 双主模型的高可用负载均衡 推荐
- Haproxy+Keepalived实现负载均衡高可用
- HAProxy高可用配置视频教程
- Haproxy、Keepalived双主高可用负载均衡集群环境搭建
- Haproxy+keepalived 高可用负载 推荐
- Keepalived+HAproxy实现高可用负载均衡
- miradb+galera+haproxy+keepalived实现mysql负载均衡与高可用
- Haproxy+keepalived实现sphinx高可用负载均衡
- haproxy高可用之非抢占keepalived(二)
- Haproxy+keepalived实现sphinx高可用负载均衡
- haproxy+keepalived实现高可用负载均衡