通向架构师的道路(九)--之Axis2 Web Service(一)
2013-06-06 16:06
543 查看
一、Axis2简介
1.1 介绍Axis2
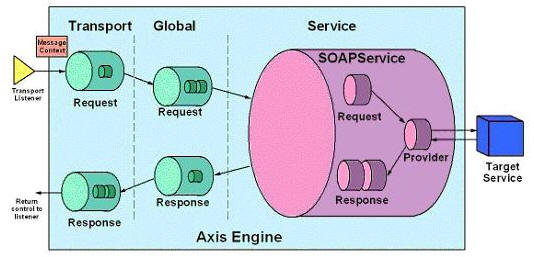
Axis框架来自 Apache 开放源代码组织,它是基于JAVA语言的最新的 SOAP 规范(SOAP 1.2)和 SOAP withAttachments 规范(来自 Apache Group )的开放源代码实现。有很多流行的开发工具都使用AXIS作为其实现支持Web服务的功能,例如JBuilder以及著名的Eclipse J2EE插件Lomboz。AXIS的最新版本可以从 http://ws.apache.org/axis/index.html下载。下载下来后直接解压即可用了。下图是AXIS核心引擎的体系结构图:
整个AXIS项目包括以下几个部分:
ü 消息流子系统
消息流子系统提供了灵活的消息传递框架,这个消息传递框架包括处理程序、链、序列化程序和反序列化程序。处理程序是一个处理请求、响应和故障流的对象。处理程序可被组合在一起成为链,而且可以使用一个灵活的部署描述符来配置这些处理程序的顺序。
ü 传输框架子系统
提供了一个传输框架,这个传输框架可以帮助您创建自己的可插式传输发送器和传输侦听器。
ü 数据编码子系统
AXIS完全按照 XML Schema 规范提供各种数据类型的自动序列化,并且提供功能扩展接口来使用您自己定制的序列化器和反序列化器。
ü 其他
AXIS完全支持 WSDL 以及日志记录、出错以及故障处理机制。它同时提供一些工具用来讲WSDL文档转换成客户端的调用框架以及根据类来产生WSDL定义文档。
AXIS目前版本支持的标准是:W3C SOAP1.1 和 1.2;WSDL 1.1;SAAJ 1.1(SUN公司:SOAP with Attachments API for Java);JAX-RPC(SUN公司:Java APIfor XML-Based RPC)1.0。
1.2 开发项目中如何选择使用Axis2和其它的WebService
2 如果你的应用程序需要支持多语言即有C++, .net, Java,你应该选择Axis2。2 如果应用程序是遵循 Spring 哲学路线的话,ApacheCXF 或者Spring WS是一种更好的选择,特别对嵌入式的 Web Services 来说。
一、搭建环境
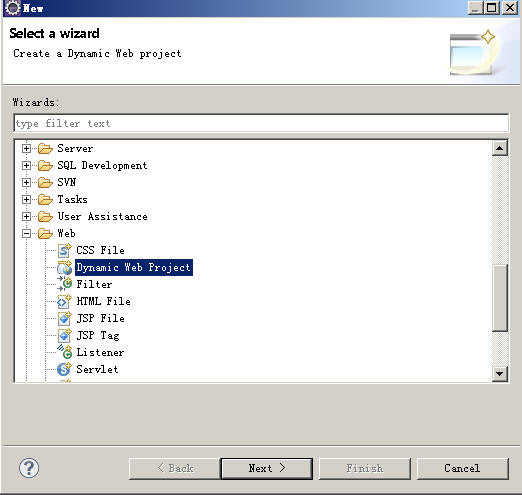
第一步:打开Eclipse,建立一个标准的Dynamic Web Project
第二步:
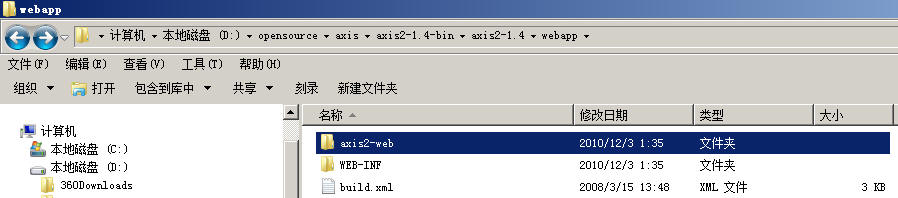
建完工程后,把Axis2-1.4/Axis2-1.4.1解压开来的目录下的axis2-web(如下图),整个拷入你工程的WebContent目录下:
第三步:
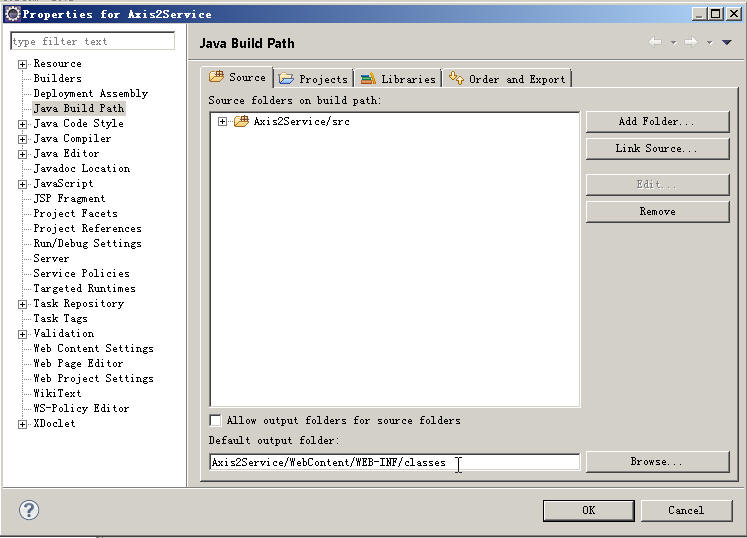
把Axis2-1.4/Axis2-1.4.1解压开来的目录下的lib目录里的所有jar导入你工程的WEB-INF/lib目录下,并加载入工程的classpath,如下图

第四步:
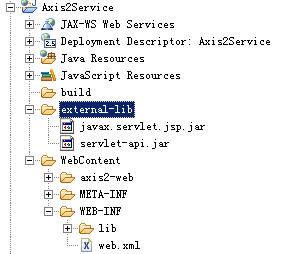
在工程和src平级处新建一个目录叫external-lib
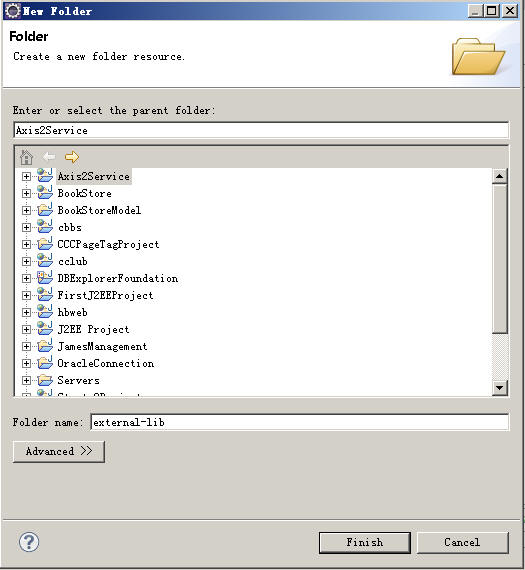
第五步:
把tomcat里的用于jsp, servlet解析的两个lib拷入此external-lib目录,并且以“加载外部jar”的方式加入工程的classpath中去
第六步:
在工程的WEB-INF目录下新建一个目录叫services目录。
第七步:
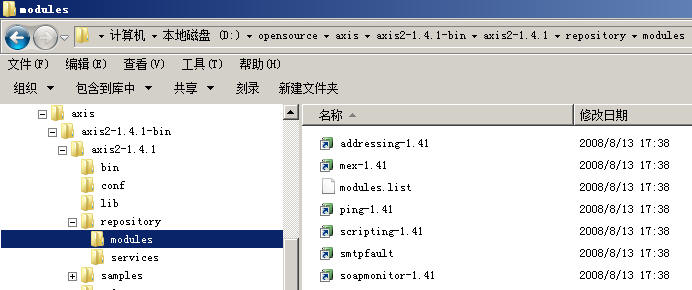
把Axis2-1.4/Axis2-1.4.1解压开来的目录下的repository\modules,modules这个目录,整个拷贝到你工程的WEB-INF目录下。
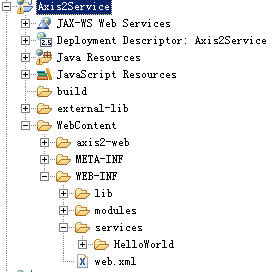
整个配完的工程结构应如下图所示:
三、 第一个Axis2Webservice之HelloWorld
3.1Service端代码| package org.sky.axis2.helloworld; import org.apache.axiom.om.OMElement; import org.apache.axis2.AxisFault; import javax.xml.stream.XMLStreamException; public class HelloWorld { public OMElement sayHello(OMElement element) throws XMLStreamException { element.build(); // Secondly the OMElement should be detached from the current OMTree so // that it can be attached // some other OM Tree. Once detached the OmTree will remove its // connections to this OMElement. element.detach(); return element; } } |
3.2 Service端的Web Service布署文件
然后我们在工程的WebContent\WEB-INF\services\目录下新建一个目录叫HelloWorld的目录,与我们的类同名,在此目录下再建立一个META-INF的目录(大小写必须完全一致),然后在META-INF目录下新建一个services.xml,具体目录结构如下图所示: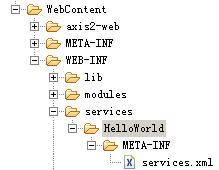
Services.xml文件的内容如下:
| <service name="HelloWorld"> <parameter name="ServiceClass">org.sky.axis2.helloworld.HelloWorld</parameter> <operation name="sayHello"> <messageReceiver class="org.apache.axis2.receivers.RawXMLINOutMessageReceiver"/> <actionMapping>urn:sayHello</actionMapping> </operation> </service> |
1) 它声明了一个WebService的主类叫” org.sky.axis2.helloworld.HelloWorld”;
2) 该WebService有一个Web Service Method,在类中该方法名叫sayHello,它返回一个OMElement为类型的值,接受一个OMElement为类型的参数;(RawXMLINOutMessageReceiver)
3) sayHello这个对外暴露的WebService方法名为: urn:sayHello
修改web.xml,在里面加入这些东东:
<servlet>
<display-name>Apache-Axis Servlet</display-name>
<servlet-name>AxisServlet</servlet-name>
<servlet-class>org.apache.axis2.transport.http.AxisServlet</servlet-class>
</servlet>
<servlet-mapping>
<servlet-name>AxisServlet</servlet-name>
<url-pattern>/servlet/AxisServlet</url-pattern>
</servlet-mapping>
<servlet-mapping>
<servlet-name>AxisServlet</servlet-name>
<url-pattern>*.jws</url-pattern>
</servlet-mapping>
<servlet-mapping>
<servlet-name>AxisServlet</servlet-name>
<url-pattern>/services/*</url-pattern>
</servlet-mapping>
<servlet>
<display-name>Apache-Axis Admin Servlet Web Admin</display-name>
<servlet-name>AxisAdminServlet</servlet-name>
<servlet-class>org.apache.axis2.transport.http.AxisAdminServlet</servlet-class>
<load-on-startup>100</load-on-startup>
</servlet>
<servlet-mapping>
<servlet-name>AxisAdminServlet</servlet-name>
<url-pattern>/axis2-admin/*</url-pattern>
</servlet-mapping>
3.3 布署Web Service
在Tomcat的webapps目录下建立一个目录叫Axis2Service的目录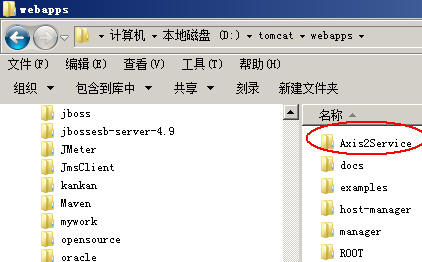
然后将整个工程的WebContent目录下的所有东西,全拷贝入这个目录内,启动tomcat。
启动后访问:http://localhost:8080/Axis2Service/axis2-web/
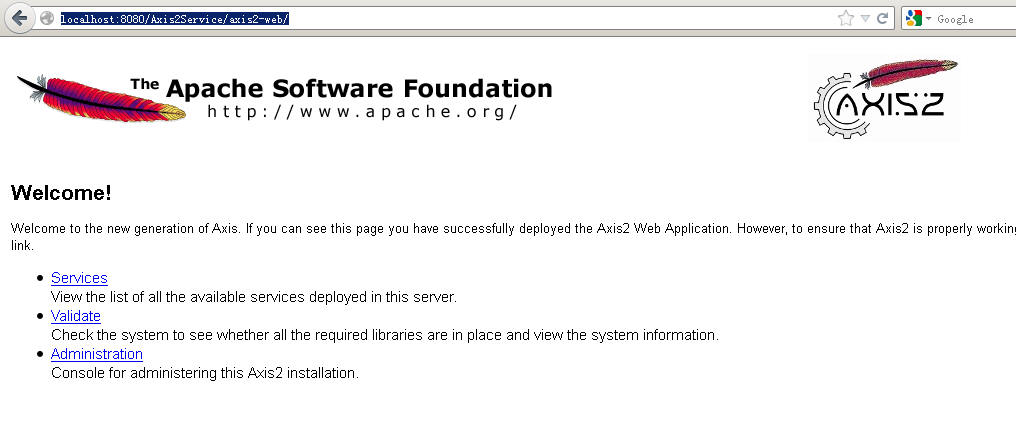
单点:Services这个链接
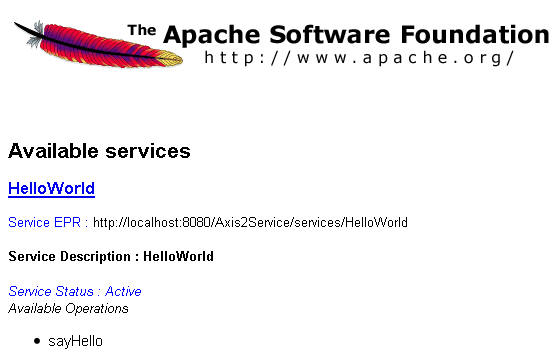
再点这个HelloWorld链接
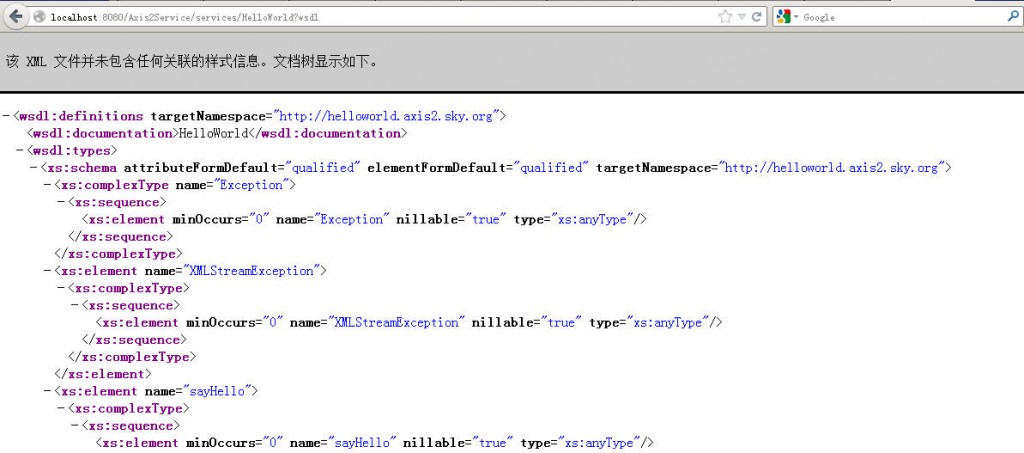
我们就可以得到我们的HelloWorld这个WebService的wsdl内容了。
三、 四种不同的HelloWorld客户端
Axis2支持4种类型的客户端:ü Block(阻塞式客户端)
传统客户端
ü Non block(非阻塞式客户端)
又被称为异步客户端,传统客户端被调用后将会被阻塞直到操作完成。这种方式在有很多Web Service需要在一个单一的客户端应用程序中启动时很不可取。一种解决方法是使用Non-Blocking API来调用这些Web Services。Axis2提供给用户一种基于回叫机制的non-blocking API。
ü 双工(双向传输)
以上的机制都使用单一的连接去发送请求和接收响应.这都明显在性能上落后于使用两条连接(单向或双向)进行进行请求和响应的传输 . 因此以上的机制都不能解决长时间运行的交易, 连接将在操作还没完成就会超时. 一种解决方案是使用分开的两条传输连接来传输请求和响应 . 我们叫这种方案为传输层异步。
ü 双工非阻塞(双向且非阻塞传输)
下面我们就来看这四个客户端(此处对于双工传输的客户端代码进行忽略,因为这个写法很简单,我们将着重于描述双工+非阻塞的客户端例子,网上目前几乎没有能够在axis21.4下真正能够运行的“双工且非阻塞”的例子或者是完整代码)。
4.1 传统的客户端HelloWorldWithReturnClient.java
| package org.sky.axis2.helloworld; import java.util.Iterator; import javax.xml.namespace.QName; import org.apache.axiom.om.OMAbstractFactory; import org.apache.axiom.om.OMElement; import org.apache.axiom.om.OMFactory; import org.apache.axiom.om.OMNamespace; import org.apache.axiom.om.OMNode; import org.apache.axiom.soap.SOAPBody; import org.apache.axis2.AxisFault; import org.apache.axis2.addressing.EndpointReference; import org.apache.axis2.client.Options; import org.apache.axis2.client.ServiceClient; import org.apache.axis2.databinding.utils.BeanUtil; import org.apache.axis2.engine.DefaultObjectSupplier; public class HelloWorldWithReturnClient { private static EndpointReference targetEPR = new EndpointReference( "http://localhost:8080/Axis2Service/services/HelloWorld"); public void sayHello() { Options options = new Options(); options.setAction("urn:sayHello"); options.setTo(targetEPR); ServiceClient sender = null; try { sender = new ServiceClient(); sender.setOptions(options); OMFactory fac = OMAbstractFactory.getOMFactory(); OMNamespace omNs = fac .createOMNamespace("http://helloworld.axis2.sky.org", ""); OMElement method = fac.createOMElement("sayHello", omNs); OMElement name = fac.createOMElement("name", omNs); name.setText("ymk"); method.addChild(name); method.build(); OMElement response = sender.sendReceive(method); System.out.println(response); OMElement element = response.getFirstChildWithName( new QName("http://helloworld.axis2.sky.org", "name")); System.out.println(element.getText()); } catch (AxisFault e) { System.out.println("------Error Occured------"); e.printStackTrace(); } } public static void main(String[] args) { HelloWorldWithReturnClient testClient = new HelloWorldWithReturnClient(); testClient.sayHello(); } } |
由于我们使用提Axis2的底层API来调用WebService而并不是像傻瓜式的通过一个wsdl生成Web Service调用句柄,所以我们要对一个WSDL能够有阅读能力。
ü Axis2中的Webservice的入口
不是: http://localhost:8080/Axis2Service/services/HelloWorld?wsdl这个哦,而应该是:
http://localhost:8080/Axis2Service/services/HelloWorld,不带?wsdl。
ü 看一个wsdl中的namespace是什么:

ü 看一个wsdl中的web service方法名是什么

ü 看一个wsdl的返回结果是怎么样的格式:
为此我们在程序里增加了一行:OMElement response =sender.sendReceive(method);
然后直接:System.out.println(response);
这样,我们可以看到它的返回为:

根据Axis2的OMElement的解析语法我们就可以直接把这个返回的值get出来。
我们甚至可以用opensource的SOAP UI这个工具,来直接得到我们的webservice调用的返回值,并以此返回结果的格式来决定我们如何去解析这个OMElement格式的返回结果:
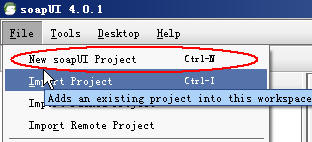
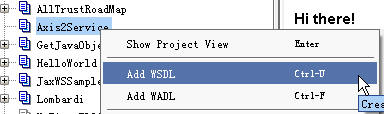
在工程上单击右键选“AddWSDL”
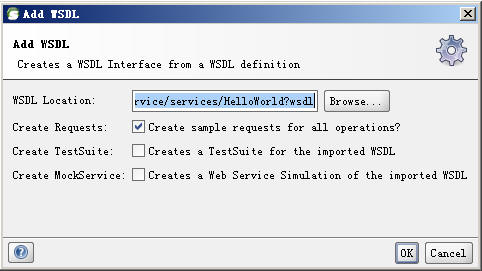
在弹出对话框中直接把http://localhost:8080/Axis2Service/services/HelloWorld?wsdl加入对方框中的wsdl栏中
点OK生成webservice soap ui调用的客户端如下图
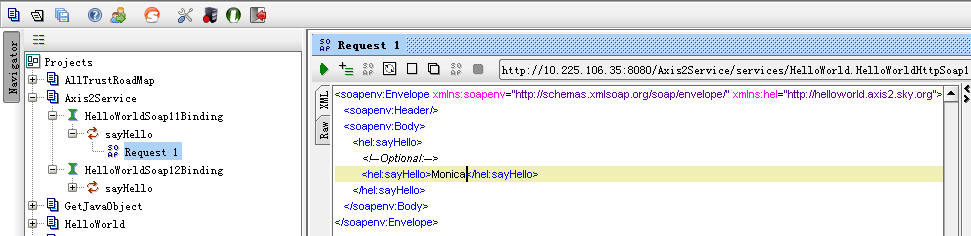
它会生成11Binding和12Binding两个客户端,我们把11Binding的节点展开,双击Request 1,在右边会显示调用的soap样例,在<hel:sayHello>?</hel:sayHello>块中我们把问号替换成Monica,然后点上方“绿色”运行按钮,我们就可以得到调用结果如下图:
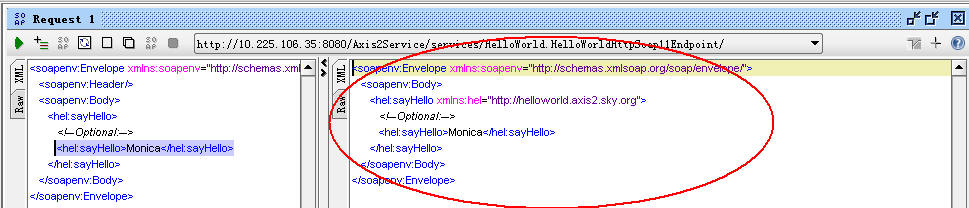
因此通过SOAP UI我们也可以测试我们的Web Service。
4.2 非阻塞式HelloWorldWithReturnNonBlock.java
与传统的阻塞式webservice调用不同的是,一旦调用"serviceClient.sendReceive(payload);",客户端将会被阻塞直到操作完成。这种方式在有很多Web Service需要在一个单一的客户端应用程序中启动时很不可取。一种解决方法是使用Non-Blocking API来调用这些Web Services。Axis2提供给用户一种基于回叫机制的non-blocking API。很多网上使用的“回调”接口都只能在Axis21.3中才能使用,而在Axis21.4中回调接口已经被升级成一个抽象类叫AxisCallBack类了,因此90%目前网上的关于“非阻塞式”的客户端的代码在Axis2中都是跑不起来的,在eclipse ide中会显示“该类/方法已经被deprecated(废弃)”。
因此请注意看笔者的代码,先声明一个用于非阻塞调用的回调(callback)类
HelloWorldNonBlockCB.java
| package org.sky.axis2.helloworld; import java.util.Iterator; import javax.xml.namespace.QName; import org.apache.axiom.om.OMElement; import org.apache.axiom.om.OMNode; import org.apache.axis2.client.async.AxisCallback; import org.apache.axis2.context.MessageContext; import org.apache.axis2.databinding.utils.BeanUtil; import org.apache.axis2.engine.DefaultObjectSupplier; public class HelloWorldNonBlockCB implements AxisCallback { private boolean complete = false; public void onMessage(MessageContext msgContext) { System.out.println(msgContext.getEnvelope().getBody()); OMElement element = msgContext.getEnvelope().getBody() .getFirstElement(); OMElement result = element.getFirstChildWithName(new QName( "http://helloworld.axis2.sky.org", "name")); System.out.println(result.getText()); synchronized (this) { this.notify(); } } public boolean isComplete() { return complete; } public void onFault(MessageContext msgContext) { System.out.println(msgContext.getEnvelope().getBody().getFault() .toString()); synchronized (this) { this.notify(); } } public void onError(Exception e) { e.printStackTrace(); synchronized (this) { this.notify(); } } public void onComplete() { this.complete = true; synchronized (this) { this.notify(); } } } |
HelloWorldWithReturnNonBlock.java
| package org.sky.axis2.helloworld; import org.apache.axis2.addressing.EndpointReference; import org.apache.axiom.om.OMAbstractFactory; import org.apache.axiom.om.OMElement; import org.apache.axiom.om.OMFactory; import org.apache.axiom.om.OMNamespace; import org.apache.axis2.AxisFault; import org.apache.axis2.addressing.EndpointReference; import org.apache.axis2.client.Options; import org.apache.axis2.client.ServiceClient; import org.apache.axis2.client.async.AxisCallback; import org.apache.axis2.context.MessageContext; public class HelloWorldWithReturnNonBlock { private static EndpointReference targetEPR = new EndpointReference( "http://localhost:8080/Axis2Service/services/HelloWorld"); public void sayHello() { OMFactory fac = OMAbstractFactory.getOMFactory(); OMNamespace omNs = fac.createOMNamespace( "http://helloworld.axis2.sky.org", ""); OMElement method = fac.createOMElement("sayHello", omNs); OMElement name = fac.createOMElement("name", omNs); name.setText("ymk"); method.addChild(name); method.build(); Options options = new Options(); options.setTo(targetEPR); ServiceClient sender = null; try { HelloWorldNonBlockCB callback = new HelloWorldNonBlockCB(); sender = new ServiceClient(); sender.setOptions(options); sender.sendReceiveNonBlocking(method, callback); synchronized (callback) { try { callback.wait(); } catch (InterruptedException e) { e.printStackTrace(); } } } catch (AxisFault e) { e.printStackTrace(); } finally { if (sender != null) try { sender.cleanup(); } catch (Exception e) { } } } public static void main(String[] args) { HelloWorldWithReturnNonBlock testClient = new HelloWorldWithReturnNonBlock(); testClient.sayHello(); } } |
4.3 非阻塞式双工HelloWorldWithReturnDualNonBlock.java
非阻塞式的Web Service客户端代码很简单,在此不做任何擅述,我们就说终极的非阻塞式双工模式的Web Service客户端使用Axis2的API如何实现。记住以下几个口决:
ü options.setUseSeparateListener(true);
非阻塞式双工模式,会在客户端也打开一个监听器,而且一直不断的监听着服务器的返回值,该进程一旦被吊用,会一直被挂在客户端这边。
ü 设置webservice客户端模式为双工全开
options.setTransportInProtocol(Constants.TRANSPORT_HTTP);
ü 先寻址,后engageModule
在双工模式下Web Service的客户端需要寻址,即engageModule,这个engageModule需要这样的一个参数:
engageModule(“addressing”)
或者也可写成:
engageModule(Constants.MODULE_ADDRESSING);
这个engageModule就是需要访问你的工程的WEB-INF\modules\目录下的一个叫addressing-1.4.mar的文件。
因此在调用engageModule语句之间有两种方式来调用你的WEB-INF\modules目录下的addressing-1.4.mar文件。
第一种方式:
| ConfigurationContext sysContext = ConfigurationContextFactory .createConfigurationContextFromFileSystem( "D:\\wspace\\Axis2Service\\WebContent\\WEB-INF", null); sender = new ServiceClient(sysContext, null); sender.engageModule(Constants.MODULE_ADDRESSING); |
| sender = new ServiceClient(sysContext, null); sender.engageModule(Constants.MODULE_ADDRESSING); |
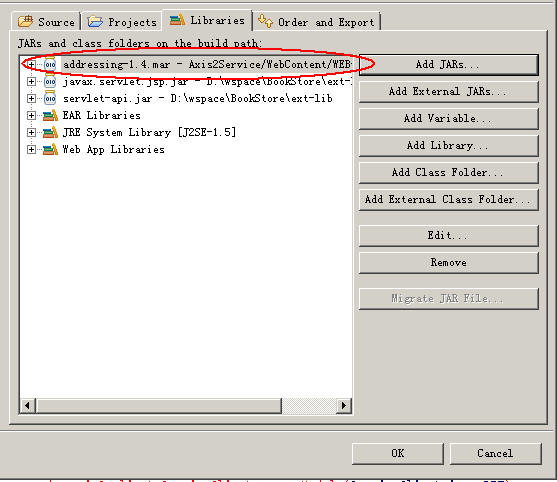
要不然运行时会抛出下面这个exception:
org.apache.axis2.AxisFault:Unable to engage module : addressing
下面来看代码,此处的callback我们延用4.2小节中建立的callback接口即可,此处不再重复,直接给出客户端代码:
| package org.sky.axis2.helloworld; import org.apache.axiom.om.OMAbstractFactory; import org.apache.axiom.om.OMElement; import org.apache.axiom.om.OMFactory; import org.apache.axiom.om.OMNamespace; import org.apache.axis2.AxisFault; import org.apache.axis2.Constants; import org.apache.axis2.addressing.EndpointReference; import org.apache.axis2.client.Options; import org.apache.axis2.client.ServiceClient; import org.apache.axis2.context.ConfigurationContext; import org.apache.axis2.context.ConfigurationContextFactory; public class HelloWorldWithReturnDualNonBlock { private static EndpointReference targetEPR = new EndpointReference( "http://localhost:8080/Axis2Service/services/HelloWorld"); public static boolean finish = false; public void sayHello() { OMFactory fac = OMAbstractFactory.getOMFactory(); OMNamespace omNs = fac.createOMNamespace( "http://helloworld.axis2.sky.org", ""); OMElement method = fac.createOMElement("sayHello", omNs); OMElement name = fac.createOMElement("name", omNs); name.setText("ymk"); method.addChild(name); method.build(); Options options = new Options(); options.setTo(targetEPR); options.setTransportInProtocol(Constants.TRANSPORT_HTTP); options.setUseSeparateListener(true); options.setAction("urn:sayHello"); ServiceClient sender = null; HelloWorldNonBlockCB callback = new HelloWorldNonBlockCB(); try { sender = new ServiceClient(); sender.engageModule(Constants.MODULE_ADDRESSING); sender.setOptions(options); sender.sendReceiveNonBlocking(method, callback); synchronized (callback) { try { callback.wait(); } catch (InterruptedException e) { e.printStackTrace(); } } } catch (Exception e) { e.printStackTrace(); } finally { try { sender.cleanup(); } catch (Exception e) { } } } public static void main(String[] args) { HelloWorldWithReturnDualNonBlock testClient = new HelloWorldWithReturnDualNonBlock(); testClient.sayHello(); } } |
4.4 运行双工异步客户端前的准备工作
将Axis2的安装目录下的conf目录下(如我的是:D:\opensource\axis\axis2-1.4.1-bin\axis2-1.4.1\conf)的axis2.xml拷贝到你的工程的WEB-INF目录下。并确保这个axis2.xml里有如下语句:
<moduleref="addressing"/>
运行后显示:

Axis2的双工非阻塞式客户端调用成功!完成Axis2编写Web Service的第一天教程。

相关文章推荐
- 通向架构师的道路(第十二天)之Axis2 Web Service(三)
- 通向架构师的道路(第十二天)之Axis2 Web Service(三)
- 通向架构师的道路(第十三天)Axis2 Web Service安全初步
- 通向架构师的道路(第十天)之Axis2 Web Service(一)
- 通向架构师的道路(第十四天)Axis2 Web Service安全之rampart
- 通向架构师的道路(第十四天)Axis2 Web Service安全之rampart
- 通向架构师的道路(第十一天)之Axis2 Web Service(二)
- 通向架构师的道路(第十天)之Axis2 Web Service(一)
- 通向架构师的道路(第十三天)Axis2 Web Service安全初步
- 通向架构师的道路(第十四天)Axis2 Web Service安全之rampart
- 通向架构师的道路(第十一天)之Axis2 Web Service(二)
- 通向架构师的道路(第十天)之Axis2 Web Service(一)
- 通向架构师的道路(第十二天)之Axis2 Web Service(三)
- 通向架构师的道路(第十一天)之Axis2 Web Service(二)
- 通向架构师的道路(第十天)之Axis2 Web Service(一)
- 通向架构师的道路(第十二天)之Axis2 Web Service(三)
- 通向架构师的道路(第十一天)之Axis2 Web Service(二)
- 通向架构师的道路(第十二天)之Axis2 Web Service(三)
- 通向架构师的道路(第十天)之Axis2 Web Service(一)
- 通向架构师的道路(第十四天)Axis2 Web Service安全之rampart