温度场有限容积法程序入门之六:后处理.Contour的绘制.基于Adobe Flash Stage3D技术
2013-05-05 19:50
423 查看
如何绘制标量场呢?我们常用诸如商业软件Tecplot,或者基于Python的开源软件包matplotlib中的contour绘制Contour图形(等值线),曾经很好奇如何绘制得到等值图,觉得很神奇,所以就调用Windous的绘图API绘制了等值图,虽然算法实现了,但是觉得不爽,我等工程技术人员还得花时间看你的API函数,笔者认为不应该被这些API所绑架,绘图效率不高,还得考虑重绘(onDraw),不利于向3D扩展。所以基于GPU的绘图才是正道,看WPF的UI绘制几乎都是基于GPU了,这个估计是大势所趋了。
作为一个Flash爱好者,一直希望Flash能够实现支持原生的3D显示,结果等到号称有3D功能的出来Flash CS4,觉得Adobe不厚道,被忽悠了。不过还好亡羊补牢,终于支持3D了。在官方提供原生3D API之前,有大量基于AS3但非原生的3D引擎,想当年笔者还玩的不亦乐乎,现在却玩不转了。
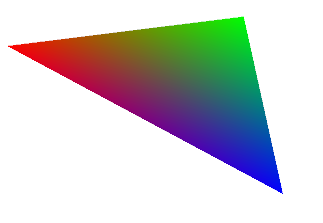
显卡是什么,笔者浅薄,觉得显卡也就擅长于画三角形而已(太极端了,如果这样CPU就只有取指令和执行指令的两大功能),对三角形进行着色,渲染,加之诸如灯光、迷雾之类的效果。其实三角形是所有图形的基础,我们看到的大千世界也可以近视为若干三角形无缝拼接而成(貌似在画有限元的三角元网格,其实差不多),而每个三角形的顶点颜色各异,三角形内部的颜色是顶点颜色的线性插值(眼熟?和有限元中形函数似的,的确);也可以看作是将眼前的景象拍照,把照片遮挡在眼前看,这是GPU显示的另一种工作方式:贴图,这里不谈。所以我们如何操纵GPU绘制等值图呢?将离散区域分为有限个无缝连接的小三角形,然后用GPU绘制每个三角形即可得到整个域的等值图。下面给予一段网上(http://www.adobe.com/devnet/flashplayer/articles/hello-triangle.html)抄袭来的顶点着色器(Vertex
Shader)的Demo,用GPU绘制一个三角形。
看不懂吧,正常,第一次接触Flash的3D编程,看不懂太正常了,等你看了他的入门后句会觉得简单,请搜索Molehill Flash。而且这个程序编译后在浏览器中打开后,Flash Player的运行时错误出现的几率很大,不过也正常,请搜索该错误,很容易排除。
如此我们可以实现绘制等值图,如下是运行结果。说道这里,本文就应当结束了。
等等,还缺点什么?Legend,这个漂亮的东西困扰了我好久。2010年秋季,我们去宣化一工业现场给老板创造剩余价值以供榨取,几个老外在现场调试程序,隧围观之,不得不说,人家的用户体验确实到位,使用3D技术显示工业测控值(话说老板公司嚷嚷着也做3D显示,数年过去了,不知道搞定没有),目测非奇技淫巧。其中看到那些厮他们的Legend竟然是几段拼接而成,我恍然大悟,原来Legend是几组颜色过渡而成。下面是我曾经写基于Flex SDK有限元前处理和后处理程序包中的一个算法(后台使用C++写网格剖分和求解器,那时候不曾知道GPU可以显示等值图),函数getGradualColor可以得到一组连续的颜色分布,程序不做解释,可意会,不可言传:
下图是,本教程后处理运行的一个截图,将就看吧,恕笔者无能,尚无时间丰富界面,更无法实现程序通用性:
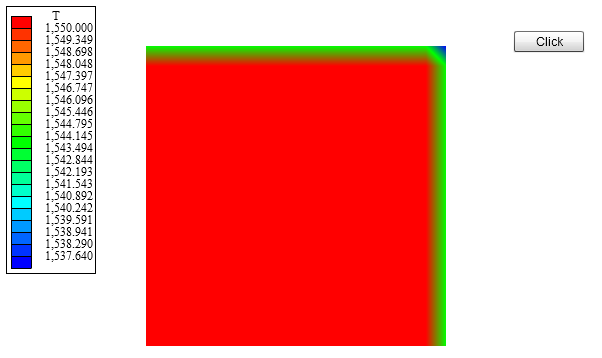
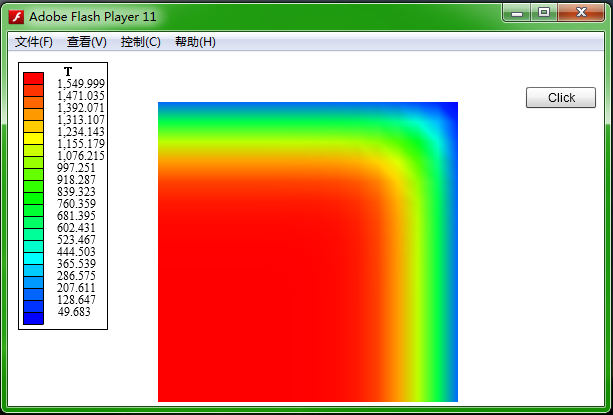
由于显卡绘图颜色分布和Legend颜色分布并非完全一致一致,当温度梯度很大时,显示效果不好(如何解决?相邻节点插入3个颜色节点,3个足够了,那又为什么是3个呢,原因和Legend绘制原理一样);而当梯度较小时,或者网格密度较密时,效果逐渐变好:
Legend是我在整个程序中最满意的地方。除了Legend可看外,其他都太丑了,这也是为什么商业软件卖钱的原因。也同时促使我们去思考:
1,当你辛辛苦苦写了一个程序,调试好后,有人上嘴唇碰下嘴唇般轻松的和你要源代码时,你是否会慷慨解囊?
2,当你使用了别人破解的软件,你是否会想到,编写这个软件的程序员有老婆孩子需要养活而感到一丝丝愧疚?
恕笔者人品差,目前这两个问题都做不好。
最后给出本教程的主程序把 ,用到了Flex Framework,笔者2011年底曾经写了一个基于mx:UIComponent的组件,专门通过Stage3D用于显示温度场:
由于flash.stage3D技术普及,大量基于GPU加速的3D(如away3D等)和2D(starling)显示框架发布,使得我们有了偷懒绘制云图的机会:比如将结果写在位图里面,直接在2D/3D环境里面贴图,即可显示最终云图,都不需要知道云图绘制机理。但是无论是由于openGL和DirectX对纹理(texture)要求的不同,stage3D要求位图尺寸必须是2的若干次幂才行,这时我们对位图进行缩放,使其大小为2的几次幂,这样就不需要移动uv了,友情提醒:调用flash.display.BitmapData.draw这个API缩放位图啊,亲,不谢。
教程先告一段落,作者要努力工作攒钱了。攒钱娶媳妇儿,生娃,娃工作,娃挣钱,娃娶媳妇,娃再生娃……

作为一个Flash爱好者,一直希望Flash能够实现支持原生的3D显示,结果等到号称有3D功能的出来Flash CS4,觉得Adobe不厚道,被忽悠了。不过还好亡羊补牢,终于支持3D了。在官方提供原生3D API之前,有大量基于AS3但非原生的3D引擎,想当年笔者还玩的不亦乐乎,现在却玩不转了。
显卡是什么,笔者浅薄,觉得显卡也就擅长于画三角形而已(太极端了,如果这样CPU就只有取指令和执行指令的两大功能),对三角形进行着色,渲染,加之诸如灯光、迷雾之类的效果。其实三角形是所有图形的基础,我们看到的大千世界也可以近视为若干三角形无缝拼接而成(貌似在画有限元的三角元网格,其实差不多),而每个三角形的顶点颜色各异,三角形内部的颜色是顶点颜色的线性插值(眼熟?和有限元中形函数似的,的确);也可以看作是将眼前的景象拍照,把照片遮挡在眼前看,这是GPU显示的另一种工作方式:贴图,这里不谈。所以我们如何操纵GPU绘制等值图呢?将离散区域分为有限个无缝连接的小三角形,然后用GPU绘制每个三角形即可得到整个域的等值图。下面给予一段网上(http://www.adobe.com/devnet/flashplayer/articles/hello-triangle.html)抄袭来的顶点着色器(Vertex
Shader)的Demo,用GPU绘制一个三角形。
package
{
import com.adobe.utils.AGALMiniAssembler;

import flash.display.Sprite;
import flash.display3D.Context3D;
import flash.display3D.Context3DProgramType;
import flash.display3D.Context3DVertexBufferFormat;
import flash.display3D.IndexBuffer3D;
import flash.display3D.Program3D;
import flash.display3D.VertexBuffer3D;
import flash.events.Event;
import flash.geom.Matrix3D;
import flash.geom.Rectangle;
import flash.geom.Vector3D;
import flash.utils.getTimer;

[SWF(width="800", height="600", frameRate="60", backgroundColor="#FFFFFF")]
public class HelloTriangleColored extends Sprite
{
protected var context3D:Context3D;
protected var program:Program3D;
protected var vertexbuffer:VertexBuffer3D;
protected var indexbuffer:IndexBuffer3D;

public function HelloTriangleColored()
{
stage.stage3Ds[0].addEventListener( Event.CONTEXT3D_CREATE, initMolehill );
stage.stage3Ds[0].requestContext3D();

addEventListener(Event.ENTER_FRAME, onRender);

}

protected function initMolehill(e:Event):void
{
context3D = stage.stage3Ds[0].context3D;
context3D.configureBackBuffer(800, 600, 1, true);

var vertices:Vector.<Number> = Vector.<Number>([
-0.3,-0.3,0, 1, 0, 0, // x, y, z, r, g, b
-0.3, 0.3, 0, 0, 1, 0,
0.3, 0.3, 0, 0, 0, 1]);

// Create VertexBuffer3D. 3 vertices, of 6 Numbers each
vertexbuffer = context3D.createVertexBuffer(3, 6);
// Upload VertexBuffer3D to GPU. Offset 0, 3 vertices
vertexbuffer.uploadFromVector(vertices, 0, 3);

var indices:Vector.<uint> = Vector.<uint>([0, 1, 2]);

// Create IndexBuffer3D. Total of 3 indices. 1 triangle of 3 vertices
indexbuffer = context3D.createIndexBuffer(3);
// Upload IndexBuffer3D to GPU. Offset 0, count 3
indexbuffer.uploadFromVector (indices, 0, 3);

var vertexShaderAssembler : AGALMiniAssembler = new AGALMiniAssembler();
vertexShaderAssembler.assemble( Context3DProgramType.VERTEX,
"m44 op, va0, vc0\n" + // pos to clipspace
"mov v0, va1" // copy color
);

var fragmentShaderAssembler : AGALMiniAssembler= new AGALMiniAssembler();
fragmentShaderAssembler.assemble( Context3DProgramType.FRAGMENT,

"mov oc, v0"
);

program = context3D.createProgram();
program.upload( vertexShaderAssembler.agalcode, fragmentShaderAssembler.agalcode);
}

protected function onRender(e:Event):void
{
if ( !context3D )
return;

context3D.clear ( 1, 1, 1, 1 );

// vertex position to attribute register 0
context3D.setVertexBufferAt (0, vertexbuffer, 0, Context3DVertexBufferFormat.FLOAT_3);
// color to attribute register 1
context3D.setVertexBufferAt(1, vertexbuffer, 3, Context3DVertexBufferFormat.FLOAT_3);
// assign shader program
context3D.setProgram(program);

var m:Matrix3D = new Matrix3D();
m.appendRotation(getTimer()/40, Vector3D.Z_AXIS);
context3D.setProgramConstantsFromMatrix(Context3DProgramType.VERTEX, 0, m, true);

context3D.drawTriangles(indexbuffer);

context3D.present();

}

}
}
看不懂吧,正常,第一次接触Flash的3D编程,看不懂太正常了,等你看了他的入门后句会觉得简单,请搜索Molehill Flash。而且这个程序编译后在浏览器中打开后,Flash Player的运行时错误出现的几率很大,不过也正常,请搜索该错误,很容易排除。
如此我们可以实现绘制等值图,如下是运行结果。说道这里,本文就应当结束了。
等等,还缺点什么?Legend,这个漂亮的东西困扰了我好久。2010年秋季,我们去宣化一工业现场给老板创造剩余价值以供榨取,几个老外在现场调试程序,隧围观之,不得不说,人家的用户体验确实到位,使用3D技术显示工业测控值(话说老板公司嚷嚷着也做3D显示,数年过去了,不知道搞定没有),目测非奇技淫巧。其中看到那些厮他们的Legend竟然是几段拼接而成,我恍然大悟,原来Legend是几组颜色过渡而成。下面是我曾经写基于Flex SDK有限元前处理和后处理程序包中的一个算法(后台使用C++写网格剖分和求解器,那时候不曾知道GPU可以显示等值图),函数getGradualColor可以得到一组连续的颜色分布,程序不做解释,可意会,不可言传:
package FEModel.util.visual
{
public class ColorUtil
{
public static function combineRGB(r:uint,g:uint,b:uint):uint
{
if(r<0) r=0
if(r>255) r=255;

if(g<0) g=0
if(g>255) g=255;

if(b<0) b=0
if(b>255) b=255;

var RGB:uint=(r<<16)|(g<<8)|b;
return RGB;
}

public static function getGradualColor(cnt:uint=10):Vector.<uint>
{
var colorList:Vector.<uint>=new Vector.<uint>(cnt+1,true);

for(var i:uint=0;i<cnt+1;i++)
{
var ratio:Number=i/cnt;
if(ratio<=0.25)
colorList[i]=colorInR1(ratio);
else if(ratio<=0.5)
colorList[i]=colorInR2(ratio);
else if(ratio<=0.75)
colorList[i]=colorInR3(ratio);
else
colorList[i]=colorInR4(ratio);
}
return colorList.reverse();
}

public static function colorInR1(ratio:Number):uint
{
ratio/=0.25;
return combineRGB(255,ratio*255,0);
}

public static function colorInR2(ratio:Number):uint
{
ratio=(ratio-0.25)/0.25;
return combineRGB((1-ratio)*255,255,0);
}

public static function colorInR3(ratio:Number):uint
{
ratio=(ratio-0.5)/0.25;
return combineRGB(0,255,ratio*255);
}

public static function colorInR4(ratio:Number):uint
{
ratio=(ratio-0.75)/0.25;
return combineRGB(0,(1-ratio)*255,255);
}
}
}
下图是,本教程后处理运行的一个截图,将就看吧,恕笔者无能,尚无时间丰富界面,更无法实现程序通用性:
由于显卡绘图颜色分布和Legend颜色分布并非完全一致一致,当温度梯度很大时,显示效果不好(如何解决?相邻节点插入3个颜色节点,3个足够了,那又为什么是3个呢,原因和Legend绘制原理一样);而当梯度较小时,或者网格密度较密时,效果逐渐变好:
Legend是我在整个程序中最满意的地方。除了Legend可看外,其他都太丑了,这也是为什么商业软件卖钱的原因。也同时促使我们去思考:
1,当你辛辛苦苦写了一个程序,调试好后,有人上嘴唇碰下嘴唇般轻松的和你要源代码时,你是否会慷慨解囊?
2,当你使用了别人破解的软件,你是否会想到,编写这个软件的程序员有老婆孩子需要养活而感到一丝丝愧疚?
恕笔者人品差,目前这两个问题都做不好。
最后给出本教程的主程序把 ,用到了Flex Framework,笔者2011年底曾经写了一个基于mx:UIComponent的组件,专门通过Stage3D用于显示温度场:
<?xml version="1.0" encoding="utf-8"?>
<s:Application xmlns:fx="http://ns.adobe.com/mxml/2009"
xmlns:s="library://ns.adobe.com/flex/spark"
xmlns:mx="library://ns.adobe.com/flex/mx"
xmlns:PostProcess="Soong.PostProcess.*"
minWidth="800" minHeight="600" backgroundAlpha="0.0" creationComplete="iniApp(event)">

<fx:Script>
<![CDATA[
import Soong.Color.RGBColor;
import Soong.Solver.TSolverMgr;

import mx.events.FlexEvent;

protected var solution:TSolverMgr=null;
protected var updateTimer:Timer=null;

protected var iterating:Boolean=false;

protected function iniApp(event:FlexEvent):void
{
updateTimer=new Timer(2*1000);
updateTimer.addEventListener(TimerEvent.TIMER,updateColor);

solution=new TSolverMgr();

solution.SetDim(15,15,1,1);

solution.SetMaterial();

solution.UpdateHeatExchangeFactor();
}

protected function updateColor(e:TimerEvent):void
{
//solution.ExportSetting();

for(var i:uint=0;i<100;i++)
{
solution.Step(1);
}

//solution.Export2Tecplot();
//solution.ExportColor("Tcontour.dat",5,1538,1550);

var Tlist:Vector.<Number>=solution.GetCurrentT(true);

var Tmax:Number=solution.Tmax;
var Tmin:Number=solution.Tmin;

var colorList:Vector.<RGBColor>=RGBColor.GetColorList(Tlist,Tmin,Tmax);

viewer.UpdateTemperature(colorList,20,Tmin,Tmax);

Tlist=null;
colorList=null;
}

protected function Debugging(event:MouseEvent):void
{
iterating=!iterating;

if(iterating)
{
updateTimer.start();
}
else
{
updateTimer.stop();
}
}

]]>
</fx:Script>
<fx:Declarations>

</fx:Declarations>
<s:Button x="518" y="35" label="Click" click="Debugging(event)"/>
<PostProcess:BilletViewer id="viewer" x="10" y="10" width="500" height="500" sliceNumber="1" billetThickness="16" billetWidth="16" resolution="0.2"/>
</s:Application>
由于flash.stage3D技术普及,大量基于GPU加速的3D(如away3D等)和2D(starling)显示框架发布,使得我们有了偷懒绘制云图的机会:比如将结果写在位图里面,直接在2D/3D环境里面贴图,即可显示最终云图,都不需要知道云图绘制机理。但是无论是由于openGL和DirectX对纹理(texture)要求的不同,stage3D要求位图尺寸必须是2的若干次幂才行,这时我们对位图进行缩放,使其大小为2的几次幂,这样就不需要移动uv了,友情提醒:调用flash.display.BitmapData.draw这个API缩放位图啊,亲,不谢。
教程先告一段落,作者要努力工作攒钱了。攒钱娶媳妇儿,生娃,娃工作,娃挣钱,娃娶媳妇,娃再生娃……

相关文章推荐
- 温度场有限容积法程序入门之六:后处理.isoline的绘制.基于Flash.Display.Graphics绘图API
- 温度场有限容积法程序入门之六:后处理.花絮.Contour Plotter and 3D Function Grapher Together - the Applet and the Souce Co
- 温度场有限容积法程序入门之四:网格剖分.边界条件设置.迭代.导出后处理数据
- 温度场有限容积法程序入门之七:相变过程温度场的数值计算
- 温度场有限容积法程序入门之七:相变过程温度场的数值计算
- 温度场有限容积法程序入门之三:2D温度场显式迭代计算(暂不考虑潜热)
- 温度场有限容积法程序入门之二:程序设计.热阻.热导.类的概念.定解条件
- 温度场有限容积法程序入门之五:展望及问题
- 温度场有限容积法程序入门之一:综述
- 【图像处理】基于半色调技术的图像打印程序(Image Printing Program Based on Halftoning)
- 浅析Microsoft .net PetShop程序中的购物车和订单处理模块(Profile技术,异步MSMQ消息)
- 基于qml创建最简单的图像处理程序(2)-使用c++&qml进行图像处理
- .Net中通过反射技术的应用----插件程序的开发入门
- 基于PHP的cURL快速入门教程 (小偷采集程序)
- 基于 KeyStone DSP 的多核视频处理技术
- 关于基于.net的WEB程序开发所需要的一些技术归纳
- 大数据处理技术 - 基于Hadoop的实战
- 基于IAP的STM32程序更新技术
- 大数据处理技术-基于Hadoop/Yarn的大数据技术实战
- 在myeclipse中基于Hibernate框架开发的入门小程序