(转)Android 解析后台返回为Json数据的简单例子!!!
2013-04-11 15:05
726 查看
今天给大家分享下Android解析Json的例子,我这里自己安装了Tomcat,让自己电脑充当下服务器,最重要的是,返回结果自己可以随便修改。
首先看下Json的定义,以及它和XML的比较:
JSON的定义:
一种轻量级的数据交换格式,具有良好的可读和便于快速编写的特性。业内主流技术为其提供了完整的解决方案(有点类似于正则表达式 ,获得了当今大部分语言的支持),从而可以在不同平台间进行数据交换。JSON采用兼容性很高的文本格式,同时也具备类似于C语言体系的行为。 – Json.org
JSON Vs XML
1.JSON和XML的数据可读性基本相同
2.JSON和XML同样拥有丰富的解析手段
3.JSON相对于XML来讲,数据的体积小
4.JSON与JavaScript的交互更加方便
5.JSON对数据的描述性比XML较差
6.JSON的速度要远远快于XML.
Tomcat安装:
Tomcat下载地址http://tomcat.apache.org/ 下载后安装,如果成功,启动Tomcat,然后在浏览器里输入:http://localhost:8080/index.jsp,会有个Tomcat首页界面,

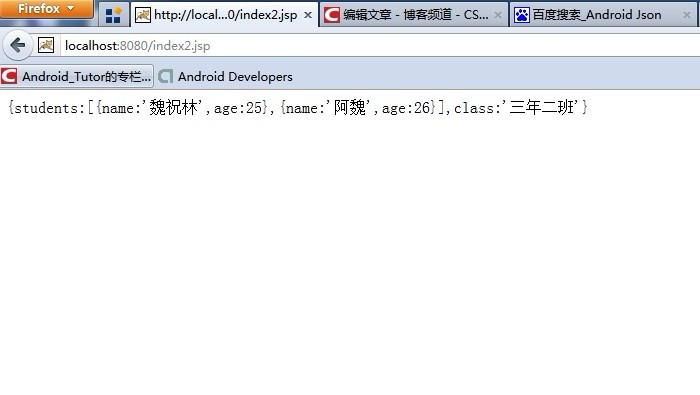
我们在Tomcat安装目录下webapps\ROOT下找到index.jsp,然后新建一个index2.jsp,用记事本或者什么的,编辑内容如下:
[java] view
plaincopy
{students:[{name:'魏祝林',age:25},{name:'阿魏',age:26}],class:'三年二班'}
然后我们在浏览器里输入:http://localhost:8080/index2.jsp返回的结果如下(这就模拟出后台返回的数据了):
新建一个Android工程JsonDemo.
工程目录如下:

这里我封装了一个JSONUtil工具类,代码如下:
[java] view
plaincopy
package com.tutor.jsondemo;
import java.io.IOException;
import java.io.InputStreamReader;
import java.io.UnsupportedEncodingException;
import org.apache.http.HttpEntity;
import org.apache.http.HttpResponse;
import org.apache.http.client.methods.HttpGet;
import org.apache.http.impl.client.DefaultHttpClient;
import org.apache.http.params.BasicHttpParams;
import org.apache.http.protocol.HTTP;
import org.json.JSONException;
import org.json.JSONObject;
import android.util.Log;
/**
* @author frankiewei.
* Json封装的工具类.
*/
public class JSONUtil {
private static final String TAG = "JSONUtil";
/**
* 获取json内容
* @param url
* @return JSONArray
* @throws JSONException
* @throws ConnectionException
*/
public static JSONObject getJSON(String url) throws JSONException, Exception {
return new JSONObject(getRequest(url));
}
/**
* 向api发送get请求,返回从后台取得的信息。
*
* @param url
* @return String
*/
protected static String getRequest(String url) throws Exception {
return getRequest(url, new DefaultHttpClient(new BasicHttpParams()));
}
/**
* 向api发送get请求,返回从后台取得的信息。
*
* @param url
* @param client
* @return String
*/
protected static String getRequest(String url, DefaultHttpClient client) throws Exception {
String result = null;
int statusCode = 0;
HttpGet getMethod = new HttpGet(url);
Log.d(TAG, "do the getRequest,url="+url+"");
try {
//getMethod.setHeader("User-Agent", USER_AGENT);
HttpResponse httpResponse = client.execute(getMethod);
//statusCode == 200 正常
statusCode = httpResponse.getStatusLine().getStatusCode();
Log.d(TAG, "statuscode = "+statusCode);
//处理返回的httpResponse信息
result = retrieveInputStream(httpResponse.getEntity());
} catch (Exception e) {
Log.e(TAG, e.getMessage());
throw new Exception(e);
} finally {
getMethod.abort();
}
return result;
}
/**
* 处理httpResponse信息,返回String
*
* @param httpEntity
* @return String
*/
protected static String retrieveInputStream(HttpEntity httpEntity) {
int length = (int) httpEntity.getContentLength();
//the number of bytes of the content, or a negative number if unknown. If the content length is known but exceeds Long.MAX_VALUE, a negative number is returned.
//length==-1,下面这句报错,println needs a message
if (length < 0) length = 10000;
StringBuffer stringBuffer = new StringBuffer(length);
try {
InputStreamReader inputStreamReader = new InputStreamReader(httpEntity.getContent(), HTTP.UTF_8);
char buffer[] = new char[length];
int count;
while ((count = inputStreamReader.read(buffer, 0, length - 1)) > 0) {
stringBuffer.append(buffer, 0, count);
}
} catch (UnsupportedEncodingException e) {
Log.e(TAG, e.getMessage());
} catch (IllegalStateException e) {
Log.e(TAG, e.getMessage());
} catch (IOException e) {
Log.e(TAG, e.getMessage());
}
return stringBuffer.toString();
}
}
编写主Activity代码JSONDemoActivity,代码如下:
[java] view
plaincopy
package com.tutor.jsondemo;
import org.json.JSONArray;
import org.json.JSONException;
import org.json.JSONObject;
import android.app.Activity;
import android.os.Bundle;
import android.widget.TextView;
public class JSONDemoActivity extends Activity {
/**
* 访问的后台地址,这里访问本地的不能用127.0.0.1应该用10.0.2.2
*/
private static final String BASE_URL = "http://10.0.2.2:8080/index2.jsp";
private TextView mStudentTextView;
private TextView mClassTextView;
@Override
public void onCreate(Bundle savedInstanceState) {
super.onCreate(savedInstanceState);
setContentView(R.layout.main);
setupViews();
}
/**
* 初始化
*/
private void setupViews(){
mStudentTextView = (TextView)findViewById(R.id.student);
mClassTextView = (TextView)findViewById(R.id.classes);
try {
//获取后台返回的Json对象
JSONObject mJsonObject = JSONUtil.getJSON(BASE_URL);
//获得学生数组
JSONArray mJsonArray = mJsonObject.getJSONArray("students");
//获取第一个学生
JSONObject firstStudent = mJsonArray.getJSONObject(0);
//获取班级
String classes = mJsonObject.getString("class");
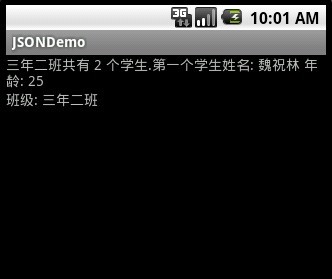
String studentInfo = classes + "共有 " + mJsonArray.length() + " 个学生."
+ "第一个学生姓名: " + firstStudent.getString("name")
+ " 年龄: " + firstStudent.getInt("age");
mStudentTextView.setText(studentInfo);
mClassTextView.setText("班级: " + classes);
} catch (JSONException e) {
e.printStackTrace();
} catch (Exception e) {
e.printStackTrace();
}
}
}
这里用到的布局文件main.xml代码如下:
[html] view
plaincopy
<?xml version="1.0" encoding="utf-8"?>
<LinearLayout xmlns:android="http://schemas.android.com/apk/res/android"
android:layout_width="fill_parent"
android:layout_height="fill_parent"
android:orientation="vertical" >
<TextView
android:id="@+id/student"
android:layout_width="fill_parent"
android:layout_height="wrap_content"
android:text="@string/hello" />
<TextView
android:id="@+id/classes"
android:layout_width="fill_parent"
android:layout_height="wrap_content"
/>
</LinearLayout>
最后要在AndroidMainfest.xml中添加访问网络权限:
[html] view
plaincopy
<?xml version="1.0" encoding="utf-8"?>
<manifest xmlns:android="http://schemas.android.com/apk/res/android"
package="com.tutor.jsondemo"
android:versionCode="1"
android:versionName="1.0" >
<uses-permission android:name="android.permission.INTERNET"></uses-permission>
<application
android:icon="@drawable/ic_launcher"
android:label="@string/app_name" >
<activity
android:name=".JSONDemoActivity"
android:label="@string/app_name" >
<intent-filter>
<action android:name="android.intent.action.MAIN" />
<category android:name="android.intent.category.LAUNCHER" />
</intent-filter>
</activity>
</application>
</manifest>
运行工程,效果如下:
转自:http://blog.csdn.net/android_tutor/article/details/7466620
首先看下Json的定义,以及它和XML的比较:
JSON的定义:
一种轻量级的数据交换格式,具有良好的可读和便于快速编写的特性。业内主流技术为其提供了完整的解决方案(有点类似于正则表达式 ,获得了当今大部分语言的支持),从而可以在不同平台间进行数据交换。JSON采用兼容性很高的文本格式,同时也具备类似于C语言体系的行为。 – Json.org
JSON Vs XML
1.JSON和XML的数据可读性基本相同
2.JSON和XML同样拥有丰富的解析手段
3.JSON相对于XML来讲,数据的体积小
4.JSON与JavaScript的交互更加方便
5.JSON对数据的描述性比XML较差
6.JSON的速度要远远快于XML.
Tomcat安装:
Tomcat下载地址http://tomcat.apache.org/ 下载后安装,如果成功,启动Tomcat,然后在浏览器里输入:http://localhost:8080/index.jsp,会有个Tomcat首页界面,
我们在Tomcat安装目录下webapps\ROOT下找到index.jsp,然后新建一个index2.jsp,用记事本或者什么的,编辑内容如下:
[java] view
plaincopy
{students:[{name:'魏祝林',age:25},{name:'阿魏',age:26}],class:'三年二班'}
然后我们在浏览器里输入:http://localhost:8080/index2.jsp返回的结果如下(这就模拟出后台返回的数据了):
新建一个Android工程JsonDemo.
工程目录如下:
这里我封装了一个JSONUtil工具类,代码如下:
[java] view
plaincopy
package com.tutor.jsondemo;
import java.io.IOException;
import java.io.InputStreamReader;
import java.io.UnsupportedEncodingException;
import org.apache.http.HttpEntity;
import org.apache.http.HttpResponse;
import org.apache.http.client.methods.HttpGet;
import org.apache.http.impl.client.DefaultHttpClient;
import org.apache.http.params.BasicHttpParams;
import org.apache.http.protocol.HTTP;
import org.json.JSONException;
import org.json.JSONObject;
import android.util.Log;
/**
* @author frankiewei.
* Json封装的工具类.
*/
public class JSONUtil {
private static final String TAG = "JSONUtil";
/**
* 获取json内容
* @param url
* @return JSONArray
* @throws JSONException
* @throws ConnectionException
*/
public static JSONObject getJSON(String url) throws JSONException, Exception {
return new JSONObject(getRequest(url));
}
/**
* 向api发送get请求,返回从后台取得的信息。
*
* @param url
* @return String
*/
protected static String getRequest(String url) throws Exception {
return getRequest(url, new DefaultHttpClient(new BasicHttpParams()));
}
/**
* 向api发送get请求,返回从后台取得的信息。
*
* @param url
* @param client
* @return String
*/
protected static String getRequest(String url, DefaultHttpClient client) throws Exception {
String result = null;
int statusCode = 0;
HttpGet getMethod = new HttpGet(url);
Log.d(TAG, "do the getRequest,url="+url+"");
try {
//getMethod.setHeader("User-Agent", USER_AGENT);
HttpResponse httpResponse = client.execute(getMethod);
//statusCode == 200 正常
statusCode = httpResponse.getStatusLine().getStatusCode();
Log.d(TAG, "statuscode = "+statusCode);
//处理返回的httpResponse信息
result = retrieveInputStream(httpResponse.getEntity());
} catch (Exception e) {
Log.e(TAG, e.getMessage());
throw new Exception(e);
} finally {
getMethod.abort();
}
return result;
}
/**
* 处理httpResponse信息,返回String
*
* @param httpEntity
* @return String
*/
protected static String retrieveInputStream(HttpEntity httpEntity) {
int length = (int) httpEntity.getContentLength();
//the number of bytes of the content, or a negative number if unknown. If the content length is known but exceeds Long.MAX_VALUE, a negative number is returned.
//length==-1,下面这句报错,println needs a message
if (length < 0) length = 10000;
StringBuffer stringBuffer = new StringBuffer(length);
try {
InputStreamReader inputStreamReader = new InputStreamReader(httpEntity.getContent(), HTTP.UTF_8);
char buffer[] = new char[length];
int count;
while ((count = inputStreamReader.read(buffer, 0, length - 1)) > 0) {
stringBuffer.append(buffer, 0, count);
}
} catch (UnsupportedEncodingException e) {
Log.e(TAG, e.getMessage());
} catch (IllegalStateException e) {
Log.e(TAG, e.getMessage());
} catch (IOException e) {
Log.e(TAG, e.getMessage());
}
return stringBuffer.toString();
}
}
编写主Activity代码JSONDemoActivity,代码如下:
[java] view
plaincopy
package com.tutor.jsondemo;
import org.json.JSONArray;
import org.json.JSONException;
import org.json.JSONObject;
import android.app.Activity;
import android.os.Bundle;
import android.widget.TextView;
public class JSONDemoActivity extends Activity {
/**
* 访问的后台地址,这里访问本地的不能用127.0.0.1应该用10.0.2.2
*/
private static final String BASE_URL = "http://10.0.2.2:8080/index2.jsp";
private TextView mStudentTextView;
private TextView mClassTextView;
@Override
public void onCreate(Bundle savedInstanceState) {
super.onCreate(savedInstanceState);
setContentView(R.layout.main);
setupViews();
}
/**
* 初始化
*/
private void setupViews(){
mStudentTextView = (TextView)findViewById(R.id.student);
mClassTextView = (TextView)findViewById(R.id.classes);
try {
//获取后台返回的Json对象
JSONObject mJsonObject = JSONUtil.getJSON(BASE_URL);
//获得学生数组
JSONArray mJsonArray = mJsonObject.getJSONArray("students");
//获取第一个学生
JSONObject firstStudent = mJsonArray.getJSONObject(0);
//获取班级
String classes = mJsonObject.getString("class");
String studentInfo = classes + "共有 " + mJsonArray.length() + " 个学生."
+ "第一个学生姓名: " + firstStudent.getString("name")
+ " 年龄: " + firstStudent.getInt("age");
mStudentTextView.setText(studentInfo);
mClassTextView.setText("班级: " + classes);
} catch (JSONException e) {
e.printStackTrace();
} catch (Exception e) {
e.printStackTrace();
}
}
}
这里用到的布局文件main.xml代码如下:
[html] view
plaincopy
<?xml version="1.0" encoding="utf-8"?>
<LinearLayout xmlns:android="http://schemas.android.com/apk/res/android"
android:layout_width="fill_parent"
android:layout_height="fill_parent"
android:orientation="vertical" >
<TextView
android:id="@+id/student"
android:layout_width="fill_parent"
android:layout_height="wrap_content"
android:text="@string/hello" />
<TextView
android:id="@+id/classes"
android:layout_width="fill_parent"
android:layout_height="wrap_content"
/>
</LinearLayout>
最后要在AndroidMainfest.xml中添加访问网络权限:
[html] view
plaincopy
<?xml version="1.0" encoding="utf-8"?>
<manifest xmlns:android="http://schemas.android.com/apk/res/android"
package="com.tutor.jsondemo"
android:versionCode="1"
android:versionName="1.0" >
<uses-permission android:name="android.permission.INTERNET"></uses-permission>
<application
android:icon="@drawable/ic_launcher"
android:label="@string/app_name" >
<activity
android:name=".JSONDemoActivity"
android:label="@string/app_name" >
<intent-filter>
<action android:name="android.intent.action.MAIN" />
<category android:name="android.intent.category.LAUNCHER" />
</intent-filter>
</activity>
</application>
</manifest>
运行工程,效果如下:
转自:http://blog.csdn.net/android_tutor/article/details/7466620

相关文章推荐
- Android 解析后台返回为Json数据的简单例子!!!
- Android 解析后台返回为Json数据的简单例子!!!
- Android 解析后台返回为Json数据的简单例子!!!
- Android 解析后台返回为Json数据的简单例子!!!
- Android 解析后台返回为Json数据的简单例子!!!
- Android 解析后台返回为Json数据的简单例子!!!
- Android 解析后台返回为Json数据的简单例子!!!
- Android 解析后台返回为Json数据的简单例子
- Android 解析后台返回为Json数据的简单例子
- Android 解析后台返回为Json数据的简单例子!!!
- Android 解析后台返回为Json数据的简单例子!!!
- Android 解析后台返回为Json数据的简单例子
- android json解析及简单例子+Android与服务器端数据交互+Android精彩案例【申明:来源于网络】
- Android 解析后台返回为Json数据实例教程
- Android json数据解析及简单例子
- android json解析及简单例子
- Android的okhttp的post请求,php返回json数据。以及遇到的okhttp dispatcher问题,和json解析遇到的问题
- android json解析及简单例子
- Android使用GSON和FASTJSON解析服务器返回的JSON数据
- android json解析及简单例子