Arduino 各种模块篇 motor shield 电机扩展板 介绍 及 步进电机使用(stepper!)
2013-04-10 11:24
661 查看
I bought this shield which is designed by adafruit.com

Here's the link to show you how to use it.
http://learn.adafruit.com/adafruit-motor-shield
http://www.ladyada.net/make/mshield/
Introduction
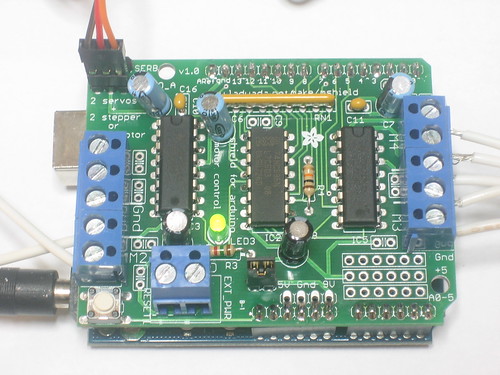
This photo has notes. Move your mouse over the photo to see them.
Arduino is a great starting point for electronics, and with a motor
shield it can also be a nice tidy platform for robotics and
mechatronics. Here is a design for a full-featured motor shield that
will be able to power many simple to medium-complexity projects.
2 connections for 5V 'hobby' servos connected to the Arduino's high-resolution dedicated timer - no jitter!
Up to 4 bi-directional DC motors with individual 8-bit speed selection (so, about 0.5% resolution)
Up to 2 stepper motors (unipolar or bipolar) with single coil, double coil, interleaved or micro-stepping.
4 H-Bridges: L293D chipset provides 0.6A per bridge (1.2A peak) with thermal shutdown protection, 4.5V to 25V
Pull down resistors keep motors disabled during power-up
Big terminal block connectors to easily hook up wires (10-22AWG) and power
Arduino reset button brought up top
2-pin terminal block to connect external power, for seperate logic/motor supplies
Tested compatible with Mega, Diecimila, & Duemilanove
Full kit available for purchase from the Adafruit shop.
Download the easy-to-use Arduino software libraries and you're ready to go!
All 6 analog input pins are available. They can also be used as digital pins (pins #14 thru 19)
Digital pin 2, and 13 are not used.
The following pins are in use only if the DC/Stepper noted is in use:
Digital pin 11: DC Motor #1 / Stepper #1 (activation/speed control)
Digital pin 3: DC Motor #2 / Stepper #1 (activation/speed control)
Digital pin 5: DC Motor #3 / Stepper #2 (activation/speed control)
Digital pin 6: DC Motor #4 / Stepper #2 (activation/speed control)
The following pins are in use if any DC/steppers are used
Digital pin 4, 7, 8 and 12 are used to drive the DC/Stepper motors via the 74HC595 serial-to-parallel latch
The following pins are used only if that particular servo is in use:
Digitals pin 9: Servo #1 control
Digital pin 10: Servo #2 control
In use
This photo has notes. Move your mouse over the photo to see them.
links://
http://learn.adafruit.com/adafruit-motor-shield/using-stepper-motors
++++++++++++++++++++++++++++++++++++++++++++++++++++++++++++++++++++++++++++++++++++++++
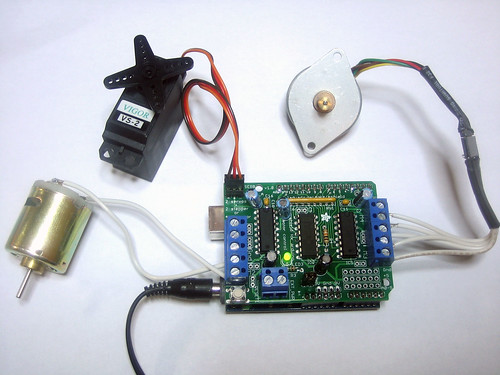
关于这款舵机的使用。把这个步进电机放在adafruit的motor shield 上

This
is a great first stepper motor, good for small projects and
experimenting with steppers. This uni-polar motor has a built in
mounting plate with two mounting holes. There are only 8 steps per
revolution, but inside is a 1/64 reduction gear set. What this means is
that there are really 8*64 steps per revolution = 512 steps! The shaft
is flattened so its easy to attach stuff to it with a set-screw. A
perfect first stepper motor and works well with the Motor Shield for
Arduino.
The gearing has a few side effects which are important to note. First, you can turn the stepper by hand but not as smoothly as an un-geared stepper.
It also means you shouldn't use interleaved or micro-stepping to
control or it will take forever to turn. Instead use single or double
stepping. The torque is fairly high but its slower than un-geared
steppers - we maxed out at about 80 RPM by over-driving it a bit with
9VDC.
To
use with the Adafruit Motor Shield, connect red to ground (middle),
orange and pink to one motor port (say M1) and blue and yellow to the
other motor port (say M2). So in order, thats: orange - pink - red -
blue - yellow. Then just use the example code that comes with the
Adafruit Motor Shield library and set the constructor to AF_Stepper motor(512, motornum) and the speed at 5 RPM by calling motor.setSpeed(5). Otherwise, you can also wire it up with some transistors and use the Arduino Stepper library
++++++++++++++++++++++++++++++++++++++++++++++++++++++++++++++++++++++++++++++++++++++++

Stepper
motors are great for (semi-)precise control, perfect for many robot and
CNC projects. This motor shield supports up to 2 stepper motors. The
library works identically for bi-polar and uni-polar motors
For
unipolar motors: to connect up the stepper, first figure out which pins
connected to which coil, and which pins are the center taps. If its a
5-wire motor then there will be 1 that is the center tap for both coils. Theres plenty of tutorials online on how to reverse engineer the coils pinout. The
center taps should both be connected together to the GND terminal on
the motor shield output block. then coil 1 should connect to one motor
port (say M1 or M3) and coil 2 should connect to the other motor port
(M2 or M4).
For bipolar motors: its just like unipolar motors except theres no 5th wire to connect to ground. The code is exactly the same.
Running a stepper is a little more intricate than running a DC motor but its still very easy
Make sure you #include <AFMotor.h>
Create the stepper motor object with AF_Stepper(steps, stepper#) to setup the motor H-bridge and latches. Steps indicates how many steps per revolution the motor has. a 7.5degree/step motor has 360/7.5 = 48 steps. Stepper# is which port it is connected to. If you're using M1 and M2, its port 1. If you're using M3 and M4 it's port 2
Set the speed of the motor using setSpeed(rpm) where rpm is how many revolutions per minute you want the stepper to turn.
Then every time you want the motor to move, call the step(#steps, direction,steptype) procedure.#steps is how many steps you'd like it to take. directionis either FORWARD or BACKWARD and the step type is SINGLE, DOUBLE. INTERLEAVE or MICROSTEP.
"Single"
means single-coil activation, "double" means 2 coils are activated at
once (for higher torque) and "interleave" means that it alternates
between single and double to get twice the resolution (but of course its
half the speed). "Microstepping" is a method where the coils are PWM'd
to create smooth motion between steps. Theres tons of information about the pros and cons of these different stepping methods in the resources page.
You
can use whichever stepping method you want, changing it "on the fly" to
as you may want minimum power, more torque, or more precision.
By
default, the motor will 'hold' the position after its done stepping. If
you want to release all the coils, so that it can spin freely, call release()
The stepping commands are 'blocking' and will return once the steps have finished.
Because the stepping commands 'block' - you have to instruct the
Stepper motors each time you want them to move. If you want to have more
of a 'background task' stepper control, check out AccelStepper library (install
similarly to how you did with AFMotor) which has some examples for
controlling two steppers simultaneously with varying accelleration
Copy Code
#include<AFMotor.h>
AF_Stepper motor(48,2);
void setup(){
Serial.begin(9600);// set up Serial library at 9600 bps
Serial.println("Stepper test!");
motor.setSpeed(10);// 10 rpm
motor.step(100, FORWARD, SINGLE);
motor.release();
delay(1000);
}
void loop(){
motor.step(100, FORWARD, SINGLE);
motor.step(100, BACKWARD, SINGLE);
motor.step(100, FORWARD, DOUBLE);
motor.step(100, BACKWARD, DOUBLE);
motor.step(100, FORWARD, INTERLEAVE);
motor.step(100, BACKWARD, INTERLEAVE);
motor.step(100, FORWARD, MICROSTEP);
motor.step(100, BACKWARD, MICROSTEP);
}
< Using RC ServosUsing DC Motors >
经过我改进的视频效果如下:
Arduino stepper with motor shield from adafruit
Shield: http://www.adafruit.com/products/81#Description
The Stepper is from http://www.adafruit.com/products/858
Product ID: 28BYJ-48 5V~DC
1 revolution = 512 Steps
Hook the taps of the stepper up with the shield as the reference:
To use with the Adafruit Motor Shield, connect red to ground (middle),
orange and pink to one motor port (say M1) and blue and yellow to the
other motor port (say M2). So in order, thats: orange - pink - red -
blue - yellow. Then just use the example code that comes with the
Adafruit Motor Shield library and set the constructor to AF_Stepper
motor(512, motornum) and the speed at 5 RPM by calling
motor.setSpeed(5). Otherwise, you can also wire it up with some
transistors and use the Arduino Stepper library
Codes here:
http://pastebin.com/VfS7GfZu
Enjoy!
I changed the rotation distance to make the stepper rotate longer as what you see in the video
我修改的代码如下:
Here's the link to show you how to use it.
http://learn.adafruit.com/adafruit-motor-shield
http://www.ladyada.net/make/mshield/
Introduction
This photo has notes. Move your mouse over the photo to see them.
Arduino is a great starting point for electronics, and with a motor
shield it can also be a nice tidy platform for robotics and
mechatronics. Here is a design for a full-featured motor shield that
will be able to power many simple to medium-complexity projects.
2 connections for 5V 'hobby' servos connected to the Arduino's high-resolution dedicated timer - no jitter!
Up to 4 bi-directional DC motors with individual 8-bit speed selection (so, about 0.5% resolution)
Up to 2 stepper motors (unipolar or bipolar) with single coil, double coil, interleaved or micro-stepping.
4 H-Bridges: L293D chipset provides 0.6A per bridge (1.2A peak) with thermal shutdown protection, 4.5V to 25V
Pull down resistors keep motors disabled during power-up
Big terminal block connectors to easily hook up wires (10-22AWG) and power
Arduino reset button brought up top
2-pin terminal block to connect external power, for seperate logic/motor supplies
Tested compatible with Mega, Diecimila, & Duemilanove
Full kit available for purchase from the Adafruit shop.
Download the easy-to-use Arduino software libraries and you're ready to go!
What pins are not used on the motor shield?
All 6 analog input pins are available. They can also be used as digital pins (pins #14 thru 19)Digital pin 2, and 13 are not used.
The following pins are in use only if the DC/Stepper noted is in use:
Digital pin 11: DC Motor #1 / Stepper #1 (activation/speed control)
Digital pin 3: DC Motor #2 / Stepper #1 (activation/speed control)
Digital pin 5: DC Motor #3 / Stepper #2 (activation/speed control)
Digital pin 6: DC Motor #4 / Stepper #2 (activation/speed control)
The following pins are in use if any DC/steppers are used
Digital pin 4, 7, 8 and 12 are used to drive the DC/Stepper motors via the 74HC595 serial-to-parallel latch
The following pins are used only if that particular servo is in use:
Digitals pin 9: Servo #1 control
Digital pin 10: Servo #2 control
In use
This photo has notes. Move your mouse over the photo to see them.
links://
http://learn.adafruit.com/adafruit-motor-shield/using-stepper-motors
++++++++++++++++++++++++++++++++++++++++++++++++++++++++++++++++++++++++++++++++++++++++
关于这款舵机的使用。把这个步进电机放在adafruit的motor shield 上
This
is a great first stepper motor, good for small projects and
experimenting with steppers. This uni-polar motor has a built in
mounting plate with two mounting holes. There are only 8 steps per
revolution, but inside is a 1/64 reduction gear set. What this means is
that there are really 8*64 steps per revolution = 512 steps! The shaft
is flattened so its easy to attach stuff to it with a set-screw. A
perfect first stepper motor and works well with the Motor Shield for
Arduino.
The gearing has a few side effects which are important to note. First, you can turn the stepper by hand but not as smoothly as an un-geared stepper.
It also means you shouldn't use interleaved or micro-stepping to
control or it will take forever to turn. Instead use single or double
stepping. The torque is fairly high but its slower than un-geared
steppers - we maxed out at about 80 RPM by over-driving it a bit with
9VDC.
To
use with the Adafruit Motor Shield, connect red to ground (middle),
orange and pink to one motor port (say M1) and blue and yellow to the
other motor port (say M2). So in order, thats: orange - pink - red -
blue - yellow. Then just use the example code that comes with the
Adafruit Motor Shield library and set the constructor to AF_Stepper motor(512, motornum) and the speed at 5 RPM by calling motor.setSpeed(5). Otherwise, you can also wire it up with some transistors and use the Arduino Stepper library
++++++++++++++++++++++++++++++++++++++++++++++++++++++++++++++++++++++++++++++++++++++++
Using Stepper MotorsCreated by Ladyada
Stepper
motors are great for (semi-)precise control, perfect for many robot and
CNC projects. This motor shield supports up to 2 stepper motors. The
library works identically for bi-polar and uni-polar motors
For
unipolar motors: to connect up the stepper, first figure out which pins
connected to which coil, and which pins are the center taps. If its a
5-wire motor then there will be 1 that is the center tap for both coils. Theres plenty of tutorials online on how to reverse engineer the coils pinout. The
center taps should both be connected together to the GND terminal on
the motor shield output block. then coil 1 should connect to one motor
port (say M1 or M3) and coil 2 should connect to the other motor port
(M2 or M4).
For bipolar motors: its just like unipolar motors except theres no 5th wire to connect to ground. The code is exactly the same.
Running a stepper is a little more intricate than running a DC motor but its still very easy
Make sure you #include <AFMotor.h>
Create the stepper motor object with AF_Stepper(steps, stepper#) to setup the motor H-bridge and latches. Steps indicates how many steps per revolution the motor has. a 7.5degree/step motor has 360/7.5 = 48 steps. Stepper# is which port it is connected to. If you're using M1 and M2, its port 1. If you're using M3 and M4 it's port 2
Set the speed of the motor using setSpeed(rpm) where rpm is how many revolutions per minute you want the stepper to turn.
Then every time you want the motor to move, call the step(#steps, direction,steptype) procedure.#steps is how many steps you'd like it to take. directionis either FORWARD or BACKWARD and the step type is SINGLE, DOUBLE. INTERLEAVE or MICROSTEP.
"Single"
means single-coil activation, "double" means 2 coils are activated at
once (for higher torque) and "interleave" means that it alternates
between single and double to get twice the resolution (but of course its
half the speed). "Microstepping" is a method where the coils are PWM'd
to create smooth motion between steps. Theres tons of information about the pros and cons of these different stepping methods in the resources page.
You
can use whichever stepping method you want, changing it "on the fly" to
as you may want minimum power, more torque, or more precision.
By
default, the motor will 'hold' the position after its done stepping. If
you want to release all the coils, so that it can spin freely, call release()
The stepping commands are 'blocking' and will return once the steps have finished.
Because the stepping commands 'block' - you have to instruct the
Stepper motors each time you want them to move. If you want to have more
of a 'background task' stepper control, check out AccelStepper library (install
similarly to how you did with AFMotor) which has some examples for
controlling two steppers simultaneously with varying accelleration
Copy Code
#include<AFMotor.h>
AF_Stepper motor(48,2);
void setup(){
Serial.begin(9600);// set up Serial library at 9600 bps
Serial.println("Stepper test!");
motor.setSpeed(10);// 10 rpm
motor.step(100, FORWARD, SINGLE);
motor.release();
delay(1000);
}
void loop(){
motor.step(100, FORWARD, SINGLE);
motor.step(100, BACKWARD, SINGLE);
motor.step(100, FORWARD, DOUBLE);
motor.step(100, BACKWARD, DOUBLE);
motor.step(100, FORWARD, INTERLEAVE);
motor.step(100, BACKWARD, INTERLEAVE);
motor.step(100, FORWARD, MICROSTEP);
motor.step(100, BACKWARD, MICROSTEP);
}
< Using RC ServosUsing DC Motors >
经过我改进的视频效果如下:
Arduino stepper with motor shield from adafruit
Shield: http://www.adafruit.com/products/81#Description
The Stepper is from http://www.adafruit.com/products/858
Product ID: 28BYJ-48 5V~DC
1 revolution = 512 Steps
Hook the taps of the stepper up with the shield as the reference:
To use with the Adafruit Motor Shield, connect red to ground (middle),
orange and pink to one motor port (say M1) and blue and yellow to the
other motor port (say M2). So in order, thats: orange - pink - red -
blue - yellow. Then just use the example code that comes with the
Adafruit Motor Shield library and set the constructor to AF_Stepper
motor(512, motornum) and the speed at 5 RPM by calling
motor.setSpeed(5). Otherwise, you can also wire it up with some
transistors and use the Arduino Stepper library
Codes here:
http://pastebin.com/VfS7GfZu
Enjoy!
I changed the rotation distance to make the stepper rotate longer as what you see in the video
我修改的代码如下:
// Adafruit Motor shield library
// copyright Adafruit Industries LLC, 2009
// this code is public domain, enjoy!

#include <AFMotor.h>
/*

// to use the 28BYJ-48 stepper with the motor shield, you may need to know this
// To use with the Adafruit Motor Shield,
//connect red to ground (middle),
//orange and pink to one motor port (say M1)
//and blue and yellow to the other motor port (say M2).
//So in order, thats: orange - pink - red - blue - yellow.
//Then just use the example code that comes with the Adafruit Motor Shield library
and set the constructor to AF_Stepper motor(512, motornum)
and the speed at 5 RPM by calling motor.setSpeed(5).
Otherwise, you can also wire it up with some transistors and use the Arduino Stepper library

// Connect a stepper motor with 512 steps per revolution
//(8 micro steps to make the inner shaft gain a revolution.)
// with the effors of shift gears, 64 revolution of the shaft make the cuprum shaft we see gain a revolution
// so A Revolution = 8*64 = 512 (shaft) steps
// to motor port #1 (M1 and M2) M1, And M2 are on the shield
*/
AF_Stepper motor(512, 1);

void setup() {
Serial.begin(9600);           // set up Serial library at 9600 bps
Serial.println("Stepper test!");

motor.setSpeed(30);  // 30 rpm    (10 or 20 as you desire)
}

void loop() {
Serial.println("Single coil steps");
motor.step(300, FORWARD, SINGLE);     // set it 300 easy to check its movement
motor.step(300, BACKWARD, SINGLE);

Serial.println("Double coil steps");
motor.step(300, FORWARD, DOUBLE);
motor.step(300, BACKWARD, DOUBLE);

Serial.println("Interleave coil steps");
motor.step(300, FORWARD, INTERLEAVE);
motor.step(300, BACKWARD, INTERLEAVE);

Serial.println("Micrsostep steps");
motor.step(300, FORWARD, MICROSTEP);
motor.step(300, BACKWARD, MICROSTEP);
}

相关文章推荐
- Arduino 各种模块篇 motor shield 电机扩展板(舵机、直流电机、步进电机party)
- Arduino 各种模块篇 步进电机 step motor( 不用库,不用shield, 纯)
- Arduino 各种模块篇 步进电机 step motor 舵机 servo 直流电机 总复习
- 微软企业库5.0 学习之路——第五步、介绍EntLib.Validation模块信息、验证器的实现层级及内置的各种验证器的使用方法——上篇
- 用WIZwiki-W7500 和 Arduino Motor Shield 进行网页电机控制
- [EntLib]微软企业库5.0 学习之路——第五步、介绍EntLib.Validation模块信息、验证器的实现层级及内置的各种验证器的使用方法——上篇
- Linkit 7688 DUO(五) 接上各种Arduino传感器和模块—扩展篇
- 【Arduino学习笔记】使用L298N电机驱动模块驱动直流电机
- [EntLib]微软企业库5.0 学习之路——第五步、介绍EntLib.Validation模块信息、验证器的实现层级及内置的各种验证器的使用方法——下篇
- 微软企业库5.0 学习之路——第五步、介绍EntLib.Validation模块信息、验证器的实现层级及内置的各种验证器的使用方法——中篇
- [EntLib]微软企业库5.0 学习之路——第五步、介绍EntLib.Validation模块信息、验证器的实现层级及内置的各种验证器的使用方法
- arduino L293D电机扩展模块入门 Reference
- 微软企业库5.0 学习之路——第五步、介绍EntLib.Validation模块信息、验证器的实现层级及内置的各种验证器的使用方法——下篇
- 微软企业库5.0 学习之路——第五步、介绍EntLib.Validation模块信息、验证器的实现层级及内置的各种验证器的使用方法——上篇
- arduino L293D电机扩展模块入门 Reference
- 微软企业库5.0 学习之路——第五步、介绍EntLib.Validation模块信息、验证器的实现层级及内置的各种验证器的使用方法——中篇
- mysql各种存储引擎_使用及介绍
- 【STM32小案例 04 】STM32简单使用L298N电机驱动模块 控制直流电机正反转
- Node.js中多进程模块Cluster的介绍与使用
- python模块介绍- base64 使用ASCII编码二进制数据