iphone应用程序开发指南--触摸事件
2013-04-08 10:40
337 查看
手指在屏幕上能达到的精度和鼠标指针有很大的不同。当用户触击屏幕时,接触
区域实际上是椭圆形的,而且比用户想像的位置更靠下一点。根据触摸屏幕的手指、手指的尺寸、手指接触屏幕的力量、手指的方向、以及其它因素的不同,其“接触部位”的尺寸和形状也有所不同。底层的多点触摸系统会分析所有的这些信息,为您计算出单一的触点。
UIResponder 是所有响应者对象的基类,
它不仅为事件处理,而且也为常见的响应者行为定义编程接口。UIApplication、UIView、和所有从UIView 派生出来的UIKit 类(包括UIWindow)都直接或间接地继承自UIResponder类。
- (void)touchesBegan:(NSSet *)touches withEvent:(UIEvent *)event {
UITouch* touch = [touches anyObject];
NSUInteger numTaps = [touch tapCount];
if (numTaps < 2) {
[self.nextResponder touchesBegan:touches withEvent:event];
} else {
[self handleDoubleTap:touch];
}
}
缺省情况下,视图会接收触摸事件。但是,您可以将其userInteractionEnabled
属性声明设置为NO,关闭事件传递的功能。
在一定的时间内关闭事件的传递。应用程序可以调用UIApplication 的
beginIgnoringInteractionEvents 方法,并在随后调用endIgnoringInteractionEvents 方法来实现这个目的。
缺省情况下,视图只接收多点触摸序列的第一个触摸事件,而忽略
所有其它事件。如果您希望视图处理多点触摸,就必须使它启用这个功能。在代码或Interface Builder 的查看器窗口中将视图的multipleTouchEnabled 属性设置为YES,就可以实现这个目标。
将事件传递限制在某个单独的视图上。缺省情况下,视图的exclusiveTouch 属性被设置为NO。将这个属性设置为YES 会使相应的视图具有这样的特性:即当该视图正在跟踪触摸动作时,窗口中的其它视图无法同时进行跟踪,它们不能接收到那些触摸事件。
多点触摸:
- (void)touchesBegan:(NSSet *)touches withEvent:(UIEvent *)event;
- (void)touchesMoved:(NSSet *)touches withEvent:(UIEvent *)event;
- (void)touchesEnded:(NSSet *)touches withEvent:(UIEvent *)event;
- (void)touchesCancelled:(NSSet *)touches withEvent:(UIEvent *)event
当一个或多个手指触碰屏幕时,发送touchesBegan:withEvent:消息。
当一个或多个手指在屏幕上移动时,发送touchesMoved:withEvent:消息。
当一个或多个手指离开屏幕时,发送touchesEnded:withEvent:消息。
当触摸序列被诸如电话呼入这样的系统事件所取消时,发送touchesCancelled:withEvent:消息。
上面这些方法都和特定的触摸阶段(比如UITouchPhaseBegan)相关联,该信息存在于UITouch 对象的phase 属性声明中。
为了处理给定阶段的事件,响应者对象常常从传入的集合参数中取得一或多个UITouch 对象,然后考察这些对象的属性或取得它们的位置(如果需要处理所有触摸对象,可以向该NSSet 对象发送anyObject 消息)。UITouch
类中有一个名为locationInView:的重要方法,如果传入self 参数值,它会给出触摸动作在响应者坐标系统中的位置(假定该响应者是一个UIView 对象,且传入的视图参数不为nil)。另外,还有一个与之平行的方法,可以给出触摸动作之前位置(previousLocationInView:)。UITouch
实例的属性还可以给出发生多少次触
碰(tapCount)、触摸对象的创建或最后一次变化发生在什么时间(timestamp)、以及触摸处于什么阶段(phase)。
- (void) touchesEnded:(NSSet*)touches withEvent:(UIEvent*)event
{
UITouch *touch = [touches anyObject];
if ([touch tapCount] == 2) {
CGPoint tapPoint = [theTouch locationInView:self];
// Process a double-tap gesture
}
}
在touchesEnded:withEvent:方法中,当触击次数为一时,响应者对象就向自身发送一个performSelector:withObject:afterDelay:消息,其中的选择器标识由响应者对象实现的、用于处理单击手势的方法;第二个参数是一个NSValue 或NSDictionary 对象,用于保存相关的UITouch 对象;时延参数则表示单击和双击手势之间的合理时间间隔。
在touchesBegan:withEvent:方法中,如果触击次数为二,响应者对象会向自身发送一个cancelPreviousPerformRequestsWithTarget:消息,取消当前被挂起和延期执行的调用。如果触碰次数不为二,则在指定的延时之后,先前步骤中由选择器标识的方法就会被调用,以处理单击手势。
在视图中跟踪碰擦手势
#define HORIZ_SWIPE_DRAG_MIN 12
#define VERT_SWIPE_DRAG_MAX 4
- (void)touchesBegan:(NSSet *)touches withEvent:(UIEvent *)event
{
UITouch *touch = [touches anyObject];
startTouchPosition = [touch locationInView:self];
}
- (void)touchesMoved:(NSSet *)touches withEvent:(UIEvent *)event
{
UITouch *touch = [touches anyObject];
CGPoint currentTouchPosition = [touch locationInView:self];
// If the swipe tracks correctly.
if (fabsf(startTouchPosition.x - currentTouchPosition.x) >= HORIZ_SWIPE_DRAG_MIN
&&
fabsf(startTouchPosition.y - currentTouchPosition.y) <=
VERT_SWIPE_DRAG_MAX)
{
// It appears to be a swipe.
if (startTouchPosition.x < currentTouchPosition.x)
[self myProcessRightSwipe:touches withEvent:event];
else
[self myProcessLeftSwipe:touches withEvent:event];
}
else
{
// Process a non-swipe event.
}
}
处理复杂的多点触摸序列
- (void)touchesBegan:(NSSet *)touches withEvent:(UIEvent *)event
{
UITouch *touch = [[event allTouches] anyObject];
// Only move the placard view if the touch was in the placard view
if ([touch view] != placardView) {
// On double tap outside placard view, update placard's display string
if ([touch tapCount] == 2) {
[placardView setupNextDisplayString];
}
return;
}
// "Pulse" the placard view by scaling up then down
// Use UIView's built-in animation
[UIView beginAnimations:nil context:NULL];
[UIView setAnimationDuration:0.5];
CGAffineTransform transform = CGAffineTransformMakeScale(1.2, 1.2);
placardView.transform = transform;
[UIView commitAnimations];
[UIView beginAnimations:nil context:NULL];
[UIView setAnimationDuration:0.5];
transform = CGAffineTransformMakeScale(1.1, 1.1);
placardView.transform = transform;
[UIView commitAnimations];
// Move the placardView to under the touch
[UIView beginAnimations:nil context:NULL];
[UIView setAnimationDuration:0.25];
placardView.center = [self convertPoint:[touch locationInView:self]
fromView:placardView];
[UIView commitAnimations];
}
- (void)touchesMoved:(NSSet *)touches withEvent:(UIEvent *)event
{
UITouch *touch = [[event allTouches] anyObject];
// If the touch was in the placardView, move the placardView to its location
if ([touch view] == placardView) {
CGPoint location = [touch locationInView:self];
location = [self convertPoint:location fromView:placardView];
placardView.center = location;
return;
}
}
- (void)touchesEnded:(NSSet *)touches withEvent:(UIEvent *)event
{
UITouch *touch = [[event allTouches] anyObject];
// If the touch was in the placardView, bounce it back to the center
if ([touch view] == placardView) {
// Disable user interaction so subsequent touches don't interfere with animation
self.userInteractionEnabled = NO;
[self animatePlacardViewToCenter];
return;
}
}
在事件处理代码中,您可以将触摸状态的相关位置保存下来,以便在必要时和变化之后的UITouch 实例进行比较。定制视图可以用UIView 的hitTest:withEvent:方法或CALayer 的hitTest:方法来寻找接收触摸事件的子视图或层,进而正确地处理事件。下面的例子用于检测定制视图的层中的“Info”
图像是否被触碰。
- (void)touchesEnded:(NSSet*)touches withEvent:(UIEvent*)event {
CGPoint location = [[touches anyObject] locationInView:self];
CALayer *hitLayer = [[self layer] hitTest:[self convertPoint:location
fromView:nil]];
if (hitLayer == infoImage) {
[self displayInfo];
}
}
- (void)touchesEnded:(NSSet*)touches withEvent:(UIEvent*)event {
if ([touches count] == [[event touchesForView:self] count]) {
// last finger has lifted....
}
}
触摸事件中包含一个触摸对象的集合及其相关的状态,而运动事件中除了事件类型、子类型、和时间戳之外,没有其它状态。系统以这种方式来解析运动手势,避免和方向变化事件造成冲突。
为了处理运动事件, UIResponder 的子类必须实现motionBegan:withEvent: 或
motionEnded:withEvent:方法之一,或者同时实现这两个方法
UIKit 框架在UITextView、UITextField、和UIWebView 类中实现了拷贝-剪切-粘贴支持。如果您希望在自己的应用程序中得到这个行为,可以使用这些类的对象,或者自行实现。
UIPasteboard 类提供了粘贴板的接口。粘贴板是用于在一个应用程序内或不同应用程序间进行数据共享的受保护区域。该类提供了读写剪贴板上数据项目的方法。
UIMenuController 类可以在选定的拷贝、剪切、和粘贴对象的上下方显示一个编辑菜单。编辑菜单上的命令可以有拷贝、剪切、粘贴、选定、和全部选定。
UIResponder 类声明了canPerformAction:withSender:方法。响应者类可以实现这个方法,以根据当前的上下文显示或移除编辑菜单上的命令。
UIResponderStandardEditActions 非正式协议声明了处理拷贝、剪切、粘贴、选定、和全部选定命令的接口。当用户触碰编辑菜单上的某个命令时, 相应的
UIResponderStandardEditActions 方法就会被调用。
UIPasteboardNameGeneral 用于剪切、拷贝、和粘贴操作,涉及到广泛的数据类型。您可以通过该类的generalPasteboard 类方法来取得代表通用(General)粘贴板的单件对象。
UIPasteboardNameFind 用于检索操作。当前用户在检索条(UISearchBar)键入的字符串会被写入到这个粘贴板中, 因此可以在不同的应用程序中共享。您可以通过调用pasteboardWithName:create:类方法,并在名字参数中传入UIPasteboardNameFind 值来取得代表检索粘贴板的对象。典型情况下, 您只需使用系统定义的粘贴板就够了。但在必要时, 您也可以通过pasteboardWithName:create:
方法来创建自己的应用程序粘贴板。如果您调用pasteboardWithUniqueName 方法,UIPasteboard 会为您提供一个具有唯一名称的应用程序粘贴板。您可以通过其name 属性声明来取得这个名称。
调用UIMenuController 的sharedMenuController 类方法来取得全局的,即菜单控制器实例。
计算选定内容的边界,并用得到的边界矩形调用setTargetRect:inView:方法。系统会根据选定内容与屏幕顶部和底部的距离,将编辑菜单显示在该矩形的上方或下方。
调用setMenuVisible:animated:方法(两个参数都传入YES),在选定内容的上方或下方动画显示编辑菜单。
程序清单3-4演示了如何在touchesEnded:withEvent:方法的实现中显示编辑菜单(注意,例子中省略了处理选择的代码)。在这个代码片段中, 定制视图还向自己发送一个becomeFirstResponder 消息,确保自己在随后的拷贝、剪切、和粘贴操作中是第一响应者。
- (void)touchesEnded:(NSSet *)touches withEvent:(UIEvent *)event {
UITouch *theTouch = [touches anyObject];
if ([theTouch tapCount] == 2 && [self becomeFirstResponder]) {
// selection management code goes here...
// bring up editing menu.
UIMenuController *theMenu = [UIMenuController sharedMenuController];
CGRect selectionRect = CGRectMake(currentSelection.x, currentSelection.y, SIDE,SIDE);
[theMenu setTargetRect:selectionRect inView:self];
[theMenu setMenuVisible:YES animated:YES];
}
}
有条件地激活菜单命令
- (BOOL)canPerformAction:(SEL)action withSender:(id)sender {
BOOL retValue = NO;
ColorTile *theTile = [self colorTileForOrigin:currentSelection];
if (action == @selector(paste:) )
retValue = (theTile == nil) &&
[[UIPasteboard generalPasteboard]
containsPasteboardTypes:
[NSArray arrayWithObject:ColorTileUTI]];
else if ( action == @selector(cut:) || action == @selector(copy:) )
retValue = (theTile != nil);
else
retValue = [super canPerformAction:action
withSender:sender];
return retValue;
}
请注意,这个方法的最后一个else 子句调用了超类的实现,使超类有机会处理子类忽略的命令。
拷贝和剪切操作
- (void)copy:(id)sender {
UIPasteboard *gpBoard = [UIPasteboard generalPasteboard];
ColorTile *theTile = [self colorTileForOrigin:currentSelection];
if (theTile) {
NSData *tileData = [NSKeyedArchiver
archivedDataWithRootObject:theTile];
if (tileData)
[gpBoard setData:tileData forPasteboardType:ColorTileUTI];
}
}
- (void)cut:(id)sender {
[self copy:sender];
ColorTile *theTile = [self colorTileForOrigin:currentSelection];
if (theTile) {
CGPoint tilePoint = theTile.tileOrigin;
[tiles removeObject:theTile];
CGRect tileRect = [self rectFromOrigin:tilePoint inset:TILE_INSET];
[self setNeedsDisplayInRect:tileRect];
}
}
将粘贴板的数据粘贴到选定位置上
- (void)paste:(id)sender {
UIPasteboard *gpBoard = [UIPasteboard generalPasteboard];
NSArray *pbType = [NSArray arrayWithObject:ColorTileUTI];
ColorTile *theTile = [self colorTileForOrigin:currentSelection];
if (theTile == nil && [gpBoard containsPasteboardTypes:pbType]) {
NSData *tileData = [gpBoard dataForPasteboardType:ColorTileUTI];
ColorTile *theTile = (ColorTile *)[NSKeyedUnarchiver
unarchiveObjectWithData:tileData];
if (theTile) {
theTile.tileOrigin = self.currentSelection;
[tiles addObject:theTile];
CGRect tileRect = [self rectFromOrigin:currentSelection inset:TILE_INSET];
[self setNeedsDisplayInRect:tileRect];
}
}
}
Quartz 是主要的描画接口,支持基于路径的描画、
抗锯齿渲染、渐变填充模式、图像、颜色、坐标空间变换、以及PDF 文档的创建、显示、和分析。UIKit 为Quartz 的图像和颜色操作提供了Objective-C 的封装。Core Animation 为很多UIKit 的视图属性声明的动画效果提供底层支持,也可以用于实现定制的动画。
在调用您提供的drawRect:方法之前,视图对象会自动配置其描画环境,使您的代码可以立即进行描画。作为这些配置的一部分,UIView 对象会为当前描画环境创建一个图形上下文(对应于CGContextRef 封装类型)
用户坐标空间是您发出的所有描画命令的工作环境。该空间的单位由点来表示。设备坐标空间指的是设备内在的坐标空间,由像素来表示。缺省情况下,用户坐标空间上的一个点等于设备坐标空间的一个像素,这意味着一个点等于1/160英寸。然而,您不应该假定这个比例总是1:1。
UIColor 对象提供了一些便利方法,用于通过RGB、HSB、和灰度值指定颜色值。
您也可以使用Core Graphics 框架中的CGContextSetRGBStrokeColor 和
CGContextSetRGBFillColor 函数来创建和设置颜色。
可移植网络图像格式(PNG) .png
标记图像文件格式(TIFF) .tiff, .tif
联合影像专家组格式(JPEG) .jpeg, .jpg
图形交换格式(GIF) .gif
视窗位图格式(DIB) .bmp, .BMPf
视窗图标格式.ico
视窗光标.cur
XWindow 位图.xbm
UIImage, 一个不可变类,用于图像显示。
UIColor, 为设备颜色提供基本的支持。
UIFont, 为需要字体的类提供字体信息。
UIScreen, 提供屏幕的基本信息。
NSString* imagePath = [[NSBundle mainBundle] pathForResource:@"myImage"
ofType:@"png"];
UIImage* myImageObj = [[UIImage alloc] initWithContentsOfFile:imagePath];
- (void)drawRect:(CGRect)rect
{
// Draw the image
[anImage drawAtPoint:CGPointMake(10,10)];
}
重要提示:如果您使用CGContextDrawImage 函数来直接描画位图,则在缺省情况下,图像数据会上下倒置,因为Quartz 图像假定坐标系统的原点在左下角,且坐标轴的正向是向上和向右。虽然您可以在描画之前对其进行转换,但是将Quartz 图像包装为一个UIImage 对象是更简单的方法,这样可以自动补偿坐标空间的差别。
UIKit 中的UIRectFrame 和UIRectFill 函数(以及其它函数)的功能是在视图中描画象矩形这样的简单路径。
在创建路径时,需要首先通过CGContextBeginPath 函数配置一个接收路径命令的图形上下文。调用该函数之后,就可以使用与路径相关的函数来设置路径的起始点,描画直线和曲线,加入矩形和椭圆形等等。路径的几何形状指定完成后,就可以直接进行描画,或者将其引用存储在CGPathRef 或CGMutablePathRef数据类型中,以备后用。在视图上描画路径时,可以描画轮廓,也可以进行填充,或者同时进行这两种操作。路径轮廓可以用像CGContextStrokePath 这样的函数来画,即用当前的笔划颜色画出以路径为中心位置的线。路径的填充则可以用CGContextFillPath 函数来实现,它的功能是用当前的填充颜色或样式填充路径线段包围的区域。
Core Animation 的关键技术是层对象。层是一种轻量级的对象,在本质上类似于视图,但实际上是模型对象,负责封装显示内容的几何属性、显示时机、和视觉属性变量。内容本身可以通过如下三种方式来提供:
您可以将一个CGImageRef 类型的数据赋值给层对象的contents 属性变量。
您可以为层分配一个委托,让它负责描画工作。
您可以从CALayer 派生出子类,并对其显示方法进行重载。
UIKit 框架提供三个显示文本内容的基本类:
UILabel 显示静态文本字符串
UITextField 显示单行可编辑文本
UITextView 显示多行可编辑文本
为UITextField类提供支持的委托需要实现UITextFieldDelegate 协议定义的方法。类似地,为UITextView类提供支持的委托需要实现UITextViewDelegate 协议定义的方法。
当键盘被显示或隐藏的时候,iPhone OS 会向所有经过注册的观察者对象发出如下通告:
UIKeyboardWillShowNotification
UIKeyboardDidShowNotification
UIKeyboardWillHideNotification
UIKeyboardDidHideNotification
您可以通过调用视图对象的becomeFirstResponder 方法来为可编辑的文本视图显
示键盘。调用这个方法可以使目标视图成为第一响应者,并开始编辑过程,其效果和用户触击该视图是一样的。
需要做的调整通常包括暂时调整一或多个视图的尺寸和位置,从而使文本对象可见。管理带
有键盘的文本对象的最简单方法是将它们嵌入到一个UIScrollView ( 或其子类,如UITableView)对象。当键盘被显示出来时,您需要做的只是调整滚动视图的尺寸,并将目标文本对象滚动到合适的位置。为此,在UIKeyboardDidShowNotification 通告的处理代码中需要进行如下操作:
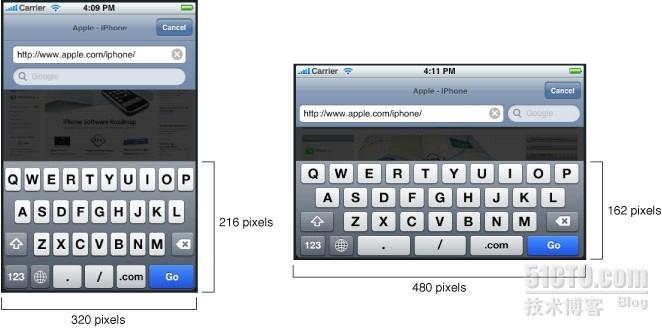
取得键盘的尺寸。
将滚动视图的高度减去键盘的高度。
将目标文本框滚动到视图中。
在配置滚动视图时,请务必为所有的内容视图配置恰当的自动尺寸调整规则。在之
前的图中,文本框实际上是一个UIView 对象的子视图,该UIView 对象又是UIScrollView对象的子视图。如果该UIView 对象的UIViewAutoresizingFlexibleWidth和UIViewAutoresizingFlexibleHeight 选项被设置了,则改变滚动视图的边框尺寸会同时改变它的边框,因而可能导致不可预料的结果。禁用这些选项可以确保该视图保持尺寸不变,并正确滚动。
处理键盘通告
// Call this method somewhere in your view controller setup code.
- (void)registerForKeyboardNotifications
{
[[NSNotificationCenter defaultCenter] addObserver:self
selector:@selector(keyboardWasShown:)
name:UIKeyboardDidShowNotification object:nil];
[[NSNotificationCenter defaultCenter] addObserver:self
selector:@selector(keyboardWasHidden:)
name:UIKeyboardDidHideNotification object:nil];
}
// Called when the UIKeyboardDidShowNotification is sent.
- (void)keyboardWasShown:(NSNotification*)aNotification
{
if (keyboardShown)
return;
NSDictionary* info = [aNotification userInfo];
// Get the size of the keyboard.
NSValue* aValue = [info
objectForKey:UIKeyboardBoundsUserInfoKey];
CGSize keyboardSize = [aValue CGRectValue].size;
// Resize the scroll view (which is the root view of the window)
CGRect viewFrame = [scrollView frame];
viewFrame.size.height -= keyboardSize.height;
scrollView.frame = viewFrame;
// Scroll the active text field into view.
CGRect textFieldRect = [activeField frame];
[scrollView scrollRectToVisible:textFieldRect animated:YES];
keyboardShown = YES;
}
// Called when the UIKeyboardDidHideNotification is sent
- (void)keyboardWasHidden:(NSNotification*)aNotification
{
NSDictionary* info = [aNotification userInfo];
// Get the size of the keyboard.
NSValue* aValue = [info
objectForKey:UIKeyboardBoundsUserInfoKey];
CGSize keyboardSize = [aValue CGRectValue].size;
// Reset the height of the scroll view to its original value
CGRect viewFrame = [scrollView frame];
viewFrame.size.height += keyboardSize.height;
scrollView.frame = viewFrame;
keyboardShown = NO;
}
跟踪活动文本框的方法
- (void)textFieldDidBeginEditing:(UITextField *)textField
{
activeField = textField;
}
- (void)textFieldDidEndEditing:(UITextField *)textField
{
activeField = nil;
}
区域实际上是椭圆形的,而且比用户想像的位置更靠下一点。根据触摸屏幕的手指、手指的尺寸、手指接触屏幕的力量、手指的方向、以及其它因素的不同,其“接触部位”的尺寸和形状也有所不同。底层的多点触摸系统会分析所有的这些信息,为您计算出单一的触点。
UIResponder 是所有响应者对象的基类,
它不仅为事件处理,而且也为常见的响应者行为定义编程接口。UIApplication、UIView、和所有从UIView 派生出来的UIKit 类(包括UIWindow)都直接或间接地继承自UIResponder类。
- (void)touchesBegan:(NSSet *)touches withEvent:(UIEvent *)event {
UITouch* touch = [touches anyObject];
NSUInteger numTaps = [touch tapCount];
if (numTaps < 2) {
[self.nextResponder touchesBegan:touches withEvent:event];
} else {
[self handleDoubleTap:touch];
}
}
缺省情况下,视图会接收触摸事件。但是,您可以将其userInteractionEnabled
属性声明设置为NO,关闭事件传递的功能。
在一定的时间内关闭事件的传递。应用程序可以调用UIApplication 的
beginIgnoringInteractionEvents 方法,并在随后调用endIgnoringInteractionEvents 方法来实现这个目的。
缺省情况下,视图只接收多点触摸序列的第一个触摸事件,而忽略
所有其它事件。如果您希望视图处理多点触摸,就必须使它启用这个功能。在代码或Interface Builder 的查看器窗口中将视图的multipleTouchEnabled 属性设置为YES,就可以实现这个目标。
将事件传递限制在某个单独的视图上。缺省情况下,视图的exclusiveTouch 属性被设置为NO。将这个属性设置为YES 会使相应的视图具有这样的特性:即当该视图正在跟踪触摸动作时,窗口中的其它视图无法同时进行跟踪,它们不能接收到那些触摸事件。
多点触摸:
- (void)touchesBegan:(NSSet *)touches withEvent:(UIEvent *)event;
- (void)touchesMoved:(NSSet *)touches withEvent:(UIEvent *)event;
- (void)touchesEnded:(NSSet *)touches withEvent:(UIEvent *)event;
- (void)touchesCancelled:(NSSet *)touches withEvent:(UIEvent *)event
当一个或多个手指触碰屏幕时,发送touchesBegan:withEvent:消息。
当一个或多个手指在屏幕上移动时,发送touchesMoved:withEvent:消息。
当一个或多个手指离开屏幕时,发送touchesEnded:withEvent:消息。
当触摸序列被诸如电话呼入这样的系统事件所取消时,发送touchesCancelled:withEvent:消息。
上面这些方法都和特定的触摸阶段(比如UITouchPhaseBegan)相关联,该信息存在于UITouch 对象的phase 属性声明中。
为了处理给定阶段的事件,响应者对象常常从传入的集合参数中取得一或多个UITouch 对象,然后考察这些对象的属性或取得它们的位置(如果需要处理所有触摸对象,可以向该NSSet 对象发送anyObject 消息)。UITouch
类中有一个名为locationInView:的重要方法,如果传入self 参数值,它会给出触摸动作在响应者坐标系统中的位置(假定该响应者是一个UIView 对象,且传入的视图参数不为nil)。另外,还有一个与之平行的方法,可以给出触摸动作之前位置(previousLocationInView:)。UITouch
实例的属性还可以给出发生多少次触
碰(tapCount)、触摸对象的创建或最后一次变化发生在什么时间(timestamp)、以及触摸处于什么阶段(phase)。
- (void) touchesEnded:(NSSet*)touches withEvent:(UIEvent*)event
{
UITouch *touch = [touches anyObject];
if ([touch tapCount] == 2) {
CGPoint tapPoint = [theTouch locationInView:self];
// Process a double-tap gesture
}
}
在touchesEnded:withEvent:方法中,当触击次数为一时,响应者对象就向自身发送一个performSelector:withObject:afterDelay:消息,其中的选择器标识由响应者对象实现的、用于处理单击手势的方法;第二个参数是一个NSValue 或NSDictionary 对象,用于保存相关的UITouch 对象;时延参数则表示单击和双击手势之间的合理时间间隔。
在touchesBegan:withEvent:方法中,如果触击次数为二,响应者对象会向自身发送一个cancelPreviousPerformRequestsWithTarget:消息,取消当前被挂起和延期执行的调用。如果触碰次数不为二,则在指定的延时之后,先前步骤中由选择器标识的方法就会被调用,以处理单击手势。
在视图中跟踪碰擦手势
#define HORIZ_SWIPE_DRAG_MIN 12
#define VERT_SWIPE_DRAG_MAX 4
- (void)touchesBegan:(NSSet *)touches withEvent:(UIEvent *)event
{
UITouch *touch = [touches anyObject];
startTouchPosition = [touch locationInView:self];
}
- (void)touchesMoved:(NSSet *)touches withEvent:(UIEvent *)event
{
UITouch *touch = [touches anyObject];
CGPoint currentTouchPosition = [touch locationInView:self];
// If the swipe tracks correctly.
if (fabsf(startTouchPosition.x - currentTouchPosition.x) >= HORIZ_SWIPE_DRAG_MIN
&&
fabsf(startTouchPosition.y - currentTouchPosition.y) <=
VERT_SWIPE_DRAG_MAX)
{
// It appears to be a swipe.
if (startTouchPosition.x < currentTouchPosition.x)
[self myProcessRightSwipe:touches withEvent:event];
else
[self myProcessLeftSwipe:touches withEvent:event];
}
else
{
// Process a non-swipe event.
}
}
处理复杂的多点触摸序列
- (void)touchesBegan:(NSSet *)touches withEvent:(UIEvent *)event
{
UITouch *touch = [[event allTouches] anyObject];
// Only move the placard view if the touch was in the placard view
if ([touch view] != placardView) {
// On double tap outside placard view, update placard's display string
if ([touch tapCount] == 2) {
[placardView setupNextDisplayString];
}
return;
}
// "Pulse" the placard view by scaling up then down
// Use UIView's built-in animation
[UIView beginAnimations:nil context:NULL];
[UIView setAnimationDuration:0.5];
CGAffineTransform transform = CGAffineTransformMakeScale(1.2, 1.2);
placardView.transform = transform;
[UIView commitAnimations];
[UIView beginAnimations:nil context:NULL];
[UIView setAnimationDuration:0.5];
transform = CGAffineTransformMakeScale(1.1, 1.1);
placardView.transform = transform;
[UIView commitAnimations];
// Move the placardView to under the touch
[UIView beginAnimations:nil context:NULL];
[UIView setAnimationDuration:0.25];
placardView.center = [self convertPoint:[touch locationInView:self]
fromView:placardView];
[UIView commitAnimations];
}
- (void)touchesMoved:(NSSet *)touches withEvent:(UIEvent *)event
{
UITouch *touch = [[event allTouches] anyObject];
// If the touch was in the placardView, move the placardView to its location
if ([touch view] == placardView) {
CGPoint location = [touch locationInView:self];
location = [self convertPoint:location fromView:placardView];
placardView.center = location;
return;
}
}
- (void)touchesEnded:(NSSet *)touches withEvent:(UIEvent *)event
{
UITouch *touch = [[event allTouches] anyObject];
// If the touch was in the placardView, bounce it back to the center
if ([touch view] == placardView) {
// Disable user interaction so subsequent touches don't interfere with animation
self.userInteractionEnabled = NO;
[self animatePlacardViewToCenter];
return;
}
}
在事件处理代码中,您可以将触摸状态的相关位置保存下来,以便在必要时和变化之后的UITouch 实例进行比较。定制视图可以用UIView 的hitTest:withEvent:方法或CALayer 的hitTest:方法来寻找接收触摸事件的子视图或层,进而正确地处理事件。下面的例子用于检测定制视图的层中的“Info”
图像是否被触碰。
- (void)touchesEnded:(NSSet*)touches withEvent:(UIEvent*)event {
CGPoint location = [[touches anyObject] locationInView:self];
CALayer *hitLayer = [[self layer] hitTest:[self convertPoint:location
fromView:nil]];
if (hitLayer == infoImage) {
[self displayInfo];
}
}
- (void)touchesEnded:(NSSet*)touches withEvent:(UIEvent*)event {
if ([touches count] == [[event touchesForView:self] count]) {
// last finger has lifted....
}
}
触摸事件中包含一个触摸对象的集合及其相关的状态,而运动事件中除了事件类型、子类型、和时间戳之外,没有其它状态。系统以这种方式来解析运动手势,避免和方向变化事件造成冲突。
为了处理运动事件, UIResponder 的子类必须实现motionBegan:withEvent: 或
motionEnded:withEvent:方法之一,或者同时实现这两个方法
UIKit 框架在UITextView、UITextField、和UIWebView 类中实现了拷贝-剪切-粘贴支持。如果您希望在自己的应用程序中得到这个行为,可以使用这些类的对象,或者自行实现。
UIPasteboard 类提供了粘贴板的接口。粘贴板是用于在一个应用程序内或不同应用程序间进行数据共享的受保护区域。该类提供了读写剪贴板上数据项目的方法。
UIMenuController 类可以在选定的拷贝、剪切、和粘贴对象的上下方显示一个编辑菜单。编辑菜单上的命令可以有拷贝、剪切、粘贴、选定、和全部选定。
UIResponder 类声明了canPerformAction:withSender:方法。响应者类可以实现这个方法,以根据当前的上下文显示或移除编辑菜单上的命令。
UIResponderStandardEditActions 非正式协议声明了处理拷贝、剪切、粘贴、选定、和全部选定命令的接口。当用户触碰编辑菜单上的某个命令时, 相应的
UIResponderStandardEditActions 方法就会被调用。
UIPasteboardNameGeneral 用于剪切、拷贝、和粘贴操作,涉及到广泛的数据类型。您可以通过该类的generalPasteboard 类方法来取得代表通用(General)粘贴板的单件对象。
UIPasteboardNameFind 用于检索操作。当前用户在检索条(UISearchBar)键入的字符串会被写入到这个粘贴板中, 因此可以在不同的应用程序中共享。您可以通过调用pasteboardWithName:create:类方法,并在名字参数中传入UIPasteboardNameFind 值来取得代表检索粘贴板的对象。典型情况下, 您只需使用系统定义的粘贴板就够了。但在必要时, 您也可以通过pasteboardWithName:create:
方法来创建自己的应用程序粘贴板。如果您调用pasteboardWithUniqueName 方法,UIPasteboard 会为您提供一个具有唯一名称的应用程序粘贴板。您可以通过其name 属性声明来取得这个名称。
调用UIMenuController 的sharedMenuController 类方法来取得全局的,即菜单控制器实例。
计算选定内容的边界,并用得到的边界矩形调用setTargetRect:inView:方法。系统会根据选定内容与屏幕顶部和底部的距离,将编辑菜单显示在该矩形的上方或下方。
调用setMenuVisible:animated:方法(两个参数都传入YES),在选定内容的上方或下方动画显示编辑菜单。
程序清单3-4演示了如何在touchesEnded:withEvent:方法的实现中显示编辑菜单(注意,例子中省略了处理选择的代码)。在这个代码片段中, 定制视图还向自己发送一个becomeFirstResponder 消息,确保自己在随后的拷贝、剪切、和粘贴操作中是第一响应者。
- (void)touchesEnded:(NSSet *)touches withEvent:(UIEvent *)event {
UITouch *theTouch = [touches anyObject];
if ([theTouch tapCount] == 2 && [self becomeFirstResponder]) {
// selection management code goes here...
// bring up editing menu.
UIMenuController *theMenu = [UIMenuController sharedMenuController];
CGRect selectionRect = CGRectMake(currentSelection.x, currentSelection.y, SIDE,SIDE);
[theMenu setTargetRect:selectionRect inView:self];
[theMenu setMenuVisible:YES animated:YES];
}
}
有条件地激活菜单命令
- (BOOL)canPerformAction:(SEL)action withSender:(id)sender {
BOOL retValue = NO;
ColorTile *theTile = [self colorTileForOrigin:currentSelection];
if (action == @selector(paste:) )
retValue = (theTile == nil) &&
[[UIPasteboard generalPasteboard]
containsPasteboardTypes:
[NSArray arrayWithObject:ColorTileUTI]];
else if ( action == @selector(cut:) || action == @selector(copy:) )
retValue = (theTile != nil);
else
retValue = [super canPerformAction:action
withSender:sender];
return retValue;
}
请注意,这个方法的最后一个else 子句调用了超类的实现,使超类有机会处理子类忽略的命令。
拷贝和剪切操作
- (void)copy:(id)sender {
UIPasteboard *gpBoard = [UIPasteboard generalPasteboard];
ColorTile *theTile = [self colorTileForOrigin:currentSelection];
if (theTile) {
NSData *tileData = [NSKeyedArchiver
archivedDataWithRootObject:theTile];
if (tileData)
[gpBoard setData:tileData forPasteboardType:ColorTileUTI];
}
}
- (void)cut:(id)sender {
[self copy:sender];
ColorTile *theTile = [self colorTileForOrigin:currentSelection];
if (theTile) {
CGPoint tilePoint = theTile.tileOrigin;
[tiles removeObject:theTile];
CGRect tileRect = [self rectFromOrigin:tilePoint inset:TILE_INSET];
[self setNeedsDisplayInRect:tileRect];
}
}
将粘贴板的数据粘贴到选定位置上
- (void)paste:(id)sender {
UIPasteboard *gpBoard = [UIPasteboard generalPasteboard];
NSArray *pbType = [NSArray arrayWithObject:ColorTileUTI];
ColorTile *theTile = [self colorTileForOrigin:currentSelection];
if (theTile == nil && [gpBoard containsPasteboardTypes:pbType]) {
NSData *tileData = [gpBoard dataForPasteboardType:ColorTileUTI];
ColorTile *theTile = (ColorTile *)[NSKeyedUnarchiver
unarchiveObjectWithData:tileData];
if (theTile) {
theTile.tileOrigin = self.currentSelection;
[tiles addObject:theTile];
CGRect tileRect = [self rectFromOrigin:currentSelection inset:TILE_INSET];
[self setNeedsDisplayInRect:tileRect];
}
}
}
Quartz 是主要的描画接口,支持基于路径的描画、
抗锯齿渲染、渐变填充模式、图像、颜色、坐标空间变换、以及PDF 文档的创建、显示、和分析。UIKit 为Quartz 的图像和颜色操作提供了Objective-C 的封装。Core Animation 为很多UIKit 的视图属性声明的动画效果提供底层支持,也可以用于实现定制的动画。
在调用您提供的drawRect:方法之前,视图对象会自动配置其描画环境,使您的代码可以立即进行描画。作为这些配置的一部分,UIView 对象会为当前描画环境创建一个图形上下文(对应于CGContextRef 封装类型)
用户坐标空间是您发出的所有描画命令的工作环境。该空间的单位由点来表示。设备坐标空间指的是设备内在的坐标空间,由像素来表示。缺省情况下,用户坐标空间上的一个点等于设备坐标空间的一个像素,这意味着一个点等于1/160英寸。然而,您不应该假定这个比例总是1:1。
UIColor 对象提供了一些便利方法,用于通过RGB、HSB、和灰度值指定颜色值。
您也可以使用Core Graphics 框架中的CGContextSetRGBStrokeColor 和
CGContextSetRGBFillColor 函数来创建和设置颜色。
可移植网络图像格式(PNG) .png
标记图像文件格式(TIFF) .tiff, .tif
联合影像专家组格式(JPEG) .jpeg, .jpg
图形交换格式(GIF) .gif
视窗位图格式(DIB) .bmp, .BMPf
视窗图标格式.ico
视窗光标.cur
XWindow 位图.xbm
UIImage, 一个不可变类,用于图像显示。
UIColor, 为设备颜色提供基本的支持。
UIFont, 为需要字体的类提供字体信息。
UIScreen, 提供屏幕的基本信息。
NSString* imagePath = [[NSBundle mainBundle] pathForResource:@"myImage"
ofType:@"png"];
UIImage* myImageObj = [[UIImage alloc] initWithContentsOfFile:imagePath];
- (void)drawRect:(CGRect)rect
{
// Draw the image
[anImage drawAtPoint:CGPointMake(10,10)];
}
重要提示:如果您使用CGContextDrawImage 函数来直接描画位图,则在缺省情况下,图像数据会上下倒置,因为Quartz 图像假定坐标系统的原点在左下角,且坐标轴的正向是向上和向右。虽然您可以在描画之前对其进行转换,但是将Quartz 图像包装为一个UIImage 对象是更简单的方法,这样可以自动补偿坐标空间的差别。
UIKit 中的UIRectFrame 和UIRectFill 函数(以及其它函数)的功能是在视图中描画象矩形这样的简单路径。
在创建路径时,需要首先通过CGContextBeginPath 函数配置一个接收路径命令的图形上下文。调用该函数之后,就可以使用与路径相关的函数来设置路径的起始点,描画直线和曲线,加入矩形和椭圆形等等。路径的几何形状指定完成后,就可以直接进行描画,或者将其引用存储在CGPathRef 或CGMutablePathRef数据类型中,以备后用。在视图上描画路径时,可以描画轮廓,也可以进行填充,或者同时进行这两种操作。路径轮廓可以用像CGContextStrokePath 这样的函数来画,即用当前的笔划颜色画出以路径为中心位置的线。路径的填充则可以用CGContextFillPath 函数来实现,它的功能是用当前的填充颜色或样式填充路径线段包围的区域。
Core Animation 的关键技术是层对象。层是一种轻量级的对象,在本质上类似于视图,但实际上是模型对象,负责封装显示内容的几何属性、显示时机、和视觉属性变量。内容本身可以通过如下三种方式来提供:
您可以将一个CGImageRef 类型的数据赋值给层对象的contents 属性变量。
您可以为层分配一个委托,让它负责描画工作。
您可以从CALayer 派生出子类,并对其显示方法进行重载。
UIKit 框架提供三个显示文本内容的基本类:
UILabel 显示静态文本字符串
UITextField 显示单行可编辑文本
UITextView 显示多行可编辑文本
为UITextField类提供支持的委托需要实现UITextFieldDelegate 协议定义的方法。类似地,为UITextView类提供支持的委托需要实现UITextViewDelegate 协议定义的方法。
当键盘被显示或隐藏的时候,iPhone OS 会向所有经过注册的观察者对象发出如下通告:
UIKeyboardWillShowNotification
UIKeyboardDidShowNotification
UIKeyboardWillHideNotification
UIKeyboardDidHideNotification
您可以通过调用视图对象的becomeFirstResponder 方法来为可编辑的文本视图显
示键盘。调用这个方法可以使目标视图成为第一响应者,并开始编辑过程,其效果和用户触击该视图是一样的。
需要做的调整通常包括暂时调整一或多个视图的尺寸和位置,从而使文本对象可见。管理带
有键盘的文本对象的最简单方法是将它们嵌入到一个UIScrollView ( 或其子类,如UITableView)对象。当键盘被显示出来时,您需要做的只是调整滚动视图的尺寸,并将目标文本对象滚动到合适的位置。为此,在UIKeyboardDidShowNotification 通告的处理代码中需要进行如下操作:
取得键盘的尺寸。
将滚动视图的高度减去键盘的高度。
将目标文本框滚动到视图中。
在配置滚动视图时,请务必为所有的内容视图配置恰当的自动尺寸调整规则。在之
前的图中,文本框实际上是一个UIView 对象的子视图,该UIView 对象又是UIScrollView对象的子视图。如果该UIView 对象的UIViewAutoresizingFlexibleWidth和UIViewAutoresizingFlexibleHeight 选项被设置了,则改变滚动视图的边框尺寸会同时改变它的边框,因而可能导致不可预料的结果。禁用这些选项可以确保该视图保持尺寸不变,并正确滚动。
处理键盘通告
// Call this method somewhere in your view controller setup code.
- (void)registerForKeyboardNotifications
{
[[NSNotificationCenter defaultCenter] addObserver:self
selector:@selector(keyboardWasShown:)
name:UIKeyboardDidShowNotification object:nil];
[[NSNotificationCenter defaultCenter] addObserver:self
selector:@selector(keyboardWasHidden:)
name:UIKeyboardDidHideNotification object:nil];
}
// Called when the UIKeyboardDidShowNotification is sent.
- (void)keyboardWasShown:(NSNotification*)aNotification
{
if (keyboardShown)
return;
NSDictionary* info = [aNotification userInfo];
// Get the size of the keyboard.
NSValue* aValue = [info
objectForKey:UIKeyboardBoundsUserInfoKey];
CGSize keyboardSize = [aValue CGRectValue].size;
// Resize the scroll view (which is the root view of the window)
CGRect viewFrame = [scrollView frame];
viewFrame.size.height -= keyboardSize.height;
scrollView.frame = viewFrame;
// Scroll the active text field into view.
CGRect textFieldRect = [activeField frame];
[scrollView scrollRectToVisible:textFieldRect animated:YES];
keyboardShown = YES;
}
// Called when the UIKeyboardDidHideNotification is sent
- (void)keyboardWasHidden:(NSNotification*)aNotification
{
NSDictionary* info = [aNotification userInfo];
// Get the size of the keyboard.
NSValue* aValue = [info
objectForKey:UIKeyboardBoundsUserInfoKey];
CGSize keyboardSize = [aValue CGRectValue].size;
// Reset the height of the scroll view to its original value
CGRect viewFrame = [scrollView frame];
viewFrame.size.height += keyboardSize.height;
scrollView.frame = viewFrame;
keyboardShown = NO;
}
跟踪活动文本框的方法
- (void)textFieldDidBeginEditing:(UITextField *)textField
{
activeField = textField;
}
- (void)textFieldDidEndEditing:(UITextField *)textField
{
activeField = nil;
}

相关文章推荐
- iphone应用程序开发指南--触摸事件
- iphone应用程序开发指南--触摸事件
- iphone应用程序开发指南--触摸事件(笔记 3 )
- iPhone开发指南-事件处理
- iPhone开发进阶(8)— 检测屏幕触摸事件
- iPhone应用程序编程指南(事件处理)
- iphone 开发周记2 触摸事件处理与简单绘图。
- iPhone开发进阶(8)--- 检测屏幕触摸事件
- iPhone开发指南-应用程序核心
- iphone应用程序开发指南(笔记2)
- iPhone开发指南-事件处理
- iPhone开发指南-事件处理
- iPhone开发进阶(8)--- 检测屏幕触摸事件
- iPhone开发进阶(8)--- 检测屏幕触摸事件
- iPhone开发指南-应用程序核心
- iPhone应用程序开发指南 学习笔记
- 移动开发:iphone开发之触摸事件详解
- iPhone应用程序编程指南(事件处理)
- Windows2000 服务器端应用程序开发设计指南-事件记录
- 移动开发:iphone开发之触摸事件详解