Zebra-VTYSH源码分析和改造
2013-01-28 21:32
826 查看
以下内容均为转载,内容来自:
http://blog.csdn.net/xuexingyang/article/details/6925487
http://blog.csdn.net/xuexingyang/article/details/7107221
http://blog.csdn.net/xuexingyang/article/details/7237935
感谢xuexingyang的辛勤劳动!
=======================================================
1. Zebra 功能认识
ZEBRA 提供了一个类Cisco命令行的分级多用户命令解析引擎--VTY(Virtual Terminal)。它是类似于Linux Shell的虚拟终端接口,负责对访问的安全验证、数据缓冲、命令解析、模式切换和命令调用。
用户通过VTYSH的每一次接口访问都会发起一个对应的VTY。VTY会根据用户优先级初始化并挂载相应的命令集Command Node。Command Node中以链表的形式包含了该用户可以访问和使用的Command。
用户通过各种接口访问VTY,VTY解析用户的每个命令,并且通过命令集链表找到并执行Command相应函数。这样,通过访问VTY实现基于命令集的管理功能。
2. Zebra 架构
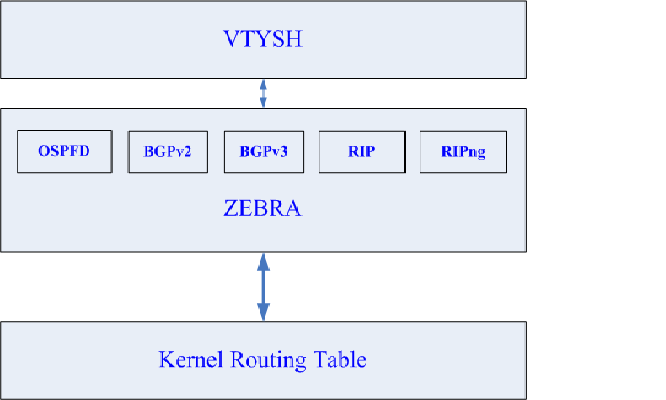
Zebra采用模块化的架构,,整个程序由一系列的守护进程构成,每个路由协议都有自己单独的路由处理进程,同时,它提供一个管理内核路由表的zebra 守护进程。路由处理程序通过zebra 守护程序管理内核路由表。
由图示可知,在Zebra中,总共有五个路由守护进程,和一个管理进程。这些路由进程可以和管理进程分布在不同的机器上,每一个进程可以分别监听从不同的端口来的VTY连接。
3. 编译Zebra为我所用
一般的路由产品都可以拿来Zebra稍加改动就可以使用了。如果你只需要VTY连接功能,通过接口增、改、删命令的话,Zebra是支持模块的删除和屏蔽的。
比如只需要VTY,那么你编译的时候可以在congfigure的时候加上如下参数就可以了。
...
cd ../zebra-vtysh && (test -e config.status ||(touch config.status && ./configure --disable-ipv6 --disable-bgpd --disable-ripngd --disable-ospf6d --disable-bgp-announce --enable-vtysh --disable-ospfd --disable-ripd --disable-zebra
--prefix=/ --with-cflags="-O2 -Wall" --build=i386 --host=mips-linux --target=mips)) &&
...
(其中,config.status是configure的状态记录信息,以备下次使用)
这样,编译完zebra后,就可以运行vtysh了,查看它的各种模式(下篇文章会讲),就可以开始你的快乐之旅了。
参考:http://www.zebra.org
4. 分析代码
分析Zebra-VTYSH的源码,首先从main函数开始,在ztysh-main.c中找到main函数,来进一步分析流程执行如下图所示:

在平时的使用中我们会发现,配置的时候有很多的视图(View),每个视图中有不同的命令可供用户输入进行配置。
这里,根据源码,视图可以认为是Node,而每一个命令称为element,他们之间的结构如下图所示:
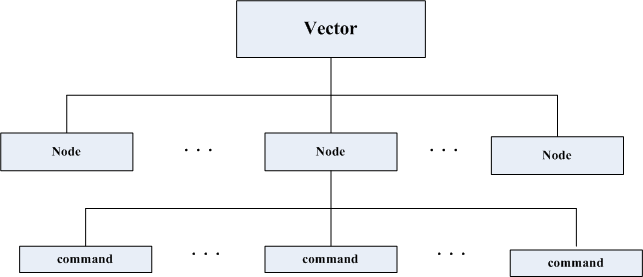
如图中所示,用到的数据结构如下:
[cpp] view
plaincopy
/* struct for vector */
struct _vector
{
unsigned int max; /* max number of used slot */
unsigned int alloced; /* number of allocated slot */
void **index; /* index to data */
};
/* Node which has some commands and prompt string and configuration
function pointer . */
struct cmd_node
{
/* Node index. */
enum node_type node;
/* Prompt character at vty interface. */
char *prompt;
/* Is this node's configuration goes to vtysh ? */
int vtysh;
/* Node's configuration write function */
int (*func) (struct vty *);
/* Vector of this node's command list. */
vector cmd_vector;
};
/* Structure of command element. */
struct cmd_element
{
char *string; /* Command specification by string. */
int (*func) (struct cmd_element *, struct vty *, int, char **);
char *doc; /* Documentation of this command. */
int daemon; /* Daemon to which this command belong. */
vector strvec; /* Pointing out each description vector. */
int cmdsize; /* Command index count. */
char *config; /* Configuration string */
vector subconfig; /* Sub configuration string */
};
下面我们所要做的事情就是在node和element中添加我们自己的命令,如果一切顺利,稍加处理就可以在图一中的最后一步也就是loop循环中的vtysh_execute函数中来实现我们的执行过程了。
5. 添加定制命令
5.1 视图介绍
由上面几篇文章分析可见,所有的命令都是包含在node中的,根据Cisco或者H3常见路由器或者交换机的CLI格式可见,一个node就对应着一个视图(View)。常用的视图包括:普通视图,管理视图,文件系统视图,配置视图,以及接口配置视图和VLAN视图等。
在Zebra-VTYSH源码中,实现了的有Enable视图和配置视图。如下图所示:
[cpp] view
plaincopy
/ # vtysh
Copyright 2010-2011 IBM Co., Ltd.
CLI> enable
CLI#
clear Reset functions
configure Configuration from vty interface
copy Copy from one file to another
debug Debugging functions (see also 'undebug')
disable Turn off privileged mode command
end End current mode and down to previous mode
exit Exit current mode and down to previous mode
list Print command list
no Negate a command or set its defaults
ping send echo messages
quit Exit current mode and down to previous mode
show Show running system information
start-shell Start UNIX shell
telnet Open a telnet connection
terminal Set terminal line parameters
traceroute Trace route to destination
undebug Disable debugging functions (see also 'debug')
write Write running configuration to memory, network, or terminal
CLI# configure terminal
CLI(config)#
access-list Add an access list entry
bgp BGP information
debug Debugging functions (see also 'undebug')
device-config Device configuration
dump Dump packet
enable Modify enable password parameters
end End current mode and down to previous mode
exit Exit current mode and down to previous mode
hostname Set system's network name
interface Select an interface to configure
ip IP information
ipv6 IPv6 information
key Authentication key management
list Print command list
log Logging control
no Negate a command or set its defaults
password Assign the terminal connection password
route-map Create route-map or enter route-map command mode
router Enable a routing process
system-config System and management configuration
username
write Write running configuration to memory, network, or terminal
CLI(config)# system-config
CLI(config-system)#
access Set CPE access ND flag
admin-idle-time Set system idle time
admin-psw Set system administrator password
admin-username Set system administrator username
connection-mode Set network connection mode : static and dynamic
datetime Set date time (format:2000-01-01 00:00:00)
default-gateway Set system's network default gateway
dns-server-1 Set system network DNS server 1
dns-server-2 Set system network DNS server 2
exit Exit current mode and down to previous mode
factory-defaults Restore ALL configure to factory default values( 0: reset all 1: reset with network parameters unchanged)
hostname Set system's network name
image-upgrade Upgrade image via ftp method
ip Set system ip address and netmask
list Print command list
managment-ip-range Set management IP range and netmask
managment-ip-range-flag Set management IP range service flag
mgr-vlan-id Set management VLAN ID
ntpserver Set NTP server
quit Exit current mode and down to previous mode
reset Reset system
snmp-refresh-time Set SNMP service refresh time cycle
snmp-rwcommunicty Set SNMP read/write community
snmp-service Set SNMP service enable or disable
snmp-trap-ip1 Set SNMP trap ip 1 address
snmp-trap-ip2 Set SNMP trap ip 2 address
snmp-trap1-ip-flag Set SNMP trap ip 1 service flag(enable/disable)
snmp-trap2-ip-flag Set SNMP trap ip 2 service flag(enable/disable)
ssh Set ssh service port and timeout values
ssh-service Set ssh service flag
telnet Set telnet PORT
telnet-service Set telnet service flag
timesync Set time sync service flag
timezone Set time zone (0:ShangHai,1:ChongQing)
CLI(config-system)# quit
CLI(config)# device-config
CLI(config-device)#
exit Exit current mode and down to previous mode
list Print command list
port-mirror-analysis-port Device configuration: Set analysis port(1: eth1 2: eth2)
port-mirror-flag Device configuration: Enable or disable port mirror service(0:disable,1:enable)
port-mirror-packet Device configuration: Set packet type to be mirrored(1:Import & Export 2: Import 3: Export)
port-mirror-port Device configuration:Set port to be mirrored
port1-rate Device configuration: set duplex mode and import/export/broadcast/unkown/multicast rate limit.
port2-rate Device configuration: set duplex mode and import/export/broadcast/unkown/multicast rate limit.
quit Exit current mode and down to previous mode
CLI(config-device)#
CLI(config-device)#
如果想要添加自己的命令,可以在原有的视图上增加(也就是在原有的node中增加commands),或者新开自己的视图,然后在新视图中添加自己的commands。
5.2 添加命令
进入vtysh目录中,查看vtysh_main.c文件的main函数,也就是和vtysh初始化相关的一切都在这里,基本上在这里可以完成你需要的一些基本命令。
在函数vtysh_init_vty()中,有个
[cpp] view
plaincopy
/* Initialize command interface. Install basic nodes and commands. */
Void cmd_init (int terminal)
的函数,就是负责初始化command接口,安装node和命令的。
比如你就可以添加自己的视图如下:
[cpp] view
plaincopy
/*Added by xyang*/
install_element (CONFIG_NODE, &vtysh_sysconfig_cmd);
install_element (CONFIG_NODE, &vtysh_devconfig_cmd);
(其中,安装的system和device配置的视图)
[cpp] view
plaincopy
/*Added by xyang
* system config node*
*/
DEFUN (system_config,
vtysh_sysconfig_cmd,
"system-config",
SYS_CFG_STR
"\n")
{
//vty_out (vty, "testing by xyang.%s", VTY_NEWLINE);
vty->node = SYSCONFIG_NODE;
return CMD_SUCCESS;
}
DEFUN (device_config,
vtysh_devconfig_cmd,
"device-config",
DEV_CFG_STR
"\n")
{
//vty_out (vty, "testing by xyang.%s", VTY_NEWLINE);
vty->node = DEVCONFIG_NODE;
return CMD_SUCCESS;
}
DEFUN定义为:
/* DEFUN for vty command interafce. Little bit hacky ;-). */
#define DEFUN(funcname, cmdname, cmdstr, helpstr) \
int funcname (struct cmd_element *, struct vty *, int, char **); \
struct cmd_element cmdname = \
{ \
cmdstr, \
funcname, \
helpstr \
}; \
int funcname \
(struct cmd_element *self, struct vty *vty, int argc, char **argv)
SYSCONFIG_NODE和DEVCONFIG_NODE要添加进enum node_type{}中去。
最后就要在init_cmd的最后加进自己的command了
比如
[cpp] view
plaincopy
/*add commands to system config node
* added by xyang @ 2012-02-01*
*/
/*management network settings*/
install_element (SYSCONFIG_NODE, &vtysh_system_cfg_ip_cmd);//ip and subnet mask
其中,函数指针需要定义先:
[cpp] view
plaincopy
DEFUN (vtysh_system_cfg_ip,
vtysh_system_cfg_ip_cmd,
"ip ADDRESS NETMASK",
"Set system ip address and netmask\n")
{
applyCfg(argv[0],"IPADDR");
applyCfg(argv[1],"NETMASK");
system(NETWORK_SETTING_SCRIPT);
return CMD_SUCCESS;
}
这样,基本上完成了添加node和命令的任务了。
其他Zebra-VTYH自带的命令如果不想要的话删除掉就行了。
(总完)
http://blog.csdn.net/xuexingyang/article/details/6925487
http://blog.csdn.net/xuexingyang/article/details/7107221
http://blog.csdn.net/xuexingyang/article/details/7237935
感谢xuexingyang的辛勤劳动!
=======================================================
1. Zebra 功能认识
ZEBRA 提供了一个类Cisco命令行的分级多用户命令解析引擎--VTY(Virtual Terminal)。它是类似于Linux Shell的虚拟终端接口,负责对访问的安全验证、数据缓冲、命令解析、模式切换和命令调用。
用户通过VTYSH的每一次接口访问都会发起一个对应的VTY。VTY会根据用户优先级初始化并挂载相应的命令集Command Node。Command Node中以链表的形式包含了该用户可以访问和使用的Command。
用户通过各种接口访问VTY,VTY解析用户的每个命令,并且通过命令集链表找到并执行Command相应函数。这样,通过访问VTY实现基于命令集的管理功能。
2. Zebra 架构
Zebra采用模块化的架构,,整个程序由一系列的守护进程构成,每个路由协议都有自己单独的路由处理进程,同时,它提供一个管理内核路由表的zebra 守护进程。路由处理程序通过zebra 守护程序管理内核路由表。
由图示可知,在Zebra中,总共有五个路由守护进程,和一个管理进程。这些路由进程可以和管理进程分布在不同的机器上,每一个进程可以分别监听从不同的端口来的VTY连接。
3. 编译Zebra为我所用
一般的路由产品都可以拿来Zebra稍加改动就可以使用了。如果你只需要VTY连接功能,通过接口增、改、删命令的话,Zebra是支持模块的删除和屏蔽的。
比如只需要VTY,那么你编译的时候可以在congfigure的时候加上如下参数就可以了。
...
cd ../zebra-vtysh && (test -e config.status ||(touch config.status && ./configure --disable-ipv6 --disable-bgpd --disable-ripngd --disable-ospf6d --disable-bgp-announce --enable-vtysh --disable-ospfd --disable-ripd --disable-zebra
--prefix=/ --with-cflags="-O2 -Wall" --build=i386 --host=mips-linux --target=mips)) &&
...
(其中,config.status是configure的状态记录信息,以备下次使用)
这样,编译完zebra后,就可以运行vtysh了,查看它的各种模式(下篇文章会讲),就可以开始你的快乐之旅了。
参考:http://www.zebra.org
4. 分析代码
分析Zebra-VTYSH的源码,首先从main函数开始,在ztysh-main.c中找到main函数,来进一步分析流程执行如下图所示:
在平时的使用中我们会发现,配置的时候有很多的视图(View),每个视图中有不同的命令可供用户输入进行配置。
这里,根据源码,视图可以认为是Node,而每一个命令称为element,他们之间的结构如下图所示:
如图中所示,用到的数据结构如下:
[cpp] view
plaincopy
/* struct for vector */
struct _vector
{
unsigned int max; /* max number of used slot */
unsigned int alloced; /* number of allocated slot */
void **index; /* index to data */
};
/* Node which has some commands and prompt string and configuration
function pointer . */
struct cmd_node
{
/* Node index. */
enum node_type node;
/* Prompt character at vty interface. */
char *prompt;
/* Is this node's configuration goes to vtysh ? */
int vtysh;
/* Node's configuration write function */
int (*func) (struct vty *);
/* Vector of this node's command list. */
vector cmd_vector;
};
/* Structure of command element. */
struct cmd_element
{
char *string; /* Command specification by string. */
int (*func) (struct cmd_element *, struct vty *, int, char **);
char *doc; /* Documentation of this command. */
int daemon; /* Daemon to which this command belong. */
vector strvec; /* Pointing out each description vector. */
int cmdsize; /* Command index count. */
char *config; /* Configuration string */
vector subconfig; /* Sub configuration string */
};
下面我们所要做的事情就是在node和element中添加我们自己的命令,如果一切顺利,稍加处理就可以在图一中的最后一步也就是loop循环中的vtysh_execute函数中来实现我们的执行过程了。
5. 添加定制命令
5.1 视图介绍
由上面几篇文章分析可见,所有的命令都是包含在node中的,根据Cisco或者H3常见路由器或者交换机的CLI格式可见,一个node就对应着一个视图(View)。常用的视图包括:普通视图,管理视图,文件系统视图,配置视图,以及接口配置视图和VLAN视图等。
在Zebra-VTYSH源码中,实现了的有Enable视图和配置视图。如下图所示:
[cpp] view
plaincopy
/ # vtysh
Copyright 2010-2011 IBM Co., Ltd.
CLI> enable
CLI#
clear Reset functions
configure Configuration from vty interface
copy Copy from one file to another
debug Debugging functions (see also 'undebug')
disable Turn off privileged mode command
end End current mode and down to previous mode
exit Exit current mode and down to previous mode
list Print command list
no Negate a command or set its defaults
ping send echo messages
quit Exit current mode and down to previous mode
show Show running system information
start-shell Start UNIX shell
telnet Open a telnet connection
terminal Set terminal line parameters
traceroute Trace route to destination
undebug Disable debugging functions (see also 'debug')
write Write running configuration to memory, network, or terminal
CLI# configure terminal
CLI(config)#
access-list Add an access list entry
bgp BGP information
debug Debugging functions (see also 'undebug')
device-config Device configuration
dump Dump packet
enable Modify enable password parameters
end End current mode and down to previous mode
exit Exit current mode and down to previous mode
hostname Set system's network name
interface Select an interface to configure
ip IP information
ipv6 IPv6 information
key Authentication key management
list Print command list
log Logging control
no Negate a command or set its defaults
password Assign the terminal connection password
route-map Create route-map or enter route-map command mode
router Enable a routing process
system-config System and management configuration
username
write Write running configuration to memory, network, or terminal
CLI(config)# system-config
CLI(config-system)#
access Set CPE access ND flag
admin-idle-time Set system idle time
admin-psw Set system administrator password
admin-username Set system administrator username
connection-mode Set network connection mode : static and dynamic
datetime Set date time (format:2000-01-01 00:00:00)
default-gateway Set system's network default gateway
dns-server-1 Set system network DNS server 1
dns-server-2 Set system network DNS server 2
exit Exit current mode and down to previous mode
factory-defaults Restore ALL configure to factory default values( 0: reset all 1: reset with network parameters unchanged)
hostname Set system's network name
image-upgrade Upgrade image via ftp method
ip Set system ip address and netmask
list Print command list
managment-ip-range Set management IP range and netmask
managment-ip-range-flag Set management IP range service flag
mgr-vlan-id Set management VLAN ID
ntpserver Set NTP server
quit Exit current mode and down to previous mode
reset Reset system
snmp-refresh-time Set SNMP service refresh time cycle
snmp-rwcommunicty Set SNMP read/write community
snmp-service Set SNMP service enable or disable
snmp-trap-ip1 Set SNMP trap ip 1 address
snmp-trap-ip2 Set SNMP trap ip 2 address
snmp-trap1-ip-flag Set SNMP trap ip 1 service flag(enable/disable)
snmp-trap2-ip-flag Set SNMP trap ip 2 service flag(enable/disable)
ssh Set ssh service port and timeout values
ssh-service Set ssh service flag
telnet Set telnet PORT
telnet-service Set telnet service flag
timesync Set time sync service flag
timezone Set time zone (0:ShangHai,1:ChongQing)
CLI(config-system)# quit
CLI(config)# device-config
CLI(config-device)#
exit Exit current mode and down to previous mode
list Print command list
port-mirror-analysis-port Device configuration: Set analysis port(1: eth1 2: eth2)
port-mirror-flag Device configuration: Enable or disable port mirror service(0:disable,1:enable)
port-mirror-packet Device configuration: Set packet type to be mirrored(1:Import & Export 2: Import 3: Export)
port-mirror-port Device configuration:Set port to be mirrored
port1-rate Device configuration: set duplex mode and import/export/broadcast/unkown/multicast rate limit.
port2-rate Device configuration: set duplex mode and import/export/broadcast/unkown/multicast rate limit.
quit Exit current mode and down to previous mode
CLI(config-device)#
CLI(config-device)#
如果想要添加自己的命令,可以在原有的视图上增加(也就是在原有的node中增加commands),或者新开自己的视图,然后在新视图中添加自己的commands。
5.2 添加命令
进入vtysh目录中,查看vtysh_main.c文件的main函数,也就是和vtysh初始化相关的一切都在这里,基本上在这里可以完成你需要的一些基本命令。
在函数vtysh_init_vty()中,有个
[cpp] view
plaincopy
/* Initialize command interface. Install basic nodes and commands. */
Void cmd_init (int terminal)
的函数,就是负责初始化command接口,安装node和命令的。
比如你就可以添加自己的视图如下:
[cpp] view
plaincopy
/*Added by xyang*/
install_element (CONFIG_NODE, &vtysh_sysconfig_cmd);
install_element (CONFIG_NODE, &vtysh_devconfig_cmd);
(其中,安装的system和device配置的视图)
[cpp] view
plaincopy
/*Added by xyang
* system config node*
*/
DEFUN (system_config,
vtysh_sysconfig_cmd,
"system-config",
SYS_CFG_STR
"\n")
{
//vty_out (vty, "testing by xyang.%s", VTY_NEWLINE);
vty->node = SYSCONFIG_NODE;
return CMD_SUCCESS;
}
DEFUN (device_config,
vtysh_devconfig_cmd,
"device-config",
DEV_CFG_STR
"\n")
{
//vty_out (vty, "testing by xyang.%s", VTY_NEWLINE);
vty->node = DEVCONFIG_NODE;
return CMD_SUCCESS;
}
DEFUN定义为:
/* DEFUN for vty command interafce. Little bit hacky ;-). */
#define DEFUN(funcname, cmdname, cmdstr, helpstr) \
int funcname (struct cmd_element *, struct vty *, int, char **); \
struct cmd_element cmdname = \
{ \
cmdstr, \
funcname, \
helpstr \
}; \
int funcname \
(struct cmd_element *self, struct vty *vty, int argc, char **argv)
SYSCONFIG_NODE和DEVCONFIG_NODE要添加进enum node_type{}中去。
最后就要在init_cmd的最后加进自己的command了
比如
[cpp] view
plaincopy
/*add commands to system config node
* added by xyang @ 2012-02-01*
*/
/*management network settings*/
install_element (SYSCONFIG_NODE, &vtysh_system_cfg_ip_cmd);//ip and subnet mask
其中,函数指针需要定义先:
[cpp] view
plaincopy
DEFUN (vtysh_system_cfg_ip,
vtysh_system_cfg_ip_cmd,
"ip ADDRESS NETMASK",
"Set system ip address and netmask\n")
{
applyCfg(argv[0],"IPADDR");
applyCfg(argv[1],"NETMASK");
system(NETWORK_SETTING_SCRIPT);
return CMD_SUCCESS;
}
这样,基本上完成了添加node和命令的任务了。
其他Zebra-VTYH自带的命令如果不想要的话删除掉就行了。
(总完)

相关文章推荐
- Zebra-VTYSH源码分析和改造(三):添加定制命令
- Zebra-VTYSH源码分析和改造(二):深入代码
- Zebra-VTYSH源码分析和改造(序)
- Zebra-VTYSH源码分析和改造
- Zebra-VTYSH源码分析和改造(一):Zebra软件架构
- Netty的UDP多线程源码改造分析
- (2) quagga源码分析--路由信息处理zebra-rib
- quagga源码分析--路由信息处理zebra-rib
- 基于风险数据项目对kibana-4.5源码分析和改造
- 0day安全-软件漏洞分析技术(第一版)--8_3_vtable 虚表攻击源码改造
- quagga源码分析--大内总管zebra
- 【GamingAnywhere源码分析之知识补充三】GA并发连接改造
- CAS进行https到http的改造方案,结合cookie源码分析
- Sqoop-1.4.6 Merge源码分析与改造使其支持多个merge-key
- Sqoop-1.4.6 Merge源码分析与改造使其支持多个merge-key
- (1) quagga源码分析--大内总管zebra
- 谷歌浏览器的源码分析(9)
- u-boot启动过程分析(源码)
- jeecms 2012 源码分析(6) lucene 检索分析
- apache kafka源码分析-Producer分析