Zebra-VTYSH源码分析和改造(二):深入代码
2011-12-27 21:43
495 查看
分析Zebra-VTYSH的源码,首先从main函数开始,在ztysh-main.c中找到main函数,来进一步分析流程执行如下图所示:

在平时的使用中我们会发现,配置的时候有很多的视图(View),每个视图中有不同的命令可供用户输入进行配置。
这里,根据源码,视图可以认为是Node,而每一个命令称为element,他们之间的结构如下图所示:
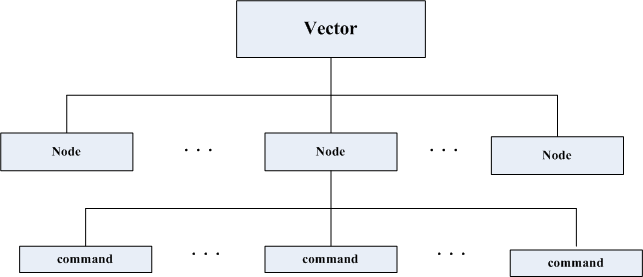
如图中所示,用到的数据结构如下:
/* struct for vector */
struct _vector
{
unsigned int max;		/* max number of used slot */
unsigned int alloced;		/* number of allocated slot */
void **index;			/* index to data */
};
/* Node which has some commands and prompt string and configuration
function pointer . */
struct cmd_node
{
/* Node index. */
enum node_type node;

/* Prompt character at vty interface. */
char *prompt;

/* Is this node's configuration goes to vtysh ? */
int vtysh;

/* Node's configuration write function */
int (*func) (struct vty *);

/* Vector of this node's command list. */
vector cmd_vector;
};

/* Structure of command element. */
struct cmd_element
{
char *string;			/* Command specification by string. */
int (*func) (struct cmd_element *, struct vty *, int, char **);
char *doc;			/* Documentation of this command. */
int daemon;                   /* Daemon to which this command belong. */
vector strvec;		/* Pointing out each description vector. */
int cmdsize;			/* Command index count. */
char *config;			/* Configuration string */
vector subconfig;		/* Sub configuration string */
};
下面我们所要做的事情就是在node和element中添加我们自己的命令,如果一切顺利,稍加处理就可以在图一中的最后一步也就是loop循环中的vtysh_execute函数中来实现我们的执行过程了。

相关文章推荐
- Zebra-VTYSH源码分析和改造(一):Zebra软件架构
- Zebra-VTYSH源码分析和改造(序)
- Zebra-VTYSH源码分析和改造
- Zebra-VTYSH源码分析和改造
- Zebra-VTYSH源码分析和改造(三):添加定制命令
- 【安卓】从源码的角度深入分析Scroller
- Solr4.8.0源码分析(14)之SolrCloud索引深入(1)
- Java源码分析:深入探讨Iterator模式及Java 5.0中改进的for循环
- 从源码的角度深入分析Scroller
- Eclipse导入Github上的Robotium源码进行代码分析的步骤
- spark源码阅读一-spark-mongodb代码分析
- master thread源码分析-伪代码
- 1k行代码的编辑器-kilo源码分析
- 灰鸽子键盘记录源码分析及一个中英文键盘记录代码
- u-boot-2014.10移植第8天----深入分析代码(三)
- 深入理解Spark 2.1 Core (六):资源调度的原理与源码分析
- 从源码角度深入分析ant
- Java程序员从笨鸟到菜鸟之(八十一)细谈Spring(十)深入源码分析Spring之HibernateTemplate 和HibernateDaoSupport
- 深入JAVA源码分析
- FreeRTOS源码分析-代码结构