CA ARCserve Backup系列(3)—安装代理(Linux篇)
2012-04-13 13:18
281 查看
step1、将安装光盘挂载
mount /dev/cdrom /mnt/
step2、执行安装cd /mnt/DataMoverandAgent/Linux
./install
#####################################################################
# ARCserve Installation Options
#####################################################################
# 1. CA ARCserve Backup for Linux Data Mover (ABdatmov)
# 2. CA ARCserve Backup for Linux Client Agent (ABagntux)
# 3. CA ARCserve Backup for Linux Agent for Oracle (ABora)
#
# 0. Quit
Note: Client Agent will be installed automatically if Data Mover is selected.
Please enter your selection separated by "," For example: 1,2. Press Enter to select the default components (E.g. Data Mover, Client Agent)...
Your choices are:2(选择安装客户端)
Please specify the installation path of Client Agent for Linux (default: /opt/CA):
The following program will be installed:
. Install Client Agent for Linux (ABagntux) ==> [ /opt/CA/ABuagent ]
Are you sure? (y)es/(n)o/(q)uit: y
All CA ARCserve Backup agents can be configured for automatic startup
and shutdown as part of your operating system startup and shutdown.
Do you want to enable automatic startup and shutdown of all backup agents? [y|n]:(default: y)
Checking available space in /opt/CA ==> [ OK ]
Installation log file is ==> [ /tmp/ARCserveInstall041012-1055.log ]
Common Agent Module (ABcmagt) ==> [ INSTALL SUCCESSFUL ]
Client Agent for Linux (ABagntux) ==> [ INSTALL SUCCESSFUL ]
###########################################################################
Installation log file is ==> [ /tmp/ARCserveInstall041012-1055.log ]
###########################################################################
Do you want to view the readme? [y|n]:(default: y) n
Installation done! Thank you
step3、安装完成
step4、查看服务状态
[root@master ABuagent]# /opt/CA/ABuagent/uagent status
CA ARCserve Backup Client Agent is enabled and running
step5、查看6051端口是否开启
[root@master ABuagent]# netstat -an|grep 6051
tcp 0 0 0.0.0.0:6051 0.0.0.0:* LISTEN
udp 0 0 0.0.0.0:6051 0.0.0.0:*
默认情况下,CA ARCserve Backup 使用端口 6051 进行通讯。
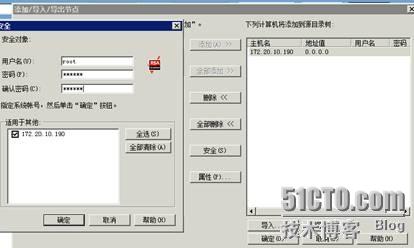
step6、在“备份服务器”的“源”中添加此客户端

step7、输入客户端的IP地址,选择“添加”

step8、成功添加后,选择“安全”,输入用户名和密码

step9、可以看到已经成功添加了。

相关文章:
CA ARCserve Backup系列(5)—使用“重复数据删除”备份---[/b]
/article/4363853.html
CA ARCserve Backup系列(4)—配置设备---[/b]
/article/4363852.html
CA ARCserve Backup系列(2)—安装代理(windows篇)---
/article/4363850.html
CA ARCserve Backup系列(1)—安装---[/b]
/article/4363849.html[/b]
本文出自 “star&storage” 博客,请务必保留此出处http://taotao1240.blog.51cto.com/731446/833003
mount /dev/cdrom /mnt/
step2、执行安装cd /mnt/DataMoverandAgent/Linux
./install
#####################################################################
# ARCserve Installation Options
#####################################################################
# 1. CA ARCserve Backup for Linux Data Mover (ABdatmov)
# 2. CA ARCserve Backup for Linux Client Agent (ABagntux)
# 3. CA ARCserve Backup for Linux Agent for Oracle (ABora)
#
# 0. Quit
Note: Client Agent will be installed automatically if Data Mover is selected.
Please enter your selection separated by "," For example: 1,2. Press Enter to select the default components (E.g. Data Mover, Client Agent)...
Your choices are:2(选择安装客户端)
Please specify the installation path of Client Agent for Linux (default: /opt/CA):
The following program will be installed:
. Install Client Agent for Linux (ABagntux) ==> [ /opt/CA/ABuagent ]
Are you sure? (y)es/(n)o/(q)uit: y
All CA ARCserve Backup agents can be configured for automatic startup
and shutdown as part of your operating system startup and shutdown.
Do you want to enable automatic startup and shutdown of all backup agents? [y|n]:(default: y)
Checking available space in /opt/CA ==> [ OK ]
Installation log file is ==> [ /tmp/ARCserveInstall041012-1055.log ]
Common Agent Module (ABcmagt) ==> [ INSTALL SUCCESSFUL ]
Client Agent for Linux (ABagntux) ==> [ INSTALL SUCCESSFUL ]
###########################################################################
Installation log file is ==> [ /tmp/ARCserveInstall041012-1055.log ]
###########################################################################
Do you want to view the readme? [y|n]:(default: y) n
Installation done! Thank you
step3、安装完成
step4、查看服务状态
[root@master ABuagent]# /opt/CA/ABuagent/uagent status
CA ARCserve Backup Client Agent is enabled and running
step5、查看6051端口是否开启
[root@master ABuagent]# netstat -an|grep 6051
tcp 0 0 0.0.0.0:6051 0.0.0.0:* LISTEN
udp 0 0 0.0.0.0:6051 0.0.0.0:*
默认情况下,CA ARCserve Backup 使用端口 6051 进行通讯。
step6、在“备份服务器”的“源”中添加此客户端

step7、输入客户端的IP地址,选择“添加”

step8、成功添加后,选择“安全”,输入用户名和密码
step9、可以看到已经成功添加了。

相关文章:
CA ARCserve Backup系列(5)—使用“重复数据删除”备份---[/b]
/article/4363853.html
CA ARCserve Backup系列(4)—配置设备---[/b]
/article/4363852.html
CA ARCserve Backup系列(2)—安装代理(windows篇)---
/article/4363850.html
CA ARCserve Backup系列(1)—安装---[/b]
/article/4363849.html[/b]
本文出自 “star&storage” 博客,请务必保留此出处http://taotao1240.blog.51cto.com/731446/833003

相关文章推荐
- CA ARCserve Backup系列(2)—安装代理(windows篇)
- CA ARCserve Backup系列(1)—安装
- CA ARCserve Backup系列(5)—使用“重复数据删除”备份
- CA ARCserve Backup系列(4)—配置设备
- ocs部署实验系列之四——安装exchange um服务器
- Exchange系列—安装篇:安装边缘传输服务器
- Exchange Server 2010系列—01全新安装Exchange Server 2010
- Exchange系列—安装篇:安装Exchange统一消息服务器
- Operations Manager 2007 R2系列之客户端代理安装
- Exchange系列—安装篇:exchange邮件系统典型安装
- ca arcserver backup安装agent故障处理(ON RHEL 6)
- BeeFramework 系列一 安装篇(Arc)
- Percona-XtraBackup系列一:安装 perl(Time::HiRes) is needed by percona-xtrabackup-2.2.10-1.el6.x86_64
- Symantec Backup Exec 系列二:客户端安装
- SCOM 2012系列④客户端代理安装
- Exchange系列—管理代理发送功能及邮件转发
- Symantec Backup Exec 系列一:服务端安装
- SCCM2012 R2实战系列之六:安装客户端代理软件
- SCCM2012 R2实战系列之六:安装客户端代理软件
- BeeFramework 系列一 安装篇(Arc)