PXE + NFS + kickstart实现无人值守安装RHEL5
2011-02-17 21:24
911 查看
一、原理
实现网络安装的过程是这样的:PXE网卡启动------DHCP服务器------获得IP------从TFTP上下载pxelinux.0、vmlinuz、initrd------启动系统------通过PEXlinux去NFS下载ks.cfg文件-----根据ks.cfg去NFS下载RPM包及安装系统------完成安装。
工作流程:
[align=left]1、 pxe启动,就广播寻找dhcp服务器获取ip地址和bootstrap文件,成功以后进入第二步(DHCP提供IP地址,还有bootstrap配置文件的位置)[/align]
[align=left] [/align]
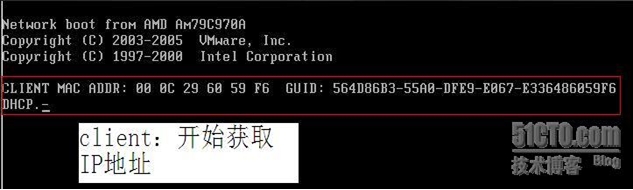
[align=left]2、client通过tftp连接到服务器,下载bootstrap文件。(linux里的bootstrap文件就是pxelinux.0,系统内有,大家可以使用#locate pxelinux.0查找它存放的位置)[/align]
[align=left]3、client下载成功pxelinux.0文件后,系统还会下载控制pxelinux.0的配置文件,叫default。然后client就会按照default的配置来执行pxelinux.0文件。[/align]
[align=left]4、现在client端会再获取一次IP地址。并且根据DHCP服务器配置文件找到kickstart配置文件并下载。也是使用的tftp协议。[/align]
[align=left]5、pxelinux.0文件定义的想服务器请求linux内核,根文件系统之类的参数。运行这个文件,client就会向服务器请求相关的文件并下载,都里使用的都是tftp协议。[/align]
[align=left] [/align]
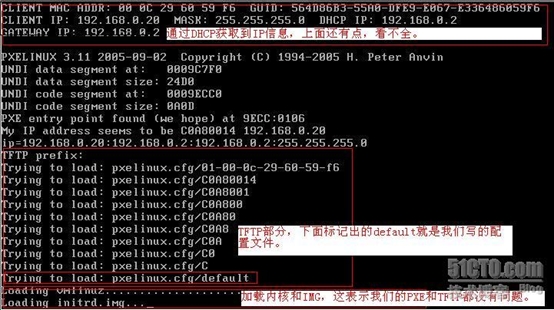
[align=left]6、文件下载文成后,client就会启动linux内核,这就进入了我们安装时候看见的第一个图形界面,这个界面和自己安装看见的第一个画面一样,回车就是图形安装,输入text就是文本安装那里。如果使用了kickstart,这个界面消失很快,可能看不见。到这里PXE启动就完成了。[/align]
7、下面就该主角kickstart出场了。其实kickstart在第四步已经出现了,当按照default要求运行pxelinux.0文件,系统读取内核,挂在根文件系统以后的任务就都交给了kickstart了。包括安装介质来源、语言、时区、分区、安装哪些包等,都是在kickstart文件中定义。
只要进入这一步,kickstart配置文件正确,我们的无人值守安装已经成功了。
二、安装步骤
需要的环境
1、一台server担任DHCP\TFTP\NFS服务器
2、一台client,支持pxe网卡启动
3、服务器要有安装所需的所有包
具体实施步骤
1、配置好自己的yum服务器
2、配置NFS服务
[root@server1 tftpboot]# mkdir -p /mnt/install
[root@server1 tftpboot]# vim /etc/exports
/mnt/install 192.168.0.0/24(ro,async)
[root@server1 tftpboot]# service nfs restart
Shutting down NFS mountd: [FAILED]
Shutting down NFS daemon: [FAILED]
Shutting down NFS services: [ OK ]
Starting NFS services: [ OK ]
Starting NFS quotas: [ OK ]
Starting NFS daemon: [ OK ]
Starting NFS mountd: [ OK ]
[root@server1 tftpboot]# cp –rv /mnt/cdrom/* /mnt/install
/mnt/cdrom 是光盘挂载目录
这里我尝试使用ln,但是之后在客户机安装的时候找不到安装树
3、配置TFTP服务
yum install –y tftp-server
安装tftp server软件包
[root@server1 Server]# vim /etc/xinetd.d/tftp
service tftp
{
socket_type = dgram
protocol = udp
wait = yes
user = root
server = /usr/sbin/in.tftpd
server_args = -s /tftpboot
disable = no
per_source = 11
cps = 100 2
flags = IPv4
}
或者
chkconfig tftp on
[root@server1 Server]# service xinetd restart
Stopping xinetd: [ OK ]
Starting xinetd: [ OK ]
[root@server1 Server]# netstat -nupal |grep 69
udp 0 0 0.0.0.0:69 0.0.0.0:* 5433/xinetd
udp 0 0 :::32769 :::* 5159/avahi-daemon:
[root@server1 Server]#
OK,TFTP服务已经开启。
4、配置DHCP服务
Yum install -y dhcp 安装dhcp软件包
[root@server1 Server]# cat /etc/dhcpd.conf
#
# DHCP Server Configuration file.
# see /usr/share/doc/dhcp*/dhcpd.conf.sample
[root@server1 Server]# cp /usr/share/doc/dhcp-3.0.5/dhcpd.conf.sample /etc/dhcp.conf
cp: overwrite `/etc/dhcpd.conf'? Y
[root@server1 Server]# vim /etc/dhcpd.conf
ddns-update-style interim; #定义所支持的DNS动态更新类型(必选)
ignore client-updates;
subnet 192.168.0.0 netmask 255.255.255.0 {
# --- default gateway
option routers 192.168.0.1;
option subnet-mask 255.255.255.0;
filename "/pxelinux.0"; 指定pxelinux.0的位置,相对于tftpboot
next-server 192.168.0.1; 指定TFTP地址
option time-offset -18000; # Eastern Standard Time
range dynamic-bootp 192.168.0.128 192.168.0.254;
default-lease-time 21600;
max-lease-time 43200;
}
[root@server1 Server]# service dhcpd start
Starting dhcpd: [ OK ]
[root@server1 Server]# netstat -nupal | grep dhcpd
udp 0 0 0.0.0.0:67 0.0.0.0:* 5525/dhcpd
5、配置pxe服务模块
[root@server1 Server]# updatedb
[root@server1 Server]# locate pxelinux.0
/tftpboot/linux-install/pxelinux.0
/usr/lib/syslinux/pxelinux.0
[root@server1 Server]# cp /usr/lib/syslinux/pxelinux.0 /tftpboot/
[root@server1 Server]#
[root@server1 cdrom]# pwd
/mnt/cdrom
[root@server1 cdrom]# /bin/cp isolinux/* /tftpboot/ 此处的vmlinuz initrd.img 用images\pxeboot中的也行
[root@server1 cdrom]# cd /tftpboot/
[root@server1 tftpboot]# mkdir pxelinux.cfg
[root@server1 tftpboot]# cp isolinux.cfg pxelinux.cfg/default 此处要注意default的权限,其他人要有可读权限
[root@server1 tftpboot]# vim pxelinux.cfg/default
default linux
prompt 1
timeout 10 设置boot:后面超时时间
display boot.msg
F1 boot.msg
F2 options.msg
F3 general.msg
F4 param.msg
F5 rescue.msg
label linux
kernel vmlinuz
append initrd=initrd.img ks=nfs:192.168.0.1:/mnt/install/ks.cfg
label text
kernel vmlinuz
append initrd=initrd.img text
label ks
kernel vmlinuz
append ks initrd=initrd.img
label local
localboot 1
label memtest86
kernel memtest
append -
安装kickstart配置工具:
[root@server1 ~]# cd /mnt/cdrom
[root@server1 cdrom]# cd Server/
[root@server1 Server]# yum install -y system-config-kickstart
[root@server1 Server]# system-config-kickstart
这个命令是在X下运行的。
用 system-config-kickstart打开/root/anaconda-ks.cfg,根据需求修改配置。并且另存为/mnt/install/ks.cfg
#platform=x86, AMD64, or Intel EM64T
# System authorization information
auth --useshadow --enablemd5
# System bootloader configuration
bootloader --append="rhgb quiet" --location=mbr --driveorder=sda
# Clear the Master Boot Record
zerombr
# Partition clearing information
clearpart --all --initlabel
这行一定不能注释,否则会让你确认是否格式化硬盘
# Use text mode install
text
# Firewall configuration
firewall --disabled
# Run the Setup Agent on first boot
firstboot --disable
key --skip
跳过安装序列号
# System keyboard
keyboard us
# System language
lang en_US
# Installation logging level
logging --level=info
# Use NFS installation media
nfs --server=192.168.0.1 –dir=/mnt/install
# Network information
network --bootproto=dhcp --device=eth0 --onboot=on
# Reboot after installation
reboot
#Root password
rootpw --iscrypted $1$K3L4H4zb$5DPvt/Va6WHXTYHnUKrzh.
# SELinux configuration
selinux --disabled
# System timezone
timezone --isUtc Asia/Shanghai
# Install OS instead of upgrade
install
# X Window System configuration information
xconfig --defaultdesktop=GNOME --depth=24 --resolution=1024x768 --startxonboot
# Disk partitioning information
part /boot --bytes-per-inode=4096 --fstype="ext3" --size=256
part swap --bytes-per-inode=4096 --fstype="swap" --size=512
part / --bytes-per-inode=4096 --fstype="ext3" --grow s--size=1
%packages
@office
@editors
@text-internet
@gnome-desktop
@dialup
@core
@base
@games
@java
@legacy-software-support
@base-x
@graphics
@printing
@sound-and-video
@admin-tools
@graphical-internet
emacs
kexec-tools
device-mapper-multipath
xorg-x11-utils
xorg-x11-server-Xnest
libsane-hpaio
-sysreport
这个是我的ks.cfg
设置客户端从pxe启动就可以了,这样无人值守安装就完成了
kickstart服务器排除
1、关闭防火墙,系统自带的和IPTABLES都要关闭
2、从网卡启动,获取不到IP地址检查你的DHCP服务器是否开机,使用#netstat -tulnp | grep dhcpd ,来查看是否在监听67号端口。
3、获取IP后,在TFTP那步卡住了。检查你的DHCP配置文件,next-server 是不是指的正确的tftp服务器。TFTP服务器是否开启,是否运行正常。可以在linux里面使用这个方法来测试
#tftp 您的服务器IP 登陆进入后
tftp>get pxelinux.0
tftp>quit
查看当前目录是否有pxelinux.0这个文件,有的话,证明你的tftp服务器是正常的最后检查你的网络中是不是还有其他dhcp服务器
4、内核成功加载后,系统有完成自动安装,需要人工介入,那就证明你的kickstart脚本文件出问题了,需要重新生成以个,或者使用我给的,在里面修改下NFS的服务器的地址就可以用了。
5、监控服务器的/var/log/message文件,寻找故障原因。
[align=left] [/align]
在安装过程中有人会问“之前网卡PXE模块已经获取了一次IP地址,为什么现在还要设置一次?”
这里我再说明以下,
1)PXE获取的是安装用的内核以及安装程序等,安装程序要获取的是安装系统所需的二进制包以及配置文件!
2)PXE模块和安装程序是相对独立的,PXE的网络配置并不能传递给安装程序!
[align=left] [/align]
[align=left] [/align]
[align=left] [/align]
实现网络安装的过程是这样的:PXE网卡启动------DHCP服务器------获得IP------从TFTP上下载pxelinux.0、vmlinuz、initrd------启动系统------通过PEXlinux去NFS下载ks.cfg文件-----根据ks.cfg去NFS下载RPM包及安装系统------完成安装。
工作流程:
[align=left]1、 pxe启动,就广播寻找dhcp服务器获取ip地址和bootstrap文件,成功以后进入第二步(DHCP提供IP地址,还有bootstrap配置文件的位置)[/align]
[align=left] [/align]
[align=left]2、client通过tftp连接到服务器,下载bootstrap文件。(linux里的bootstrap文件就是pxelinux.0,系统内有,大家可以使用#locate pxelinux.0查找它存放的位置)[/align]
[align=left]3、client下载成功pxelinux.0文件后,系统还会下载控制pxelinux.0的配置文件,叫default。然后client就会按照default的配置来执行pxelinux.0文件。[/align]
[align=left]4、现在client端会再获取一次IP地址。并且根据DHCP服务器配置文件找到kickstart配置文件并下载。也是使用的tftp协议。[/align]
[align=left]5、pxelinux.0文件定义的想服务器请求linux内核,根文件系统之类的参数。运行这个文件,client就会向服务器请求相关的文件并下载,都里使用的都是tftp协议。[/align]
[align=left] [/align]
[align=left]6、文件下载文成后,client就会启动linux内核,这就进入了我们安装时候看见的第一个图形界面,这个界面和自己安装看见的第一个画面一样,回车就是图形安装,输入text就是文本安装那里。如果使用了kickstart,这个界面消失很快,可能看不见。到这里PXE启动就完成了。[/align]
7、下面就该主角kickstart出场了。其实kickstart在第四步已经出现了,当按照default要求运行pxelinux.0文件,系统读取内核,挂在根文件系统以后的任务就都交给了kickstart了。包括安装介质来源、语言、时区、分区、安装哪些包等,都是在kickstart文件中定义。
只要进入这一步,kickstart配置文件正确,我们的无人值守安装已经成功了。
二、安装步骤
需要的环境
1、一台server担任DHCP\TFTP\NFS服务器
2、一台client,支持pxe网卡启动
3、服务器要有安装所需的所有包
具体实施步骤
1、配置好自己的yum服务器
2、配置NFS服务
[root@server1 tftpboot]# mkdir -p /mnt/install
[root@server1 tftpboot]# vim /etc/exports
/mnt/install 192.168.0.0/24(ro,async)
[root@server1 tftpboot]# service nfs restart
Shutting down NFS mountd: [FAILED]
Shutting down NFS daemon: [FAILED]
Shutting down NFS services: [ OK ]
Starting NFS services: [ OK ]
Starting NFS quotas: [ OK ]
Starting NFS daemon: [ OK ]
Starting NFS mountd: [ OK ]
[root@server1 tftpboot]# cp –rv /mnt/cdrom/* /mnt/install
/mnt/cdrom 是光盘挂载目录
这里我尝试使用ln,但是之后在客户机安装的时候找不到安装树
3、配置TFTP服务
yum install –y tftp-server
安装tftp server软件包
[root@server1 Server]# vim /etc/xinetd.d/tftp
service tftp
{
socket_type = dgram
protocol = udp
wait = yes
user = root
server = /usr/sbin/in.tftpd
server_args = -s /tftpboot
disable = no
per_source = 11
cps = 100 2
flags = IPv4
}
或者
chkconfig tftp on
[root@server1 Server]# service xinetd restart
Stopping xinetd: [ OK ]
Starting xinetd: [ OK ]
[root@server1 Server]# netstat -nupal |grep 69
udp 0 0 0.0.0.0:69 0.0.0.0:* 5433/xinetd
udp 0 0 :::32769 :::* 5159/avahi-daemon:
[root@server1 Server]#
OK,TFTP服务已经开启。
4、配置DHCP服务
Yum install -y dhcp 安装dhcp软件包
[root@server1 Server]# cat /etc/dhcpd.conf
#
# DHCP Server Configuration file.
# see /usr/share/doc/dhcp*/dhcpd.conf.sample
[root@server1 Server]# cp /usr/share/doc/dhcp-3.0.5/dhcpd.conf.sample /etc/dhcp.conf
cp: overwrite `/etc/dhcpd.conf'? Y
[root@server1 Server]# vim /etc/dhcpd.conf
ddns-update-style interim; #定义所支持的DNS动态更新类型(必选)
ignore client-updates;
subnet 192.168.0.0 netmask 255.255.255.0 {
# --- default gateway
option routers 192.168.0.1;
option subnet-mask 255.255.255.0;
filename "/pxelinux.0"; 指定pxelinux.0的位置,相对于tftpboot
next-server 192.168.0.1; 指定TFTP地址
option time-offset -18000; # Eastern Standard Time
range dynamic-bootp 192.168.0.128 192.168.0.254;
default-lease-time 21600;
max-lease-time 43200;
}
[root@server1 Server]# service dhcpd start
Starting dhcpd: [ OK ]
[root@server1 Server]# netstat -nupal | grep dhcpd
udp 0 0 0.0.0.0:67 0.0.0.0:* 5525/dhcpd
5、配置pxe服务模块
[root@server1 Server]# updatedb
[root@server1 Server]# locate pxelinux.0
/tftpboot/linux-install/pxelinux.0
/usr/lib/syslinux/pxelinux.0
[root@server1 Server]# cp /usr/lib/syslinux/pxelinux.0 /tftpboot/
[root@server1 Server]#
[root@server1 cdrom]# pwd
/mnt/cdrom
[root@server1 cdrom]# /bin/cp isolinux/* /tftpboot/ 此处的vmlinuz initrd.img 用images\pxeboot中的也行
[root@server1 cdrom]# cd /tftpboot/
[root@server1 tftpboot]# mkdir pxelinux.cfg
[root@server1 tftpboot]# cp isolinux.cfg pxelinux.cfg/default 此处要注意default的权限,其他人要有可读权限
[root@server1 tftpboot]# vim pxelinux.cfg/default
default linux
prompt 1
timeout 10 设置boot:后面超时时间
display boot.msg
F1 boot.msg
F2 options.msg
F3 general.msg
F4 param.msg
F5 rescue.msg
label linux
kernel vmlinuz
append initrd=initrd.img ks=nfs:192.168.0.1:/mnt/install/ks.cfg
label text
kernel vmlinuz
append initrd=initrd.img text
label ks
kernel vmlinuz
append ks initrd=initrd.img
label local
localboot 1
label memtest86
kernel memtest
append -
安装kickstart配置工具:
[root@server1 ~]# cd /mnt/cdrom
[root@server1 cdrom]# cd Server/
[root@server1 Server]# yum install -y system-config-kickstart
[root@server1 Server]# system-config-kickstart
这个命令是在X下运行的。
用 system-config-kickstart打开/root/anaconda-ks.cfg,根据需求修改配置。并且另存为/mnt/install/ks.cfg
#platform=x86, AMD64, or Intel EM64T
# System authorization information
auth --useshadow --enablemd5
# System bootloader configuration
bootloader --append="rhgb quiet" --location=mbr --driveorder=sda
# Clear the Master Boot Record
zerombr
# Partition clearing information
clearpart --all --initlabel
这行一定不能注释,否则会让你确认是否格式化硬盘
# Use text mode install
text
# Firewall configuration
firewall --disabled
# Run the Setup Agent on first boot
firstboot --disable
key --skip
跳过安装序列号
# System keyboard
keyboard us
# System language
lang en_US
# Installation logging level
logging --level=info
# Use NFS installation media
nfs --server=192.168.0.1 –dir=/mnt/install
# Network information
network --bootproto=dhcp --device=eth0 --onboot=on
# Reboot after installation
reboot
#Root password
rootpw --iscrypted $1$K3L4H4zb$5DPvt/Va6WHXTYHnUKrzh.
# SELinux configuration
selinux --disabled
# System timezone
timezone --isUtc Asia/Shanghai
# Install OS instead of upgrade
install
# X Window System configuration information
xconfig --defaultdesktop=GNOME --depth=24 --resolution=1024x768 --startxonboot
# Disk partitioning information
part /boot --bytes-per-inode=4096 --fstype="ext3" --size=256
part swap --bytes-per-inode=4096 --fstype="swap" --size=512
part / --bytes-per-inode=4096 --fstype="ext3" --grow s--size=1
%packages
@office
@editors
@text-internet
@gnome-desktop
@dialup
@core
@base
@games
@java
@legacy-software-support
@base-x
@graphics
@printing
@sound-and-video
@admin-tools
@graphical-internet
emacs
kexec-tools
device-mapper-multipath
xorg-x11-utils
xorg-x11-server-Xnest
libsane-hpaio
-sysreport
这个是我的ks.cfg
设置客户端从pxe启动就可以了,这样无人值守安装就完成了
kickstart服务器排除
1、关闭防火墙,系统自带的和IPTABLES都要关闭
2、从网卡启动,获取不到IP地址检查你的DHCP服务器是否开机,使用#netstat -tulnp | grep dhcpd ,来查看是否在监听67号端口。
3、获取IP后,在TFTP那步卡住了。检查你的DHCP配置文件,next-server 是不是指的正确的tftp服务器。TFTP服务器是否开启,是否运行正常。可以在linux里面使用这个方法来测试
#tftp 您的服务器IP 登陆进入后
tftp>get pxelinux.0
tftp>quit
查看当前目录是否有pxelinux.0这个文件,有的话,证明你的tftp服务器是正常的最后检查你的网络中是不是还有其他dhcp服务器
4、内核成功加载后,系统有完成自动安装,需要人工介入,那就证明你的kickstart脚本文件出问题了,需要重新生成以个,或者使用我给的,在里面修改下NFS的服务器的地址就可以用了。
5、监控服务器的/var/log/message文件,寻找故障原因。
[align=left] [/align]
在安装过程中有人会问“之前网卡PXE模块已经获取了一次IP地址,为什么现在还要设置一次?”
这里我再说明以下,
1)PXE获取的是安装用的内核以及安装程序等,安装程序要获取的是安装系统所需的二进制包以及配置文件!
2)PXE模块和安装程序是相对独立的,PXE的网络配置并不能传递给安装程序!
[align=left] [/align]
[align=left] [/align]
[align=left] [/align]

相关文章推荐
- pxe+kickstart实现无人值守网络安装rhel5.4
- PXE+DHCP+NFS+KICKSTART无人值守安装RHEL6.4
- pxe+kickstart实现无人值守网络安装rhel5.4
- RHEL5下DHCP+TFTP+NFS+KICKSTART实现PXE无人职守安装
- PXE+DHCP+NFS+KICKSTART无人值守安装RHEL6.4
- RHEL5下DHCP+TFTP+NFS+KICKSTART实现PXE无人职守安装
- 部署PXE高效批量网络装机并实现Kickstart无人值守自动安装
- 实现Kickstart + NFS + DHCP + PXE的全自动远程无人职守安装
- 利用Kickstart实现无人值守安装Rhel6.0系统
- PXE+KickStart+DHCP+NFS无人值守linux安装
- 使用kickstart、dchp、tftp、http,实现RHEL 5.5操作系统的无人值守自动化安装
- pxe+dhcp+tftp+kickstart 实现无人值守自动安装
- PXE结合Kickstart实现无人值守安装CentOS6.5
- kickstart+nfs+tftp+dhcp无人值守安装rhel5.5
- 利用Kickstart实现无人值守安装Rhel6.0系统
- 实现Kickstart + NFS + DHCP + PXE的全自动远程无人职守安装
- 利用Kickstart实现无人值守安装Rhel6.0系统
- Kickstart+PXE实现无人值守自动安装
- PXE+DHCP+HTTP/FTP/NFS+kickstart安装无人值守的LINUX
- Kickstart+PXE实现无人值守自动安装 推荐