ListView项(Item)的三种布局使用例子
2010-12-19 11:32
295 查看
在使用ListView的时候,经常看到需要为List中的item添加诸如“android.R.layout.simple_list_item_2”、“android.R.layout.two_line_list_item”之类的布局。用起来虽然简单,但却不明其所以然。下面来探究一下、学习一下它的源码和应用一下:
例子代码://main.xml
//list_item.xml
//MySimpleAdapterActivity.java
//下面两个是Android自带的布局,直接引用即可,不用添加到工程中:
//base/core/res/res/layout/simple_list_item_2.xml
//base/core/res/res/layout/two_line_list_item.xml
运行的结果如下:
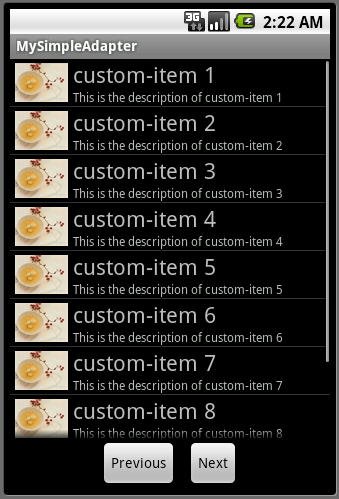

例子中,List中的item布局有三种:
自定义的布局,使用了相对布局(RelativeLayout,见list_item.xml),左侧一个图片,右侧上方是字体比较大的title,下方是字体稍小的description;
第二种是Android自带的布局(见源码里的simple_list_item_2.xml),主要是一个垂直的LinearLayout,里面包含两个ID分别为text1、text2的TextView,这两个TextView的字体大小不一样,一个带textAppearanceLarge属性,另外一个带textAppearanceSmall属性;
第三种也是Android自带的布局(见源码里的two_line_list_item.xml),主要是一个垂直的LinearLayout,里面包含两个ID分别为text1、text2的TextView,这两个TextView的字体大小一样,但每个TextView还带一个字体加粗的属性。
SimpleAdapter的使用:
构造函数: SimpleAdapter(Context context, List<? extends Map<String, ?>> data, int resource, String[] from, int[] to)
参数有5个:
context:也就是上下文,而Activity都是继承于Context的,所以这个参数一般使用Activity的实例;
data:类型要为一个List的子类,且List中的每个元素都必须为Map的子类,每个Map中以有一对或多对的Key-Value对,这些值与下面的参数from有对应;
resource:这是每个List项(Item)对应的XML布局资源文件名,在里面控制List项显示的元素以及相对位置;
from:是一个字符串数组,可以理解为列名,对应于data数据中Map元素的Key值,只有包含在这个字符串数组的元素对应到Map中的Value值才能显示到TextView中(这些TextView在最后一个参数to配置),所以这些Value值需要为字符串或者有toString()的方法;
to:TextView组件ID的数组,上面的from参数配置了Key值,而根据这个Key值从data参数里的map取出的value值需要设置到TextView中,而这些TextView的id需要在这个数组中配置。而且这些TextView需要在参数resource对应的XML资源文件中配置。
补充:
例子中使用了ListActivity,它有默认的XML资源文件;但由于本例需要添加两个按钮(原来的布局是没有按钮),所以重新在main.xml中配置了一个ListView,且ListActivity要求放到它里面的ListView的ID必须是 android:list 。本例的两个按钮主要是切换不同的ListActivity来显示ListView项的三种不同布局,一种是自定义的,另外两种是Android自带的常用ListView项布局。
例子代码://main.xml
<?xml version="1.0" encoding="utf-8"?>
<LinearLayout xmlns:android="http://schemas.android.com/apk/res/android"
android:layout_width="fill_parent"
android:layout_height="wrap_content"
android:orientation="vertical"
>
<ListView android:id="@+id/android:list"
android:layout_width="fill_parent"
android:layout_height="fill_parent"
android:layout_weight="1"
android:drawSelectorOnTop="false"
/>
<LinearLayout
android:layout_width="fill_parent"
android:layout_height="wrap_content"
android:orientation="horizontal"
android:gravity="center_horizontal"
>
<Button android:id="@+id/btnPrevious"
android:layout_width="wrap_content"
android:layout_height="wrap_content"
android:layout_marginRight="10dip"
android:text="Previous">
</Button>
<Button android:id="@+id/btnNext"
android:layout_width="wrap_content"
android:layout_height="wrap_content"
android:text="Next">
</Button>
</LinearLayout>
</LinearLayout>
//list_item.xml
<?xml version="1.0" encoding="utf-8"?>
<RelativeLayout xmlns:android="http://schemas.android.com/apk/res/android"
android:layout_width="fill_parent"
android:layout_height="wrap_content">
<ImageView android:id="@+id/imageView"
android:layout_width="wrap_content"
android:layout_height="wrap_content"
android:layout_centerVertical="true"
android:layout_marginLeft="5px"
android:layout_marginRight="5px"
android:src="@drawable/tea_80x59"
/>

<TextView android:id="@+id/titleTextView"
android:layout_width="fill_parent"
android:layout_height="wrap_content"
android:layout_toRightOf="@id/imageView"
android:textSize="22px"
/>
<TextView android:id="@+id/descTextView"
android:layout_width="fill_parent"
android:layout_height="wrap_content"
android:layout_toRightOf="@id/imageView"
android:layout_below="@id/titleTextView"
android:textSize="12px"
/>
</RelativeLayout>
//MySimpleAdapterActivity.java
package com.tutor.simpleadapter;
import java.util.ArrayList;
import java.util.HashMap;
import java.util.List;
import java.util.Map;
import android.app.Activity;
import android.app.ListActivity;
import android.content.Intent;
import android.os.Bundle;
import android.util.Log;
import android.view.View;
import android.widget.Button;
import android.widget.ListView;
import android.widget.SimpleAdapter;
import android.widget.Toast;
public class MySimpleAdapterActivity extends ListActivity {
private Button btnPrevious = null;
private Button btnNext = null;
private String TAG = "SimpleAdapter";
private int index = 0;

/** Called when the activity is first created. */
@Override
public void onCreate(Bundle savedInstanceState) {
super.onCreate(savedInstanceState);
setContentView(R.layout.main);

btnPrevious = (Button)findViewById(R.id.btnPrevious);
btnNext = (Button)findViewById(R.id.btnNext);
btnPrevious.setOnClickListener(new ButtonClickListener(this));
btnNext.setOnClickListener(new ButtonClickListener(this));

Intent intent = getIntent();
index = intent.getIntExtra("Index", 0);
Log.d(TAG, "onCreate "+index);
switch((index % 3)) {
case 0://自定义的List Item布局
setListAdapter(new SimpleAdapter(this,
getData("custom-item"),
R.layout.list_item,
new String[]{"title", "description"},
new int[]{R.id.titleTextView, R.id.descTextView}));
Log.i(TAG, "SimpleAdapter with R.layout.list_1");
break;
case 1://Android提供的simple_list_item_2布局
setListAdapter(new SimpleAdapter(this,
getData("simple-list-item-2"),
android.R.layout.simple_list_item_2,
new String[]{"title", "description"},
new int[]{android.R.id.text1, android.R.id.text2}));
Log.i(TAG, "SimpleAdapter with android.R.layout.simple_list_item_2");
break;
case 2://Android提供的two_line_list_item布局
setListAdapter(new SimpleAdapter(this,
getData("two-line-list-item"),
android.R.layout.two_line_list_item,
new String[]{"title", "description"},
new int[]{android.R.id.text1, android.R.id.text2}));
Log.i(TAG, "SimpleAdapter with android.R.layout.two_line_list_item");
break;
default:
Log.i(TAG, "no SimpleAdapter");
}

}

protected void onRestart() {
super.onRestart();
Log.d(TAG, "onRestart "+index);
}

protected void onStart() {
super.onStart();
Log.d(TAG, "");
}

protected void onResume() {
super.onResume();
Log.d(TAG, "onResume "+index);
}

protected void onPause() {
super.onPause();
Log.d(TAG, "onPause "+index);
}

protected void onStop () {
super.onStop();
Log.d(TAG, "onStop "+index);
}

protected void onDestroy() {
Log.d(TAG, "onDestroy "+index);
if(btnPrevious != null) {
btnPrevious.setOnClickListener(null);
btnPrevious = null;
}

if(btnNext != null) {
btnNext.setOnClickListener(null);
btnNext = null;
}

super.onDestroy();
}

/**
* 构造SimpleAdapter的第二个参数,类型为List<Map<?,?>>
* @param title
* @return
*/
private List<Map<String, String>> getData(String title) {
List<Map<String, String>> listData = new ArrayList<Map<String, String>>();
for(int i = 1; i<=10; i++) {
Map<String, String> map = new HashMap<String, String>();
map.put("title", title+" "+i);
map.put("description", "This is the description of "+title+" "+i);
listData.add(map);
}

return listData;
}

/**
* 当List的项被选中时触发
*/
protected void onListItemClick(ListView listView, View v, int position, long id) {
Map map = (Map)listView.getItemAtPosition(position);
Toast toast = Toast.makeText(this, map.get("title")+" is selected.", Toast.LENGTH_LONG);
toast.show();
}

class ButtonClickListener implements View.OnClickListener  {
private Activity context = null;
public ButtonClickListener(Activity context) {
this.context = context;
}
@Override
public void onClick(View v) {
// TODO Auto-generated method stub
if(context != null) {
Intent intent = context.getIntent();
int index = intent.getIntExtra("Index", 0);

if(v.getId() == R.id.btnNext) {
index += 1;
}else if(v.getId() == R.id.btnPrevious) {
index -= 1;
if(index < 0) {
index = Math.abs(index);
}
}

//发起新的Activity
Intent newIntent = new Intent(context, MySimpleAdapterActivity.class);
newIntent.putExtra("Index", index);
context.startActivity(newIntent);

//关闭原来的Activity
context.finish();
}
}

}
}
//下面两个是Android自带的布局,直接引用即可,不用添加到工程中:
//base/core/res/res/layout/simple_list_item_2.xml
<TwoLineListItem xmlns:android="http://schemas.android.com/apk/res/android"
android:paddingTop="2dip"
android:paddingBottom="2dip"
android:layout_width="match_parent"
android:layout_height="wrap_content"
android:minHeight="?android:attr/listPreferredItemHeight"
android:mode="twoLine"
>

<TextView android:id="@android:id/text1"
android:layout_width="match_parent"
android:layout_height="wrap_content"
android:layout_marginLeft="6dip"
android:layout_marginTop="6dip"
android:textAppearance="?android:attr/textAppearanceLarge"
/>

<TextView android:id="@android:id/text2"
android:layout_width="match_parent"
android:layout_height="wrap_content"
android:layout_below="@android:id/text1"
android:layout_alignLeft="@android:id/text1"
android:textAppearance="?android:attr/textAppearanceSmall"
/>
</TwoLineListItem>
//base/core/res/res/layout/two_line_list_item.xml
<LinearLayout xmlns:android="http://schemas.android.com/apk/res/android"
android:layout_width="match_parent"
android:layout_height="wrap_content"
android:orientation="vertical">
<TextView android:id="@android:id/text1"
android:textSize="16sp"
android:textStyle="bold"
android:layout_width="match_parent"
android:layout_height="wrap_content"/>
<TextView android:id="@android:id/text2"
android:textSize="16sp"
android:layout_width="match_parent"
android:layout_height="wrap_content"/>
</LinearLayout>
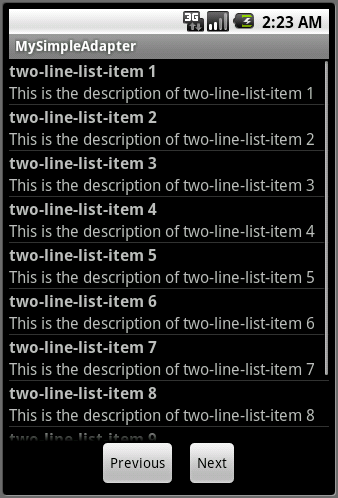
运行的结果如下:
例子中,List中的item布局有三种:
自定义的布局,使用了相对布局(RelativeLayout,见list_item.xml),左侧一个图片,右侧上方是字体比较大的title,下方是字体稍小的description;
第二种是Android自带的布局(见源码里的simple_list_item_2.xml),主要是一个垂直的LinearLayout,里面包含两个ID分别为text1、text2的TextView,这两个TextView的字体大小不一样,一个带textAppearanceLarge属性,另外一个带textAppearanceSmall属性;
第三种也是Android自带的布局(见源码里的two_line_list_item.xml),主要是一个垂直的LinearLayout,里面包含两个ID分别为text1、text2的TextView,这两个TextView的字体大小一样,但每个TextView还带一个字体加粗的属性。
SimpleAdapter的使用:
构造函数: SimpleAdapter(Context context, List<? extends Map<String, ?>> data, int resource, String[] from, int[] to)
参数有5个:
context:也就是上下文,而Activity都是继承于Context的,所以这个参数一般使用Activity的实例;
data:类型要为一个List的子类,且List中的每个元素都必须为Map的子类,每个Map中以有一对或多对的Key-Value对,这些值与下面的参数from有对应;
resource:这是每个List项(Item)对应的XML布局资源文件名,在里面控制List项显示的元素以及相对位置;
from:是一个字符串数组,可以理解为列名,对应于data数据中Map元素的Key值,只有包含在这个字符串数组的元素对应到Map中的Value值才能显示到TextView中(这些TextView在最后一个参数to配置),所以这些Value值需要为字符串或者有toString()的方法;
to:TextView组件ID的数组,上面的from参数配置了Key值,而根据这个Key值从data参数里的map取出的value值需要设置到TextView中,而这些TextView的id需要在这个数组中配置。而且这些TextView需要在参数resource对应的XML资源文件中配置。
补充:
例子中使用了ListActivity,它有默认的XML资源文件;但由于本例需要添加两个按钮(原来的布局是没有按钮),所以重新在main.xml中配置了一个ListView,且ListActivity要求放到它里面的ListView的ID必须是 android:list 。本例的两个按钮主要是切换不同的ListActivity来显示ListView项的三种不同布局,一种是自定义的,另外两种是Android自带的常用ListView项布局。

相关文章推荐
- ListView项(Item)的三种布局使用例子
- Android中ListView使用getItemViewType为item设置不同的布局
- listView中多个listItem布局时 convertView缓存及使用(转)
- 关于一个ListView使用多个item布局在优化时出现显示错乱的解决方案 (优化)
- 使用ListView进行不同布局ItemView的显示
- listView中多个listItem布局时,convertView缓存及使用
- 使用listview显示多个不同的item布局报数组越界
- android Listview的getView和convertview原理解析以及使用不同的item布局(一)
- listView中多个listItem布局时,convertView缓存及使用
- android 一个listview中不同行Item使用不同布局
- android Listview的getView和convertview原理解析以及使用不同的item布局(二)
- listView中多个listItem布局时,convertView缓存及使用
- listView中多个listItem布局时,convertView缓存及使用
- 在listView中多个listItem布局时,convertView缓存及使用
- 使用ListView界面布局、给每个item绑定监听器
- ListView Item使用多种布局优化
- 关于一个ListView使用多个item布局在优化时出现显示错乱的解决方案
- listView中多个listItem布局时,convertView缓存及使用
- listView中多个listItem布局时,convertView缓存及使用
- 【listView】listView中多个listItem布局时,convertView缓存及使用