Increasing virtual disk file partition size with DISKPART or GPartEd (较实用的方法)
2010-08-23 12:05
549 查看
To create more space for your apps and data on a virtual machine (VM), you could create a new VM, but it may be more efficient to increase virtual disk space on the same VM.
In case you're just joining this two-part series, check out part one to learn how to use VMware Converter to resize the virtual disk files.
Before attempting to increase the size of the original disk partition, it's a good idea to make a backup of your disk file. You can do this by either copying the two VMDK files to a temporary directory on your ESX host, or by using the vmkfstools command with the –i option which creates a copy of the disk file. The syntax is:
Or in our example:
The disk file name should be the non-flat file name. Vmkfstools automatically copies both the descriptor VMDK file and the –flat data VMDK file.
The first method for accomplishing a disk partition re-size involves attaching the disk file to another VM and using the Windows DISKPART utility to extend the volume. DISKPART will not allow you to extend a system or boot volume on the server you are running it on, which is why we must extend it using another server. The second method involves booting from a Gnome Partition Editor (GPartEd) live CD and using the utility to extend the volume.
Windows helper VM method:
Notice:Instructions for Windows 2000, XP, Server 2003 or Server 2003 R2, If your resized virtual disk is bootable, you cannot use diskpart from the virtual machine itself
Instructions for Windows Vista, 7 and 2008R2,These versions of Windows ship with a more enhanced version of diskpart.exe that supports partition extension for bootable disks.
Shut down the VM whose disk was extended (VM1).
Select a VM to be used as a Helper (VM2). The VM should preferably be running the same OS and be on the same ESX host as VM1.
Shutdown the VM which will be the helper (VM2).
Edit the VM settings for VM2, add an additional hard disk, select to use an existing virtual disk and browse to VM1's disk file and click OK to finish.
Power on VM2. If you go into the disk management utility you will see the second hard drive.

Click image for larger view
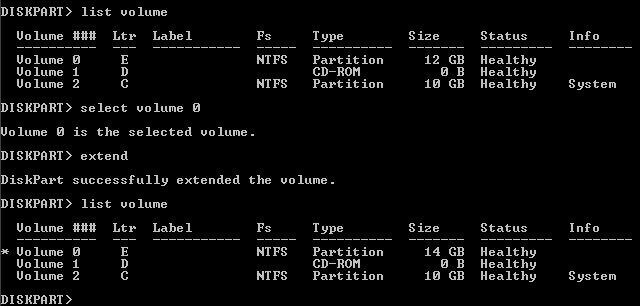
Go to a command prompt and type DISKPART. Next type LIST VOLUME to see all the available volumes. Then, find the volume number of the disk from the other server. You can usually tell which one it is by the drive letter and size, and it should also be the one that is not a system volume.
Type SELECT VOLUME <volume #> to select it. Once it is selected type EXTEND to extend it. If you enter LIST VOLUME again you will see the new size.

Click image for larger view
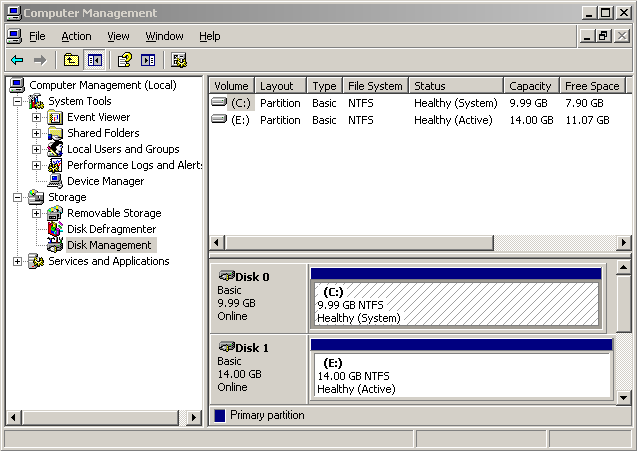
Exit out of the DISKPART utility. If you check in the Disk Management utility you will also see that the previously unallocated space it gone and the disk is now larger.

Click for larger view
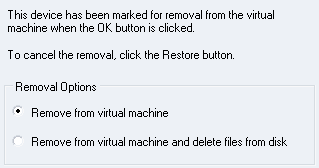
Shutdown VM2, edit VM2's settings and remove the hard disk from it. Make sure you only remove it and do NOT delete the disk file.

Click image for larger view
Power on VM1. Once it boots and you log into it you will probably see a prompt asking you to restart. Let it restart, log back in, load Disk Management and you should see that your disk has been successfully increased.

Click image for larger view
GPartEd method:
Shutdown the VM whose disk was extended.
Download the ISO file for the GpartEd Live CD.
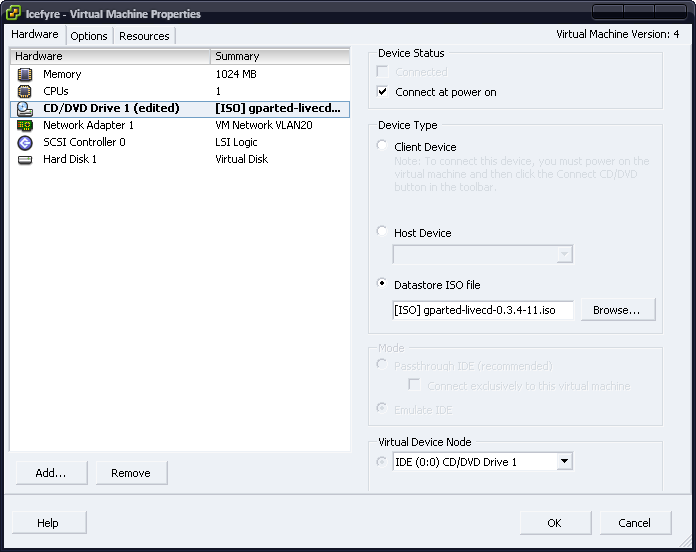
Copy the ISO to the VMFS volume of the ESX server so it can be mounted by the VM. Edit the VM's settings, select the CD drive, select the data store ISO file for the device type, browse to your ISO file and select it and make sure you have Connect at Power On checked.

Click image for larger view
The next part can be a bit tricky because of the very brief amount of time that the VM's BIOS screen displays when it is started. This delay is not configurable in ESX 3.0.x but can be modified in ESX 3.5. You may want to temporarily increase the delay if your VM is on a ESX 3.5 server. To do this, edit the VM's settings by going to the Options tab, then selecting Boot Options and change the Power-on Boot Delay to 5,000 milliseconds (5 seconds).
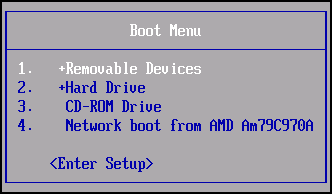
Make sure you have the VM's console open and click the Power On icon. As soon as you see the BIOS screen displayed, quickly click inside the console window to give it focus and hit the ESC key which will bring up the Boot menu. If you miss it, let the server boot, log into it, do a shutdown and restart and wait for the BIOS screen to appear and try again.

Click image for larger view
Once you get the boot menu, select CD-ROM and it will boot from the ISO file that you selected.
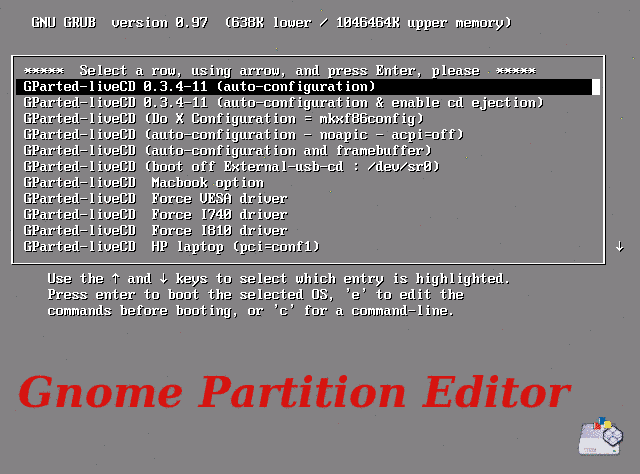
The GPartEd screen will appear, hit ENTER to continue.

Click image for larger view
The live CD will start loading, hit ENTER to load the default key map, choose a language or hit ENTER for US. The live CD will continue loading until the GUI screen is finally displayed.
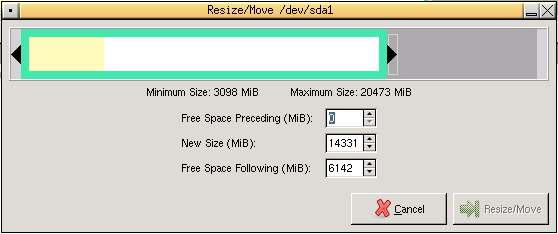
Select your partition (/dev/sda1) in the list and click the Resize/Move button.

Click image for larger view
Move your mouse to the right-arrow. The cursor should change to a double-arrow. Make sure you do not move into the green area which is Move (four-way arrow cursor) instead of Re-size.

Click image for larger view
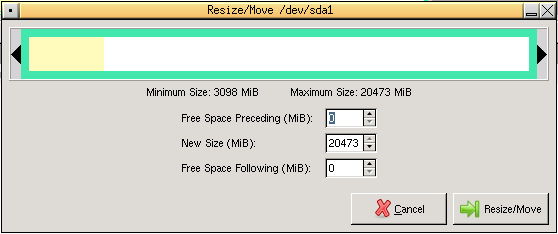
Drag the right-arrow all the way to the right to increase the partition size to the maximum size.

Click image for larger view
Click the Resize/Move button and the Resize/Move window will disappear. Click the Apply button to start the Resize operation. Click Apply a second time to confirm.

Click image for larger view
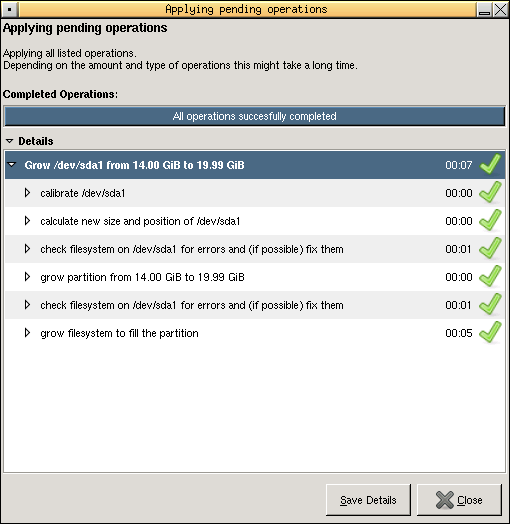
The Resize operation will begin and should quickly complete. You can expand the details heading to see detailed information on the operation. Once it completes click the Close button.

Click image for larger view
Click the Exit button and select the Reboot option. The server will reboot. Windows servers will typically do a Check Disk when booting after the partition has been modified outside of Windows. Once the Check Disk finishes, log in to the server. Windows will have detected the change and will want to restart. Let it restart, log in again, load Disk Management and you should see that your partition has been enlarged.
That's it, you should now have more disk space for your virtual machine to enjoy. There are a few other methods for increasing and decreasing virtual disk sizes but the methods in this article tend to work the best. You can also read about additional methods here.
Increasing virtual disk file partition size with DISKPART or GPartEd
But if you want to increase virtual disk file space, you need to resize the virtual disk files. To use the newly available disk space, you have to increase the size of the previously existing disk partitions. There are two methods for executing this task and each requires several steps.In case you're just joining this two-part series, check out part one to learn how to use VMware Converter to resize the virtual disk files.
Before attempting to increase the size of the original disk partition, it's a good idea to make a backup of your disk file. You can do this by either copying the two VMDK files to a temporary directory on your ESX host, or by using the vmkfstools command with the –i option which creates a copy of the disk file. The syntax is:
vmkfstools -i<
source disk name> <
destination disk name>
Or in our example:
vmkfstools -i myvm1.vmdk myvm1-backup.vmdk
The disk file name should be the non-flat file name. Vmkfstools automatically copies both the descriptor VMDK file and the –flat data VMDK file.
The first method for accomplishing a disk partition re-size involves attaching the disk file to another VM and using the Windows DISKPART utility to extend the volume. DISKPART will not allow you to extend a system or boot volume on the server you are running it on, which is why we must extend it using another server. The second method involves booting from a Gnome Partition Editor (GPartEd) live CD and using the utility to extend the volume.
Windows helper VM method:
Notice:Instructions for Windows 2000, XP, Server 2003 or Server 2003 R2, If your resized virtual disk is bootable, you cannot use diskpart from the virtual machine itself
Instructions for Windows Vista, 7 and 2008R2,These versions of Windows ship with a more enhanced version of diskpart.exe that supports partition extension for bootable disks.
Shut down the VM whose disk was extended (VM1).
Select a VM to be used as a Helper (VM2). The VM should preferably be running the same OS and be on the same ESX host as VM1.
Shutdown the VM which will be the helper (VM2).
Edit the VM settings for VM2, add an additional hard disk, select to use an existing virtual disk and browse to VM1's disk file and click OK to finish.
Power on VM2. If you go into the disk management utility you will see the second hard drive.

Click image for larger view
Go to a command prompt and type DISKPART. Next type LIST VOLUME to see all the available volumes. Then, find the volume number of the disk from the other server. You can usually tell which one it is by the drive letter and size, and it should also be the one that is not a system volume.
Type SELECT VOLUME <volume #> to select it. Once it is selected type EXTEND to extend it. If you enter LIST VOLUME again you will see the new size.
Click image for larger view
Exit out of the DISKPART utility. If you check in the Disk Management utility you will also see that the previously unallocated space it gone and the disk is now larger.
Click for larger view
Shutdown VM2, edit VM2's settings and remove the hard disk from it. Make sure you only remove it and do NOT delete the disk file.
Click image for larger view
Power on VM1. Once it boots and you log into it you will probably see a prompt asking you to restart. Let it restart, log back in, load Disk Management and you should see that your disk has been successfully increased.

Click image for larger view
GPartEd method:
Shutdown the VM whose disk was extended.
Download the ISO file for the GpartEd Live CD.
Copy the ISO to the VMFS volume of the ESX server so it can be mounted by the VM. Edit the VM's settings, select the CD drive, select the data store ISO file for the device type, browse to your ISO file and select it and make sure you have Connect at Power On checked.
Click image for larger view
The next part can be a bit tricky because of the very brief amount of time that the VM's BIOS screen displays when it is started. This delay is not configurable in ESX 3.0.x but can be modified in ESX 3.5. You may want to temporarily increase the delay if your VM is on a ESX 3.5 server. To do this, edit the VM's settings by going to the Options tab, then selecting Boot Options and change the Power-on Boot Delay to 5,000 milliseconds (5 seconds).
Make sure you have the VM's console open and click the Power On icon. As soon as you see the BIOS screen displayed, quickly click inside the console window to give it focus and hit the ESC key which will bring up the Boot menu. If you miss it, let the server boot, log into it, do a shutdown and restart and wait for the BIOS screen to appear and try again.
Click image for larger view
Once you get the boot menu, select CD-ROM and it will boot from the ISO file that you selected.
The GPartEd screen will appear, hit ENTER to continue.
Click image for larger view
The live CD will start loading, hit ENTER to load the default key map, choose a language or hit ENTER for US. The live CD will continue loading until the GUI screen is finally displayed.
Select your partition (/dev/sda1) in the list and click the Resize/Move button.

Click image for larger view
Move your mouse to the right-arrow. The cursor should change to a double-arrow. Make sure you do not move into the green area which is Move (four-way arrow cursor) instead of Re-size.
Click image for larger view
Drag the right-arrow all the way to the right to increase the partition size to the maximum size.
Click image for larger view
Click the Resize/Move button and the Resize/Move window will disappear. Click the Apply button to start the Resize operation. Click Apply a second time to confirm.

Click image for larger view
The Resize operation will begin and should quickly complete. You can expand the details heading to see detailed information on the operation. Once it completes click the Close button.
Click image for larger view
Click the Exit button and select the Reboot option. The server will reboot. Windows servers will typically do a Check Disk when booting after the partition has been modified outside of Windows. Once the Check Disk finishes, log in to the server. Windows will have detected the change and will want to restart. Let it restart, log in again, load Disk Management and you should see that your partition has been enlarged.
That's it, you should now have more disk space for your virtual machine to enjoy. There are a few other methods for increasing and decreasing virtual disk sizes but the methods in this article tend to work the best. You can also read about additional methods here.

相关文章推荐
- "Your package contains a file with a name that contains leading or trailing whitespace"解决方法
- Exception 'yii\db\Exception' with message 'SQLSTATE[HY000] [2002] No such file or directory’错误的解决方法
- Resizing or shrinking KVM virtual machine filesystems and disk images
- How to increase swap size with a swap file and Partition
- "The sandbox is not in sync with the Podfile.lock. Run 'pod install' or update your CocoaPods i"解决方法
- 安装php出现“/replace/with/path/to/perl/interpreter: bad interpreter: No such file or directory ”的解决方法
- Uncaught exception 'PDOException' with message 'SQLSTATE[HY000] [2002] No such file or directory解决方法
- mac下安装mysql-python包报unable to execute llvm-gcc-4.2: No such file or directory error: command 'llvm-gcc-4.2' failed with exit status 1解决方法
- iOS: NSFileHandle的方法fileHandleWithStandardInput
- #import </usr/include/objc/objc-class.h> not such file or directory问题的解决方法
- rmmod: can't change directory to '3.4.39': No such file or directory 解决方法
- iOS: NSDictionary的方法initWithContentsOfFile:
- VirtualBox 启动报错 could not find an open hard disk with uuid 解决方法
- 运行docker容器时报standard_init_linux.go:195: exec user process caused "no such file or directory" 的解决方法
- Limiting Upload File Size with Django Forms
- 使用Hadoop流进行MapReduce时出现subprocess failed with code 2 No such file or dictionary时的解决方式
- resource is out of sync with the file system 解决方法
- 解决rpm conflicts with file from package的两个方法
- IOError: [Errno 2] No such file or directory的解决方法
- ESX4.0 Recreating a missing virtual disk (VMDK) header/descriptor file