Denyhosts 轻松应对SSH暴力破解
2010-03-14 20:04
501 查看
一.简介
DenyHosts 是一个设计用来阻止SSH非法连接的一个脚本程序。
DenyHosts 开发语言 python
主要特征:
- Parses /var/log/secure to find all login attempts and filters failed and successful attempts.
解析/var/log/secure文件,查找所有试图登录,对登录成功和失败的记录过滤。
- Synchronization mode (new in 2.0) allows DenyHosts daemons the ability to share data via a centralized server to proactively thwart attacks.
同步模式(2.0以上版本)允许DenyHosts守护进程经中央服务器共享数据来主动阻止***.
- Can be run from the command line, cron or as a daemon (new in 0.9)
支持命令行﹑cron或做为一个守护进程运行(0.9以上版本)
- Records all failed login attempts for the user and offending host
记录所有恶意登录失败的用户和主机
- For each host that exceeds a threshold count, records the evil host
记录所有超出阈值,恶意登录的主机.
- Keeps track of each non-existent user (eg. sdadasd) when a login attempt failed.
记录每一个试图登录而失败的系统不存在的用户.
- Keeps track of each existing user (eg. root) when a login attempt failed.
记录每一个试图登录而失败的系统存在的用户.
- Keeps track of each offending host (with 0.8+ these hosts can be purged if the associated entry in /etc/hosts.deny is expired)
记录每一个恶意的主机(版本>=0.8 如果与之相关的入口/etc/hosts.deny过期,这些记录的主机将被移除)
- Keeps track of suspicious logins (that is, logins that were successful for a host that had many login failures)
记录可疑的登录(即,经过很多次失败登录才登录成功的主机)
- Keeps track of the file offset, so that you can reparse the same file (/var/log/secure) continuously (until it is rotated).
记录文件的偏移量,以便能够连续不断的重复解析/var/log/secure这个文件.(直到文件被回滚)
- When the log file is rotated, the script will detect it and parse from the beginning.
当一个日志文件被回滚时,DenyHosts脚本会察觉到变化,然后从头开始重新解析日志文件.
- Appends /etc/hosts.deny and adds the newly banned hosts
新近的被禁用的主机附加到/etc/hosts.deny文件.
- Optionally sends an email of newly banned hosts and suspicious logins.
可选的新近禁用的主机和可疑登录邮件通知功能.
- Keeps a history of all user, host, user/host combo and suspicious logins encountered which includes the data and number of corresponding failed login attempts.
保留所有用户﹑主机﹑用户/主机组合和可疑的登录,内容涉及登录失败的相关的数据和次数.
- Maintains failed valid and invalid user login attempts in separate files, such that it is easy to see which valid user is under attack (which would give you the opportunity to remove the account, change the password or change it's default shell to something like /sbin/nologin
在单独的文件里保留任何有效和无效的登录尝试,这样会很容易看到哪个有效用户处于被***.(它使你有机会移除这个账户,重置密码或改变账号默认的shell.如/sbin/nologin
- Upon each run, the script will load the previously saved data and re-use it to append new failures.
当每次运行时,DenyHosts脚本会加载以前保存的数据并且会重新使用它.
- Resolves IP addresses to hostnames, if available (new in v0.6.0).
解析IP地址到主机名,如果有效(版本高于0.6)
- /etc/hosts.deny entries can be expired (purge) at a user specified time (new in 0.8)
/etc/hosts.deny在用户指定的时间会过期因而清除(版本0.8以上)
- FreeBSD support (added in 0.7)
DenyHosts支持FreeBSD(版本0.7以上)
二.下载
http://ncu.dl.sourceforge.net/sourceforge/denyhosts/DenyHosts-2.6.tar.gz
三.安装
@版本DenyHosts-2.6.tar.gz
@python版本Python 2.4.3(系统已安装)检测方式: #python –V ,如果没有安装,应该先安装一下.
以下是具体安装,可以参考解压包根下的README.txt
##########################################################:
# tar zxvf DenyHosts-2.6.tar.gz && cd DenyHosts*
# python setup.py install
##########################################################
注:程序脚本默认安装目录是/usr/share/denyhosts
库文件默认安装目录是/usr/lib/python2.4/site-packages/DenyHosts
denyhosts.py 默认安装目录是/usr/bin
四.配置
1. 制作系统服务脚本
# cp /usr/share/denyhosts/daemon-control-dist /etc/rc.d/init.d/denyhostsd
daemon-control-dist为脚本模板文件
# chown root /etc/rc.d/init.d/denyhostsd
#chmod 700 /etc/rc.d/init.d/denyhostsd
以上是给予脚本执行权限
2.Denyhosts数据文件目录/usr/share/denyhosts/data

用红框圈起的文件不存在,需要手动创建。
# touch allowed-hosts
# touch restricted-usernames
3.主要配置文件
# sed -e '/#/d' -e '/^$/d' denyhosts.cfg-dist > denyhosts.cfg
# Redhat or Fedora Core:安全日志位置
SECURE_LOG = /var/log/secure
# 主机访问控制文件
HOSTS_DENY = /etc/hosts.deny
# 清除时间,下边代表一周
PURGE_DENY = 1w
# 主机被清除的最大次数,默认是0,即不限制
PURGE_THRESHOLD = 2
#指定DenyHosts对哪个服务有效,如果是所有,可以设置为ALL
BLOCK_SERVICE = sshd
# 允许无效用户登录失败的次数
DENY_THRESHOLD_INVALID = 5
# 允许有效用户登录失败的次数(root用户除外),用户数据文件/etc/passwd
DENY_THRESHOLD_VALID = 3
# 允许ROOT用户登录失败的次数
DENY_THRESHOLD_ROOT = 5
# 限制restricted-usernames文件列表中用户登录失败的次数
DENY_THRESHOLD_RESTRICTED = 5
# DenyHosts 数据保存目录
WORK_DIR = /usr/share/denyhosts/data
#
SUSPICIOUS_LOGIN_REPORT_ALLOWED_HOSTS=YES
# 是否域名反解,默认是YES
HOSTNAME_LOOKUP=NO
# 进程锁文件
LOCK_FILE = /var/lock/subsys/denyhosts
# 受限主机和可疑主机报告接收邮件
ADMIN_EMAIL = henry.an@mail.***.com
SMTP_HOST = mail.***.com
SMTP_PORT = 25
#SMTP_USERNAME=
#SMTP_PASSWORD=
SMTP_FROM = DenyHosts <henry.an@***.com>
SMTP_SUBJECT = DenyHosts Report
# 用户的失败登录计数重置为0的时间(/etc/passwd)
AGE_RESET_VALID=5d
# root用户失败登录计数重置为0的时间
AGE_RESET_ROOT=25d
#用户的失败登录计数重置为0的时间(/usr/share/denyhosts/data/restricted-usernames)
AGE_RESET_RESTRICTED=25d
# 无效用户的失败登录计数重置为0的时间(/etc/passwd)
AGE_RESET_INVALID=10d
# DenyHosts日志
DAEMON_LOG = /var/log/denyhosts
DAEMON_SLEEP = 30s
DAEMON_PURGE = 1h
# mkdir /usr/share/denyhosts/data
以上是DenyHosts生成的数据文件目录
五.调试
debug模式起动denyhostsd
# service denyhostsd start –debug
# tail –f /var/log/denyhosts //以下附加ip到/etc/hosts.deny文件后发送邮件的日志
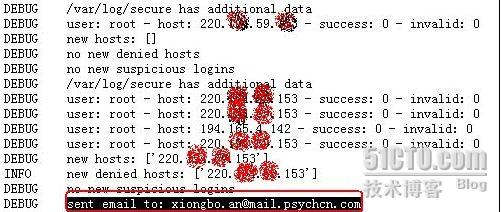
以下是邮件通知的内容:
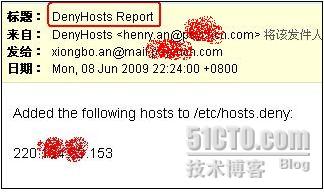
本文出自 “漫步人生” 博客,请务必保留此出处http://anxiongbo.blog.51cto.com/805770
DenyHosts 是一个设计用来阻止SSH非法连接的一个脚本程序。
DenyHosts 开发语言 python
主要特征:
- Parses /var/log/secure to find all login attempts and filters failed and successful attempts.
解析/var/log/secure文件,查找所有试图登录,对登录成功和失败的记录过滤。
- Synchronization mode (new in 2.0) allows DenyHosts daemons the ability to share data via a centralized server to proactively thwart attacks.
同步模式(2.0以上版本)允许DenyHosts守护进程经中央服务器共享数据来主动阻止***.
- Can be run from the command line, cron or as a daemon (new in 0.9)
支持命令行﹑cron或做为一个守护进程运行(0.9以上版本)
- Records all failed login attempts for the user and offending host
记录所有恶意登录失败的用户和主机
- For each host that exceeds a threshold count, records the evil host
记录所有超出阈值,恶意登录的主机.
- Keeps track of each non-existent user (eg. sdadasd) when a login attempt failed.
记录每一个试图登录而失败的系统不存在的用户.
- Keeps track of each existing user (eg. root) when a login attempt failed.
记录每一个试图登录而失败的系统存在的用户.
- Keeps track of each offending host (with 0.8+ these hosts can be purged if the associated entry in /etc/hosts.deny is expired)
记录每一个恶意的主机(版本>=0.8 如果与之相关的入口/etc/hosts.deny过期,这些记录的主机将被移除)
- Keeps track of suspicious logins (that is, logins that were successful for a host that had many login failures)
记录可疑的登录(即,经过很多次失败登录才登录成功的主机)
- Keeps track of the file offset, so that you can reparse the same file (/var/log/secure) continuously (until it is rotated).
记录文件的偏移量,以便能够连续不断的重复解析/var/log/secure这个文件.(直到文件被回滚)
- When the log file is rotated, the script will detect it and parse from the beginning.
当一个日志文件被回滚时,DenyHosts脚本会察觉到变化,然后从头开始重新解析日志文件.
- Appends /etc/hosts.deny and adds the newly banned hosts
新近的被禁用的主机附加到/etc/hosts.deny文件.
- Optionally sends an email of newly banned hosts and suspicious logins.
可选的新近禁用的主机和可疑登录邮件通知功能.
- Keeps a history of all user, host, user/host combo and suspicious logins encountered which includes the data and number of corresponding failed login attempts.
保留所有用户﹑主机﹑用户/主机组合和可疑的登录,内容涉及登录失败的相关的数据和次数.
- Maintains failed valid and invalid user login attempts in separate files, such that it is easy to see which valid user is under attack (which would give you the opportunity to remove the account, change the password or change it's default shell to something like /sbin/nologin
在单独的文件里保留任何有效和无效的登录尝试,这样会很容易看到哪个有效用户处于被***.(它使你有机会移除这个账户,重置密码或改变账号默认的shell.如/sbin/nologin
- Upon each run, the script will load the previously saved data and re-use it to append new failures.
当每次运行时,DenyHosts脚本会加载以前保存的数据并且会重新使用它.
- Resolves IP addresses to hostnames, if available (new in v0.6.0).
解析IP地址到主机名,如果有效(版本高于0.6)
- /etc/hosts.deny entries can be expired (purge) at a user specified time (new in 0.8)
/etc/hosts.deny在用户指定的时间会过期因而清除(版本0.8以上)
- FreeBSD support (added in 0.7)
DenyHosts支持FreeBSD(版本0.7以上)
二.下载
http://ncu.dl.sourceforge.net/sourceforge/denyhosts/DenyHosts-2.6.tar.gz
三.安装
@版本DenyHosts-2.6.tar.gz
@python版本Python 2.4.3(系统已安装)检测方式: #python –V ,如果没有安装,应该先安装一下.
以下是具体安装,可以参考解压包根下的README.txt
##########################################################:
# tar zxvf DenyHosts-2.6.tar.gz && cd DenyHosts*
# python setup.py install
##########################################################
注:程序脚本默认安装目录是/usr/share/denyhosts
库文件默认安装目录是/usr/lib/python2.4/site-packages/DenyHosts
denyhosts.py 默认安装目录是/usr/bin
四.配置
1. 制作系统服务脚本
# cp /usr/share/denyhosts/daemon-control-dist /etc/rc.d/init.d/denyhostsd
daemon-control-dist为脚本模板文件
# chown root /etc/rc.d/init.d/denyhostsd
#chmod 700 /etc/rc.d/init.d/denyhostsd
以上是给予脚本执行权限
2.Denyhosts数据文件目录/usr/share/denyhosts/data
用红框圈起的文件不存在,需要手动创建。
# touch allowed-hosts
# touch restricted-usernames
3.主要配置文件
# sed -e '/#/d' -e '/^$/d' denyhosts.cfg-dist > denyhosts.cfg
# Redhat or Fedora Core:安全日志位置
SECURE_LOG = /var/log/secure
# 主机访问控制文件
HOSTS_DENY = /etc/hosts.deny
# 清除时间,下边代表一周
PURGE_DENY = 1w
# 主机被清除的最大次数,默认是0,即不限制
PURGE_THRESHOLD = 2
#指定DenyHosts对哪个服务有效,如果是所有,可以设置为ALL
BLOCK_SERVICE = sshd
# 允许无效用户登录失败的次数
DENY_THRESHOLD_INVALID = 5
# 允许有效用户登录失败的次数(root用户除外),用户数据文件/etc/passwd
DENY_THRESHOLD_VALID = 3
# 允许ROOT用户登录失败的次数
DENY_THRESHOLD_ROOT = 5
# 限制restricted-usernames文件列表中用户登录失败的次数
DENY_THRESHOLD_RESTRICTED = 5
# DenyHosts 数据保存目录
WORK_DIR = /usr/share/denyhosts/data
#
SUSPICIOUS_LOGIN_REPORT_ALLOWED_HOSTS=YES
# 是否域名反解,默认是YES
HOSTNAME_LOOKUP=NO
# 进程锁文件
LOCK_FILE = /var/lock/subsys/denyhosts
# 受限主机和可疑主机报告接收邮件
ADMIN_EMAIL = henry.an@mail.***.com
SMTP_HOST = mail.***.com
SMTP_PORT = 25
#SMTP_USERNAME=
#SMTP_PASSWORD=
SMTP_FROM = DenyHosts <henry.an@***.com>
SMTP_SUBJECT = DenyHosts Report
# 用户的失败登录计数重置为0的时间(/etc/passwd)
AGE_RESET_VALID=5d
# root用户失败登录计数重置为0的时间
AGE_RESET_ROOT=25d
#用户的失败登录计数重置为0的时间(/usr/share/denyhosts/data/restricted-usernames)
AGE_RESET_RESTRICTED=25d
# 无效用户的失败登录计数重置为0的时间(/etc/passwd)
AGE_RESET_INVALID=10d
# DenyHosts日志
DAEMON_LOG = /var/log/denyhosts
DAEMON_SLEEP = 30s
DAEMON_PURGE = 1h
# mkdir /usr/share/denyhosts/data
以上是DenyHosts生成的数据文件目录
五.调试
debug模式起动denyhostsd
# service denyhostsd start –debug
# tail –f /var/log/denyhosts //以下附加ip到/etc/hosts.deny文件后发送邮件的日志
以下是邮件通知的内容:
本文出自 “漫步人生” 博客,请务必保留此出处http://anxiongbo.blog.51cto.com/805770

相关文章推荐
- Denyhosts 轻松应对SSH暴力破解 推荐
- linux下使用denyhosts防止ssh暴力破解
- 利用denyhosts轻松实现,sshd和ftp暴力密码破解防御
- 安装DenyHosts阻止SSH暴力破解
- Debian vps使用DenyHosts防止SSH密码暴力破解
- linux安全---利用DenyHosts防止ssh暴力破解
- Linux服务器应注意的安全问题-ssh暴力破解--denyhosts解决
- SSH防暴力破解软件 Denyhosts
- 使用DenyHosts阻止SSH暴力破解
- linux服务器不得不注意的安全问题--ssh暴力破解--denyhosts解决
- centos 7 DenyHosts 安装 防暴力破解ssh登陆
- DenyHosts 阻止SSH暴力破解最好的方法
- 防止ssh暴力破解软件 denyhosts
- linux服务器不得不注意的安全问题--ssh暴力破解--denyhosts解决
- 转载:linux服务器不得不注意的安全问题--ssh暴力破解--denyhosts解决
- Denyhosts 防止SSH暴力破解服务器密码-1
- Ubuntu安装denyhosts防止暴力破解远程SSH
- DenyHosts防止ssh暴力破解
- linux使用denyhosts防ssh暴力破解
- DenyHosts防止SSH暴力破解