GoogleAppEngine上部署Weather2Phone
2010-01-21 16:06
417 查看
前几天在服务器上部署了一个发送天气预报的服务,那个程序的实现方式还比较原始,先是抓取天气信息然后用PyFetion发送到手机上。为了实现每天收到天气预报,使用的方法是在服务器配置计划任务,到时间就执行py2exe打包好的程序文件。
在服务器上配置计划任务毕竟不保险,被领导发现了虽然不会批评,说两下是肯定的。这不就考虑这在Google App Engine上部署一个算了。因为前几天在看web.py,已经着手用web.py写了,后来看到gae上webapp使用起来更简单一些而且更原生一点(另外就是用web.py部署到gae上还是稍微繁琐一些的),转而用webapp实现了。
简单看一下教程后就动手了,先是定义好数据实体
用PyFetion发送短信其实只要知道飞信号也就是sip就可以了,为了方便记忆,把昵称和手机号也放过来吧。
很汗的登录界面实现
这里不得不说一下,目前还不会使用login这样的方式来登录。不过想想应该也不是很难了,定义一个管理员表,然后进行判断来登录,顺便保存到session,如此云云,这个就未来再考虑实现吧。那这样的话其实登录只是个摆设而已啦,只要知道后面设定的地址,直接输入即可到后台了。
然后就是主界面了,主界面下主要有两部分,一个是设置好的天气信息,另一个就是选择发送对象。
weahter.html模板里的form内容
<form method="post" action="sendsms">
<p><div class="message">发送消息内容<br>
<textarea name="sms_content" rows=6 cols=80>{{ message }}</textarea>
</div></p>
<div class="userhead">发送目标 <small><a href="edituser">edit</a></small></div>
<div class="user">
{% for user in users %}
<input type="checkbox" name="sip" value ="{{ user.sip }}" checked>{{ user.nickname }}
<div class="nick_tips">
<small>飞信号:{{ user.sip }} 手机号码:{{ user.phone }}</small>
</div><br>
{% endfor %}
</div>
<input type="submit" value="发送" />
</form>
这样下来实现的效果如图:
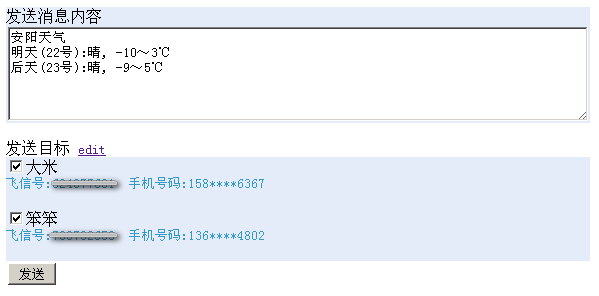
文字域里面已经自动生成了天气信息,已经指定了城市,如果要实现定制的话就需要多几个页面和表了。发送对象可以选定也可以编辑。编辑用户的实现比较简单就不说了,无非就是浏览所有用户、添加、删除如此。
主要的发送功能实现:
这里面post方法是前面用户的提交操作,根据发送文本域中的内容到选择的用户。而get方式则是关键所在,抓取天气信息后直接发送给所有用户。这也是为了执行定时任务准备的。
为了执行定时任务就需要用到gae提供的cron服务,在cron.yaml中配置如下
cron:
- description: daily weather send job
url: /send-sms
schedule: every mon,tue,wed,thu,fri,sat,sun of month 17:30
timezone: Asia/Shanghaicron:
这里指定的schedule为每个月的所有星期,官方提供的说明不是很明白(也许是我笨),指定every 24 hours又怕时间不准。测试几天看情况如何再说吧。
至此,我的服务已经在Google App Engine上架好了,嘿嘿,静候每天的温馨天气提醒就是了。
在服务器上配置计划任务毕竟不保险,被领导发现了虽然不会批评,说两下是肯定的。这不就考虑这在Google App Engine上部署一个算了。因为前几天在看web.py,已经着手用web.py写了,后来看到gae上webapp使用起来更简单一些而且更原生一点(另外就是用web.py部署到gae上还是稍微繁琐一些的),转而用webapp实现了。
简单看一下教程后就动手了,先是定义好数据实体
class FetionUser(db.Model):
sip = db.StringProperty()
nickname = db.StringProperty()
phone = db.StringProperty()
用PyFetion发送短信其实只要知道飞信号也就是sip就可以了,为了方便记忆,把昵称和手机号也放过来吧。
很汗的登录界面实现
class MainPage(webapp.RequestHandler):
"""index页,实现一个简单的密码登录,防君子不防小人"""
def get(self):
self.response.out.write("""<html><head>
<title>Weather to Phone</title></head>
<body><center>
<p><br /></p><br /><br />
<form method="post">
<div><input type="password" name="pwd"><input type="submit" value="Enter"></div>
</form></center>
</body></html>""")
def post(self):
if self.request.get("pwd") == '我的密码':
self.redirect('/index')
else:
self.redirect('/')
这里不得不说一下,目前还不会使用login这样的方式来登录。不过想想应该也不是很难了,定义一个管理员表,然后进行判断来登录,顺便保存到session,如此云云,这个就未来再考虑实现吧。那这样的话其实登录只是个摆设而已啦,只要知道后面设定的地址,直接输入即可到后台了。
然后就是主界面了,主界面下主要有两部分,一个是设置好的天气信息,另一个就是选择发送对象。
class Weather(webapp.RequestHandler):
def get(self):
user_query = FetionUser.all()  # 选择所有用户
users = user_query.fetch(20)  # 这里gae限制必需有返回数量参数
message = weather.message  # 默认获取天气预报信息
code_content = {
"message": message,
"users": users
}
path = os.path.join(os.path.dirname(__file__), 'weather.html')
self.response.out.write(template.render(path, code_content))
weahter.html模板里的form内容
<form method="post" action="sendsms">
<p><div class="message">发送消息内容<br>
<textarea name="sms_content" rows=6 cols=80>{{ message }}</textarea>
</div></p>
<div class="userhead">发送目标 <small><a href="edituser">edit</a></small></div>
<div class="user">
{% for user in users %}
<input type="checkbox" name="sip" value ="{{ user.sip }}" checked>{{ user.nickname }}
<div class="nick_tips">
<small>飞信号:{{ user.sip }} 手机号码:{{ user.phone }}</small>
</div><br>
{% endfor %}
</div>
<input type="submit" value="发送" />
</form>
这样下来实现的效果如图:
文字域里面已经自动生成了天气信息,已经指定了城市,如果要实现定制的话就需要多几个页面和表了。发送对象可以选定也可以编辑。编辑用户的实现比较简单就不说了,无非就是浏览所有用户、添加、删除如此。
主要的发送功能实现:
class SendSMS(webapp.RequestHandler):
def get(self):
"""自动获取信息并发送,用于执行定时任务"""
content = weather.message
user_query = FetionUser.all()
users = user_query.fetch(20)
fetion = PyFetion(fetion_id, fetion_pwd, "HTTP")
fetion.login(FetionHidden)
for user in users:
sip = str(user.sip)
fetion.send_sms(content, sip, True)
fetion.logout()
self.response.out.write("Done")
def post(self):
"""人工指定的发送模式,用于网页端"""
content = cgi.escape(self.request.get("sms_content"))
content = content.encode('utf-8', 'ignore')  #编码短信为utf8
targets = self.request.get_all("sip")
if targets:
out = content + "/n"
fetion = PyFetion(fetion_id, fetion_pwd, "HTTP")
fetion.login(FetionHidden)
for target in targets:
fetion.send_sms(content, target, True)
out += "/n" + str(target) + "/tDone./n"
fetion.logout()
self.response.out.write("<html><body><pre>" + out + "</pre></body></html>")
else:
self.response.out.write("你要发给哪位大大啊?")
这里面post方法是前面用户的提交操作,根据发送文本域中的内容到选择的用户。而get方式则是关键所在,抓取天气信息后直接发送给所有用户。这也是为了执行定时任务准备的。
为了执行定时任务就需要用到gae提供的cron服务,在cron.yaml中配置如下
cron:
- description: daily weather send job
url: /send-sms
schedule: every mon,tue,wed,thu,fri,sat,sun of month 17:30
timezone: Asia/Shanghaicron:
这里指定的schedule为每个月的所有星期,官方提供的说明不是很明白(也许是我笨),指定every 24 hours又怕时间不准。测试几天看情况如何再说吧。
至此,我的服务已经在Google App Engine上架好了,嘿嘿,静候每天的温馨天气提醒就是了。

相关文章推荐
- GoogleAppEngine上部署Weather2Phone
- WingIDE部署GAE(google app engine)
- Google App Engine (GAE)注册与部署
- 部署到Google App Engine时中途退出后引起的问题
- 使用Google App Engine进行软件的开发和部署发布
- Google AppEngine上部署PHP应用
- Google Appengine 的自动部署脚本
- Google AppEngine上部署PHP应用
- GAE(Google App Engine)部署时候遇到的问题
- 基于Google App Engine 的翻F墙Q工具XX-NET部署全套攻略
- Google APPEngine部署问题
- 在 Google AppEngine 上部署 WebService(Java)
- 有关google的appengine部署服务器的简单教程
- 部署struts2项目到 google app engine (age)中遇到的一个问题
- Google AppEngine上部署PHP应用
- Geoserver不能在Google App Engine中部署的几个原因及在Amazon中的部署方式
- 在google云平台上部署Java web工程(在google app engine上部署自己的应用)
- Google AppEngine上部署PHP应用
- 第一次部署GoogleAppEngine网络程序
- 我在Google AppEngine上部署了一个Java应用(OpenID测试)