设计模式6:Adapter Pattern (适配器模式)
2009-06-25 15:53
671 查看
来自于:http://www.cnblogs.com/zhenyulu/articles/39386.html
参考于:http://www.dofactory.com/Patterns/PatternAdapter.aspx
一、 适配器(Adapter)模式
适配器模式把一个类的接口变换成客户端所期待的另一种接口,从而使原本接口不匹配而无法在一起工作的两个类能够在一起工作。
名称由来
这很像变压器(Adapter),变压器把一种电压变换成另一种电压。美国的生活用电电压是110V,而中国的电压是220V。如果要在中国使用美国电器,就必须有一个能把220V电压转换成110V电压的变压器。这个变压器就是一个Adapter。
Adapter模式也很像货物的包装过程:被包装的货物的真实样子被包装所掩盖和改变,因此有人把这种模式叫做包装(Wrapper)模式。事实上,大家经常写很多这样的Wrapper类,把已有的一些类包装起来,使之有能满足需要的接口。
适配器模式的两种形式
适配器模式有类的适配器模式和对象的适配器模式两种。我们将分别讨论这两种Adapter模式。

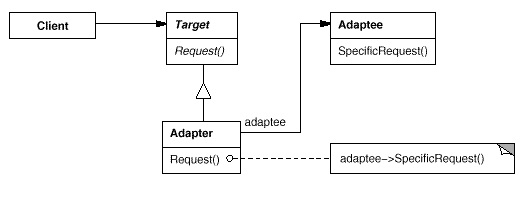
由图中可以看出,Adaptee类没有Request方法,而客户期待这个方法。为了使客户能够使用Adaptee类,提供一个中间环节,即类Adapter类,Adapter类实现了Target接口,并继承自Adaptee,Adapter类的Request方法重新封装了Adaptee的SpecificRequest方法,实现了适配的目的。
因为Adapter与Adaptee是继承的关系,所以这决定了这个适配器模式是类的。
该适配器模式所涉及的角色包括:
目标(Target)角色:这是客户所期待的接口。因为C#不支持多继承,所以Target必须是接口,不可以是类。
源(Adaptee)角色:需要适配的类。
适配器(Adapter)角色:把源接口转换成目标接口。这一角色必须是类。
下面的程序给出了一个类的Adapter模式的示意性的实现:
从图中可以看出:客户端需要调用Request方法,而Adaptee没有该方法,为了使客户端能够使用Adaptee类,需要提供一个包装(Wrapper)类Adapter。这个包装类包装了一个Adaptee的实例,从而将客户端与Adaptee衔接起来。由于Adapter与Adaptee是委派关系,这决定了这个适配器模式是对象的。
该适配器模式所涉及的角色包括:
目标(Target)角色:这是客户所期待的接口。目标可以是具体的或抽象的类,也可以是接口。
源(Adaptee)角色:需要适配的类。
适配器(Adapter)角色:通过在内部包装(Wrap)一个Adaptee对象,把源接口转换成目标接口。
下面的程序给出了一个类的Adapter模式的示意性的实现:
在以下各种情况下使用适配器模式:
1、 系统需要使用现有的类,而此类的接口不符合系统的需要。
2、 想要建立一个可以重复使用的类,用于与一些彼此之间没有太大关联的一些类,包括一些可能在将来引进的类一起工作。这些源类不一定有很复杂的接口。
3、 (对对象适配器而言)在设计里,需要改变多个已有子类的接口,如果使用类的适配器模式,就要针对每一个子类做一个适配器,而这不太实际。
下面的程序演示了Class Adapter与Object Adapter的应用。
Adapter模式在实现时有以下这些值得注意的地方:
1、 目标接口可以省略,模式发生退化。但这种做法看似平庸而并不平庸,它可以使Adaptee不必实现不需要的方法(可以参考Default Adapter模式)。其表现形式就是父类实现缺省方法,而子类只需实现自己独特的方法。这有些像模板(Template)模式。
2、 适配器类可以是抽象类。
3、 带参数的适配器模式。使用这种办法,适配器类可以根据参数返还一个合适的实例给客户端。
其他的例子
参考于:http://www.dofactory.com/Patterns/PatternAdapter.aspx
一、 适配器(Adapter)模式
适配器模式把一个类的接口变换成客户端所期待的另一种接口,从而使原本接口不匹配而无法在一起工作的两个类能够在一起工作。
名称由来
这很像变压器(Adapter),变压器把一种电压变换成另一种电压。美国的生活用电电压是110V,而中国的电压是220V。如果要在中国使用美国电器,就必须有一个能把220V电压转换成110V电压的变压器。这个变压器就是一个Adapter。
Adapter模式也很像货物的包装过程:被包装的货物的真实样子被包装所掩盖和改变,因此有人把这种模式叫做包装(Wrapper)模式。事实上,大家经常写很多这样的Wrapper类,把已有的一些类包装起来,使之有能满足需要的接口。
适配器模式的两种形式
适配器模式有类的适配器模式和对象的适配器模式两种。我们将分别讨论这两种Adapter模式。
二、 类的Adapter模式的结构:
由图中可以看出,Adaptee类没有Request方法,而客户期待这个方法。为了使客户能够使用Adaptee类,提供一个中间环节,即类Adapter类,Adapter类实现了Target接口,并继承自Adaptee,Adapter类的Request方法重新封装了Adaptee的SpecificRequest方法,实现了适配的目的。
因为Adapter与Adaptee是继承的关系,所以这决定了这个适配器模式是类的。
该适配器模式所涉及的角色包括:
目标(Target)角色:这是客户所期待的接口。因为C#不支持多继承,所以Target必须是接口,不可以是类。
源(Adaptee)角色:需要适配的类。
适配器(Adapter)角色:把源接口转换成目标接口。这一角色必须是类。
三、 类的Adapter模式示意性实现:
下面的程序给出了一个类的Adapter模式的示意性的实现:using System;
using System.Collections.Generic;
using System.Linq;
using System.Text;
namespace Adapter_Pattern
{
// Class Adapter pattern -- Structural example
using System;
// "ITarget"
interface ITarget
{
// Methods
void Request();
}
// "Adaptee"
class Adaptee
{
// Methods
public void SpecificRequest()
{
Console.WriteLine("Called SpecificRequest()");
}
}
// "Adapter"
class Adapter : Adaptee, ITarget
{
// Implements ITarget interface
public void Request()
{
// Possibly do some data manipulation
// and then call SpecificRequest
this.SpecificRequest();
}
}
/**/
/// <summary>
/// Client test
/// </summary>
public class Client
{
public static void Main(string[] args)
{
// Create adapter and place a request
ITarget t = new Adapter();
t.Request();
}
}
}
四、 对象的Adapter模式的结构:
从图中可以看出:客户端需要调用Request方法,而Adaptee没有该方法,为了使客户端能够使用Adaptee类,需要提供一个包装(Wrapper)类Adapter。这个包装类包装了一个Adaptee的实例,从而将客户端与Adaptee衔接起来。由于Adapter与Adaptee是委派关系,这决定了这个适配器模式是对象的。
该适配器模式所涉及的角色包括:
目标(Target)角色:这是客户所期待的接口。目标可以是具体的或抽象的类,也可以是接口。
源(Adaptee)角色:需要适配的类。
适配器(Adapter)角色:通过在内部包装(Wrap)一个Adaptee对象,把源接口转换成目标接口。
五、 对象的Adapter模式示意性实现:
下面的程序给出了一个类的Adapter模式的示意性的实现:using System;
using System.Collections.Generic;
using System.Linq;
using System.Text;
namespace Adapter_Pattern
{
// Adapter pattern -- Structural example
// "Target"
class Target
{
// Methods
virtual public void Request()
{
// Normal implementation goes here
}
}
// "Adapter"
class Adapter : Target
{
// Fields
private Adaptee adaptee = new Adaptee();
// Methods
override public void Request()
{
// Possibly do some data manipulation
// and then call SpecificRequest
adaptee.SpecificRequest();
}
}
// "Adaptee"
class Adaptee
{
// Methods
public void SpecificRequest()
{
Console.WriteLine("Called SpecificRequest()");
}
}
/**/
/// <summary>
/// Client test
/// </summary>
public class Client
{
public static void Main(string[] args)
{
// Create adapter and place a request
Target t = new Adapter();
t.Request();
Console.Read();
}
}
}
六、 在什么情况下使用适配器模式
在以下各种情况下使用适配器模式:1、 系统需要使用现有的类,而此类的接口不符合系统的需要。
2、 想要建立一个可以重复使用的类,用于与一些彼此之间没有太大关联的一些类,包括一些可能在将来引进的类一起工作。这些源类不一定有很复杂的接口。
3、 (对对象适配器而言)在设计里,需要改变多个已有子类的接口,如果使用类的适配器模式,就要针对每一个子类做一个适配器,而这不太实际。
七、 一个实际应用Adapter模式的例子
下面的程序演示了Class Adapter与Object Adapter的应用。using System;
using System.Collections.Generic;
using System.Linq;
using System.Text;
namespace Adapter_Pattern
{
// Example of implementing the Adapter pattern
using System;
// Target
public interface ICar
{
void Drive();
}
// Direct use without Adapter
public class CToyota : ICar
{
public void Drive()
{
Console.WriteLine("Vroom Vroom, we're off in our Toyota");
}
}
// Adaptee
public class CCessna
{
public void Fly()
{
Console.WriteLine("Static runup OK, we're off in our C172");
}
}
// Class Adapter
public class CDrivableCessna : CCessna, ICar
{
public void Drive() { base.Fly(); }
}
// Object Adapter
public class CDrivableCessna2 : ICar
{
private CCessna m_oContained;
public CDrivableCessna2()
{
m_oContained = new CCessna();
}
public void Drive() { m_oContained.Fly(); }
}
// Client
public class Client
{
public static void Main(string[] args)
{
ICar oCar = new CToyota();
Console.Write("Class Adapter: Driving an Automobile");
oCar.Drive();
oCar = new CDrivableCessna();
Console.Write("Driving a Cessna");
oCar.Drive();
oCar = new CDrivableCessna2();
Console.Write(" Object Adapter: Driving a Cessna");
oCar.Drive();
}
}
}
八、 关于Adapter模式的讨论
Adapter模式在实现时有以下这些值得注意的地方:1、 目标接口可以省略,模式发生退化。但这种做法看似平庸而并不平庸,它可以使Adaptee不必实现不需要的方法(可以参考Default Adapter模式)。其表现形式就是父类实现缺省方法,而子类只需实现自己独特的方法。这有些像模板(Template)模式。
2、 适配器类可以是抽象类。
3、 带参数的适配器模式。使用这种办法,适配器类可以根据参数返还一个合适的实例给客户端。
其他的例子
// Adapter pattern -- Real World example
using System;
namespace DoFactory.GangOfFour.Adapter.RealWorld
{

/// <summary>

/// MainApp startup class for Real-World

/// Adapter Design Pattern.

/// </summary>

class MainApp
{

/// <summary>

/// Entry point into console application.

/// </summary>

static void Main()
{

// Non-adapted chemical compound

Compound unknown = new Compound("Unknown");

unknown.Display();

// Adapted chemical compounds

Compound water = new RichCompound("Water");

water.Display();

Compound benzene = new RichCompound("Benzene");

benzene.Display();

Compound ethanol = new RichCompound("Ethanol");

ethanol.Display();

// Wait for user

Console.ReadKey();

}

}

/// <summary>

/// The 'Target' class

/// </summary>

class Compound
{

protected string _chemical;

protected float _boilingPoint;

protected float _meltingPoint;

protected double _molecularWeight;

protected string _molecularFormula;

// Constructor

public Compound(string chemical)
{

this._chemical = chemical;

}

public virtual void Display()
{

Console.WriteLine("/nCompound: {0} ------ ", _chemical);

}

}

/// <summary>

/// The 'Adapter' class

/// </summary>

class RichCompound : Compound
{

private ChemicalDatabank _bank;

// Constructor

public RichCompound(string name)

: base(name)
{

}

public override void Display()
{

// The Adaptee

_bank = new ChemicalDatabank();

_boilingPoint = _bank.GetCriticalPoint(_chemical, "B");

_meltingPoint = _bank.GetCriticalPoint(_chemical, "M");

_molecularWeight = _bank.GetMolecularWeight(_chemical);

_molecularFormula = _bank.GetMolecularStructure(_chemical);

base.Display();

Console.WriteLine(" Formula: {0}", _molecularFormula);

Console.WriteLine(" Weight : {0}", _molecularWeight);

Console.WriteLine(" Melting Pt: {0}", _meltingPoint);

Console.WriteLine(" Boiling Pt: {0}", _boilingPoint);

}

}

/// <summary>

/// The 'Adaptee' class

/// </summary>

class ChemicalDatabank
{

// The databank 'legacy API'

public float GetCriticalPoint(string compound, string point)
{

// Melting Point

if (point == "M")
{

switch (compound.ToLower())
{

case "water": return 0.0f;

case "benzene": return 5.5f;

case "ethanol": return -114.1f;

default: return 0f;

}

}

// Boiling Point

else
{

switch (compound.ToLower())
{

case "water": return 100.0f;

case "benzene": return 80.1f;

case "ethanol": return 78.3f;

default: return 0f;

}

}

}

public string GetMolecularStructure(string compound)
{

switch (compound.ToLower())
{

case "water": return "H20";

case "benzene": return "C6H6";

case "ethanol": return "C2H5OH";

default: return "";

}

}

public double GetMolecularWeight(string compound)
{

switch (compound.ToLower())
{

case "water": return 18.015;

case "benzene": return 78.1134;

case "ethanol": return 46.0688;

default: return 0d;

}

}

}

}

相关文章推荐
- 设计模式(结构型)之适配器模式(Adapter Pattern)
- C#设计模式之六适配器模式(Adapter Pattern)【结构型】
- 二十四种设计模式:适配器模式(Adapter Pattern)
- c++设计模式:适配器模式(Adapter Pattern)
- 设计模式-适配器模式(Adapter Pattern)
- Java设计模式--适配器模式【Adapter Pattern】
- C#设计模式(7)——适配器模式(Adapter Pattern)
- 设计模式学习--适配器模式(Adapter Pattern)+外观模式(Facade Pattern)
- 我所理解的设计模式(C++实现)——适配器模式(Adapter Pattern)
- C#设计模式之六适配器模式(Adapter Pattern)【结构型】
- .NET设计模式(8):适配器模式(Adapter Pattern)
- 设计模式之适配器模式(Adapter Pattern)C++实现
- 设计模式:适配器模式(Adapter Pattern)
- 设计模式心得:适配器模式(adapter pattern)和外观模式(facade pattern)
- Java设计模式之适配器模式(Adapter Pattern)
- .NET设计模式(8):适配器模式(Adapter Pattern)
- .Net设计模式 Adapter 适配器模式(结构型模式)Adapter Pattern
- Php设计模式之【适配器模式 Adapter Pattern】
- 【设计模式】适配器模式(Adapter Pattern)
- 设计模式 适配器模式(Adapter Pattern)