WPF笔记(4.2 单笔数据绑定)——Data Binding
2007-09-06 17:17
405 查看
WPF的数据绑定机制
既保证了数据的同步性,又使得数据类型的相应转换正常进行。如下所示:
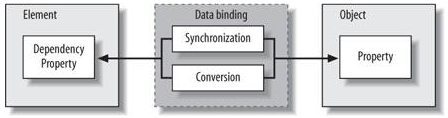
左边是XMAL的UI元素,右边是cs程序中的Object,中间是数据绑定层,将左右两层连接起来。
那么, 两个层次的语法如下:
UI层,有3种表示方式:
方法1:
//这种方法在新版本好像不支持,以后来改这个地方
<TextBox >
<TextBox.Text>
<Binding Path="Age" />
</TextBox.Text>
</TextBox>
方法2:
//TextContent改为新版本的Text
<TextBox Text="{Binding Path=Age}" />
方法3:
//TextContent改为新版本的Text
<TextBox Text="{Binding Age}" />
注意,绑定后从底层向上开始找数据源,直到发现位置为止,最上层是<Window>
Object层,要设置数据源:
grid1.DataContext = person; // person为对象
相应前面的XAML中的TextBox控件:<TextBox Text="{Binding Age}" />,于是可以看到显示的是person对象的Age属性
结合Resource技术,可以全都写在XAML中而不用编写后台程序,这样做的前提是这个Object,在这里是Person,有一个用来初始化的构造函数。这时,DataContext绑定的是静态资源{StaticResource Tom},Tom是资源的Key:
<!-- Window1.xaml -->
<?Mapping XmlNamespace="local" ClrNamespace="PersonBinding" ?>
<Window xmlns:local="local">
<Window.Resources>
<local:Person x:Key="Tom" Name="Tom" Age="9" />
</Window.Resources>
<Grid DataContext="{StaticResource Tom}">
<TextBlock >Name:</TextBlock>
<TextBox Text="{Binding Path=Name}" />
<TextBlock >Age:</TextBlock>
<TextBox Text="{Binding Path=Age}" />
<Button x:Name="birthdayButton">Birthday</Button>
</Grid>
</Window>
当然,按下Button后,后台还是有代码的:
public partial class Window1 : Window {
void birthdayButton_Click(object sender, RoutedEventArgs e) {
Person person = (Person)this.FindResource("Tom"));
++person.Age;
MessageBox.Show();
}
}
注意这个FindResource()方法,找到key为Tom的资源后,强制类型转换为Person
以上介绍的都是隐式的数据源,因为只有一个DataSource,所以可以不指定Source属性;当数据源多于1个的时候,这时要指定具体绑定那一个数据源了——称之为显示数据源,关键的是Source属性
<!-- Window1.xaml -->
<Window >
<Window.Resources>
<local:Person x:Key="Tom" />
<local:Person x:Key="John" />
</Window.Resources>
<Grid>
<TextBox x:Name="tomTextBox"
Text="
{Binding
Path=Name,
Source={StaticResource Tom}}" />
<TextBox x:Name="johnTextBox"
Text="
{Binding
Path=Name,
Source={StaticResource John}}" />
</Grid>
</Window>
绑定其他类型数据
以上介绍的都只是文本。接下来说的是如何绑定ForeColor这样的类型数据。
现在考虑的是如果 Age〉25,则名字显示为红色。ForeColor是Brush类型,Age为整型。
WPF提供了接口IValueConverter,只要实现了该接口的两个方法,就可以完成这件工作:一个是Convert,另一个是ConvertBack,分别控制正反两个方向的转换。对于当前情况,新建一个类AgeToForegroundConverter,实现如下:
public class AgeToForegroundConverter : IValueConverter {
// Called when converting the Age to a Foreground brush
public object Convert(object value, Type targetType, ) {
Debug.Assert(targetType == typeof(Brush));
// DANGER! After 25, it's all down hill
int age = int.Parse(value.ToString( ));
return (age > 25 ? Brushes.Red : Brushes.Black);
}
// Called when converting a Foreground brush back to an Age
public object ConvertBack(object value, ) {
// should never be called
throw new NotImplementedException( );
}
}
于是,在XAML中添加这个类AgeToForegroundConverter的资源,并设置相应的Convert属性即可:
<!-- Window1.xaml -->
<?Mapping XmlNamespace="local" ClrNamespace="PersonBinding" ?>
<Window xmlns:local="local">
<Window.Resources>
<local:Person x:Key="Tom" />
<local:AgeToForegroundConverter
x:Key="AgeToForegroundConverter" />
</Window.Resources>
<Grid DataContext="{StaticResource Tom}">
<TextBox
Text="{Binding Path=Age}"
Foreground="
{Binding
Path=Age,
Converter={StaticResource AgeToForegroundConverter}}"
/>
</Grid>
</Window>
总结,以上介绍的技术,只限于单独一个对象的绑定,可以取代第一节介绍的INotifyPropertyChanged实现模式。
既保证了数据的同步性,又使得数据类型的相应转换正常进行。如下所示:
左边是XMAL的UI元素,右边是cs程序中的Object,中间是数据绑定层,将左右两层连接起来。
那么, 两个层次的语法如下:
UI层,有3种表示方式:
方法1:
//这种方法在新版本好像不支持,以后来改这个地方
<TextBox >
<TextBox.Text>
<Binding Path="Age" />
</TextBox.Text>
</TextBox>
方法2:
//TextContent改为新版本的Text
<TextBox Text="{Binding Path=Age}" />
方法3:
//TextContent改为新版本的Text
<TextBox Text="{Binding Age}" />
注意,绑定后从底层向上开始找数据源,直到发现位置为止,最上层是<Window>
Object层,要设置数据源:
grid1.DataContext = person; // person为对象
相应前面的XAML中的TextBox控件:<TextBox Text="{Binding Age}" />,于是可以看到显示的是person对象的Age属性
结合Resource技术,可以全都写在XAML中而不用编写后台程序,这样做的前提是这个Object,在这里是Person,有一个用来初始化的构造函数。这时,DataContext绑定的是静态资源{StaticResource Tom},Tom是资源的Key:
<!-- Window1.xaml -->
<?Mapping XmlNamespace="local" ClrNamespace="PersonBinding" ?>
<Window xmlns:local="local">
<Window.Resources>
<local:Person x:Key="Tom" Name="Tom" Age="9" />
</Window.Resources>
<Grid DataContext="{StaticResource Tom}">
<TextBlock >Name:</TextBlock>
<TextBox Text="{Binding Path=Name}" />
<TextBlock >Age:</TextBlock>
<TextBox Text="{Binding Path=Age}" />
<Button x:Name="birthdayButton">Birthday</Button>
</Grid>
</Window>
当然,按下Button后,后台还是有代码的:
public partial class Window1 : Window {
void birthdayButton_Click(object sender, RoutedEventArgs e) {
Person person = (Person)this.FindResource("Tom"));
++person.Age;
MessageBox.Show();
}
}
注意这个FindResource()方法,找到key为Tom的资源后,强制类型转换为Person
以上介绍的都是隐式的数据源,因为只有一个DataSource,所以可以不指定Source属性;当数据源多于1个的时候,这时要指定具体绑定那一个数据源了——称之为显示数据源,关键的是Source属性
<!-- Window1.xaml -->
<Window >
<Window.Resources>
<local:Person x:Key="Tom" />
<local:Person x:Key="John" />
</Window.Resources>
<Grid>
<TextBox x:Name="tomTextBox"
Text="
{Binding
Path=Name,
Source={StaticResource Tom}}" />
<TextBox x:Name="johnTextBox"
Text="
{Binding
Path=Name,
Source={StaticResource John}}" />
</Grid>
</Window>
绑定其他类型数据
以上介绍的都只是文本。接下来说的是如何绑定ForeColor这样的类型数据。
现在考虑的是如果 Age〉25,则名字显示为红色。ForeColor是Brush类型,Age为整型。
WPF提供了接口IValueConverter,只要实现了该接口的两个方法,就可以完成这件工作:一个是Convert,另一个是ConvertBack,分别控制正反两个方向的转换。对于当前情况,新建一个类AgeToForegroundConverter,实现如下:
public class AgeToForegroundConverter : IValueConverter {
// Called when converting the Age to a Foreground brush
public object Convert(object value, Type targetType, ) {
Debug.Assert(targetType == typeof(Brush));
// DANGER! After 25, it's all down hill
int age = int.Parse(value.ToString( ));
return (age > 25 ? Brushes.Red : Brushes.Black);
}
// Called when converting a Foreground brush back to an Age
public object ConvertBack(object value, ) {
// should never be called
throw new NotImplementedException( );
}
}
于是,在XAML中添加这个类AgeToForegroundConverter的资源,并设置相应的Convert属性即可:
<!-- Window1.xaml -->
<?Mapping XmlNamespace="local" ClrNamespace="PersonBinding" ?>
<Window xmlns:local="local">
<Window.Resources>
<local:Person x:Key="Tom" />
<local:AgeToForegroundConverter
x:Key="AgeToForegroundConverter" />
</Window.Resources>
<Grid DataContext="{StaticResource Tom}">
<TextBox
Text="{Binding Path=Age}"
Foreground="
{Binding
Path=Age,
Converter={StaticResource AgeToForegroundConverter}}"
/>
</Grid>
</Window>
总结,以上介绍的技术,只限于单独一个对象的绑定,可以取代第一节介绍的INotifyPropertyChanged实现模式。

相关文章推荐
- WPF笔记(4.3 集合数据绑定)——Data Binding
- WPF笔记(4.5 Master-Detail数据绑定)——Data Binding
- 【转载】wpf学习笔记数据绑定9
- WPF and Silverlight 学习笔记(二十五):使用CollectionView实现对绑定数据的排序、筛选、分组
- WPF笔记(1.6 数据绑定)——Hello,WPF!
- ASP.net(1.1)原理学习笔记--第七章 数据绑定Data Binding
- WPF学习笔记之数据绑定
- WPF and Silverlight 学习笔记(二十二):使用代码实现绑定、绑定数据的验证
- WPF学习笔记一 依赖属性及其数据绑定
- wpf数据绑定和数据库基础-学习笔记1
- 黑马程序员——wpf数据绑定控件笔记
- WPF and Silverlight 学习笔记(二十二):使用代码实现绑定、绑定数据的验证
- Android中的MVP笔记之二: Data Binding 库的使用之layout绑定数据与事件。
- wpf学习笔记-数据绑定功能总结
- WPF学习笔记(04) - 简单的控件和数据绑定
- WPF学习笔记:(二)数据绑定模式与INotifyPropertyChanged接口
- 调试WPF数据绑定(Data Binding)错误
- Data Binding(数据绑定)---学习笔记
- WPF学习笔记 - 数据绑定(在代码中)
- WPF笔记(1.6 数据绑定)——Hello,WPF!