ASP.net(1.1)原理学习笔记--第七章 数据绑定Data Binding
2006-01-25 10:39
881 查看
Chapter 7. Data Binding
This chapter covers the process of binding data to controls. ASP.NET introduces a new syntax for data binding that is convenient to use in conjunction with the ADO.NET DataSet and DataReader classes. While data can be bound to any control, several controls simplify the common case of data presentation, including the DataGrid, Repeater, and DataList controls. We look in detail at these three controls for data presentation, with particular focus on how to customize each control's appearance using templates.This chapter focuses on the controls used in data binding and less on the details of ADO.NET. For a complete treatment of ADO.NET, see the book Essential ADO.NET, by Bob Beauchemin (Boston, Massachusets: Addison-Wesley, 2002).
7.1 Fundamentals
At its core, data binding is a very straightforward process. Controls that support data binding expose a property named DataSource and a method called DataBind(). When a page is loaded, the user of the control initializes the DataSource property to some collection of data, such as an array, a DataReader, or a DataSet. When the data source is ready to be read from, the user of the control calls the DataBind() method on the control, at which point the control reads in all the data from the data source, making a local copy of it. When the page is ultimately rendered, the control takes the cached data it retrieved from the data source and renders its contents into the response buffer in whatever format the control is built to provide. Figure 7-1 shows the data binding process for a control.Figure 7-1. Data Binding Process
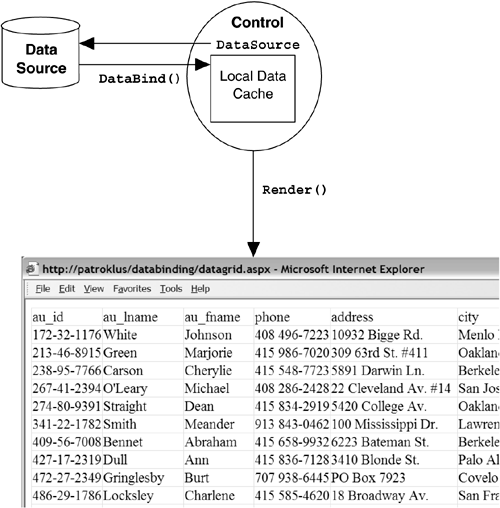
As we will see, it is possible to bind many different types of data sources, including simple collection classes and data readers connected to a database. The most common data source to bind is typically a data reader, however, because it is the most efficient means of transferring data from a database into a data-bound control. Several controls support data binding, including simple controls, such as the ListBox, and controls designed exclusively for data binding, such as the DataGrid and Repeater. As an example of a common use of data binding, Listing 7-1 shows a page that contains a DataGrid, which is data-bound to the "authors" table in the "pubs" database in SQL Server. This example uses the IDataReader interface to retrieve the data, and it takes care to invoke the DataBind() method immediately after the data reader is prepared and before it is closed.
Listing 7-1 Binding a DataReader to a DataGrid
<!� File: DataGrid.aspx �>
<%@Page Language="C#" %>
<%@ Import Namespace="System.Data" %>
<%@ Import Namespace="System.Data.SqlClient" %>

<html>
<script language="C#" runat="server">
protected void Page_Load(Object src, EventArgs e)
{
IDbConnection conn =
new SqlConnection("server=.;uid=sa;pwd=;database=Pubs");

IDbCommand cmd = conn.CreateCommand();
cmd.CommandText = "SELECT * FROM Authors";

try
{
conn.Open();
IDataReader reader = cmd.ExecuteReader();
gd1.DataSource = reader;
gd1.DataBind();
}
finally
{
conn.Dispose();
}
}
</script>

<body>
<form runat=server>
<asp:DataGrid id="gd1" runat=server />
</form>
</body>
</html>Figure 7-3. ArrayListBind.aspx Page Instance7.2 Data Binding Controls
Many server controls in ASP.NET support data binding for populating their contents. These controls expose a DataSource property to be initialized to any object that supports the IEnumerable interface, as well as DataTables and DataSets. When the control's DataBind() method is invoked, the collection is traversed, and the contents of the control are filled with whatever was in the collection. Like the Render method of controls, the DataBind method invokes DataBind on any of the control's child controls. So invoking the Page's top-level DataBind() method implicitly invokes all the DataBind() methods for all controls on that page. Alternatively, you can elect to invoke each control's DataBind() method independently. Figure 7-2 shows a list of all the controls that support data binding, and some of the most common classes that support IEnumerable and are thus suitable for attaching to a data-bound control. Figure 7-2. Controls Capable of Data Binding, and Some Common Collections to Bind ToNote that the list of data sources includes many collection classes in addition to the ADO.NET classes. This means that binding data to a control does not necessarily mean that you are retrieving data from a database; it could just as well mean that you have manually populated an array of values that you want displayed in a list box. Listing 7-2 shows a page that binds a hand-constructed ArrayList to a number of server controls, and Figure 7-3 shows an instance of this page running. Listing 7-2 Binding an ArrayList to Several Server Controls[code]<!� File: ArrayListBind.aspx �> <%@ Page Language="C#" %> <html> <body> <head> <script runat=server> void Page_Load(Object sender, EventArgs e) { if (!Page.IsPostBack) { ArrayList vals = new ArrayList(); vals.Add("v1"); vals.Add("v2"); vals.Add("v3"); vals.Add("v4"); s1.DataSource = vals; cbl1.DataSource= vals; dd1.DataSource = vals; lb1.DataSource = vals; rbl1.DataSource= vals; DataBind(); } } </script> </head> <form runat=server> <Select id="s1" runat=server /> <br/> <asp:CheckBoxList id="cbl1" runat=server /> <br/> <asp:DropDownList id="dd1" runat=server /> <br/> <asp:ListBox id="lb1" runat=server /> <br/> <asp:RadioButtonList id="rbl1" runat=server /> <br/> </form> </body> </html>

[/code]
In this example, we are only populating the DropDownList control if the incoming request is the initial GET request to the page, not a subsequent POST back to the same page. By default, all the data-bound controls retain their state across post-backs, so it is not necessary to repopulate them on a post-back. Also note in this example that we are able to associate two data values with each item in the DropDownList. The DataTextField determines what string is displayed in the control, and the DataValueField determines what value is associated with that field. This is a convenient mechanism for retaining primary-key information for table values without resorting to additional data structures. Figure 7-4 shows a sample instance of this page running.7.3 Binding to Database Sources
As we have seen, it is possible to bind to many different types of collections in .NET. The most common type of binding by far, however, is to bind to a result set retrieved from a database query. ADO.NET provides two ways of retrieving result sets from a database: the streaming IDataReader interface and the disconnected DataSet class. We will look at each of these in turn.7.3.1 IDataReader Binding
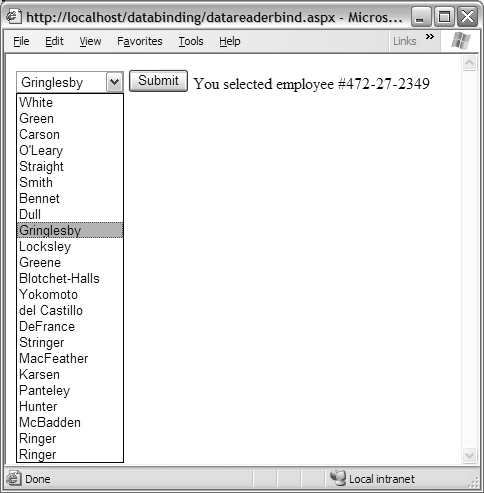
The most efficient way to retrieve data for binding from a database is to use the streaming IDataReader interface from ADO.NET. This interface provides access to the results of a query in a stream, in forward-only fashion, and makes no additional copy of the data. In all the existing ADO.NET data providers, the data reader implementation classes also support IEnumerable so that they are compatible with data binding, and in general, it should be safe to assume that any data reader implementation provides an IEnumerable interface implementation as well. In our first example of using a data reader, shown in Listing 7-1, we bound to a DataGrid, which provides a tabular rendering of the data. If you are trying to bind a data reader to a single column control such as a ListBox or a DropDownList, however, it is ambiguous which fields of the result set should be mapped to the strings and values of the control. To deal with this, controls like the DropDownList define two additional fields: DataTextField and DataValueField. These fields can be initialized to the appropriate column names of the data reader to specify the column from which the data should be drawn when the control populates itself with data. Listing 7-3 shows an example of binding an IDataReader to a drop-down list. Listing 7-3 Binding a Data Reader to a DropDownList[code]<!� File: DataReaderBind.aspx �> <%@Page Language="C#" %> <%@ Import Namespace="System.Data" %> <%@ Import Namespace="System.Data.SqlClient" %> <html> <script language="C#" runat="server"> protected void Page_Load(Object src, EventArgs e) { if (!IsPostBack) { IDbConnection conn = new SqlConnection("server=.;uid=sa;pwd=;database=Pubs"); IDbCommand cmd = conn.CreateCommand(); cmd.CommandText = "SELECT * FROM Authors"; try { conn.Open(); IDataReader reader = cmd.ExecuteReader(); _authors.DataSource = reader; _authors.DataTextField = "au_lname"; _authors.DataValueField = "au_id"; _authors.DataBind(); } finally { conn.Dispose(); } } else { _message.Text = string.Format("You selected employee #{0}", _authors.SelectedItem.Value); } } </script></head> <form runat=server> <asp:DropDownList id="_authors" runat=server /> <br/> <asp:Label id="_message" runat=server/> <br/> <input type=submit value="Submit" /> </form> </body> </html>
Figure 7-4. DataReaderBind.aspx Page Running
7.3.2 DataSet Binding
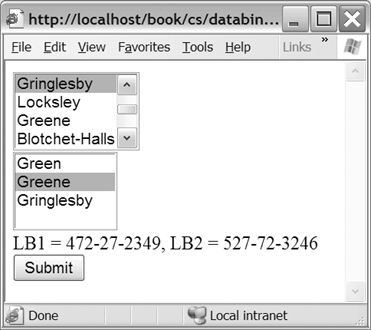
It is also common to bind DataSets to controls for display. Because a DataSet can represent the results of multiple database queries, however, you need to specify which portion of the DataSet should be used for binding. If you simply bind to the entire DataSet, the default view of the first table in the DataSet is used. If you want more control over which table within a DataSet to use during binding, data-bound controls support an additional field, DataMember, that indicates which "set" of data to bind to the control. For a DataSet, this means which table to bind. Alternatively, you can be explicit about it and bind to a table within a DataSet, in which case the default view of that table is used. Or you can be even more explicit and use the DataView that provides a "view" into a data set and can be created with custom sorting and filtering rules.Listing 7-4 shows an example of binding data from a DataSet to a pair of controls. Note that the first control is bound directly to the DataSet, which implicitly binds to the default view of the DataSet. The second control is bound to an explicitly created DataView, whose Filter property has been populated to show only authors with last names beginning with G and whose Sort property has been set to the au_id field of the table.
Listing 7-4 Binding to a DataView
<!� File: DataViewBind.aspx �>
<%@ Page Language="C#" %>
<%@ Import Namespace="System.Data" %>
<%@ Import Namespace="System.Data.SqlClient" %>

<html>
<script language="C#" runat="server">
protected void Page_Load(Object src, EventArgs e)
{
if (!IsPostBack)
{
SqlConnection conn =
new SqlConnection("server=.;uid=sa;pwd=;database=pubs");
SqlDataAdapter da =
new SqlDataAdapter("select * from Authors", conn);

DataSet ds = new DataSet();
da.Fill(ds, "Authors");

_lb1.DataSource = ds;
_lb1.DataTextField = "au_lname";
_lb1.DataValueField = "au_id";

DataView view = new DataView(ds.Tables["Authors"]);
view.RowFilter = "au_lname like 'G%'";
view.Sort = "au_lname";
_lb2.DataSource = view;
_lb2.DataTextField = "au_lname";
_lb2.DataValueField = "au_id";

DataBind();
}
else
{
_message.Text =
string.Format("LB1 = {0}, LB2 = {1}",
_lb1.SelectedItem.Value,
_lb2.SelectedItem.Value);
}
}
</script>

<body>
<form runat=server>
<asp:ListBox id="_lb1" runat=server /> <br/>
<asp:ListBox id="_lb2" runat=server /> <br/>
<asp:Label id="_message" runat=server/> <br/>
<input type=submit value="Submit"/>
</form>
</body>
</html>
The biggest difference between binding to a DataSet and binding to data readers is that the DataSet makes a local copy of the data, and the connection to the database is closed immediately after the call to the SqlDataAdapter.Fill() method completes. Figure 7-5 shows the DataViewBind.aspx page running.Figure 7-5. DataViewBind.aspx Page Instance
7.3.3 DataSet versus DataReader for Data Binding
As we have seen, both the DataSet and the DataReader can be used to bind data to a control, but when should you choose one over the other? A good rule of thumb to answer this question is, if you are not taking advantage of the DataSet's cache of the data, you should probably use a DataReader. If you use a DataSet simply to retrieve data from a data source and then immediately bind it to a control, subsequently discarding the DataSet, you are creating an unnecessary duplicate copy of the data, since all data-bound controls keep their own local copy of any data to which they are bound.In addition, because data-bound controls guarantee that they will retain any data you bind to them, even across post-backs, it is quite easy to generate three distinct copies of the data in-memory in the server, which can be problematic for large rowsets. The first copy of the data is loaded into the DataSet's cache after it is filled from the data source. The second copy is created when you perform a DataBind on the control, which takes the data from the DataSet and make its own local copy using its own internal storage mechanism. The third, and final, copy exists in the ViewState state bag, which the control populates with its data to ensure that it can be fully restored on subsequent post-backs. Figure 7-6 shows this inefficient data propagation scenario.
Figure 7-6. The Hazards of Naïve Data Binding

To avoid this duplication of data during data binding, you can take two steps. First, use a DataReader in place of a DataSet when you are doing nothing with the data but binding it to a control. Second, disable the view state of the data-bound control by setting the control's EnableViewState flag to false (although there are caveats to doing this, discussed later). Performing both of these steps removes the two extra copies of the data, leaving only the local copy managed by the control, as shown in Figure 7-7.
Figure 7-7. Efficient Data Binding
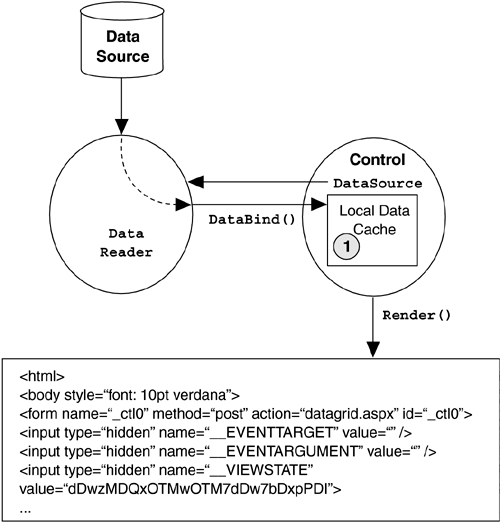
Unfortunately, you cannot always disable the view state of a control without impacting its behavior, which you may be relying on in your application. For example, server-side events rely on the EnableViewState flag being enabled for a control, so if you have added handlers for any server-side events issued by a data-bound control, you have no choice but to leave view state enabled. Also, by disabling view state, you must take care to explicitly repopulate the data-bound control on each request. It is no longer sufficient merely to populate it once on the initial GET request and assume that it will retain its state on subsequent POST requests to the same page. If you can live with these restrictions, however, you can save significant bandwidth space and server memory by disabling view state on your data-bound controls.
There are also occasions where using the DataSet makes more sense than using a DataReader. As mentioned earlier, if you are taking advantage of the fact that the DataSet creates a local cache of the data, by all means use it. One case in which to consider a DataSet is when you bind one set of data to multiple controls, especially by taking advantage of the DataView mechanism of the DataSet to provide filtering and ordering during the binding process. Another appealing application of the DataSet is to keep an instance of a DataSet in the cache (discussed in Chapter 9) for binding to controls without having to go back to the database over and over. This works especially well for small result sets, such as lookup tables.
7.4 DataGrid
Of all the controls provided by ASP.NET, the DataGrid is by far the most complex, with literally hundreds of properties, methods, and events. Understanding the full set of features of this control is a daunting prospect. Instead of enumerating all the various options available for the DataGrid, this section presents some of the more commonly used techniques for presenting tabular data with the DataGrid. For a full reference of all the available styles and features, refer to the MSDN documentation[13] for the DataGrid class.To begin with, the DataGrid control displays tabular data from a data source. In its simplest usage, as shown earlier in Listing 7-1, you can use a DataGrid to quickly generate a table rendering of any data source. Its object model includes a collection of columns, a header, and a footer, all of which can be customized to create the appearance you need. Columns can be autogenerated from the underlying data source schema, where each column of the data source table generates a column in the grid. Alternatively, you can be explicit about which columns to display by disabling the AutoGenerateColumns property and adding BoundColumns to the Columns collection. Figure 7-8 demonstrates a DataGrid with AutoGenerateColumns set to false and with several other style attributes to alter the appearance.
Figure 7-8. A DataGrid with Custom BoundColumns

7.4.1 DataGrid Paging
Paging of data is a common approach to giving clients control over how much data they want to view at a time. Instead of generating one giant table with all of the data, you can generate a table with a fixed number of rows and specify an interface to navigate forward and backward through the data source.To enable paging on a DataGrid, you must set the AllowPaging property to true, and you must provide a handler for the PageIndexChanged event of the DataGrid. In the PageIndexChanged event handler, you need to set the CurrentPageIndex property of the DataGrid to the NewPageIndex passed in via the DataGridPageChangedEventArgs parameter to the handler. Without doing anything else, you will have a paged grid with a default page size of 10. However, for this default paging mechanism to work, you must supply the DataGrid with the complete set of records each time its DataBind method is called, because this is how it calculates how many pages to display. Unfortunately, although this gives the appearance of paging, it loses the main benefit of paging, which is to avoid retrieving all of the data with each access to the page. And even worse, this technique implicitly sends all of the data associated with the DataGrid through the __VIEWSTATE field across each post-back.
A more compelling alternative is to add a little more logic to your DataGrid and use its custom paging capabilities. You enable custom paging by setting the AllowCustomPaging property to true. It is then left up to you to manage the page count and page navigation by setting the VirtualItemCount property of the DataGrid to the total number if items it should display, and then when performing data binding, by determining what subset of the underlying data source to retrieve based on the current page index. Figure 7-9 shows a sample custom paging data grid in action.
Figure 7-9. Custom Paging DataGrid in Action

Listing 7-5 shows the page with the DataGrid declaration supporting custom paging (additional style attributes are not shown). Note that AllowCustomPaging has been set to true, and the PageSize has been explicitly specified, in addition to AllowPaging and the PageIndexChanged handler necessary for standard paging.
Listing 7-5 Page with a DataGrid Implementing Custom Paging
<!� File: DataGridPage.aspx �>
<%@ Page language="C#" Debug="True"
Src="DataGridPage.aspx.cs" Inherits="DataGridPage" %>
<html>
<body>
<form runat="server">

<asp:DataGrid id=_gd1
Width="90%"
Runat="server"
AllowCustomPaging='true'
AllowPaging='true'
OnPageIndexChanged="Grid_Change"
PageSize=10
/>
</form>
</body>
</html>
Listing 7-6 shows the code-behind class that implements the logic behind the custom paging DataGrid. When this page is loaded for the first time, it queries the data source to discover how many items are in the collection to be displayed by the paged DataGrid. This number is assigned to the VirtualItemCount of the DataGrid so that it knows how many pages of data there are and can change the page navigation indicators appropriately. The total count of items is obtained via a private method called GetItemCount that issues a "SELECT COUNT(*)..." query to discover the number of rows in the underlying table. The logic for the GetItemCount function varies from application to application depending on the underlying data source, but this is one common approach.
Perhaps the most important piece of logic in this class is provided by the BindGrid() method, used to populate the DataGrid whenever necessary. This function issues a query against the data source for precisely the number of rows necessary to display the current page. Again, the logic in this function varies from application to application. In this particular application, the ID field of the Employees table is a linear indexer, so to retrieve records 11 through 20, you can query the table for records whose IDs range from 11 through 20.
Finally, the Grid_Change method is our handler for the PageIndexChanged event of the DataGrid. In it, we assign the CurrentPageIndex property of the DataGrid to the incoming NewPageIndex of the DataGridPageChangedEventArgs parameter. We also calculate the beginning index of the underlying data source to be retrieved by taking the current page index (plus 1), multiplying it by the page size, and subtracting the result from the total VirtualItemCount. This starting index is saved in a field of our class called _startIndex, used during the BindGrid method to retrieve the correct rows from the underlying table.
Listing 7-6 Code-Behind Class Implementing Custom Paging Logic
// File: DataGridPage.aspx.cs
public class DataGridPage : Page
{
private   int      _startIndex = 0;
protected DataGrid _gd1;

protected void Page_Load(object Src, EventArgs e)
{
if (!IsPostBack)
{
_gd1.VirtualItemCount = GetItemCount();
_startIndex = _gd1.VirtualItemCount-_gd1.PageSize;
BindGrid();
}
}

private int GetItemCount()
{
int count = 0;

SqlConnection conn =
new SqlConnection("server=.;uid=sa;pwd=;database=Test");

SqlCommand cmd =
new SqlCommand("SELECT COUNT(*) FROM Employees", conn);

try
{
conn.Open();
count = (int)cmd.ExecuteScalar();
}
finally { conn.Dispose(); }

return count;
}

private void BindGrid()
{
string select = "SELECT * FROM Employees WHERE ID > " +
_startIndex + " AND ID <= " +
(_startIndex + _gd1.PageSize) +
" ORDER BY ID DESC";
SqlConnection conn =
new SqlConnection("server=.;uid=sa;pwd=;database=Test");

SqlCommand cmd = new SqlCommand(select, conn);

try
{
conn.Open();
IDataReader reader = cmd.ExecuteReader();
_gd1.DataSource = reader;
_gd1.DataBind();
}
finally { conn.Dispose(); }
}

protected void Grid_Change(object sender,
DataGridPageChangedEventArgs e)
{
_gd1.CurrentPageIndex = e.NewPageIndex;
_startIndex = _gd1.VirtualItemCount -
((_gd1.CurrentPageIndex+1) * _gd1.PageSize);
BindGrid();
}
}
7.4.2 DataGrid Sorting
When most users see a grid with column headers on a Web page, they expect to be able to click the headers to sort the grid based on that column. If they click the header and nothing happens, they become frustrated and are less likely to visit that page again. To avoid this kind of disappointment, the DataGrid class supports sorting through the AllowSorting property and the SortCommand event. As with paging, the details of sorting are left up to you, but the DataGrid takes care of turning the column headers into hyperlinks and issuing the SortCommand event whenever one of the links is pressed. Figure 7-10 shows an example of a DataGrid that supports sorting in action.Figure 7-10. DataGrid Supporting Sorting in Action
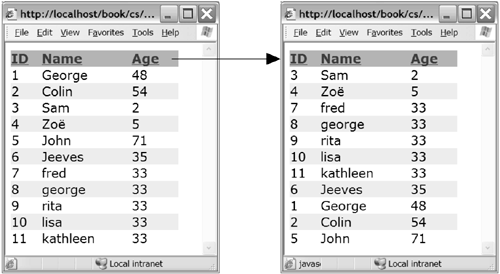
To add support for sorting to a DataGrid, you need to enable the AllowSorting property of the grid, and you need to associate a handler with the SortCommand. Enabling AllowSorting turns all your DataGrid headers into hyperlinks, which when clicked perform a post-back and fire the SortCommand event, passing in the sort expression associated with the clicked column. The sort expression of a column defaults to the column name, but you can change it by explicitly describing the column in your DataGrid declaration and assigning a string to the SortExpression property of the column. Listing 7-7 shows a sample page with a DataGrid that has sorting enabled.
Listing 7-7 Page with a DataGrid Supporting Sorting
<!� File: DataGridSort.aspx �>
<%@ Page language="C#" Src="DataGridSort.aspx.cs"
Inherits="DataGridSort" %>
<html>
<body>
<form runat="server">

<asp:datagrid id=_gd1
Width="90%"
Runat="server"
AllowSorting="True"
OnSortCommand="gd1_Sort"
/>

</form>
</body>
</html>
The logic behind a sortable grid involves repopulating the grid with whatever the current sort expression selected by the user is. Listing 7-8 shows the code-behind page for a grid with sorting enabled. In this implementation, a local field named _sortExpression is maintained to determine what to pass into the ORDER BY clause of our query. The sort expression is set in the gd1_Sort method, our handler for the SortCommand event. The details of how the sorting of the data is performed may vary from application to application, but the core methods and sort expression management should stay the same.
Listing 7-8 Code-Behind Class Implementing DataGrid Sorting Logic
// File: DataGridSort.aspx.cs
public class DataGridSort : Page
{
private   string   _sortExpression;
protected DataGrid _gd1;

protected void Page_Load(object Src, EventArgs e)
{
if (!IsPostBack)
BindGrid();
}

protected void gd1_Sort(object src,
DataGridSortCommandEventArgs e)
{
_sortExpression = e.SortExpression;
BindGrid();
}

public void BindGrid()
{
string select = "SELECT * FROM Employees";
if (_sortExpression != null)
select +=  " ORDER BY " + _sortExpression;

SqlConnection conn =
new SqlConnection("server=.;uid=sa;pwd=;database=Test");

SqlCommand cmd = new SqlCommand(select, conn);

try
{
conn.Open();
IDataReader reader = cmd.ExecuteReader();
_gd1.DataSource=reader;
_gd1.DataBind();
}
finally { conn.Dispose(); }
}
}
7.4.3 DataGrid Editing
In addition to paging and sorting, the DataGrid class supports editing of individual rows. Editing is supported through a property of the DataGrid named EditItemIndex. When this property is set to a non-negative integer, the row associated with that number is redisplayed using text input controls instead of just table cells, giving the user a chance to edit the values in the fields. This property is used in conjunction with the EditCommandColumn, which you place in the Columns collection of your DataGrid, where it renders an additional column in your table containing hyperlinks for the user to click to perform editing. This column also issues three server-side events for you to handle, the EditCommand, the CancelCommand, and the UpdateCommand, corresponding to the three hyperlinks that the user might press when working with your grid. Figure 7-11 shows a sample DataGrid page with editing support in action.Figure 7-11. A DataGrid with Editing Support in Action
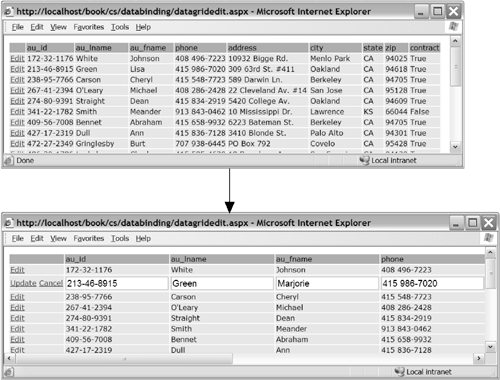
As with both paging and sorting, the DataGrid merely provides the shell for performing row updating. It is up to you to implement the internal details of responding to events and propagating the information back to your data source. To enable editing on a DataGrid, you first need to add to your grid's Columns collection the EditCommandColumn, which describes the appearance and behavior of the supplemental column that is added, indicating that individual rows can be edited. Next, you need to add server-side event handlers for the EditCommand, CancelCommand, and UpdateCommand events the grid issues when the corresponding hyperlinks are pressed. Listing 7-9 shows a sample page with a DataGrid that supports editing.
Listing 7-9 Page with a DataGrid Supporting Editing
<!� File: DataGridEdit.aspx �>
<%@ Page language="C#" Src="DataGridEdit.aspx.cs"
Inherits="DataGridEdit" %>
<html>
<body>
<form runat="server">

<asp:datagrid id="_gd1" runat=server
GridLines=None
OnEditCommand="gd1_Edit"
OnCancelCommand="gd1_Cancel"
OnUpdateCommand="gd1_Update">
<Columns>
<asp:EditCommandColumn EditText="Edit"
CancelText="Cancel"
UpdateText="Update"
ItemStyle-Wrap="false"
/>
</Columns>
</asp:datagrid>

</form>
</body>
</html>
Once the DataGrid is declared with editing support, you have to build pieces of logic to make the grid truly editable. First, in your handler for the EditCommand event, you need to set the EditItemIndex property of your DataGrid class equal to the incoming ItemIndex property of the Item property on the DataGridCommandEventArgs parameter. When the grid renders back to the client after setting this property, it renders the columns for the selected row as text boxes instead of plain table cells, indicating that the user can edit the values. It also changes the EditCommandColumn to display two hyperlinks for that row: Update and Cancel. Second, in your handler for the CancelCommand event, you need to reset the EditItemIndex to -1, indicating that none of the rows are currently being edited. This makes no row selected when the grid renders back to the client. Third, and most importantly, in your handler for the UpdateCommand event, you need to query the contents of the text boxes for the selected row and propagate back to your data source any changes made. The DataGridCommandEventArgs parameter passed into your UpdateCommand handler exposes the current row through its Item property, which in turn has an array of controls called Cells, which you can index to obtain the control in the column you need. An example of a page implementing this logic is shown in Listing 7-10.
Listing 7-10 Code-Behind Class Implementing DataGrid Editing Logic
// File: DataGridEdit.aspx.cs

public class DataGridEdit : Page
{
protected DataGrid _gd1;

protected void Page_Load(object Src, EventArgs e)
{
if (!IsPostBack)
BindGrid();
}

public void gd1_Edit(object sender,
DataGridCommandEventArgs e)
{
_gd1.EditItemIndex = e.Item.ItemIndex;
BindGrid();
}

public void gd1_Cancel(object sender,
DataGridCommandEventArgs e)
{
_gd1.EditItemIndex = -1;
BindGrid();
}

public void BindGrid()
{
SqlConnection conn =
new SqlConnection("server=.;uid=sa;pwd=;database=Pubs");

SqlDataAdapter da =
new SqlDataAdapter("select * from Authors", conn);

DataSet ds = new DataSet();
da.Fill(ds, "Authors");

_gd1.DataSource=ds;
_gd1.DataBind();
}

public void gd1_Update(object sender,
DataGridCommandEventArgs e)
{
string updateCmd = "UPDATE Authors SET au_lname = "+
"@vLname, au_fname = @vFname, phone = @vPhone, "+
"address = @vAddress, city = @vCity, state = " +
"@vState, zip = @vZip, contract = @vContract " +
"where au_id=@vId";

SqlConnection conn =
new SqlConnection("server=.;uid=sa;pwd=;database=pubs");

SqlCommand cmd = new SqlCommand(updateCmd, conn);

cmd.Parameters.Add("@vId",
((TextBox)e.Item.Cells[1].Controls[0]).Text);
cmd.Parameters.Add("@vLname",
((TextBox)e.Item.Cells[2].Controls[0]).Text);
cmd.Parameters.Add("@vFname",
((TextBox)e.Item.Cells[3].Controls[0]).Text);
cmd.Parameters.Add("@vPhone",
((TextBox)e.Item.Cells[4].Controls[0]).Text);
cmd.Parameters.Add("@vAddress",
((TextBox)e.Item.Cells[5].Controls[0]).Text);
cmd.Parameters.Add("@vCity",
((TextBox)e.Item.Cells[6].Controls[0]).Text);
cmd.Parameters.Add("@vState",
((TextBox)e.Item.Cells[7].Controls[0]).Text);
cmd.Parameters.Add("@vZip",
((TextBox)e.Item.Cells[8].Controls[0]).Text);

// The bool is stored in a textbox too, so parse it
// into a bool before passing in as a parameter
bool contract =
bool.Parse(((TextBox)e.Item.Cells[9].Controls[0]).Text);

cmd.Parameters.Add("@vContract", contract);
try
{
conn.Open();
cmd.ExecuteNonQuery();
_gd1.EditItemIndex = -1;
}
finally { conn.Dispose(); }

BindGrid();
}
}
7.5 Templates
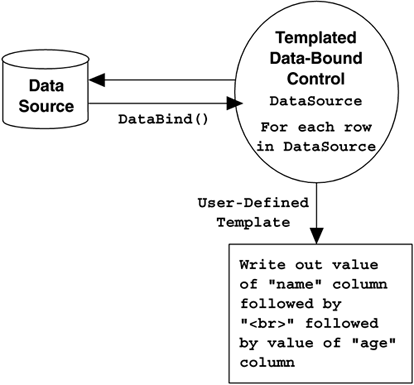
Templates provide a mechanism for separating the appearance of a control from the core data binding functionality of the control. A templated control manages the data and (typically) the layout of that data, but it leaves the rendering of the data to a user-provided template, giving you much more flexibility in how a data-bound control displays its contents. Conceptually, you can think of templated controls as providing a place for you to "plug in" whatever output you want displayed for each row in the data source during data binding. Figure 7-12 shows this conceptual model. Note that the templated data-bound control manages the data source and the process of data binding, but leaves the rendering of each row to a "user-defined template." Inside the user-defined template, the user of the control specifies what should be output for each row that is bound.Figure 7-12. Conceptual Model of Templated Controls
ASP.NET provides three templated data-bound controls: the Repeater, the DataList, and the DataGrid. Each of these controls provides varying degrees of flexibility in layout, and support for different sets of templates, as we will see.
7.5.1 Data Binding Evaluation Syntax
To be able to define the rendering portion of a data-bound control, we need a mechanism to access the currently bound row. ASP.NET defines a special syntax using the "<%# %>" notation for template-based data binding. It looks somewhat similar to traditional ASP evaluation syntax but is evaluated differently. Instead of being evaluated during page rendering, data binding evaluation expressions are evaluated during data binding. And typically, if the expression occurs within the item template of a data-bound control, it is evaluated once per row of the data source during binding.As a concrete example of using this syntax, Listing 7-11 shows a sample use of the Repeater template control, the most generic of the templated controls. In this example, the Repeater control consists of an ItemTemplate containing two data binding expressions and some static HTML. The data binding expressions are evaluated once per row of the underlying data source梚n this case, an SqlDataReader. Figure 7-13 shows the rendering of this page.
Listing 7-11 Sample Use of Data Binding Evaluation Syntax
<!� File: SimpleRepeater.aspx�>
<%@ Page language=C# %>
<%@ Import Namespace="System.Data" %>
<%@ Import Namespace="System.Data.SqlClient" %>

<html>
<script language="C#" runat="server">
protected void Page_Load(Object src, EventArgs e)
{
if (!IsPostBack)
{
SqlConnection conn =
new SqlConnection("server=.;uid=sa;pwd=;database=Test");
SqlCommand cmd =
new SqlCommand("SELECT Name, Age FROM Employees",
conn);

try
{
conn.Open();
SqlDataReader reader = cmd.ExecuteReader();
rp1.DataSource = reader;
DataBind();
}
finally
{ conn.Dispose(); }
}
}
</script>

<body>
<form runat=server>
<asp:Repeater id="rp1" runat=server>
<ItemTemplate>
<%# ((IDataRecord)Container.DataItem)["Name"] %><br>
<%# ((IDataRecord)Container.DataItem)["Age"] %><br>
</ItemTemplate>
</asp:Repeater>
</form>
</body>
</html>
Figure 7-13. Simple Repeater Page Rendering
To understand what types of expressions can go into a data binding expression within a templated control, we must understand where the expression is going to end up in the generated Page-derived class definition for this .aspx file. Typically, each data binding expression that occurs within a template turns into an instance of the DataBoundLiteralControl class and is added as a child control to the templated control (the Repeater in our example). In addition, the page parser generates a handler function that is wired up to the DataBinding event of the DataBoundLiteralControl class. It is within this handler function that the contents of the data binding expression are inserted, as shown in Figure 7-14.
Figure 7-14. Code Generation for Data Binding Expression within a Template
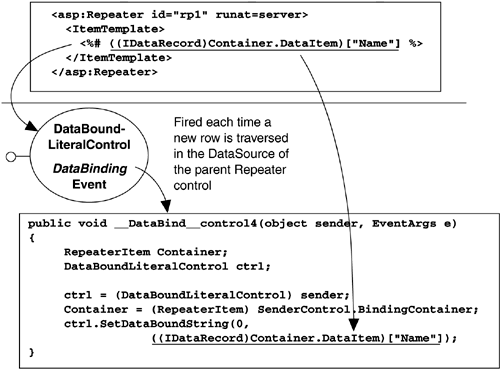
The DataBinding event of the DataBoundLiteralControl class is triggered once for each row of the data source during the DataBind() call to the Repeater control. The generated code for this handler also prepares a local variable named Container, which is set to the BindingContainer property of the control that issued the event. In our example, the control that issues the event is our DataBoundLiteralControl, and the BindingContainer property returns a reference to the current template, the ItemTemplate, which for the Repeater class is an instance of the RepeaterItem class. Finally, to access the current row in the underlying data source, the RepeaterItem class exposes a DataItem property. Because we chose to bind our Repeater control to an SqlDataReader, the underlying data source exposes the IDataRecord interface, which we can then use to access the current value of the "Name" column.
If, instead of adding data binding expressions to the top-level of an ItemTemplate, you assign the property of a server-side control to a data binding expression, the code generation changes slightly. Listing 7-12 shows a Repeater control that sets the Text property of a server-side TextBox control to a data binding expression.
Listing 7-12 Data Binding Expressions as Property Values
<asp:Repeater id="rp1" runat=server>
<ItemTemplate>
<asp:TextBox id=_name
Text='<%# ((IDataRecord)Container.DataItem)["Name"] %>'
/>
</ItemTemplate>
</asp:Repeater>
In this case, instead of turning the data binding expression into an instance of the DataBoundLiteralControl class, it generates a handler for the DataBinding event of the TextBox control and places the contents of the data binding expression on the right-hand side of an assignment to the Text property of the TextBox control. The end result is the same, but the creation of the DataBoundLiteralControl control is unnecessary.
7.5.2 DataBinder
In the previous example of using the data binding evaluation syntax within a template, the DataItem property of the implicit Container variable was cast to an IDataRecord and then indexed to retrieve the value of a named column for the current row. If, instead of using an SqlDataReader as a data source, we had used a DataSet, this cast would have failed, because rows of a DataSet are not exposed with the IDataRecord interface. We would instead have to cast the Container.DataItem to a DataRowView, which we could then index with our desired column name or index. This means that changing the data source to which your templated controls are bound would involve changing the data binding expressions as well.Fortunately, another solution works regardless of the type of data source梚t is called the DataBinder class. This class defines a static method called Eval() that evaluates a generic DataItem by first using reflection to determine what type of data source it is and then dynamically constructing a call to its default indexer to retrieve the desired value. This method supports two overloads, the second of which includes a format string that should be applied when retrieving the data. Although this mechanism incurs slightly more overhead, it ensures that any future changes to the type of data source used for binding will work with the existing data binding expressions. Listing 7-13 shows our earlier Repeater example rewritten to use the DataBinder class instead of direct casting. Note that in the second usage, a format string of "{0:2d}" is applied to the requested string, indicating that the resulting value should be displayed as a two-digit decimal value.
Listing 7-13 Using DataBinder.Eval to Create Data-Source-Independent Expressions
<asp:Repeater id="rp1" runat=server>
<ItemTemplate>
<%# DataBinder.Eval(Container.DataItem, "Name") %><br>
<%# DataBinder.Eval(Container.DataItem, "Age","{0:2d"}) %>
<br>
</ItemTemplate>
</asp:Repeater>
7.5.3 Templated Controls
Now that we have covered the mechanism of data binding in templates, it is time to turn to the templated controls provided by ASP.NET. The three templated controls available are the Repeater, DataList, and DataGrid. Each of these controls supports a different set of templates, beginning with the most common ItemTemplate. Table 7-1 shows the various templates that are available in each of the three classes.| Template | Description | DataGrid | DataList | Repeater |
|---|---|---|---|---|
| ItemTemplate | Generates appearance of items | Yes | Yes | Yes |
| AlternatingItemTemplate | Generates appearance of every other row item | No | Yes | Yes |
| HeaderTemplate | Generates appearance of header for columns | Yes | Yes | Yes |
| FooterTemplate | Generates appearance of footer for columns | Yes | Yes | Yes |
| SeparatorTemplate | Generates appearance between items | Yes | No | Yes |
| EditItemTemplate | Generates appearance of item currently being edited | Yes | Yes | No |
Figure 7-15. Use of a DataGrid Control with a Template Column

To place a CheckBox in a column of a DataGrid, first we need to turn off AutoGenerateColumns so that we control the column creation completely. Then, in place of the Contract column, we define a TemplateColumn consisting of an ItemTemplate, the content of which is a CheckBox control. We then use the declarative data binding syntax described earlier to extract the Boolean value from the Contract column in the underlying data row. Listing 7-14 shows the modified DataGrid declaration (excluding styles) that generates the page shown in Figure 7-15.
Listing 7-14 DataGrid declaration with template column
<!� File: DataGridEditTemplate.aspx �>
<asp:datagrid id="_gd1" runat=server
AutoGenerateColumns="false"
OnEditCommand="gd1_Edit"
OnCancelCommand="gd1_Cancel"
OnUpdateCommand="gd1_Update">
<Columns>
<asp:EditCommandColumn EditText="Edit"
CancelText="Cancel"
UpdateText="Update"
ItemStyle-Wrap="false"/>
<asp:BoundColumn HeaderText="Id"
ReadOnly="true" DataField="au_id"/>
<asp:BoundColumn HeaderText="LastName"
DataField="au_lname"/>
<asp:BoundColumn HeaderText="FirstName"
DataField="au_fname"/>
<asp:BoundColumn HeaderText="Phone" DataField="phone"/>
<asp:BoundColumn HeaderText="Address"
DataField="address"/>
<asp:BoundColumn HeaderText="City" DataField="city"/>
<asp:BoundColumn HeaderText="State" DataField="state"/>
<asp:BoundColumn HeaderText="Zip" DataField="zip"/>
<asp:TemplateColumn HeaderText="Contract">
<ItemTemplate>
<asp:CheckBox id="contract" runat=server
Checked=
'<%# DataBinder.Eval(Container.DataItem, "Contract") %>'
/>
</ItemTemplate>
</asp:TemplateColumn>
</Columns>
</asp:datagrid>
In addition to the DataGrid declaration change, we have to change the UpdateCommand event handler to extract the Boolean value from the embedded CheckBox control. The easiest way to do this is to call the FindControl method of the cell with the ID of the CheckBox, as shown in Listing 7-15.
Listing 7-15 Extracting the Value of a Nested Control in a DataGrid
// File: DataGridEditTemplate.aspx.cs
public void gd1_Update(object sender,
DataGridCommandEventArgs e)
{
// other control extraction values not shown

// Change au_id field access because it is read-only
cmd.Parameters.Add("@vId",    e.Item.Cells[1].Text);

// Find the checkbox control in column 9
CheckBox cb =
(CheckBox)e.Item.Cells[9].FindControl("contract");
cmd.Parameters.Add("@vContract", cb.Checked);
//...
}
7.5.4 Repeater
The Repeater control is a very generic shell that gives you complete control over how data is rendered. It requires that you provide all the HTML layout, formatting, and style tags within the templates of the control. You may want to consider using a DataGrid or DataList before using a Repeater because they will do much more of the work on your behalf. If, however, you have a complex data layout that cannot be represented as a list or a grid, the Repeater will accommodate any formatting you can imagine. Figure 7-16 shows a sample use of the Repeater control.Figure 7-16. A Repeater Control in Use

7.5.5 DataList
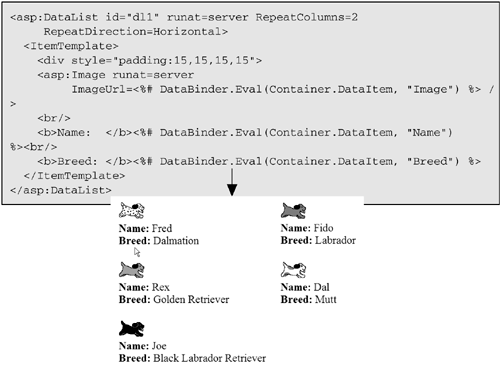
The DataList control provides a simple way to display data from a data source in a repeating list. While similar functionality can be achieved using the DataGrid control, the DataList is simpler to work with and is designed to make displaying lists trivial. At the very least, you must define an ItemTemplate to describe how each item appears. Styles are provided for each of the templates, which make it easy to modify the appearance of any templated item. For example, the HeaderStyle property gives you control over the appearance of items in the header, including border, background color, width, and so on. Another set of properties affects how the list flows on the page. Setting the RepeatLayout to Flow, for example, generates div and span elements instead of a table (which is the default). Setting the RepeatDirection lets you control whether elements flow horizontally or vertically. Setting RepeatColumns gives you control over how many columns are displayed before another row is generated. Figure 7-17 shows an example use of the DataList control.Figure 7-17. DataList Control Example
SUMMARY
One of the most common tasks encountered in building Web applications is retrieving data from a data source and rendering that data to the client browser. ASP.NET provides an architecture for binding data to controls that greatly simplifies and modularizes this task. Instead of manually walking through result sets, you can initialize the data source, point one or more server-side controls to it, and ask them to bind themselves to the data. The source of data can be most any collection, whether it is a result set from a database query or a programmatically populated ArrayList. The controls are equally diverse, beginning with simple list controls such as SELECT elements and ListBoxes, and going all the way up to the more complex data-bound controls such as the DataGrid, DataList, and Repeater.Templates give you even more control over the data binding process by letting you specify exactly how each row of the data source should be rendered in the context of the data-bound control. For the DataGrid, this means that you can provide a shell, or template, of HTML sprinkled with data binding syntax to indicate where the data should be inserted for each column in the rendered grid. The DataList gives you a similar tabular layout with precise control over each cell rendered in the table, and the Repeater gives you complete control over how the data should be rendered, without even generating the containing table for you.
[/code]
相关文章推荐
- [ASP.NET学习笔记之十四]ASP.NET 2.0 数据绑定
- ASP.net(1.1)原理学习笔记--第九章 缓存Caching
- ASP.NET学习笔记----ItemCommand中竟然没有绑定数据(20080326)(前面一篇CSDN有BUG)
- asp.net 学习笔记 从sql中取数据并且绑定到 gridView
- Asp.Net--DropDownList与DataTable数据绑定的方法(C#)[学习笔记]
- ASP.net(1.1)原理学习笔记--第一章 ASP.net的基本架构
- ASP.net(1.1)原理学习笔记--第二章 web Form 网页视窗
- Asp.net控件开发学习笔记(十二)----数据绑定
- ASP.net(1.1)原理学习笔记--第三章 配置Configuration
- ASP.NET 3.5核心编程学习笔记(18):数据绑定表达式
- ASP.net(1.1)原理学习笔记--第十章 状态管理State Management
- ASP.net(1.1)原理学习笔记--第五章 诊断和错误处理
- ASP.net(1.1)原理学习笔记--第六章 验证 Validation
- ASP.net(1.1)原理学习笔记--第十一章 安全性Security
- Asp.Net 中Report Service (RDLC)动态绑定数据-学习笔记
- Asp.net控件开发学习笔记(十二)----数据绑定
- ASP.net(1.1)原理学习笔记--第四章 HTTP管道 Pipeline
- ASP.NET 3.5核心编程学习笔记(17):基于数据源的数据绑定
- ASP.net(1.1)原理学习笔记--第八章 自定义控件Custom Controls
- [学习笔记][asp.net下SQL语句无法向ACCESS数据库插入数据的小提示
