Enterprise Library 3.0体验(4):Validation Application Block与ASP.NET的集成
2007-01-23 08:36
621 查看
摘要:也许大家都已经习惯了使用ASP.NET中的验证控件进行数据有效性的验证,但是验证控件的验证无法与我们的自定义的实体类结合起来,两者属于不同层面的验证。在Enterprise Library 3.0中有了Validation Application Block,可以轻松的实现页面验证与类验证的结合。
1.编写实体类,本文我使用Enterprise Library 3.0 QuickStarts中的例子,采用Atteribute验证的方式(采用配置文件来实现也是一样的),分别设置验证规则集合、错误信息提示等属性,代码如下:
public class Customer
<div>
<h3>
Validation Application Block: ASP.NET Integration QuickStart</h3>
<table>
<tr>
<td style="width: 100px">
First Name:</td>
<td style="width: 508px">
<asp:TextBox ID="firstNameTextBox" runat="server" Width="235px"></asp:TextBox>
<br />
</td>
</tr>
<tr>
<td style="width: 100px; height: 21px">
Last Name:</td>
<td style="width: 508px; height: 21px">
<asp:TextBox ID="lastNameTextBox" runat="server" Width="235px"></asp:TextBox><br />
</td>
</tr>
<tr>
<td style="width: 100px">
Date Of Birth:</td>
<td style="width: 508px">
<asp:TextBox ID="dateOfBirthTextBox" runat="server"></asp:TextBox><br />
</td>
</tr>
<tr>
<td style="width: 100px">
E-mail:</td>
<td style="width: 508px">
<asp:TextBox ID="emailTextBox" runat="server" Width="235px"></asp:TextBox><br />
</td>
</tr>
<tr>
<td style="width: 100px; height: 25px;">
Rewards Points:</td>
<td style="width: 508px; height: 25px;">
<asp:TextBox ID="rewardsPointsTextBox" runat="server"></asp:TextBox><br />
</td>
</tr>
<tr>
<td style="width: 100px">
</td>
<td style="width: 508px">
<asp:Button ID="submitButton" runat="server" Text="Submit" OnClick="submitButton_Click" />
<asp:Label ID="validationResultsLabel" runat="server"></asp:Label></td>
</tr>
</table>
</div>
4.在页面上需要验证的地方添加PropertyProxyValidator控件,基本的属性设置如下:
<cc1:propertyproxyvalidator id="firstNameValidator" runat="server"
ControlToValidate="ContolToValidate"
PropertyName="PropertyName"
RulesetName="RuleSetName"
SourceTypeName="ValidationAspNetQuickStart.Customer">
</cc1:propertyproxyvalidator>
其中ControlToValidate指定对应的需要验证的控件ID,PropertyName指定在实体类中的属性名,RulesetName指定验证规则的名称,SourceTypeName指定实体类型名,当然了你也可以像验证控件一样通过Display属性来指定验证信息的显示方式:None、Static、Dynamic。PropertyProxyValidator还有一个很重要的事件OnValueConvert,在事件可以通过做类型转换根据是否抛出异常来判断输入是否正确,以及设置验证提示信息等。添加完PropertyProxyValidator后代码如下:
<div>
<h1>
Validation Application Block: ASP.NET Integration QuickStart</h1>
<table>
<tr>
<td style="width: 100px">
First Name:</td>
<td style="width: 508px">
<asp:TextBox ID="firstNameTextBox" runat="server" Width="235px"></asp:TextBox>
<br />
<cc1:propertyproxyvalidator id="firstNameValidator" runat="server"
ControlToValidate="firstN
ameTextBox"
PropertyName="FirstName"
RulesetName="RuleSetA"
SourceTypeName="ValidationAspNetQuickStart.Customer">
</cc1:propertyproxyvalidator>
</td>
</tr>
<tr>
<td style="width: 100px; height: 21px">
Last Name:</td>
<td style="width: 508px; height: 21px">
<asp:TextBox ID="lastNameTextBox" runat="server" Width="235px"></asp:TextBox><br />
<cc1:PropertyProxyValidator ID="lastNameValidator" runat="server" ControlToValidate="lastNameTextBox"
PropertyName="LastName" RulesetName="RuleSetA" SourceTypeName="ValidationAspNetQuickStart.Customer"></cc1:PropertyProxyValidator></td>
</tr>
<tr>
<td style="width: 100px">
Date Of Birth:</td>
<td style="width: 508px">
<asp:TextBox ID="dateOfBirthTextBox" runat="server"></asp:TextBox><br />
<cc1:PropertyProxyValidator ID="dateOfBirthValidator" runat="server" ControlToValidate="dateOfBirthTextBox"
OnValueConvert="dateOfBirthValidator_ValueConvert" PropertyName="DateOfBirth"
RulesetName="RuleSetA" SourceTypeName="ValidationAspNetQuickStart.Customer"></cc1:PropertyProxyValidator></td>
</tr>
<tr>
<td style="width: 100px">
E-mail:</td>
<td style="width: 508px">
<asp:TextBox ID="emailTextBox" runat="server" Width="235px"></asp:TextBox><br />
<cc1:PropertyProxyValidator ID="emailValidator" runat="server" ControlToValidate="emailTextBox"
PropertyName="Email" RulesetName="RuleSetA" SourceTypeName="ValidationAspNetQuickStart.Customer"></cc1:PropertyProxyValidator></td>
</tr>
<tr>
<td style="width: 100px; height: 25px;">
Rewards Points:</td>
<td style="width: 508px; height: 25px;">
<asp:TextBox ID="rewardsPointsTextBox" runat="server"></asp:TextBox><br />
<cc1:PropertyProxyValidator ID="rewardPointsValidator" runat="server" ControlToValidate="rewardsPointsTextBox"
PropertyName="RewardPoints"
RulesetName="RuleSetA" SourceTypeName="ValidationAspNetQuickStart.Customer" OnValueConvert="rewardsPointsValidator_ValueConvert"></cc1:PropertyProxyValidator></td>
</tr>
<tr>
<td style="width: 100px">
</td>
<td style="width: 508px">
<asp:Button ID="submitButton" runat="server" Text="Submit" OnClick="submitButton_Click" />
<asp:Label ID="validationResultsLabel" runat="server"></asp:Label></td>
</tr>
</table>
</div>
5.在这里有两个验证器用到了OnValueConvert事件,对应的CS代码如下:
protected void rewardsPointsValidator_ValueConvert(object sender, Microsoft.Practices.EnterpriseLibrary.Validation.Integration.AspNet.ValueConvertEventArgs e)
protected void dateOfBirthValidator_ValueConvert(object sender, Microsoft.Practices.EnterpriseLibrary.Validation.Integration.AspNet.ValueConvertEventArgs e)
{

string value = e.ValueToConvert as string;
try


{
e.ConvertedValue = DateTime.Parse(value, System.Globalization.CultureInfo.CurrentCulture);

}
catch
{
e.ConversionErrorMessage = "Date Of Birth is not in the correct format.";
e.ConvertedValue = null;
}

}
6.运行后,输入错误的数据如下图所示:
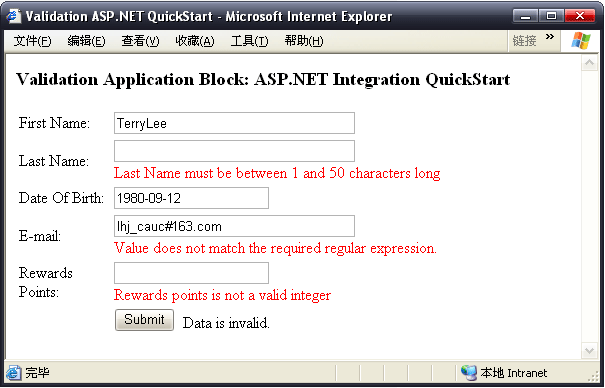
关于Validation Application Block与ASP.NET的集成就简单得介绍到这儿。
注意本文使用的版本是Enterprise Library 3.0 January 2007 CTP版本。
1.编写实体类,本文我使用Enterprise Library 3.0 QuickStarts中的例子,采用Atteribute验证的方式(采用配置文件来实现也是一样的),分别设置验证规则集合、错误信息提示等属性,代码如下:
public class Customer
<div>
<h3>
Validation Application Block: ASP.NET Integration QuickStart</h3>
<table>
<tr>
<td style="width: 100px">
First Name:</td>
<td style="width: 508px">
<asp:TextBox ID="firstNameTextBox" runat="server" Width="235px"></asp:TextBox>
<br />
</td>
</tr>
<tr>
<td style="width: 100px; height: 21px">
Last Name:</td>
<td style="width: 508px; height: 21px">
<asp:TextBox ID="lastNameTextBox" runat="server" Width="235px"></asp:TextBox><br />
</td>
</tr>
<tr>
<td style="width: 100px">
Date Of Birth:</td>
<td style="width: 508px">
<asp:TextBox ID="dateOfBirthTextBox" runat="server"></asp:TextBox><br />
</td>
</tr>
<tr>
<td style="width: 100px">
E-mail:</td>
<td style="width: 508px">
<asp:TextBox ID="emailTextBox" runat="server" Width="235px"></asp:TextBox><br />
</td>
</tr>
<tr>
<td style="width: 100px; height: 25px;">
Rewards Points:</td>
<td style="width: 508px; height: 25px;">
<asp:TextBox ID="rewardsPointsTextBox" runat="server"></asp:TextBox><br />
</td>
</tr>
<tr>
<td style="width: 100px">
</td>
<td style="width: 508px">
<asp:Button ID="submitButton" runat="server" Text="Submit" OnClick="submitButton_Click" />
<asp:Label ID="validationResultsLabel" runat="server"></asp:Label></td>
</tr>
</table>
</div>
4.在页面上需要验证的地方添加PropertyProxyValidator控件,基本的属性设置如下:
<cc1:propertyproxyvalidator id="firstNameValidator" runat="server"
ControlToValidate="ContolToValidate"
PropertyName="PropertyName"
RulesetName="RuleSetName"
SourceTypeName="ValidationAspNetQuickStart.Customer">
</cc1:propertyproxyvalidator>
其中ControlToValidate指定对应的需要验证的控件ID,PropertyName指定在实体类中的属性名,RulesetName指定验证规则的名称,SourceTypeName指定实体类型名,当然了你也可以像验证控件一样通过Display属性来指定验证信息的显示方式:None、Static、Dynamic。PropertyProxyValidator还有一个很重要的事件OnValueConvert,在事件可以通过做类型转换根据是否抛出异常来判断输入是否正确,以及设置验证提示信息等。添加完PropertyProxyValidator后代码如下:
<div>
<h1>
Validation Application Block: ASP.NET Integration QuickStart</h1>
<table>
<tr>
<td style="width: 100px">
First Name:</td>
<td style="width: 508px">
<asp:TextBox ID="firstNameTextBox" runat="server" Width="235px"></asp:TextBox>
<br />
<cc1:propertyproxyvalidator id="firstNameValidator" runat="server"
ControlToValidate="firstN
ameTextBox"
PropertyName="FirstName"
RulesetName="RuleSetA"
SourceTypeName="ValidationAspNetQuickStart.Customer">
</cc1:propertyproxyvalidator>
</td>
</tr>
<tr>
<td style="width: 100px; height: 21px">
Last Name:</td>
<td style="width: 508px; height: 21px">
<asp:TextBox ID="lastNameTextBox" runat="server" Width="235px"></asp:TextBox><br />
<cc1:PropertyProxyValidator ID="lastNameValidator" runat="server" ControlToValidate="lastNameTextBox"
PropertyName="LastName" RulesetName="RuleSetA" SourceTypeName="ValidationAspNetQuickStart.Customer"></cc1:PropertyProxyValidator></td>
</tr>
<tr>
<td style="width: 100px">
Date Of Birth:</td>
<td style="width: 508px">
<asp:TextBox ID="dateOfBirthTextBox" runat="server"></asp:TextBox><br />
<cc1:PropertyProxyValidator ID="dateOfBirthValidator" runat="server" ControlToValidate="dateOfBirthTextBox"
OnValueConvert="dateOfBirthValidator_ValueConvert" PropertyName="DateOfBirth"
RulesetName="RuleSetA" SourceTypeName="ValidationAspNetQuickStart.Customer"></cc1:PropertyProxyValidator></td>
</tr>
<tr>
<td style="width: 100px">
E-mail:</td>
<td style="width: 508px">
<asp:TextBox ID="emailTextBox" runat="server" Width="235px"></asp:TextBox><br />
<cc1:PropertyProxyValidator ID="emailValidator" runat="server" ControlToValidate="emailTextBox"
PropertyName="Email" RulesetName="RuleSetA" SourceTypeName="ValidationAspNetQuickStart.Customer"></cc1:PropertyProxyValidator></td>
</tr>
<tr>
<td style="width: 100px; height: 25px;">
Rewards Points:</td>
<td style="width: 508px; height: 25px;">
<asp:TextBox ID="rewardsPointsTextBox" runat="server"></asp:TextBox><br />
<cc1:PropertyProxyValidator ID="rewardPointsValidator" runat="server" ControlToValidate="rewardsPointsTextBox"
PropertyName="RewardPoints"
RulesetName="RuleSetA" SourceTypeName="ValidationAspNetQuickStart.Customer" OnValueConvert="rewardsPointsValidator_ValueConvert"></cc1:PropertyProxyValidator></td>
</tr>
<tr>
<td style="width: 100px">
</td>
<td style="width: 508px">
<asp:Button ID="submitButton" runat="server" Text="Submit" OnClick="submitButton_Click" />
<asp:Label ID="validationResultsLabel" runat="server"></asp:Label></td>
</tr>
</table>
</div>
5.在这里有两个验证器用到了OnValueConvert事件,对应的CS代码如下:
protected void rewardsPointsValidator_ValueConvert(object sender, Microsoft.Practices.EnterpriseLibrary.Validation.Integration.AspNet.ValueConvertEventArgs e)
protected void dateOfBirthValidator_ValueConvert(object sender, Microsoft.Practices.EnterpriseLibrary.Validation.Integration.AspNet.ValueConvertEventArgs e)
{
string value = e.ValueToConvert as string;
try
{
e.ConvertedValue = DateTime.Parse(value, System.Globalization.CultureInfo.CurrentCulture);
}
catch
{
e.ConversionErrorMessage = "Date Of Birth is not in the correct format.";
e.ConvertedValue = null;
}
}
6.运行后,输入错误的数据如下图所示:
关于Validation Application Block与ASP.NET的集成就简单得介绍到这儿。
注意本文使用的版本是Enterprise Library 3.0 January 2007 CTP版本。

相关文章推荐
- Enterprise Library 3.0体验(4):Validation Application Block与ASP.NET的集成
- Enterprise Library 3.0体验(4):Validation Application Block与ASP.NET的集成
- Enterprise Library 3.0体验(4):Validation Application Block与ASP.NET的集成
- Using the Enterprise Library Validation Application Block in ASP.NET - Part II
- Enterprise Library 3.0 体验(2):使用Validation Application Block
- Enterprise Library 3.0 体验(2):使用Validation Application Block
- Enterprise Library 3.0 体验(2):使用Validation Application Block
- Enterprise Library 3.0 体验(3):使用配置文件的Validation Application Block
- Enterprise Library 3.0 体验:使用配置文件的Validation Application Block
- Enterprise Library 3.0 体验(3):使用配置文件的Validation Application Block
- Enterprise Library 3.0 体验(3):使用配置文件的Validation Application Block
- Enterprise Library 3.0 体验(3):使用配置文件的Validation Application Block
- Using the Enterprise Library Validation Application Block in ASP.NET - Part I
- Enterprise Library 3.0 体验(2):使用Validation Application Block
- 【转】CKEditor3.0在asp.net环境下上传文件的配置,集成CKFinder
- Unity Application Block 與 ASP.NET MVC 學習資源整理 [转]
- ASP.NET Mvc + NHibernate + Unity Application Block 示例程序(转)
- 在ASP.NET 中使用 Unity Application Block – 示例(提供代码下载)
- 在ASP.NET程序中集成更好的下载体验
- ASP.NET Mvc + NHibernate + Unity Application Block 示例程序