jenkins:实现Jenkinsfile与Json的转换
实现Jenkinsfile与Json的转换
目录最近在做个需求,需要支持Jenkinsfile和json的转换。
方法1:使用现有的jenkins插件
参考的是这篇文章。下面介绍一下将插件打包成镜像的步骤:
-
本地安装jdk和maven,jdk建议采用的版本为8(该工程会依赖一个名为
tools.jar
的包,jdk 9之后移除了该包)如果本地没有找到
tools.jar
,可以下载一个1.8版本的jdk,然后在pom.xml
中增加如下依赖<dependency> <groupId>jdk.tools</groupId> <artifactId>jdk.tools</artifactId> <version>1.8.0</version> <scope>system</scope> <systemPath>/root/jdk1.8.0_271/lib/tools.jar</systemPath> </dependency>
-
clone pipeline-model-definition-plugin工程
-
在/root/.m2/目录下创建
settings.xml
,内容来自Jenkins官方:<settings> <pluginGroups> <pluginGroup>org.jenkins-ci.tools</pluginGroup> </pluginGroups> <profiles> <!-- Give access to Jenkins plugins --> <profile> <id>jenkins</id> <activation> <activeByDefault>true</activeByDefault> <!-- change this to false, if you don't like to have it on per default --> </activation> <repositories> <repository> <id>repo.jenkins-ci.org</id> <url>https://repo.jenkins-ci.org/public/</url> </repository> </repositories> <pluginRepositories> <pluginRepository> <id>repo.jenkins-ci.org</id> <url>https://repo.jenkins-ci.org/public/</url> </pluginRepository> </pluginRepositories> </profile> </profiles> <mirrors> <mirror> <id>repo.jenkins-ci.org</id> <url>https://repo.jenkins-ci.org/public/</url> <mirrorOf>m.g.o-public</mirrorOf> </mirror> </mirrors> </settings>
-
执行
mvn install
进行编译 -
由于主要用到的是Jenkinsfile和json之间的转换关系,因此主要用的是如下两个REST API:
Conversion to JSON representation from Jenkinsfile
URL:JENKINS_URL/pipeline-model-converter/toJson
- Parameters:
jenkinsfile
- theJenkinsfile
contents - Info: Takes a
Jenkinsfile
and converts it to the JSON representation for itspipeline
step. - Returns: JSON with a
result
field that will either besuccess
orfailure
. Ifsuccess
, the JSON representation will be in thejson
field. Iffailure
, there'll be an additional array in theerrors
field of the error messages encountered.
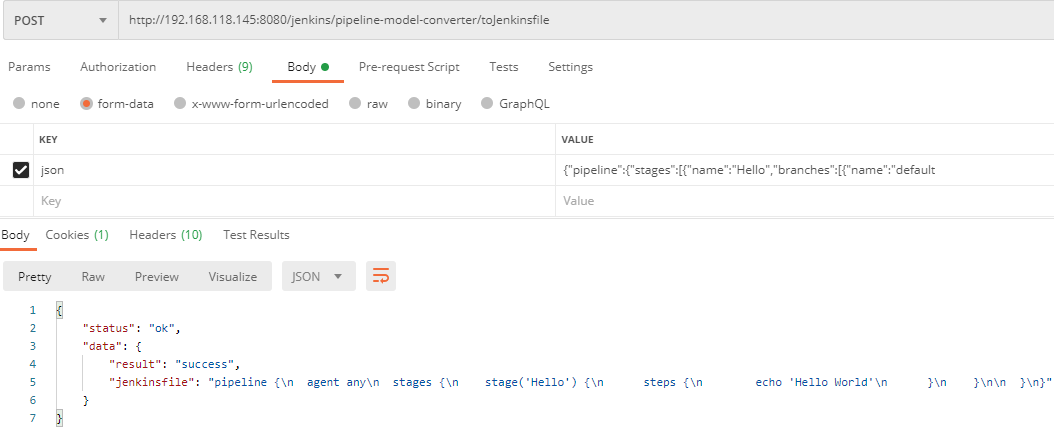
Conversion to Jenkinsfile from JSON representation
-
URL:
JENKINS_URL/pipeline-model-converter/toJenkinsfile
json- the JSON representation of the model
Jenkinsfile invoking the pipeline step.resultfield that will either be
successor
failure. If
success, the
Jenkinsfilecontents will be in the
jenkinsfilefield. If
failure, there'll be an additional array in the
errorsfield of the error messages encountered.
上述两个API在
pipeline-model-definition-plugin/pipeline-model-definition目录下,因此在该目录下直接运行:
mvn hpi:run -Dhost=0.0.0.0 -Djetty.port=8080即可。
将json转换为Jenkinsfile的操作如下:
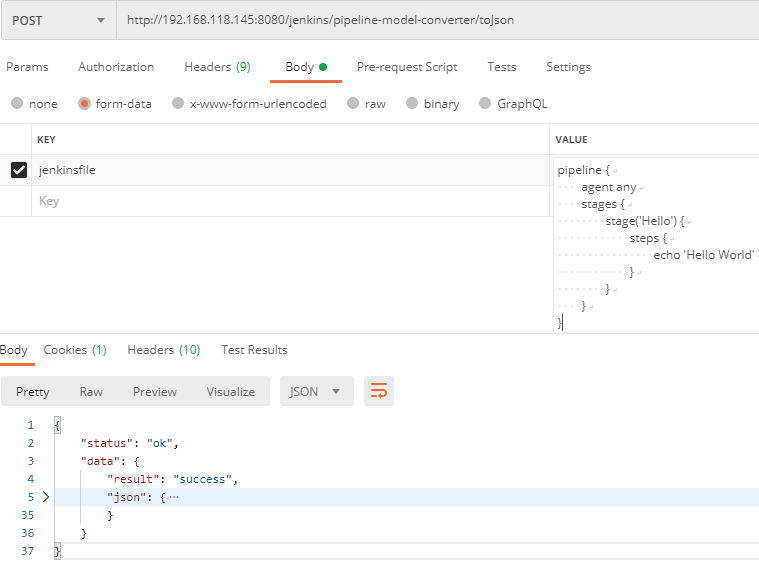
完整的返回值如下:
{
"status": "ok",
"data": {
"result": "success",
"json": {
"pipeline": {
"stages": [
{
"name": "Hello",
"branches": [
{
"name": "default",
"steps": [
{
"name": "echo",
"arguments": [
{
"key": "message",
"value": {
"isLiteral": true,
"value": "Hello World"
}
}
]
}
]
}
]
}
],
"agent": {
"type": "any"
}
}
}
}
}
将Jenkinsfile转换为json的操作如下
制作容器镜像时,只需要将本地工程和
/root/.m2上传到容器,生成对应的镜像即可,下面Dockerfile假设生成的镜像为
pipeline-model-definition-plugin:latest
FROM pipeline-model-definition-plugin:latest
WORKDIR /usr/pipeline-model-definition-plugin/pipeline-model-definition
ENV PATH=$PATH:/usr/local/bin/maven-3.6.3/bin
ENTRYPOINT ["sh", "-c", "mvn hpi:run -Dhost=0.0.0.0"]
我自己打包了一个镜像:
docker pull quay.io/woodliu/pipeline-model-definition-plugin
需要注意的是,本插件提供的转换API toJenkinsfile和toJson并不是万能的,只能支持jenkins标准的参数类型,例如对于
gitParameter这样的参数就无法解析(扩展功能),一种解决方式是独立解析扩展的参数,然后将其插入解析好的标准JenkinsFile中;另外一个方式就是写一个jenkinsfile的解析器。
参考
-
mvn hpi的命令可以参考官方文档
-
可以运行
mvn hpi:hpi
生成对应的hpi
文件,如:/pipeline-model-definition-plugin/pipeline-model-definition/target/pipeline-model-definition.hpi
方法2:解析原生的jenkinsfile文件
在GitHub上有一个支持jenkinsfile解析的项目,该项目使用rust的pest crate来编写jenkinsfile的语法,支持对jenkinsfile的格式验证。Pest官方文档中给出了一个非常好的对json语法的解析例子,主要是使用递归的方式来解析语法。
pest官方提供了一个编辑器,可以使用该编辑器查看经过pest解析之后的字段,对了解pest的工作方式非常有用。如,使用jdp项目提供的pest文件解析如下jenkinsfile:
pipeline {
agent {
docker {
reuseNode true
image 'maven:3-alpine'
label 'my-defined-label'
args  '-v /tmp:/tmp'
registryUrl 'https://myregistry.com/'
registryCredentialsId 'myPredefinedCredentialsInJenkins'
}
}

stages {
stage('Build') {
steps { sh 'make' }
}
}
}
对应的解析结果如下:
- preceeding_junk: ""
- opening_brace: "{"
- agentDecl > agentBlock
- opening_brace: "{"
- dockerAgent
- opening_brace: "{"
- bool: "true"
- string > single_quoted
- single_quote: "\'"
- inner_single_str: "maven:3-alpine"
- single_quote: "\'"
- string > single_quoted
- single_quote: "\'"
- inner_single_str: "my-defined-label"
- single_quote: "\'"
- string > single_quoted
- single_quote: "\'"
- inner_single_str: "-v /tmp:/tmp"
- single_quote: "\'"
- string > single_quoted
- single_quote: "\'"
- inner_single_str: "https://myregistry.com/"
- single_quote: "\'"
- string > single_quoted
- single_quote: "\'"
- inner_single_str: "myPredefinedCredentialsInJenkins"
- single_quote: "\'"
- closing_brace: "}"
- closing_brace: "}"
- stagesDecl
- opening_brace: "{"
- stage
- string > single_quoted
- single_quote: "\'"
- inner_single_str: "Build"
- single_quote: "\'"
- opening_brace: "{"
- stepsDecl
- opening_brace: "{"
- step > simple_step
- IDENT: "sh"
- args > string > single_quoted
- single_quote: "\'"
- inner_single_str: "make"
- single_quote: "\'"
- closing_brace: "}"
- closing_brace: "}"
- closing_brace: "}"
- closing_brace: "}"
- ending_junk: ""
- EOI: ""
Pest语法重点标注:
当使用静默规则时,解析结果中将不会出现该规则字段。当解析下面规则时,解析结果中将不会存在silent,即
parsed.as_rule()中不会存在silentsilent = _{ ... }当使用原子语法时,整个规则体将视为一个规则,如double_quoted = ${ (quote ~ inner_double_str ~ quote) },在解析时会将
quote ~ inner_double_str ~ quote视为一个规则,而不是三个。这有利于获取一段完整的字符串。atomic = @{ ... } compound_atomic = ${ ... }
我尝试使用该项目解析jenkinsfile,但发现实现起来太过复杂,且rust和jenkinsFile的语法也是一言难尽。如下,当step中带括号和不带括号混用时会导致解析错误。
steps {
echo 'test'
dir('command') {
sh "sh ./saas.sh ${params.channel} ${params.buildType} "
}
}
有精力的大神可以在此基础上实现解析JenkinsFile的功能。
参考
- pest文档

- staxon 实现 json 与xml 之间的转换 支持数组,属性
- C#实现DataTable,List和Json转换的方法
- SpringMVC中使用@RequestBody,@ResponseBody注解实现Java对象和XML/JSON数据自动转换(上)
- C#实现集合转换成json格式数据的方法
- C#编程实现对象与JSON串互相转换实例分析
- android实现json数据的解析和把数据转换成json格式的字符串
- JS对象与json字符串相互转换实现方法示例
- Android的Gson的使用方法,实现Json结构间相互转换
- js递归实现包名转换成对应的json对象
- Google Gson的使用方法,实现Json结构的相互转换
- Python基于pandas实现json格式转换成dataframe的方法
- 使用Gson或者GsonBuilder实现JSON和Java对象之间的转换
- android实现json数据的解析和把数据转换成json格式的字符串
- JS中实现对象和JSON字符串的转换
- C#实现DataTable,List和Json转换的方法
- JAVA 实现XML与JSON 相互转换
- JAVA实现json和对象间的相互转换,支持复杂对象格式
- JSON实用类,用来实现对象和JSON字符串的互相转换
- SpringMVC中使用@RequestBody,@ResponseBody注解实现Java对象和XML/JSON数据自动转换(上)
- sql server 关于表中只增标识问题 C# 实现自动化打开和关闭可执行文件(或 关闭停止与系统交互的可执行文件) ajaxfileupload插件上传图片功能,用MVC和aspx做后台各写了一个案例 将小写阿拉伯数字转换成大写的汉字, C# WinForm 中英文实现, 国际化实现的简单方法 ASP.NET Core 2 学习笔记(六)ASP.NET Core 2 学习笔记(三)