Spring Security认证流程分析--练气后期
写在前面
在前一篇文章中,我们介绍了如何配置spring security的自定义认证页面,以及前后端分离场景下如何获取spring security的CSRF Token。在这一篇文章中我们将来分析一下spring security的认证流程。 提示:我使用的spring security的版本是5.3.4.RELEASE。如果读者使用的不是和我同一个版本,源码细微之处有些不同,但是大体流程都是一样的。
认证流程分析
通过查阅spring security的官方文档我们知道,spring security的认证过滤操作由UsernamePasswordAuthenticationFilter 完成。那么,我们这次的流程分析就从这个过滤器开始。
UsernamePasswordAuthenticationFilter
先上部分源码
public class UsernamePasswordAuthenticationFilter extends
AbstractAuthenticationProcessingFilter {

public static final String SPRING_SECURITY_FORM_USERNAME_KEY = "username";
public static final String SPRING_SECURITY_FORM_PASSWORD_KEY = "password";

private String usernameParameter = SPRING_SECURITY_FORM_USERNAME_KEY;
private String passwordParameter = SPRING_SECURITY_FORM_PASSWORD_KEY;
private boolean postOnly = true;

public UsernamePasswordAuthenticationFilter() {
super(new AntPathRequestMatcher("/login", "POST"));
}

public Authentication attemptAuthentication(HttpServletRequest request,
HttpServletResponse response) throws AuthenticationException {
// 1. 必须为POST请求
if (postOnly && !request.getMethod().equals("POST")) {
throw new AuthenticationServiceException(
"Authentication method not supported: " + request.getMethod());
}
//2.取出用户填写的用户名和密码
String username = obtainUsername(request);
String password = obtainPassword(request);
//3.防止出现空指针
if (username == null) {
username = "";
}

if (password == null) {
password = "";
}
//4.去掉用户名的空格
username = username.trim();
//5.在层层校验后,开始对username和password进行封装
UsernamePasswordAuthenticationToken authRequest = new UsernamePasswordAuthenticationToken(
username, password);

// Allow subclasses to set the "details" property
setDetails(request, authRequest);
// 6.认证逻辑
return this.getAuthenticationManager()
.authenticate(authRequest);
}
}
从上面的分析我们知道了,当表单信息进入到这个过滤器之后,经过层层校验,将其封装成UsernamePasswordAuthenticationToken对象。接下来我们进入到这个对象里面看看。
一下是部分源码
public class UsernamePasswordAuthenticationToken extends AbstractAuthenticationToken {
private static final long serialVersionUID = 530L;
//用户名
private final Object principal;
//密码
private Object credentials;

//5.1还未认证,走这个构造方法
public UsernamePasswordAuthenticationToken(Object principal, Object credentials) {
super((Collection)null);
this.principal = principal;
this.credentials = credentials;

this.setAuthenticated(false);
}
}
AuthenticationManager
在上方第6步,进入了认证逻辑,(真正认证操作在AuthenticationManager里面 )我们接下来进入到AuthenticationManager对象的authenticate()方法里看看。
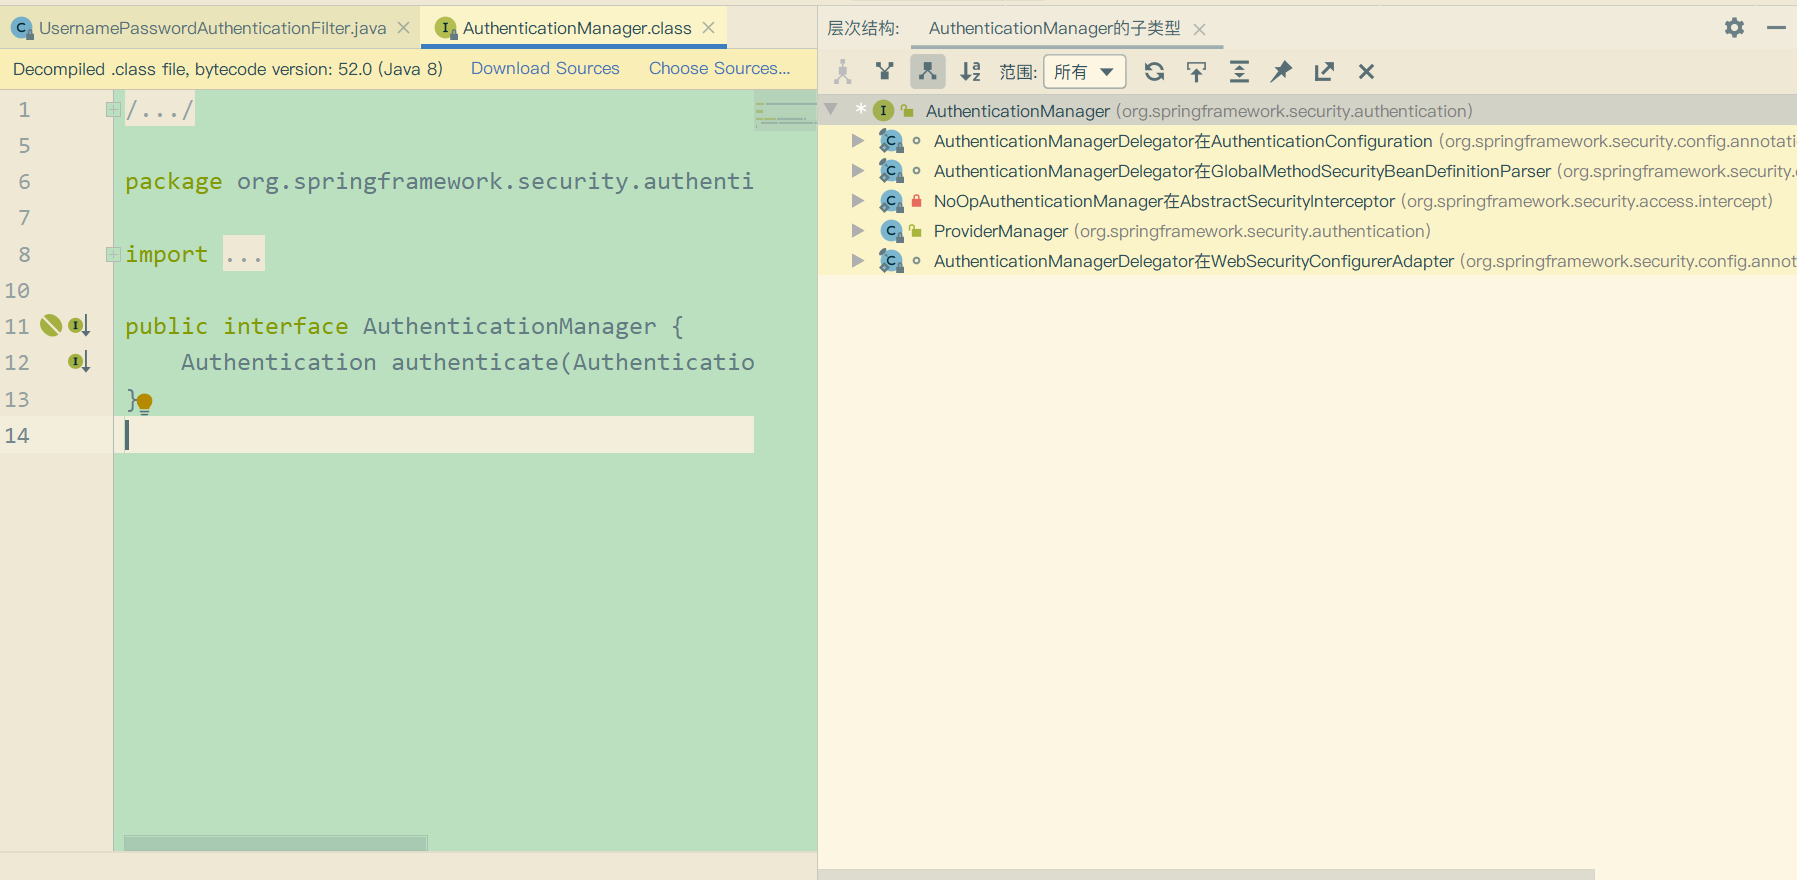
发现这是一个接口。从图中可以知道除了ProviderManager这个类之外,其他的都是内部类,所有我们就直接进入到ProviderManager对象的authenticate方法里看看
public Authentication authenticate(Authentication authentication)
throws AuthenticationException {

Class<? extends Authentication> toTest = authentication.getClass();
AuthenticationException lastException = null;
AuthenticationException parentException = null;
Authentication result = null;
Authentication parentResult = null;
boolean debug = logger.isDebugEnabled();
//7.找到与之对应的认证方式(本系统账户登录。。微信登录等)
for (AuthenticationProvider provider : getProviders()) {
if (!provider.supports(toTest)) {
continue;
}

if (debug) {
logger.debug("Authentication attempt using "
+ provider.getClass().getName());
}
//8。 调用认证服务提供者的方法进行认证
try {
result = provider.authenticate(authentication);

if (result != null) {
copyDetails(authentication, result);
break;
}
}
catch (AccountStatusException | InternalAuthenticationServiceException e) {
prepareException(e, authentication);
// SEC-546: Avoid polling additional providers if auth failure is due to
// invalid account status
throw e;
} catch (AuthenticationException e) {
lastException = e;
}
}

if (result == null && parent != null) {
// Allow the parent to try.
try {
result = parentResult = parent.authenticate(authentication);
}
catch (ProviderNotFoundException e) {
// ignore as we will throw below if no other exception occurred prior to
// calling parent and the parent
// may throw ProviderNotFound even though a provider in the child already
// handled the request
}
catch (AuthenticationException e) {
lastException = parentException = e;
}
}

if (result != null) {
if (eraseCredentialsAfterAuthentication
&& (result instanceof CredentialsContainer)) {
// Authentication is complete. Remove credentials and other secret data
// from authentication
((CredentialsContainer) result).eraseCredentials();
}

// If the parent AuthenticationManager was attempted and successful then it will publish an AuthenticationSuccessEvent
// This check prevents a duplicate AuthenticationSuccessEvent if the parent AuthenticationManager already published it
if (parentResult == null) {
eventPublisher.publishAuthenticationSuccess(result);
}
return result;
}

// Parent was null, or didn't authenticate (or throw an exception).

if (lastException == null) {
lastException = new ProviderNotFoundException(messages.getMessage(
"ProviderManager.providerNotFound",
new Object[] { toTest.getName() },
"No AuthenticationProvider found for {0}"));
}

// If the parent AuthenticationManager was attempted and failed then it will publish an AbstractAuthenticationFailureEvent
// This check prevents a duplicate AbstractAuthenticationFailureEvent if the parent AuthenticationManager already published it
if (parentException == null) {
prepareException(lastException, authentication);
}

throw lastException;
}
// spring security将其所有认证方式都封装成一个AuthenticationProvider集合,第一步便是找出对应的认证方式
public List<AuthenticationProvider> getProviders() {
return providers;
}

}
AuthenticationProvider
在步骤8中,调用了认证提供者的认证方法,接下来我们进去看看。发现AuthenticationProvider是一个接口
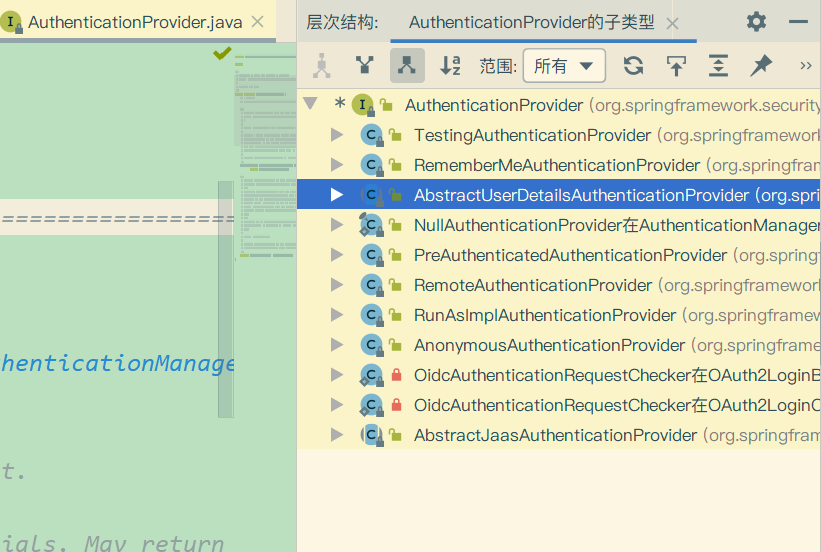
我们从实现类的名称当中猜一个进去看看,就看AbstractUserDetailsAuthenticationProvider这个类。
public Authentication authenticate(Authentication authentication)
throws AuthenticationException {
Assert.isInstanceOf(UsernamePasswordAuthenticationToken.class, authentication,
() -> messages.getMessage(
"AbstractUserDetailsAuthenticationProvider.onlySupports",
"Only UsernamePasswordAuthenticationToken is supported"));

// Determine username
String username = (authentication.getPrincipal() == null) ? "NONE_PROVIDED"
: authentication.getName();
//8.1尝试从缓存中获取用户
boolean cacheWasUsed = true;
//UserDetails就是spring Security内定义的用户对象
UserDetails user = this.userCache.getUserFromCache(username);

if (user == null) {
cacheWasUsed = false;
//8.2如果缓存中不存在用户,则开始检索
try {
user = retrieveUser(username,
(UsernamePasswordAuthenticationToken) authentication);
}
catch (UsernameNotFoundException notFound) {
logger.debug("User '" + username + "' not found");

if (hideUserNotFoundExceptions) {
throw new BadCredentialsException(messages.getMessage(
"AbstractUserDetailsAuthenticationProvider.badCredentials",
"Bad credentials"));
}
else {
throw notFound;
}
}

Assert.notNull(user,
"retrieveUser returned null - a violation of the interface contract");
}

try {
preAuthenticationChecks.check(user);
additionalAuthenticationChecks(user,
(UsernamePasswordAuthenticationToken) authentication);
}
catch (AuthenticationException exception) {
if (cacheWasUsed) {
// There was a problem, so try again after checking
// we're using latest data (i.e. not from the cache)
cacheWasUsed = false;
user = retrieveUser(username,
(UsernamePasswordAuthenticationToken) authentication);
preAuthenticationChecks.check(user);
additionalAuthenticationChecks(user,
(UsernamePasswordAuthenticationToken) authentication);
}
else {
throw exception;
}
}

postAuthenticationChecks.check(user);

if (!cacheWasUsed) {
this.userCache.putUserInCache(user);
}

Object principalToReturn = user;

if (forcePrincipalAsString) {
principalToReturn = user.getUsername();
}

return createSuccessAuthentication(principalToReturn, authentication, user);
}
在步骤8.2中,调用了retrieveUser方法查找用户,接下来我们进去看看
protected abstract UserDetails retrieveUser(String username,
UsernamePasswordAuthenticationToken authentication)
throws AuthenticationException;
发现它是一个抽象的方法,接下来点进去,看看它已经提供好的实现方法。这个方法在DaoAuthenticationProvider对象中
protected final UserDetails retrieveUser(String username,
UsernamePasswordAuthenticationToken authentication)
throws AuthenticationException {
prepareTimingAttackProtection();
try {
//8.2.1通过用户名加载用户
UserDetails loadedUser = this.getUserDetailsService().loadUserByUsername(username);
if (loadedUser == null) {
throw new InternalAuthenticationServiceException(
"UserDetailsService returned null, which is an interface contract violation");
}
return loadedUser;
}
catch (UsernameNotFoundException ex) {
mitigateAgainstTimingAttack(authentication);
throw ex;
}
catch (InternalAuthenticationServiceException ex) {
throw ex;
}
catch (Exception ex) {
throw new InternalAuthenticationServiceException(ex.getMessage(), ex);
}
}
通过阅读代码发现,它又调用了UserDetailsService对象的loadUserByUsername(方法去做加载操作,我们点进去看看
UserDetailsService
public interface UserDetailsService {

UserDetails loadUserByUsername(String username) throws UsernameNotFoundException;
}
发现这是一个接口,并且到了这一步就得到了我们的用户对象UserDetails。如果说大家要自定义认证信息检索,查找自己定义的User对象话就实现这个接口,并且让自己的用户对象实现UserDetails接口。并且实现相关查询方法和注册。
接下来我们看spring security已经提供好的实现类它的实现类

我们重点关注的有两个,一个是JdbcDaoImpl,一个是CachingUserDetailsService。前者从数据库中查询用户,后者从缓存中查询用户信息
我们先看CachingUserDetailsService的源码
public class CachingUserDetailsService implements UserDetailsService {
private UserCache userCache = new NullUserCache();
private final UserDetailsService delegate;

public CachingUserDetailsService(UserDetailsService delegate) {
this.delegate = delegate;
}

public UserCache getUserCache() {
return userCache;
}

public void setUserCache(UserCache userCache) {
this.userCache = userCache;
}

public UserDetails loadUserByUsername(String username) {
UserDetails user = userCache.getUserFromCache(username);

if (user == null) {
user = delegate.loadUserByUsername(username);
}

Assert.notNull(user, () -> "UserDetailsService " + delegate
+ " returned null for username " + username + ". "
+ "This is an interface contract violation");

userCache.putUserInCache(user);

return user;
}
}
再看JdbcDaoImpl(部分)
public class JdbcDaoImpl extends JdbcDaoSupport
implements UserDetailsService, MessageSourceAware {
@Override
public UserDetails loadUserByUsername(String username)
throws UsernameNotFoundException {
List<UserDetails> users = loadUsersByUsername(username);

if (users.size() == 0) {
this.logger.debug("Query returned no results for user '" + username + "'");

throw new UsernameNotFoundException(
this.messages.getMessage("JdbcDaoImpl.notFound",
new Object[] { username }, "Username {0} not found"));
}

UserDetails user = users.get(0); // contains no GrantedAuthority[]

Set<GrantedAuthority> dbAuthsSet = new HashSet<>();

if (this.enableAuthorities) {
dbAuthsSet.addAll(loadUserAuthorities(user.getUsername()));
}

if (this.enableGroups) {
dbAuthsSet.addAll(loadGroupAuthorities(user.getUsername()));
}

List<GrantedAuthority> dbAuths = new ArrayList<>(dbAuthsSet);

addCustomAuthorities(user.getUsername(), dbAuths);

if (dbAuths.size() == 0) {
this.logger.debug("User '" + username
+ "' has no authorities and will be treated as 'not found'");

throw new UsernameNotFoundException(this.messages.getMessage(
"JdbcDaoImpl.noAuthority", new Object[] { username },
"User {0} has no GrantedAuthority"));
}

return createUserDetails(username, user, dbAuths);
}

protected List<UserDetails> loadUsersByUsername(String username) {
return getJdbcTemplate().query(this.usersByUsernameQuery,
new String[] { username }, (rs, rowNum) -> {
String username1 = rs.getString(1);
String password = rs.getString(2);
boolean enabled = rs.getBoolean(3);
return new User(username1, password, enabled, true, true, true,
AuthorityUtils.NO_AUTHORITIES);
});
}
这两个获取方式的逻辑都比较简单,相信大家能看的明白。
稍微总结一下:
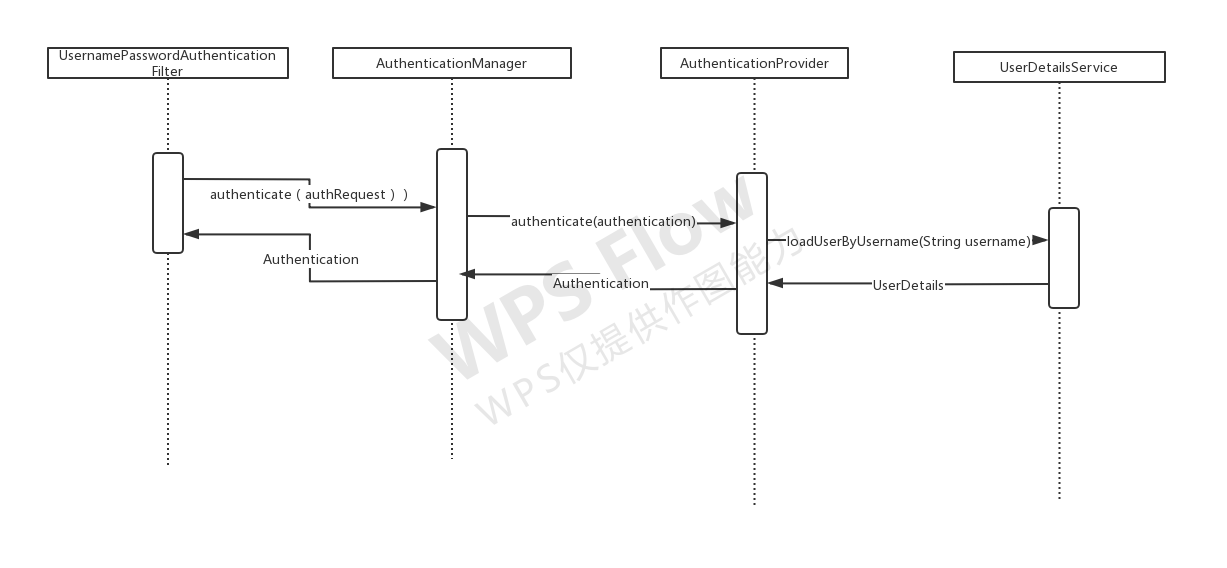
UsernamePasswordAuthenticationFilter拦截到用户填写的表单信息后,先进行校参处理(判断请求是否为POST请求,将null值转为空字符串),然后将参数封装成UsernamePasswordAuthenticationToken(这是一个Authentication实现类AbstractAuthenticationToken的子类)对象,再然后调用AuthenticationManager对象的实现类ProviderManager的authenticate方法进行认证操作;
ProviderManager在接收到token后,先根据token的className比对spring security内置的认证方式,找到后调用AuthenticationProvider的实现类AbstractUserDetailsAuthenticationProvider的authenticate方法进行认证操作
AbstractUserDetailsAuthenticationProvider对象在收到Authentication对象后,先确定用户名,再根据用户名从缓存里查找用户信息,找不到则调用retrieveUser方法在持久层查找数据(持久层数据可以是文本、数据库里的数据)。在spring security中,只有DaoAuthenticationProvider实现了这个方法(目前为止)。这时DaoAuthenticationProvider便调用UserDetailsService的loadUserByUsername方法找到userDetails。在通过了一系列的判断验证后,调用createSuccessAuthentication方法给授权,并将其(UsernamePasswordAuthenticationToken)返回给了AuthenticationManager的实现类ProviderManager。
ProviderManager在收到UsernamePasswordAuthenticationToken对象后,先进行参数校验(判空,判null),之后调用事件发布者eventPublisher的publishAuthenticationSuccess方法将验证结果发布出去。最后将结果返回给UsernamePasswordAuthenticationFilter。至此验证流程大体上就结束了.
也就述说,UsernamePasswordAuthenticationFilter负责拦截,AuthenticationManager负责组织流程,真正执行操作的是认证AuthenticationProvider的子类AbstractUserDetailsAuthenticationProvider对象。
End
给大家画了一张简化版的认证时序图

- 这样学,让你的Java面试之路畅通无阻
- Java GUI 之 数组、文件和图表
- 肥桃Java学习记录6:围成一圈报数123选队长,报3退出最后一人为队长。
- Java IO流笔记 (搬运)
- 通过java写xml文档
- Java多线程创建使用
- JAVA常用事件监听器与实例分析
- JavaSE:数组
- Java语言中使用数组、文件和图表
- Spring Boot系列(四):Spring Boot源码解析
- Java - Hello world, 从源码到 JVM
- Spring Security自定义认证页面(动态网页解决方案+静态网页解决方案)--练气中期圆满
- java-去重和排序
- 基于Java的二叉树层序遍历打印实现
- 来吧,教你JavaWeb中如何实现文件下载
- Mockito鸡尾酒第一杯 Java单测Mock
- 各大搜索引擎,Java面试题(集合+并发+调优+微服务)
- Spring集成MyBatis
- 还不会使用Java ThreadLocal落后了吧!
- 2020 年 Java 程序员应该学习什么?