typescript工程_使用TypeScript构建游戏。 工程图网格1/5
typescript工程
Chapter III in the series of tutorials on how to build a game from scratch with TypeScript and native browser APIs
本系列教程的第三章,介绍如何使用TypeScript和本机浏览器API从头开始构建游戏
Welcome back, reader! This is the first part of Chapter III of the series of articles where we discuss how to build a simple turn-based game with TypeScript and native browser APIs.
欢迎回来,读者! 这是系列文章第三章的第一部分,我们将讨论如何使用TypeScript和本机浏览器API构建简单的基于回合的游戏。
Last time we put together a Game Loop: a useful tool that helps as keep a game running regardless of the Player interaction with it.
上一次,我们组合了一个游戏循环:一个有用的工具,无论玩家与之互动如何,它都有助于保持游戏的运行。
 This is a demo of the gameplay we are looking to achieve 这是我们希望实现的游戏演示
 This chapter is all about drawing. Our game is played on a “board” or a “grid” of these gray squares. We have to visualize them, so the player knows where to place their “Ships”.
本章都是关于绘图的。 我们的游戏在这些灰色方块的“面板”或“网格”上进行。 我们必须将它们可视化,以便玩家知道将其“ Ships”放置在何处。
We will use the browser’s Canvas API to draw those gray squares. But it’s just one part of the equation. We must make these elements smart enough so the Player could interact with them. To do so, we will use the full power of the knowledge we acquired in the previous chapters: Entity Component System and Game Loop.
我们将使用浏览器的Canvas API绘制这些灰色方块。 但这只是等式的一部分。 我们必须使这些元素足够聪明,以便播放器可以与它们交互。 为此,我们将充分利用在前几章中获得的知识的全部力量:实体组件系统和游戏循环。
Feel free to switch to the
game-loop-2branch of the repository. It contains the working result of the previous posts and is a great starting point for this one.随时切换到存储库的
game-loop-2分支。 它包含了以前的帖子的工作结果,是这篇文章的一个很好的起点。
目录 (Table of Contents)
- Introduction 介绍
- How do We Draw? 我们如何画画?
- First “Dirty” Draw 首张“脏”抽奖
- Global Settings 全局设置
- Conclusion 结论
我们如何画画? (How do We Draw?)
 Background vector created by freepikFreepik创建的背景矢量
 There are a few ways we can draw something arbitrary on the screen. Working with JavaScript and browser’s API, you probably got used to DOM, CSS, divs and spans, and other tags/elements. While these are powerful tools that can render quite complex visuals, there is another tool in the toolbox for us: Canvas API.
我们可以通过几种方法在屏幕上绘制任意内容。 使用JavaScript和浏览器的API,您可能已经习惯了DOM,CSS,div和span和其他标签/元素。 虽然这些功能强大的工具可以呈现非常复杂的视觉效果,但工具箱中还有另一个工具可供我们使用: Canvas API 。
Most of the frontend applications follow the same fundamental approach when it comes to the layouts. In most cases, everything we render boils down to boxes and strings of text. Of course, they can be represented in many ways and combined to create unique and incredible User Interface.
对于布局,大多数前端应用程序都遵循相同的基本方法。 在大多数情况下,我们渲染的所有内容都归结为文本框和字符串。 当然,它们可以以多种方式表示并组合在一起以创建独特而令人难以置信的用户界面。
Imagine any typical website. You can probably see a header, a footer, maybe a table, plenty of inputs: textboxes, checkboxes, radios, long paragraphs of text, short lines of writing, and so on. But all this variation is created thanks to two simple elementals: blocks and strings.
想象任何典型的网站。 您可能会看到页眉,页脚,表格,还有很多输入内容:文本框,复选框,单选框,长文本段,短文字行等。 但是所有这些变化都是由于两个简单的元素而产生的:块和字符串。
 Sign vector created by stories故事创建的标志矢量
 There is a noticeable exception: imported assets: logos, photos, custom images, pictures for different purposes. You can usually quickly distinguish them from other visuals on the screen. The reason is their uniqueness of visual complexity (I mean it in a good way).
有一个明显的例外:导入资产:徽标,照片,自定义图像,用于不同目的的图片。 通常,您可以将它们与屏幕上的其他视觉内容快速区分开。 原因是它们视觉复杂性的独特性(我的意思是很好)。
These images are built with more shapes than just boxes and text. If you take a closer look, you can find lines, circles, curves, triangles, polygons. HTML/CSS has historically hard times working with shapes aside of blocks (even though these days, there are many ways you can push these boundaries). However, even today, it is much easier to draw a sophisticated image thanks to any external application and then import it as a static asset.
这些图像不仅具有框和文本的形状,而且具有更多的形状。 如果仔细看,您会发现直线,圆,曲线,三角形,多边形。 从历史上看,HTML / CSS很难使用块以外的形状(即使这些天来,您也可以通过许多方法来突破这些界限)。 但是,即使到了今天,由于有了任何外部应用程序,绘制复杂的图像然后将其作为静态资产导入仍要容易得多。
So, why bother with Canvas API? And why is it even a thing, if we can always simply add a static image to the page? Well, the question contains the answer: the image would be static.
那么,为什么还要麻烦Canvas API? 如果我们总是可以简单地在页面上添加静态图像,那又为什么呢? 好吧,这个问题包含了答案:图像将是静态的 。
Sometimes, we need programmatic control over the image. The classic example is an animation. Consider you have to slowly and progressively render your company’s logo while the site is loading. Having prepared, “baked” (I’m intentionally throwing a gamedev term here) image won’t be enough. At each frame, you have to render a new image, which is only a fraction of the result. You also have to perform transitions between these fractions. Drawing pictures programmatically instead of a using a static asset can handle that. And Canvas exists precisely to help you with programmatic drawings. And oh boy, we do need that power while building games!
有时,我们需要对图像进行程序控制。 经典示例是动画。 考虑到您必须在网站加载时缓慢且逐步地呈现公司徽标。 准备好“烘焙”(我故意在这里抛出一个gamedev术语)图像是不够的。 在每一帧,您都必须渲染一个新图像,这只是结果的一小部分。 您还必须在这些分数之间执行转换。 可以通过编程方式绘制图片而不是使用静态资源来处理图片。 Canvas的存在正是为了帮助您编写程序化图纸。 哦,天哪,我们在制作游戏时确实需要那种力量!
At the moment of writing this post, there are two ways you can draw in 2D: Canvas API and SVG. The latest has many attractive benefits, but we will focus on Canvas today. The reason is that it’s usually a way to go in games.
在撰写本文时,有两种绘制2D的方法:Canvas API和SVG。 最新的优点有很多,但是我们今天将重点关注Canvas。 原因是它通常是游戏中的一种方式。
“Canvas vs. SVG” for browser games is undoubtedly an exciting topic and probably deserves a separate discussion. For now, allow me to take a stand on Canvas.
浏览器游戏的“画布与SVG”无疑是一个令人兴奋的话题,可能值得单独讨论。 现在,让我在Canvas上站一席。
Anatomy of Canvas API is super simple, so I’m not going to cover it here. There are plenty of excellent tutorials and examples out there in the wild. Moving forward, I’ll assume you have the basics understanding of how Canvas works.
Canvas API的剖析非常简单,因此在此不做介绍。 在野外有许多出色的教程和示例 。 继续前进,我假设您已经了解Canvas的工作原理。
首张“脏”抽奖 (First “Dirty” Draw)
Let’s start simple. I will do first and “dirty” draw, which will allow us to see Canvas “in Action”. We will then slowly refactor and improve our code, making it suitable for our vast needs.
让我们开始简单。 我将首先进行“脏”绘制,这将使我们能够看到“进行中”的画布。 然后,我们将缓慢地重构和改进我们的代码,使其适合我们的巨大需求。
 Children vector created by brgfx儿童矢量由brgfx创建
 We can think of a grid as a set of “nodes”, and each node is, essentially, a square on the Canvas. The easiest way to render it is by following these steps:
我们可以将网格视为一组“节点”,并且每个节点本质上都是Canvas上的正方形。 呈现它的最简单方法是按照以下步骤操作:
- Define the canvas element 定义画布元素
- Add it to the page 将其添加到页面
- Draw a bunch of rectangles 画一堆矩形
Let’s do a dirty round within the Game entity:
让我们在Game实体中进行一次肮脏的回合:
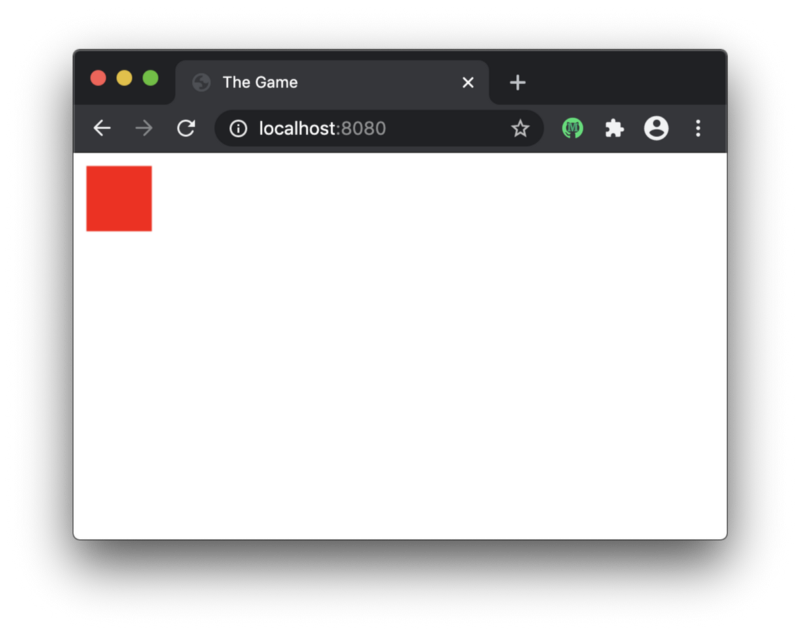
If you start your code by running
npm startand navigate to the
http://localhost:8080in the browser, you should see a small red square in the top left corner of the browser:
如果通过运行
npm start来启动代码并在浏览器中导航到
http://localhost:8080,则应该在浏览器的左上角看到一个红色小方块:

Port may be different, check the webpack console output if 8080 doesn’t work
端口可能不同,如果8080不起作用,请检查webpack控制台输出
Note, the square’s size is
50pxand it also shifted
10pxfrom the top left corner. All this is done by simple Canvas command:
ctx.rect(10, 10, 50, 50)
请注意,正方形的大小为
50px,并且也从左上角移了
10px。 所有这些操作都是通过简单的Canvas命令完成的:
ctx.rect(10, 10, 50, 50)
Awesome, we have our first visual! Not an astonishingly attractive picture, but we are making the very first steps here!
太棒了,我们有了第一个视觉效果! 这不是一张令人惊讶的照片,但我们正在这里迈出第一步!
To implement a grid, we repeat the box draw call a few times:
为了实现网格,我们重复几次框绘制调用:
I started by defining constants for size of the box and its offset (margin, if you will). I repeated the drawing in a loop, effectively rendered three rectangles. But in a browser we still see only one square:
我首先定义了框的大小及其偏移量 (边距,如果可以的话)的常量。 我以循环方式重复了绘图,有效地渲染了三个矩形。 但是在浏览器中,我们仍然只能看到一个正方形:
That is because we keep rendering at the same location: starting at point
(10, 10). We redraw the same shape over and over again. We can check our theory by making start position a function of the iteration:
那是因为我们将渲染保持在同一位置 :从点
(10, 10)。 我们一遍又一遍地重画相同的形状。 我们可以通过使起始位置成为迭代函数来检验我们的理论:
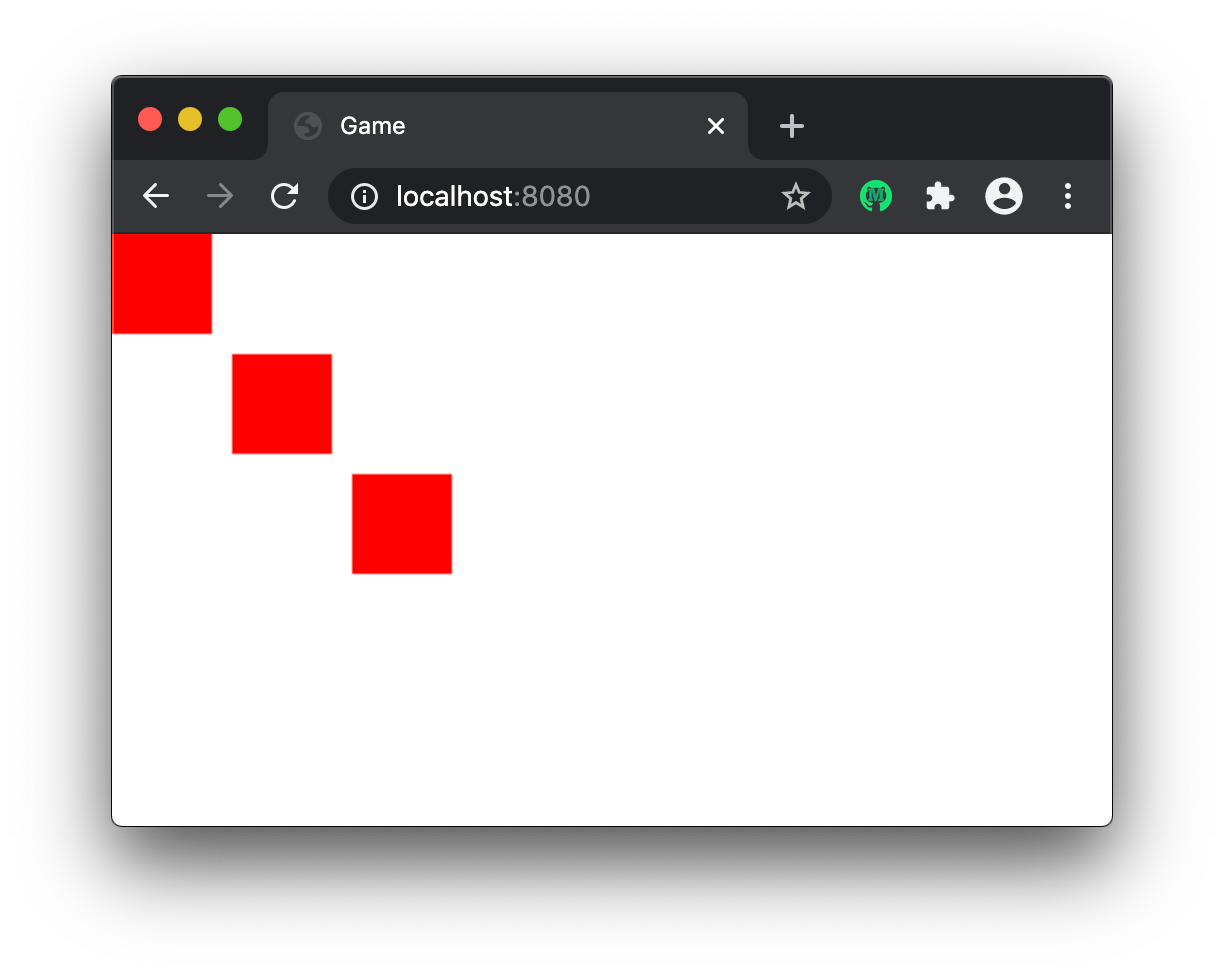
And that indeed proves our little theory:
这确实证明了我们的一点理论:

But it’s still not quite right. Rectangles are partially drawn on top of each other. It happens because the amount of “margin” is not enough. Every time we call
ctx.rectit’s start position counts from point zero, which is the top left corner. But every new square starts where previous one ends. We ought to increase the coordinates of the starting point for every new square to be the coordinate where the previous square’s right bottom point is. And then add the offset to it:
但这还不是很正确。 矩形彼此之间部分绘制。 发生这种情况是因为“保证金”的数量不够。 每次我们调用
ctx.rect它的起始位置都从零点开始 ,该点是左上角。 但是每个新的正方形都从 先前一个正方形的终点 开始 。 我们应该将每个新正方形的起点坐标增加为前一个正方形的右底点所在的坐标。 然后添加偏移量:
And that plays out nicely:
效果很好:
Note, there is no offset for the very first rectangle since it gets lost by multiplication on zero
i. And that is fine because we want the offset to be between the rectangles.注意,第一个矩形没有偏移量,因为它会因与零
i相乘而丢失 。 这很好,因为我们希望偏移量 位于矩形之间。
To draw a grid instead of this nice “ladder”, we have to loop twice: the first time for the vertical axis, second for the horizontal:
要绘制网格而不是这个漂亮的“梯子”,我们必须循环两次:第一次是垂直轴,第二次是水平轴:
The start position of the node will be determined by the respective
xor
ymultiplier:
节点的起始位置将由相应的
x或
y乘数确定:
And this is the fruit of our labor:
这是我们工作的成果:

Awesome! Now, when we have a basic understanding, we can start improving the code. First, I don’t like the idea of hardcoded values: the size of the grid, size of the node, offset between nodes, etc. It would be better if we have an external configuration. It will allow us to change values without diving into code. This is crucial because many games are built together with non-technical professionals: game designers and artists. Having a tool that can change the behavior of the game without diving too deep into the code can be a huge time saver.
太棒了! 现在,当我们有了基本的了解后,就可以开始改进代码了。 首先,我不喜欢硬编码值的概念:网格的大小,节点的大小,节点之间的偏移量等。如果我们使用外部配置,那会更好。 这将使我们无需更改代码即可更改值。 这是至关重要的,因为许多游戏都是由非技术专业人员(游戏设计师和美术师)共同打造的。 拥有一个可以改变游戏行为而又无需深入研究代码的工具可以节省大量时间。
全局设置 (Global Settings)
 Business vector created by studiogstock由studiogstock创建的商业矢量
 Idea is simple: I will define and global immutable static object that will hold all adjustable values. I call it
Settings:
想法很简单:我将定义一个全局的,不可变的静态对象,该对象将保留所有可调值。 我称之为
Settings:
And define a barrel file for it:
并为其定义一个桶文件:
Now, I will place all the settings for grid in this object:
现在,我将网格的所有设置都放置在该对象中:
Where dimension holds information how many nodes are there in any row/column of the grid, nodeSize is width/height of node in pixels, nodeOffset is a margin between nodes in pixels and, finally, color is a fill color of the node:
其中维保存了在网格的任何行/列中有多少个节点的信息, nodeSize是节点的宽度/高度(以像素为单位), nodeOffset是节点之间的边距(以像素为单位),最后, color是节点的填充色:
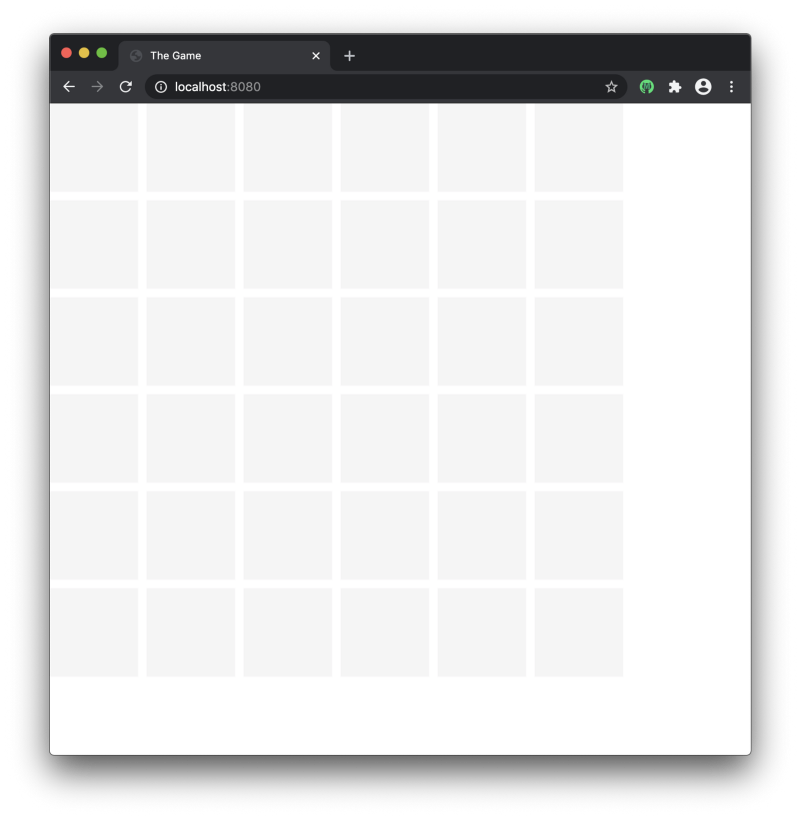
And we have the result:
结果是:

Something is off. The first four rows and columns render properly, but the fifth was cropped, and there is not even a sight of the sixth one! That is because the size of our canvas is too small to handle that many nodes:
出事了。 前四行和一列正确渲染,但第五行和第九行被裁剪,甚至看不到第六行和一列! 这是因为画布的大小太小,无法处理那么多节点:
Instead of hardcoding these values, let’s calculate them based on the Settings. Note, Canvas API expects a string, not a number:
不用对这些值进行硬编码,而是根据“设置”来计算它们。 请注意,Canvas API需要字符串,而不是数字:
Now we have enough space on the Canvas:
现在我们在画布上有足够的空间:
One tiny improvement before we wrap up the story. You may notice that the grid sticks to the left side of the screen. And that’s fair since Canvas paints from the top left corner. But it would be slightly more pleasing to see the grid in the middle of the screen.
在总结故事之前,有一个微小的改进。 您可能会注意到网格粘在屏幕的左侧。 这很公平,因为Canvas从左上角绘画。 但是在屏幕中间看到网格会更令人愉悦。
We could achieve that by shifting first row and column of nodes. Yet, simpler approach would be to assume we always start drawing from the top left corner of the canvas and simply move the canvas itself:
我们可以通过移动节点的第一行和第一列来实现。 但是,更简单的方法是假设我们总是从画布的左上角开始绘制,并简单地移动画布本身 :
Here we use good old CSS to position
canvasDOM element in the middle of the page. Our calculation for nodes are still valid because we always draw everything from the top left of the canvas:
在这里,我们使用良好的旧CSS将
canvasDOM元素放置在页面中间。 我们对节点的计算仍然有效,因为我们总是从画布的左上方绘制所有内容:

Pay attention to this simple but powerful concept: global vs. local positions. We position the nodes in the canvas local coordinate system, which is relative to the canvas element — moving canvas around changes global position of the nodes but not local one.
请注意这个简单而强大的概念:全球职位与本地职位。 我们将节点放置在画布局部坐标系中,该坐标系相对于画布元素-在画布周围移动节点会更改节点的全局位置,而不是局部节点。
Note, webpack devServer/hotReload setup in this project ignores changes in the
publicfolder. To see the updated CSS, you have to reload the page manually.请注意,在这个项目中的WebPack devServer / hotReload设置忽略了改变
public文件夹。 要查看更新CSS,您必须手动重新加载页面。You can find the complete source code of this post in the
drawing-grid-1branch of the repository.您可以 在 存储库 的
drawing-grid-1分支中 找到此文章的完整源代码 。
结论 (Conclusion)
Awesome! We have drawn our entire grid on the screen and make it look good. We also made it adjustable by the global settings, independently of code. In Part 2, we will change this code to be more robust and extendable.
太棒了! 我们已经在屏幕上绘制了整个网格并使其看起来不错。 我们还通过全局设置使其可独立于代码进行调整。 在第2部分中 ,我们将将此代码更改为更健壮和可扩展。
If you have any comments, suggestions, questions, or any other feedback, don’t hesitate to send me a private message or leave a comment below! Thank you for reading, and I’ll see you next time!
如果您有任何意见,建议,问题或任何其他反馈,请随时给我发送私人消息或在下面留下评论! 感谢您的阅读,下次再见!
This is Chapter III in the series of tutorials “Gamedev Patterns and Algorithms in Action with TypeScript”. Other Chapters are available here:
这是系列教程“使用TypeScript的Gamedev模式和算法”系列中的第三章。 其他章节可在此处找到:
Chapter III. Drawing Grid (Part 1, Part 2, Part 3, Part 4, Part 5)
第三章 工程图网格( 第1部分 ,第2部分,第3部分,第4部分,第5部分)
- Chapter IV. Drawing ships 第四章 绘图船
- Chapter V. Interaction System 第五章互动系统
- Chapter VI. Pathfinding 第六章 寻找路径
- Chapter VII. Moving ship 第七章 搬船
- Chapter VIII. State Machina 第八章 国家机械工业
- Chapter IX. Attack System: Health and Damage 第九章 攻击系统:生命与伤害
- Chapter X. Winning and Losing the Game 第十章。输赢
- Chapter XI. Enemy AI 第十一章。 敌人AI
翻译自: https://itnext.io/building-a-game-with-typescript-drawing-grid-1-5-aaf68797a0bb
typescript工程

- 使用CMake构建Ogre工程文件时的一些小细节
- 使用 了 Admob OpenFeint 接口的 iphone 游戏工程搭建 步骤
- 【工程管理】使用Ant构建struts2 web工程,自动编译,打包成war
- 使用MAVEN进行工程自动化构建
- 使用TypeScript,AngularJs和Web API构建基本的CRUD Web 应用
- 分享:使用 TypeScript 编写的 JavaScript 游戏代码
- Android Studio使用gradle-experimental构建NDK工程(无需Android.mk、Application.mk文件)
- Direct3D轮回:快速构建基于win32工程的Direct3D游戏框架
- 【Visual C++】游戏开发笔记四十四 浅墨DirectX教程十二 网格模型和X文件使用面面观
- 【Visual C++】游戏开发笔记四十四 浅墨DirectX教程十二 网格模型和X文件使用面面观
- 使用Maven构建Java工程(Building Java Projects with Maven)
- Ant—使用Ant构建一个简单的Java工程(两)
- 使用cmake自动构建工程
- 使用cmake构建跨平台工程想知道的那些事
- Opencv实现盲水印技术(二)——使用maven构建Java Web工程
- 使用rebar构建erlang工程,手把手入门版
- 使用CMake构建Ogre工程文件时的一些小细节
- 使用EA(Enterprise Architect)逆向工程查看游戏架构
- Maven构建Web工程和Tomcat7插件使用
- 使用cmake构建工程