带有Three.js的WebGL –第6课
WebGL With Three.js – Lesson 6 Today we continue our webgl lessons for those who study it and who wants to enhance his knowledge. In today’s lesson we will look at the load process of ready three-dimensional objects. There are many websites where you can download these models, and moreover, if you have an editor of three-dimensional objects (like 3D Max, Maya, or even Blender), you can create your own models. There are also many file formats of three-dimensional objects, such as obj, collada (dae), obj, mtl, stl, vrml and so on. Most of them can be loaded into your three.js scenes using special loaders. And today we will consider how to load three-dimensional models using a variety of loaders.
带有Three.js的WebGL –第6课今天,我们继续为那些学习它并希望增强其知识的人提供webgl课程。 在今天的课程中,我们将研究准备好的三维对象的加载过程。 您可以在许多网站上下载这些模型,此外,如果您拥有三维对象的编辑器(例如3D Max,Maya甚至Blender),则可以创建自己的模型。 三维对象的文件格式也很多,例如obj,collada(dae),obj,mtl,stl,vrml等。 它们中的大多数都可以使用特殊的加载器加载到您的three.js场景中。 今天,我们将考虑如何使用各种加载器加载三维模型。
现场演示1
现场演示2
现场演示3
现场演示4
OBJ (OBJ)
In order to load object files (.obj), we can use OBJLoader.js. It is rather easy to use this library, before all, we need to attach the library (in the section where we link all other necessary scripts):
为了加载目标文件(.obj),我们可以使用OBJLoader.js。 使用此库非常容易,首先,我们需要附加该库(在链接所有其他必要脚本的部分中):
<script src="js/three.min.js"></script>
<script src="js/OBJLoader.js"></script>
<script src="js/THREEx.WindowResize.js"></script>
<script src="js/OrbitControls.js"></script>
<script src="js/stats.min.js"></script>
<script src="js/script1.js"></script>
<script src="js/three.min.js"></script>
<script src="js/OBJLoader.js"></script>
<script src="js/THREEx.WindowResize.js"></script>
<script src="js/OrbitControls.js"></script>
<script src="js/stats.min.js"></script>
<script src="js/script1.js"></script>
[/code]
Now, let’s prepare a general skeleton (of all our demos):
现在,让我们准备一个通用骨架(包括所有演示):
var lesson6 = {
scene: null,
camera: null,
renderer: null,
container: null,
controls: null,
clock: null,
stats: null,
init: function() { // Initialization
// create main scene
this.scene = new THREE.Scene();
this.scene.fog = new THREE.FogExp2(0xcce0ff, 0.0003);
var SCREEN_WIDTH = window.innerWidth,
SCREEN_HEIGHT = window.innerHeight;
// prepare camera
var VIEW_ANGLE = 45, ASPECT = SCREEN_WIDTH / SCREEN_HEIGHT, NEAR = 1, FAR = 2000;
this.camera = new THREE.PerspectiveCamera( VIEW_ANGLE, ASPECT, NEAR, FAR);
this.scene.add(this.camera);
this.camera.position.set(0, 100, 300);
this.camera.lookAt(new THREE.Vector3(0,0,0));
// prepare renderer
this.renderer = new THREE.WebGLRenderer({ antialias:true });
this.renderer.setSize(SCREEN_WIDTH, SCREEN_HEIGHT);
this.renderer.setClearColor(this.scene.fog.color);
this.renderer.shadowMapEnabled = true;
this.renderer.shadowMapSoft = true;
// prepare container
this.container = document.createElement('div');
document.body.appendChild(this.container);
this.container.appendChild(this.renderer.domElement);
// events
THREEx.WindowResize(this.renderer, this.camera);
// prepare controls (OrbitControls)
this.controls = new THREE.OrbitControls(this.camera, this.renderer.domElement);
this.controls.target = new THREE.Vector3(0, 0, 0);
this.controls.maxDistance = 2000;
// prepare clock
this.clock = new THREE.Clock();
// prepare stats
this.stats = new Stats();
this.stats.domElement.style.position = 'absolute';
this.stats.domElement.style.left = '50px';
this.stats.domElement.style.bottom = '50px';
this.stats.domElement.style.zIndex = 1;
this.container.appendChild( this.stats.domElement );
// add spot light
var spLight = new THREE.SpotLight(0xffffff, 1.75, 2000, Math.PI / 3);
spLight.castShadow = true;
spLight.position.set(-100, 300, -50);
this.scene.add(spLight);
// add simple ground
var ground = new THREE.Mesh( new THREE.PlaneGeometry(200, 200, 10, 10), new THREE.MeshLambertMaterial({color:0x999999}) );
ground.receiveShadow = true;
ground.position.set(0, 0, 0);
ground.rotation.x = -Math.PI / 2;
this.scene.add(ground);
// load a model
this.loadModel();
},
loadModel: function() {
......
}
};
// Animate the scene
function animate() {
requestAnimationFrame(animate);
render();
update();
}
// Update controls and stats
function update() {
lesson6.controls.update(lesson6.clock.getDelta());
lesson6.stats.update();
}
// Render the scene
function render() {
if (lesson6.renderer) {
lesson6.renderer.render(lesson6.scene, lesson6.camera);
}
}
// Initialize lesson on page load
function initializeLesson() {
lesson6.init();
animate();
}
if (window.addEventListener)
window.addEventListener('load', initializeLesson, false);
else if (window.attachEvent)
window.attachEvent('onload', initializeLesson);
else window.onload = initializeLesson;
[/code]This code creates the empty scene with camera, rendererm control stats and light. Please pay attention to the empty ‘loadModel’ function – we will put here different codes to load models of different formats. Our first format is ‘obj’. Have a look to the following implementation:
此代码使用相机,rendererm控件统计信息和灯光创建空场景。 请注意空的“ loadModel”功能-我们将在此处放置不同的代码以加载不同格式的模型。 我们的第一种格式是'obj'。 看一下以下实现:
// prepare loader and load the model
var oLoader = new THREE.OBJLoader();
oLoader.load('models/chair.obj', function(object, materials) {
// var material = new THREE.MeshFaceMaterial(materials);
var material2 = new THREE.MeshLambertMaterial({ color: 0xa65e00 });
object.traverse( function(child) {
if (child instanceof THREE.Mesh) {
// apply custom material
child.material = material2;
// enable casting shadows
child.castShadow = true;
child.receiveShadow = true;
}
});
object.position.x = 0;
object.position.y = 0;
object.position.z = 0;
object.scale.set(1, 1, 1);
lesson6.scene.add(object);
});
[/code]Firstly, we created a new instance of THREE.OBJLoader, and then – we loaded ‘chair.obj’ model file. In order to apply a custom material, we traversed through it’s children and applied the prepared material2 (THREE.MeshLambertMaterial). We also applied casting and receiving shadows. In the end – we set the position of the object and set scale value.
首先,我们创建了THREE.OBJLoader的新实例,然后–加载了“ chair.obj”模型文件。 为了应用自定义材质,我们遍历了它的子级并应用了准备好的材质2(THREE.MeshLambertMaterial)。 我们还应用了投射和接收阴影。 最后,我们设置对象的位置并设置比例值。
MTL (MTL)
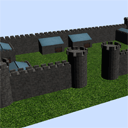
In short, this is an addition for the previously described OBJ format. Because MTL file is file that describes materials of OBJ file. To load OBJ files with support of MTL, we can use another loader: OBJMTLLoader. In order to use it, don’t forget to include necessary libraries:
简而言之,这是对先前描述的OBJ格式的补充。 因为MTL文件是描述OBJ文件材料的文件。 要加载支持MTL的OBJ文件,我们可以使用另一个加载器:OBJMTLLoader。 为了使用它,请不要忘记包含必要的库:
<script src="js/MTLLoader.js"></script>
<script src="js/OBJMTLLoader.js"></script>
<script src="js/MTLLoader.js"></script>
<script src="js/OBJMTLLoader.js"></script>
[/code]
Now add the following code into our ‘loadModel’ function:
现在将以下代码添加到我们的“ loadModel”函数中:
// prepare loader and load the model
var oLoader = new THREE.OBJMTLLoader();
oLoader.load('models/castle.obj', 'models/castle.mtl', function(object) {
object.position.x = -200;
object.position.y = 0;
object.position.z = 100;
object.scale.set(0.1, 0.1, 0.1);
lesson6.scene.add(object);
});
// prepare loader and load the model
var oLoader = new THREE.OBJMTLLoader();
oLoader.load('models/castle.obj', 'models/castle.mtl', function(object) {
object.position.x = -200;
object.position.y = 0;
object.position.z = 100;
object.scale.set(0.1, 0.1, 0.1);
lesson6.scene.add(object);
});
[/code]As you can see, the load function accepts more params – we can point our ‘mtl’ file with materials. This method allows us to load model (obj) with textures!
如您所见,load函数接受更多参数-我们可以将材料指向“ mtl”文件。 这种方法使我们可以加载带有纹理的模型(obj)!
DAE (DAE)
Collada files (dae) are also popular among 3d designers. This format supports textures as well. In order to load this format, we can use another loader: ColladaLoader. To use it, don’t forget to include necessary libraries:
Collada文件(dae)在3d设计师中也很流行。 此格式也支持纹理。 为了加载这种格式,我们可以使用另一个加载器:ColladaLoader。 要使用它,请不要忘记包含必要的库:
<script src="js/ColladaLoader.js"></script>
<script src="js/ColladaLoader.js"></script>[/code]
Now add the following code into our ‘loadModel’ function:
现在将以下代码添加到我们的“ loadModel”函数中:
// prepare loader and load the model
var oLoader = new THREE.ColladaLoader();
oLoader.load('models/mlc.dae', function(collada) {
var object = collada.scene;
var skin = collada.skins[0];
object.rotation.x = -Math.PI / 2;
object.rotation.z = Math.PI / 2;
object.position.x = -50;
object.position.y = -100;
object.position.z = 0;
object.scale.set(0.025, 0.025, 0.025);
object.updateMatrix();
lesson6.scene.add(object);
});
[/code]JSON格式 (JSON)
This format is natively supported by three.js. It also support custom materials (with textures) that are described in the json file. In order to load this format, we can use another loader: JSONLoader:
three.js本机支持此格式。 它还支持json文件中描述的自定义材质(带有纹理)。 为了加载此格式,我们可以使用另一个加载器:JSONLoader:
// prepare loader and load the model
var oLoader = new THREE.JSONLoader();
oLoader.load('models/palm.js', function(geometry, materials) {
// get original materials
var material = new THREE.MeshFaceMaterial(materials);
var mesh = new THREE.Mesh(geometry, material);
mesh.position.x = -50;
mesh.position.y = -80;
mesh.position.z = 0;
mesh.scale.set(10, 10, 10);
lesson6.scene.add(mesh);
});
[/code]现场演示1
现场演示2
现场演示3
现场演示4
[sociallocker]
[社交储物柜]
打包下载
[/sociallocker]
[/ sociallocker]
结论 (Conclusion)
Next lesson we will continue our overview of various formats and loaders. Stay tuned for new lessons and you are sure to find something new and interesting for yourself.
在下一课中,我们将继续概述各种格式和加载程序。 请继续关注新课程,您一定会发现适合自己的新事物。
翻译自: https://www.script-tutorials.com/webgl-with-three-js-lesson-6/

- 带有Three.js的WebGL –第8课
- 带有Three.js的WebGL –第7课
- 带有Three.js的WebGL –第2课
- 带有Three.js的WebGL –第1课
- 带有Three.js的WebGL –第8课
- 浅谈Three.js源码-render之WebGLCapabilities.js
- webGL之three.js入门4--ThreeJS Editor入门篇
- 如何用webgl(three.js)搭建一个3D库房
- WebGL之Three.js开发第一个场景(含源码)
- Three.js讲解以及WEBGL实例(转)
- 腾讯Web前端大会 WebGL&Three.js(MR_LP)
- Webgl之three.js
- WebGL three.js学习笔记 法向量网格材质MeshNormalMaterial的介绍和创建360度全景天空盒的方法
- 检测使用 three.js 时的 WebGL 和浏览器兼容性(Detecting WebGL and browser compatibility with three.js)(转)
- Three.js讲解以及WEBGL实例
- 图解WebGL&Three.js工作原理
- 浅谈Three.js源码-render之WebGLShader.js
- [webGL学习]基于three.js构建WebGL实例第一讲
- WebGL three.js学习笔记 6种类型的纹理介绍及应用
- Threejs 官网 - 检测使用 three.js 时的 WebGL 和浏览器兼容性(Detecting WebGL and browser compatibility with three.js)