搭建hadoop+Hbase,JAVA API操作HBase
搭建hadoop+Hbase,JAVA API操作HBase
一、实验背景
了解HBase的存储形式https://blog.csdn.net/worldchinalee/article/details/82692185 HBase基于列的而不是基于行的模式。
Hbase 全称为 Hadoop Database,即 Hbase 是 Hadoop 的数据库,是一个分布式的存储系统。Hbase 利用 Hadoop 的 HDFS 作为其文件存储系统,利用 Hadoop 的 MapReduce 来处理 Hbase 中的海量数据。利用 ZooKeeper 作为其协调工具。 HBase – Hadoop Database,是一个高可靠性、高性能、面向列、可伸缩的分布式存储系统,利用HBase技术可在廉价PC Server上搭建起大规模结构化存储集群。
二、实验环境
· 一台1核2G的主机,两台1核1G的从机
· 镜像系统为Centos6.4
· 三台主机都已经安装JDK1.8.0,并在 /etc/profile 配置了环境变量
· 三台主机配置好SSH免密码登录
· 三台主机搭建好的Hadoop集群环境,版本为2.7.7
三、实验步骤
步骤一:搭建hbase的环境
1.下载解压
wget https://mirrors.tuna.tsinghua.edu.cn/apache/hbase/stable/hbase-2.2.4-bin.tar.gz
tar xzvf hbase-2.2.4-bin.tar.gz -C /bigdata
2.配置环境
cd /bigdata/hbase-2.2.4

cd conf/
(1)配置vi hbase-env.sh
JAVA_HOME=/bigdata/jdk1.8.0_241
(2)配置vi hbase-site.xml
<property>
<name>hbase.rootdir</name>
<value>hdfs://server1:9000/hbase/hbase_db</value>
</property>

<property>
<name>hbase.cluster.distributed</name>
<value>true</value>
</property>
<property>
<name>hbase.zookeeper.quorum</name>
<value>server1,server2,server3</value>
</property>
<property>
<name>hbase.zookeeper.property.dataDir</name>
<value>/data/hbase/zookeeper</value>
</property>
<property>
<name>hbase.master.info.port</name>
<value>16610</value>
</property>
(3)配置vi regionservers
server1

server2

server3
将文件复制给server2,server3
scp -r hbase-2.2.4 server2:/bigdata/

scp -r hbase-2.2.4 server3:/bigdata/
3.启动hbase
cd /bigdata/hbase-2.2.4

./bin/start-hbase.sh

./bin/hbase shell
步骤二:启动hadoop和hbase,关于一些hbase的操作
- 启动hadoop和 hbase
#启动hadoop
cd /bigdata/hadoop-2.7.7/

./sbin/start-dfs.sh

./sbin/start-yarn.sh
#启动hbase
./bin/start-hbase.sh

./bin/hbase shell
2.运行一些简单的命令
| 名称 | 命令表达式 |
|---|---|
| 创建表 | create ‘表名称’, ‘列族名称1’,‘列族名称2’,‘列族名称N’ |
| 添加记录 | put ‘表名称’, ‘行名称’, ‘列名称:’, ‘值’ |
| 查看记录 | get ‘表名称’, ‘行名称’ |
| 查看表中的记录总数 | count ‘表名称’ |
| 删除记录 | delete ‘表名’ ,‘行名称’ , ‘列名称’ |
| 删除一张表 | 先要屏蔽该表,才能对该表进行删除,第一步 disable ‘表名称’ 第二步 drop ‘表名称’ |
| 查看所有记录 | scan “表名称” |
| 查看某个表某个列中所有数据 | scan “表名称” , {COLUMNS=>‘列族名称:列名称’} |
| 更新记录 | 就是重写一遍进行覆盖 |
存储的方式
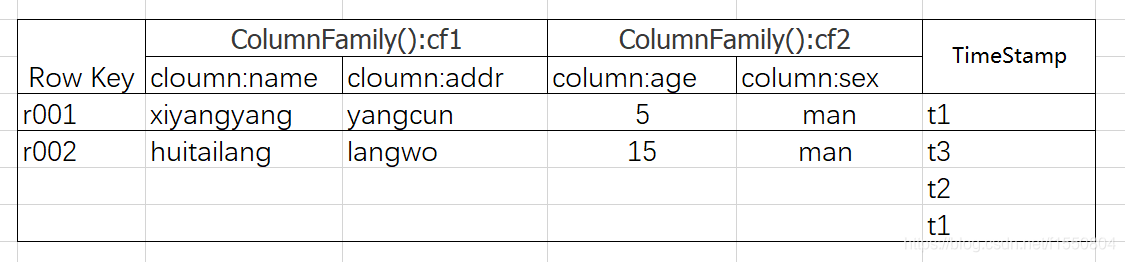
(1)创建表格:
hbase(main):001:0> create 'x','cf1','cf2'
(2)插入数据
插入数据的内容
第一行
put 'x','r001','cf1:name','xiyangyang'
put 'x','r001','cf1:addr','yangcun'
put 'x','r001','cf2:age','5'
put 'x','r001','cf2:sex','man'
第二行
put 'x','r002','cf1:name','huitailang'
put 'x','r002','cf1:addr','langwo'
put 'x','r002','cf2:age','15'
put 'x','r002','cf2:sex','man'
(3)查看记录
hbase(main):014:0> get 'x','r001'
(4)查看表中的记录总数
hbase(main):013:0> count 'x'
(5) 删除记录
hbase(main):015:0> delete 'x','r001','cf1:name'
(6)删除一张表
hbase(main):019:0> disable 'tt'
hbase(main):021:0> drop 'tt'
(7)查看所有记录
hbase(main):002:0> scan 'x'
(8)查看某个表某个列中所有数据
hbase(main):003:0> scan 'x',{COLUMNS=>'cf1:name'}
步骤三:java API访问hbase
1.创建一个maven文件,在pom.xml加入hbase需要的jar包
<dependency>
<groupId>junit</groupId>
<artifactId>junit</artifactId>
<version>3.8.1</version>
<scope>test</scope>
</dependency>
<dependency>
<groupId>org.apache.hbase</groupId>
<artifactId>hbase-client</artifactId>
<version>1.3.6</version>
</dependency>
<dependency>
2.java API操作hbase
(1)创建表
package xgs.xgs11;
import org.apache.hadoop.conf.Configuration;
import org.apache.hadoop.hbase.HBaseConfiguration;
import org.apache.hadoop.hbase.HColumnDescriptor;
import org.apache.hadoop.hbase.HTableDescriptor;
import org.apache.hadoop.hbase.TableName;
import org.apache.hadoop.hbase.client.Connection;
import org.apache.hadoop.hbase.client.ConnectionFactory;
import org.apache.hadoop.hbase.client.HBaseAdmin;
import org.apache.hadoop.hbase.client.Table;
import org.junit.Test;
import org.junit.Before;

public class HBase {
Configuration config = null;
private Connection connection = null;
private Table table = null;

@Before
public void init() throws Exception {
config = HBaseConfiguration.create();// 配置
config.set("hbase.zookeeper.quorum", "192.168.2.131,192.168.1.132,192.168.2.133");// zookeeper地址
config.set("hbase.zookeeper.property.clientPort", "2181");// zookeeper端口
connection = ConnectionFactory.createConnection(config);
table = connection.getTable(TableName.valueOf("users"));
System.out.println("hhh");
}
@Test
//创建表
public void testCreateTable() throws Exception{
//创建表管理类
HBaseAdmin admin = new HBaseAdmin(config);
//创建表描述类
TableName tableName = TableName.valueOf("test2");
HTableDescriptor descriptor = new HTableDescriptor(tableName);
//创建列族描述类
HColumnDescriptor info1 = new HColumnDescriptor("info1");
//列族加入表中
descriptor.addFamily(info1);
HColumnDescriptor info2 = new HColumnDescriptor("info2");
descriptor.addFamily(info2);
System.out.println("woliochenggonghaichayibu");
//创建表
admin.createTable(descriptor);
System.out.println("-----create-----");
}

}
(2)删除表
@Test
public void testDeleteTable() throws Exception{
HBaseAdmin admin = new HBaseAdmin(config);
admin.disableTable("test2");
admin.deleteTable("test2");
System.out.println("----delete----");
}
(3)单条插入(修改)
@Test
//单条插入(修改)
public void testPut() throws Exception{
//rowkey
Put put = new Put(Bytes.toBytes("r0003"));
//列族,列,值
put.add(Bytes.toBytes("cf1"), Bytes.toBytes("addr"), Bytes.toBytes("yangcun"));
put.add(Bytes.toBytes("cf1"), Bytes.toBytes("name"), Bytes.toBytes("lanyangyang"));
table.put(put);
System.out.println("----put-----");
//提交
//table.flushCommits();
}
(4)多条查询
@Test
//多条查询
public void testGetMany() throws Exception{

Scan scan = new Scan();
//字典序   类似于分页
//scan.setStartRow(Bytes.toBytes("cf1"));
//scan.setStopRow(Bytes.toBytes("'cf2"));
ResultScanner resultScanner = table.getScanner(scan);
System.out.println(resultScanner);
for (Result result : resultScanner) {
//Single row result of a Get or Scan query. Result
//Result 一次获取一个rowkey对应的记录
//列族,列名
byte[] addr = result.getValue(Bytes.toBytes("cf1"), Bytes.toBytes("addr"));
byte[] name = result.getValue(Bytes.toBytes("cf1"), Bytes.toBytes("name"));
System.out.print(Bytes.toString(addr)+",");
System.out.print(Bytes.toString(name));
System.out.println();
}
System.out.println("----GetMany----");
}
四、实验分析
1.java API创建表的时候卡住admin.createTable(descriptor);
解决方法:
(1)hadoop 关闭安全模式:hadoop dfsadmin -safemode leave
(2)在C:\Windows\System32\drivers\etc\hosts中,加上虚拟机的ip 主机名
192.168.2.131 server1
192.168.2.132 server2
192.168.2.133 server3

- hadoop2-HBase的Java API操作
- hadoop2-HBase的Java API操作
- hbase java api操作
- Hadoop Java API 操作 hdfs--1
- 【十八掌●武功篇】第八掌:HBase之基本操作Java API
- Hbase的java_API操作
- HBase基本API(java)操作(增删改查)
- HBase Shell及JavaAPI操作
- linux 下通过过 hbase 的Java api 操作hbase
- hbase-0.98整合hadoop-2.6,附java操作代码
- hbase快速入门-- java api 操作
- hadoop的hdfs中的javaAPI操作
- 【大数据系列】windows环境下搭建hadoop开发环境使用api进行基本操作
- hadoop第二天——2. HDFS的应用开发(JAVA API操作)
- hbase编程:通过Java api操作hbase
- HBase-java api 基本操作
- hbase java api操作
- HBase JavaAPI操作示例
- HBase的JavaAPI操作
- JAVA api 远程hbase出错 org.apache.hadoop.hbase.client.RetriesExhaustedException