Spring AOP的三种实现方式
2020-06-24 04:33
141 查看
AOP实现方式
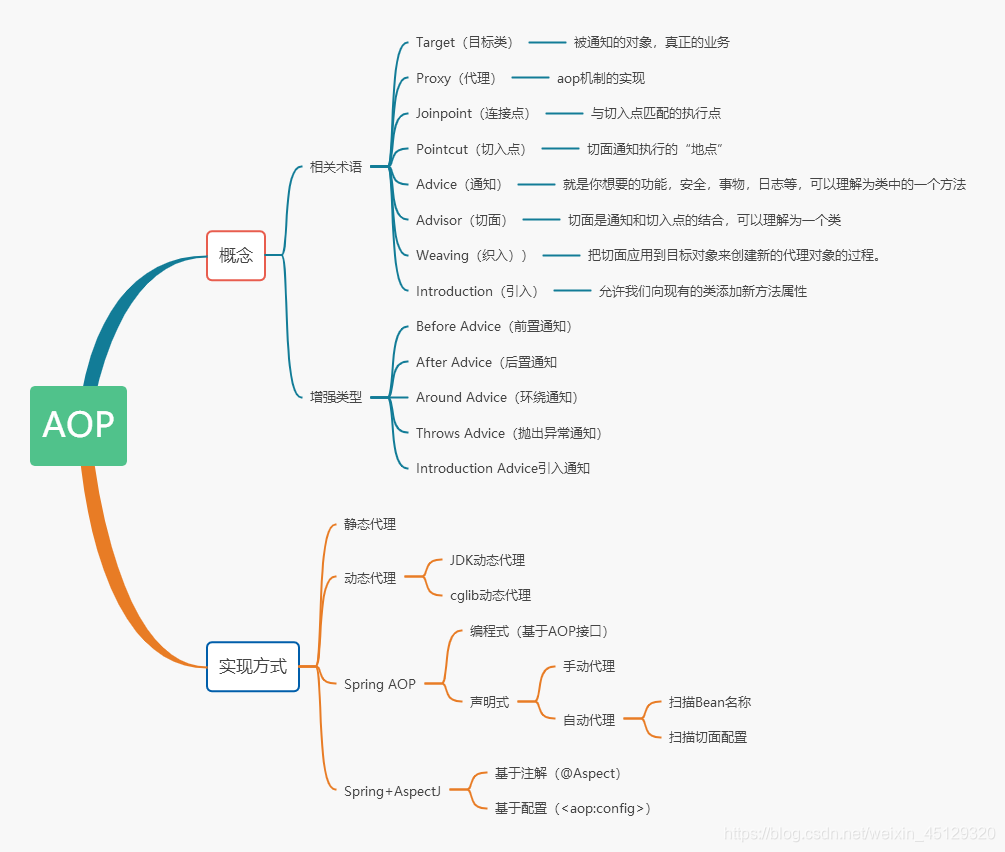
1.AOP环境配置
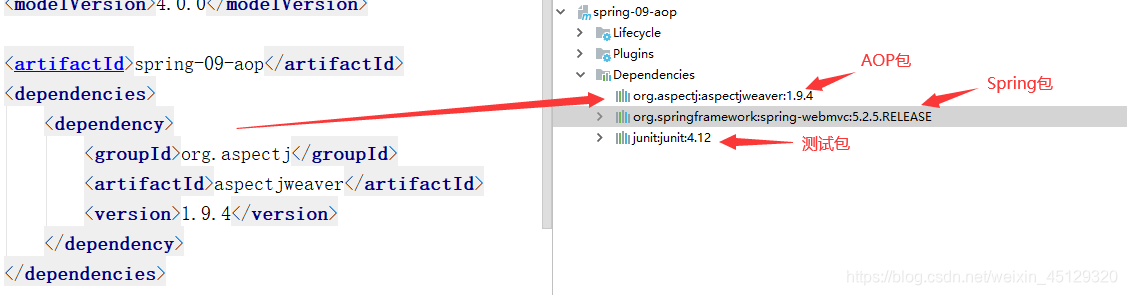
Maven中的导入:
<dependencies>
<dependency>
<groupId>org.aspectj</groupId>
<artifactId>aspectjweaver</artifactId>
<version>1.9.4</version>
</dependency>
<dependency>
<groupId>org.springframework</groupId>
<artifactId>spring-webmvc</artifactId>
<version>5.2.5.RELEASE</version>
</dependency>
<dependency>
<groupId>junit</groupId>
<artifactId>junit</artifactId>
<version>4.12</version>
</dependency>
</dependencies>
2.AOP实现方式一:使用Spring的API接口
- 定义一个接口:
package com.lin.service;

public interface UserService {
public void insert();
public void delete();
public void update();
public void select();

}
- 创建要被代理的UserServiceImpl类,代码如下:
package com.lin.service;

public class UserServiceImpl implements UserService {
public void insert() {
System.out.println("增加一个客户");
}

public void delete() {
System.out.println("删除一个客户");
}

public void update() {
System.out.println("修改一个客户");
}

public void select() {
System.out.println("查询一个客户");
}
}
3.编写AOP的通知类Log
package com.lin.log;

import org.springframework.aop.AfterReturningAdvice;
import org.springframework.aop.MethodBeforeAdvice;

import java.lang.reflect.Method;

public class Log implements MethodBeforeAdvice, AfterReturningAdvice {
//method  要执行目标对象的方法
//args  参数
//target  目标对象
public void before(Method method, Object[] args, Object target) throws Throwable {
System.out.println(target.getClass().getName()+"的"+method.getName()+"方法,被执行了");
}
//returnValue  执行方法后的返回值
public void afterReturning(Object returnValue, Method method, Object[] args, Object target) throws Throwable {
System.out.println("执行了"+method.getName()+"方法,返回的值为"+returnValue);
}
}
4.配置容器初始化时需要的log.xml文件
<?xml version="1.0" encoding="UTF-8"?>
<beans xmlns="http://www.springframework.org/schema/beans"
xmlns:xsi="http://www.w3.org/2001/XMLSchema-instance"
xmlns:aop="http://www.springframework.org/schema/aop"
xsi:schemaLocation="http://www.springframework.org/schema/beans
https://www.springframework.org/schema/beans/spring-beans.xsd
http://www.springframework.org/schema/aop
https://www.springframework.org/schema/aop/spring-aop.xsd">

<!--注册通知类-->
<bean id="log" class="com.lin.log.Log"/>
<!-- 注册被代理对象 -->
<bean id="userService" class="com.lin.service.UserServiceImpl"/>

<!--配置aop:需要导入aop约束-->
<aop:config>
<!--切入点:expression:表达式  execution(要执行的位置)-->
<aop:pointcut id="pointcut" expression="execution(* com.lin.service.UserServiceImpl.*(..))"/>
<!--执行环绕增加-->
<aop:advisor advice-ref="log" pointcut-ref="pointcut"/>
</aop:config>

</beans>
5.测试类MyTest.java代码如下:
import com.lin.service.UserService;
import com.lin.service.UserServiceImpl;
import org.springframework.context.ApplicationContext;
import org.springframework.context.support.ClassPathXmlApplicationContext;

public class MyTest {
public static void main(String[] args) {
//如果是web项目,则使用以下代码加载配置文件,如果是一般的Java项目,则使用注释的方式
ApplicationContext context = new ClassPathXmlApplicationContext("aop.xml");
// ApplicationContext context = new FileSystemXmlApplicationContext("XML文件的绝对路径...");
UserService userService = (UserService) context.getBean("userService");
userService.delete();
}
}
3.AOP实现方式二:自定义(切面) 实现AOP
1.创建一个自定义通知类
package com.lin.diy;

public class Diy {

public void before(){
System.out.println("========方法执行之前===========");
}
public void after(){
System.out.println("========方法执行之后===========");
}
}
2.XML配置部分
<bean id="userService" class="com.lin.service.UserServiceImpl"/>
<bean id="diy" class="com.lin.diy.Diy"/>
<aop:config>
<!--自定义切面,ref要引用的类-->
<aop:aspect ref="diy">
<!--切入点和通知的结合就是切面-->
<!--切入点-->
<aop:pointcut id="point" expression="execution(* com.lin.service.UserServiceImpl.*(..))"/>
<!--通知-->
<aop:before method="before" pointcut-ref="point"/>
<aop:after method="after" pointcut-ref="point"/>
</aop:aspect>
</aop:config>
3.测试类
import com.lin.service.UserService;
import com.lin.service.UserServiceImpl;
import org.springframework.context.ApplicationContext;
import org.springframework.context.support.ClassPathXmlApplicationContext;
import org.springframework.context.support.FileSystemXmlApplicationContext;

public class MyTest {
public static void main(String[] args) {
//如果是web项目,则使用以下代码加载配置文件,如果是一般的Java项目,则使用注释的方式
ApplicationContext context = new ClassPathXmlApplicationContext("aop.xml");
// ApplicationContext context = new FileSystemXmlApplicationContext("XML文件的绝对路径...");
UserService userService = (UserService) context.getBean("userService");
userService.delete();
}
}
4.AOP实现方式三:注解
1.利用注解定义一个通知类
package com.lin.diy;

import com.lin.service.UserService;
import com.lin.service.UserServiceImpl;
import org.aspectj.lang.ProceedingJoinPoint;
import org.aspectj.lang.annotation.*;

@Aspect
public class AnnotationApo {
//定义切入点
@Pointcut("execution(* com.lin.service.UserServiceImpl.*(..))")
private void cutPoint(){}
@Before("cutPoint()")  //等于@Before("* com.lin.service.UserServiceImpl.*(..)"),置前
public void before(){
System.out.println("方法执行前----------------");
}
@AfterReturning("execution(* com.lin.service.UserServiceImpl.*(..))")
//等于@AfterReturning("cutPoint()"),带有返回值置后
public void after(){
System.out.println("方法执行后----------------");
}
@Around(("cutPoint()"))			//环绕通知
public Object doBasicProfiling(ProceedingJoinPoint pjp) throws Throwable{
System.out.println("进入环绕通知");
Object object = pjp.proceed();//执行该方法
System.out.println("退出方法");
return object;
}

}
2.xml配置文件
<?xml version="1.0" encoding="UTF-8"?>
<beans xmlns="http://www.springframework.org/schema/beans"
xmlns:xsi="http://www.w3.org/2001/XMLSchema-instance"
xmlns:aop="http://www.springframework.org/schema/aop"
xsi:schemaLocation="http://www.springframework.org/schema/beans
https://www.springframework.org/schema/beans/spring-beans.xsd
http://www.springframework.org/schema/aop
https://www.springframework.org/schema/aop/spring-aop.xsd">

<!--开启注解支持,默认情况下proxy-target-class="false",基于JDK实现;true,基于cglib实现-->
<aop:aspectj-autoproxy proxy-target-class="true"/>
<!--注册bean-->
<bean id="userService" class="com.lin.service.UserServiceImpl" />
<bean id="annotation" class="com.lin.diy.AnnotationApo"  />

</beans>
3.测试类
import com.lin.service.UserService;
import org.springframework.context.ApplicationContext;
import org.springframework.context.support.ClassPathXmlApplicationContext;

public class MyTest {
public static void main(String[] args) {
//如果是web项目,则使用以下代码加载配置文件,如果是一般的Java项目,则使用注释的方式
ApplicationContext context = new ClassPathXmlApplicationContext("aop.xml");
// ApplicationContext context = new FileSystemXmlApplicationContext("XML文件的绝对路径...");
UserService userService = (UserService) context.getBean("userService");
userService.delete();
}
}
5.总结
Spring AOP 通过 CGLIB或者JDK代理 来动态地生成代理对象,这个代理对象指的就是 AOP 代理类,而 AOP 代理类的方法则通过在目标对象的切入点动态地织入增强处理,从而完成了对目标方法的增强。

相关文章推荐
- Spring aop实现的三种方式
- Spring AOP的三种实现方式
- Intent实现Activity跳转的三种方式
- 三种方式实现生产者和消费者模式
- iOS中三种方式实现登录界面播放视频或gif效果
- 分布式锁的三种实现方式
- 详细解读分布式锁原理及三种实现方式
- Android-底部菜单Tabs 三种实现方式(ViewPager,Fragment,ViewPage+Fragment)
- nginx限流方案的实现(三种方式)
- 单点登录的三种实现方式
- java使用递归,非递归方式实现二叉树的三种常见遍历方式
- Android三种方式实现视频
- android 三种实现水平向滑动方式(ViewPager、ViewFilpper、ViewFlow)的比较
- Java-多线程三种实现方式
- Android跑马灯效果实现的三种方式
- 三种 bottom half的实现方式 softirqs, tasklets, work queue 及之间的比较 ,驱动程序使用tasklet机制
- 三种方式实现圆角图片
- JAVA多线程实现的三种方式
- Android TextView实现带链接文字事件监听的三种常用方式示例
- 总结:三种方式实现单击页签切换页面效果