简易版vue及源码,实现常用指令(插值表达式,v-text,v-html,v-model,@事件)数据响应式功能
2020-06-20 22:43
507 查看
文章目录
简易版vue实现及源码(数据响应式及常用指令实现)
1. 简易vue工作机制分析
简易版vue重点实现以下两个功能:
- 数据响应式:改变data等中的数据,页面重新进行渲染;页面中的数据改变data中的数据同步发生改变
- 模板解析:提取模板中的插值表达式和指令,按照特定的语法进行解析,解析完成后插入el中,DOM进行重绘
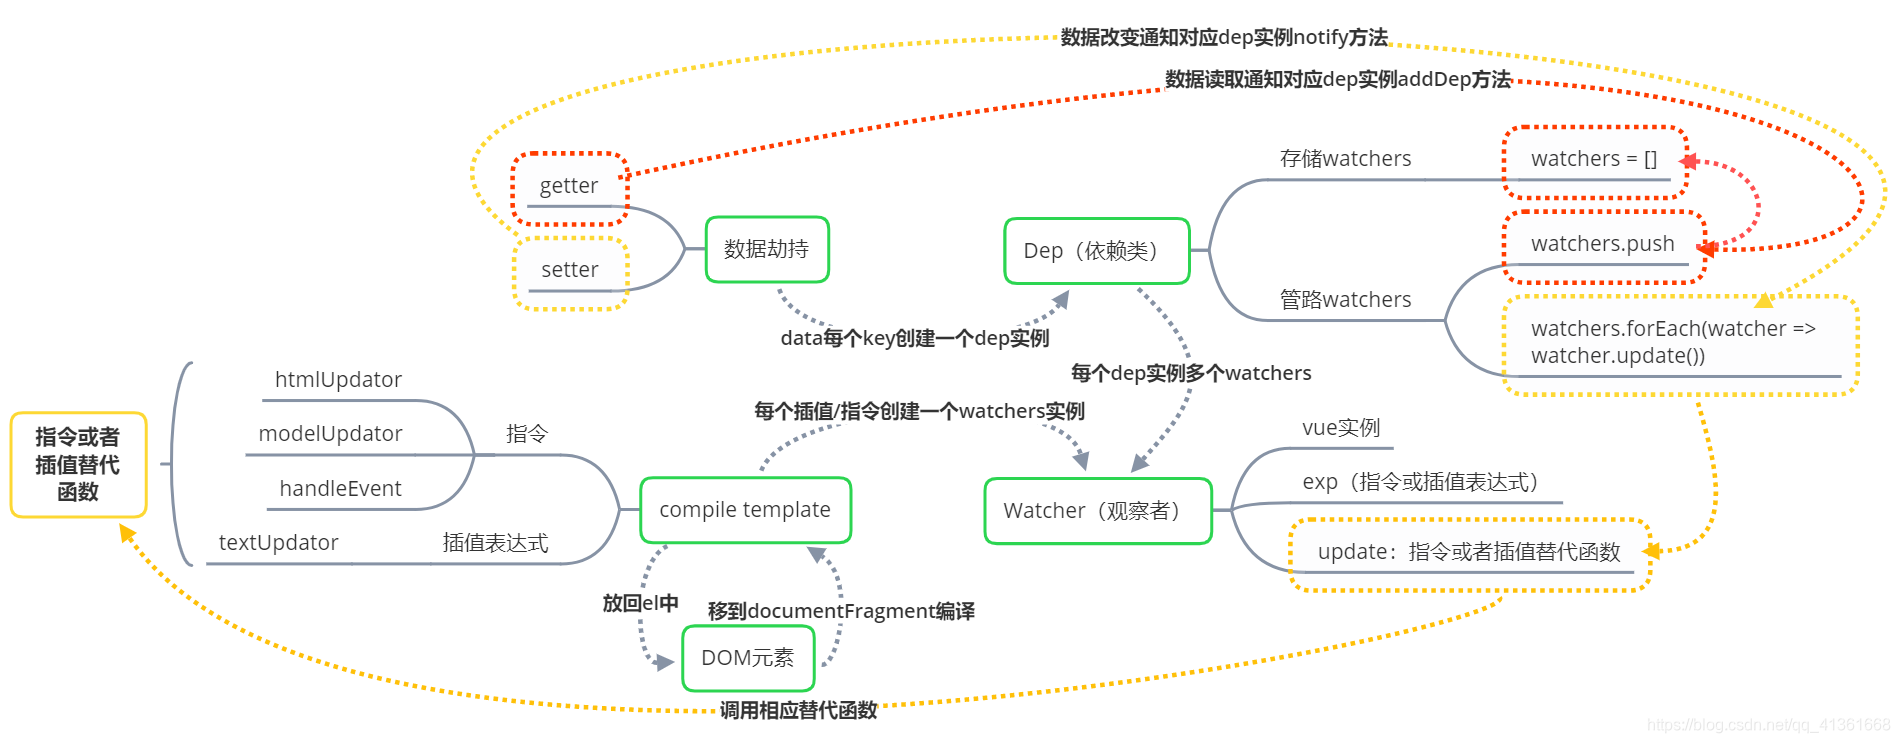
实现分4个部分:Watcher类,Dep类,数据劫持,模板解析
本案例new Vue()初始化时主要做了3件事,保存options(vue配置)和data,进行数据拦截,创建compile实例
实际 new Vue() 时会调⽤用_init()进⾏行行初始化,会初始化各种实例例⽅方法、全局⽅方法、执⾏行行⼀一些⽣生命周期、初始化props、data等状态。其中最重要的是data的「响应化」处理。
- Watcher类:模板解析时,所有的插值表达式或指令都会创建一个watcher实例,每个watchers实例存放了其vue实例,插值表达式/指令,相应的模板替换方法
- Dep类:在每个data中的key开始进行数据劫持时,会创建一个dep实例,每个dep实例存放和当前key相同的watcher实例
- 数据拦截:getter时通知dep实例执行addDep方法,保存相同key值的watchers实例,setter时通知dep实例执行notify方法(重新更新DOM)
- 模板解析:使⽤用正则解析template中的vue的指令(v-xxx) 变量量等等
实际Vue编译模块分为三个阶段
- parse:使⽤用正则解析template中的vue的指令(v-xxx) 变量量等等 形成抽象语法树AST
- optimize:标记⼀些静态节点,⽤用作后⾯面的性能优化,在diff的时候直接略略过
- generate:把第⼀部生成的AST 转化为渲染函数 render function
Virtual DOM 是react⾸首创,Vue2开始⽀支持,就是用 JavaScript 对象来描述dom结构,数据修改的时候,我们先修改虚拟dom中的数据,然后数组做diff,最后再汇总所有的diff,力求做最少的dom操作,毕竟js里对比很快,而真实的dom操作太慢
2.源码实现
1.数据响应式
本文中,重点实现data的「响应化」处理
细节:怎么将data挂载到vue实例上(源码中找答案)
property/Dep/Watcher对应关系图

class KVue {
constructor(options) {
//保存vue配置
this.$options = options;
//保存data
this.$data = options.data;
//响应化处理
this.observe(this.$data);
new Compile(options.el, this);
//钩子函数
if (options.created) {
options.created.call(this);
}
}
observe(obj) {
if (!obj || typeof obj !== 'object') {
return
}
//观察data中每一个数据
for (const key in obj) {
this.defineReactive(obj, key, obj[key]);
this.proxyData(key);
}
}
defineReactive(obj, key, val) { //数据劫持,完成响应式
//深层次遍历
this.observe(key);
let _val = val;
//为data中的每个key创建dep实例
const dep = new Dep();
Object.defineProperty(obj, key, {
get() {
// 依赖收集
Dep.target && dep.addDep(Dep.target);
return _val
},
set(newVal) {
if (newVal !== val) {
_val = newVal;
dep.notify();
}
}
})
}
// 在vue根上定义属性代理data中的数据
proxyData(key) {
// this指的KVue实例
Object.defineProperty(this, key, {
get() {
return this.$data[key];
},
set(newVal) {
this.$data[key] = newVal;
}
});
}
}
class Dep { //建立依赖类,
constructor() {
this.watchers = []
}
addDep(watcher) {
this.watchers.push(watcher)
}
notify() {
this.watchers.forEach(watcher => watcher.update())
}
}
class Watcher { // 创建Watcher:保存data中数值和页面中的挂钩关系
constructor(vm, key, cb) {
// 创建实例时立刻将该实例指向Dep.target便于依赖收集
this.vm = vm;
this.key = key;
this.cb = cb;

//用来存放解析到插值或者指令及对应的vm实例
Dep.target = this;
this.vm[this.key];//触发依赖收集
Dep.target = null;
}
// 更新
update() {
// console.log(this.key + "更新了!");
this.cb.call(this.vm, this.vm[this.key])
}
}
2.模板解析
编译过程图

//遍历dom结构,解析插值表达式或者指令
class Compile {
constructor(el, vm) {
this.$vm = vm;
this.$el = document.querySelector(el);

// 把模板中的内容移到片段操作
this.$fragment = this.node2Fragment(this.$el);
// 执行编译
this.compile(this.$fragment);
// 放回$el中
this.$el.appendChild(this.$fragment);
}
node2Fragment(el) {
// 创建元素片段
const fragment = document.createDocumentFragment();
let child;
while ((child = el.firstChild)) {
fragment.appendChild(child);
}
return fragment;
}
compile(el) {
const childNodes = el.childNodes;
Array.from(childNodes).forEach(node => {
if (node.nodeType == 1) { //表示元素节点
//// console.log(`编译${node.nodeName}元素:`)
// // console.log(node)
//只编译v-xxx
this.compileElement(node);
} else if (this.isInter(node)) { //是否为插值表达式
// //console.log(node)
//编译{{}}
this.compileText(node)
}
// 递归子节点
if (node.children && node.childNodes.length > 0) {
this.compile(node);
}
})
}
isInter(node) {
return node.nodeType == 3 && /\{\{(.*)\}\}/.test(node.textContent);
}
compileText(node) { //文本替换
// 取出插值表达式内中的表达式
const exp = RegExp.$1;
this.update(node, exp, 'text')
}
update(node, exp, type) {
const updator = this[type + "Updator"];
updator && updator(node, this.$vm[exp]); // 首次初始化
// 创建Watcher实例,收集依赖
new Watcher(this.$vm, exp, function (val) {
updator && updator(node, val);
})
}
textUpdator(node, val) {
////console.log(node, val)
//将插值表达式变为vm.$data的值
node.textContent = val;
}
compileElement(node) {
//只关心元素属性
const nodeAttrs = node.attributes;
////console.log(node,nodeAttrs)
Array.from(nodeAttrs).forEach(attr => {
//k-xxx="aaa"
const attrName = attr.name; //取出指令k-xxx
const exp = attr.value; //取出指令值aaa
////console.log(attrName,exp)
if (attrName.indexOf("k-") == 0) {
// 指令
const type = attrName.substring(2); //xxx
// 执行
this[type] && this[type](node, exp);
} else if (attrName.indexOf('@') == 0) {
//事件类型
const type = attrName.substring(1);
console.log(type);
//执行
this.handleEvent(node, this.$vm, exp, type)
}
})
}
handleEvent(node, vm, exp, type) {
const fn = vm.$options.methods && vm.$options.methods[exp]
if (type && fn) {
node.addEventListener(type, fn.bind(vm))
}
}
text(node, exp) { //k-text
////console.log(node, exp, 'k-text')
this.update(node, exp, 'text')
}
html(node, exp) { //k-html
this.update(node, exp, "html");
////console.log(node, exp, this.$vm[exp], 'k-html')
}
htmlUpdator(node, val) {
node.innerHTML = val;
}
model(node, exp) {//k-model
this.update(node, exp, 'model')
node.addEventListener('input', e => {
this.$vm[exp] = e.target.value;
})
}
modelUpdator(node, val) {
node.value = val;
}
}
测试代码
<body>
<div id="app">
{{name}}
<p>{{name}}</p>
<p k-text="name"></p>
<p>{{age}}</p>
<input type="text" k-model="name">
<button @click="changeName">点我</button>
<div k-html="html"></div>
</div>
<script src="./kvue.js"></script>
<script src="./compile.js"></script>
<script>
const kvm = new KVue({
el: '#app',
data: {
name: "I am test.",
age: 12,
html: '<button>这是一个按钮</button>'
},
created() {
console.log('开始啦')
setTimeout(() => {
this.name = '我是测试'
}, 1500)
},
methods: {
changeName() {
this.name = '哈喽,我来了'
this.age = 1
}
}
})

</script>
</body>
效果图:
| 结果 | created执行结果 | 点击事件 | v-model |
|---|---|---|---|

|

|

|

|
码云地址:
https://gitee.com/huang_canmin/VueExercise/tree/origin/02.%E6%BA%90%E7%A0%81/Vue%E5%AE%9E%E7%8E%B0

相关文章推荐
- Vue:01-指令、v-cloak、v-text、v-html、v-pre、v-once、双向数据绑定、v-model、mvvm、v-on、事件修饰符、按键修饰符、v-bind、分支结构、循环结构
- vue.js使用v-model指令实现的数据双向绑定功能示例
- angular,vue,react的基本语法—插值表达式,渲染数据,响应式数据
- vue.js--基础 事件结合双向数据绑定实现todolist,增加和删除功能
- (1)Vue指令 v-cloak v-text v-html v-bind v-on v-model用法
- vue.js使用v-model实现表单元素(input) 双向数据绑定功能示例
- vue插值操作及相关指令(mustache语法,v-once,v-pre,v-text,v-html,v-cloak)
- vue数据操作之点击事件实现num加减功能示例
- vue学习笔记(五)【vue中的基本指令(二)v-model】实现简易计算器、全选反选功能
- Vue学习笔记05-插值表达式、v-text和v-html
- vue.js实现数据库的JSON数据输出渲染到html页面功能示例
- AutoCompleteTextView的使用和源码分析以及实现响应式输入提示功能
- VUE基本指令(v-model,v-html,v-text,v-bind,v-if,v-show,v-for,v-on:click,组件,过滤器)
- Vue创建响应式全局数据--Vue.observable() 实现类似vuex的状态管理功能
- Vue-指令 v-text v-html v-model v-bind
- SSH开发框架中,实现系统启动加载类,读取数据库常用数据进入内存,利用Spring托管,并完成reload功能
- vue div contenteditable属性,模拟v-model双向数据绑定功能
- 从vue.js的源码分析,input和textarea上的v-model指令到底做了什么
- web前端vue实现插值文本和输出原始html
- 浅谈 Vue v-model指令的实现原理 - 如何利用v-model设计自定义的表单组件