Netty源码学习系列之1-NioEventLoopGroup的初始化
前言
NioEventLoopGroup是netty对Reactor线程组这个抽象概念的具体实现,其内部维护了一个EventExecutor数组,而NioEventLoop就是EventExecutor的实现(看名字也可发现,一个是NioEventLoopGroup,一个是NioEventLoop,前者是集合,后者是集合中的元素)。一个NioEventLoop中运行着唯一的一个线程即Reactor线程,这个线程一直执行NioEventLoop的run方法。这个run方法就是netty的核心方法,其重要性可以类比于Spring中的refresh方法。
下面是从百度上随便找的一篇netty文章的线程模型图(详见文章https://www.geek-share.com/detail/2784951860.html),此处引用是为方便在头脑中产生一个整体印象,结合图下面的代码进行各个概念的归位。图中绿色的Reactor Thread就是上文说的NioEventLoopGroup,对应下面代码中的boss变量,负责处理客户端的连接事件,它其实也是一个池(因为内部维护的是一个数组);蓝色的Reactor Thread Pool也是NioEventLoopGroup,对应下面代码中的worker变量,负责处理客户端的读写事件。
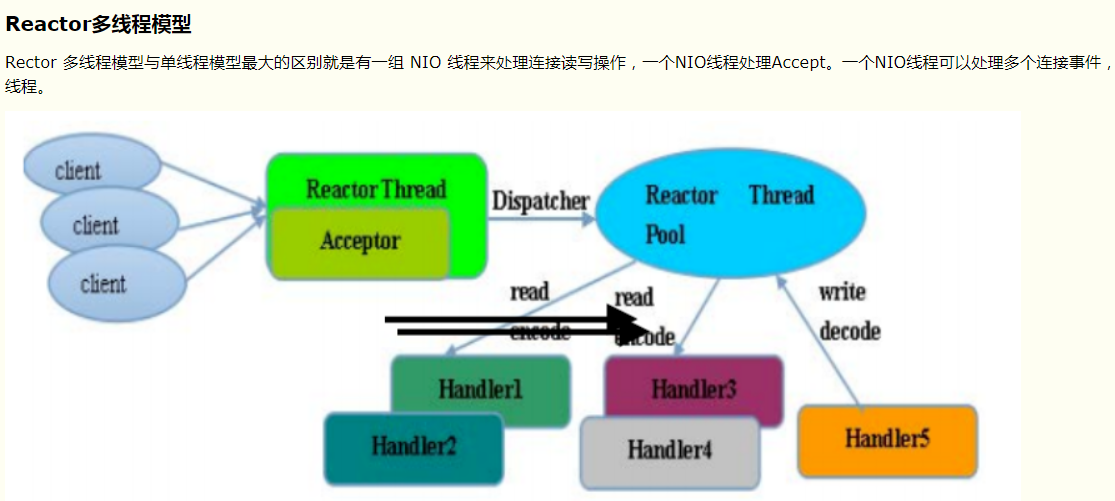
注:上图是Reactor多线程模型,而下面的代码示例是主从多线程模型,区别是只要将代码boss中的参数2改成1,示例代码就成了多线程模型,细细品味一下。
public class NettyDemo1 {
// netty服务端的一般性写法
public static void main(String[] args) {
EventLoopGroup boss = new NioEventLoopGroup(2);
EventLoopGroup worker = new NioEventLoopGroup();
try {
ServerBootstrap bootstrap = new ServerBootstrap();
bootstrap.group(boss, worker).channel(NioServerSocketChannel.class)
.option(ChannelOption.SO_BACKLOG, 100)
.childHandler(new ChannelInitializer<SocketChannel>() {
@Override
protected void initChannel(SocketChannel socketChannel) throws Exception {
ChannelPipeline pipeline = socketChannel.pipeline();
pipeline.addLast(new StringDecoder());
pipeline.addLast(new StringEncoder());
pipeline.addLast(new NettyServerHandler());
}
});
ChannelFuture channelFuture = bootstrap.bind(90);
channelFuture.channel().closeFuture().sync();
} catch (Exception e) {
e.printStackTrace();
} finally {
boss.shutdownGracefully();
worker.shutdownGracefully();
}
}
}
以上部分是博主对netty的一个概括性总结,以将概念和其实现连接起来,方便建立一个初始的总体认识,下面进入EventLoopGroup的初始化。
一、EventLoopGroup初始化
1、NioEventLoopGroup构造器
顺着有参和无参的构造方法进去,发现无参的构造器将线程数赋值0继续调了有参的构造器,而有参的构造器将线程池executor参数赋值null继续调重载构造器
public NioEventLoopGroup() {
this(0);
}
public NioEventLoopGroup(int nThreads) {
this(nThreads, (Executor) null);
}
public NioEventLoopGroup(int nThreads, Executor executor) {
this(nThreads, executor, SelectorProvider.provider());
}
因为博主是在笔记本电脑调试的,故此时的selectorProvider是WindowsSelectorProvider,然后又加了一个参数DefaultSelectStrategyFactory单例对象:
public NioEventLoopGroup(
int nThreads, Executor executor, final SelectorProvider selectorProvider) {
this(nThreads, executor, selectorProvider, DefaultSelectStrategyFactory.INSTANCE);
}
然后调父类的构造器,在末尾增加一个参数RejectedExecutionHandler单例对象:
public NioEventLoopGroup(int nThreads, Executor executor, final SelectorProvider selectorProvider,
final SelectStrategyFactory selectStrategyFactory) {
super(nThreads, executor, selectorProvider, selectStrategyFactory, RejectedExecutionHandlers.reject());
}
2、MultithreadEventLoopGroup构造器
在该构造器中,对线程数参数进行了处理,如果是0(对应上面NioEventLoopGroup的无参构造器),则将线程数设置为默认值,默认值取的是CPU核数*2,8核处理器对应16个线程;如果不是0,则以指定的线程数为准。同时,将executor后面 ad8 的参数变为数组的形式,对应上面可以知道args中有三个元素:WindowsSelectorProvider、DefaultSelectStrategyFactory、RejectedExecutionHandler。
protected MultithreadEventLoopGroup(int nThreads, Executor executor, Object... args) {
super(nThreads == 0 ? DEFAULT_EVENT_LOOP_THREADS : nThreads, executor, args);
}
3、MultithreadEventExecutorGroup构造器
此构造器又在args数组前面加了一个单例对象DefaultEventExecutorChooserFactory,用于从NioEventLoopGroup的数组中选取一个NioEventLoop。
protected MultithreadEventExecutorGroup(int nThreads, Executor executor, Object... args) {
this(nThreads, executor, DefaultEventExecutorChooserFactory.INSTANCE, args);
}
下面才是最终的核心构造器方法,结合注释应该比较好理解。其中最重要的是第3步和第4步,下面着重讲解这两步。
protected MultithreadEventExecutorGroup(int nThreads, Executor executor,
EventExecutorChooserFactory chooserFactory, Object... args) {
// 1.对线程数进行校验
if (nThreads <= 0) {
throw new IllegalArgumentException(String.format("nThreads: %d (expected: > 0)", nThreads));
}

56c
7         // 2.给线程池参数赋值,从前面追踪可知,若未赋值,executor一直是null,后续用于创建NioEventLoop中的启动线程,所以这玩意就是一个线程工厂
if (executor == null) {
executor = new ThreadPerTaskExecutor(newDefaultThreadFactory());
}
// 3.给children循环赋值,newChild方法是重点,后续会讲解 ***
children = new EventExecutor[nThreads];
for (int i = 0; i < nThreads; i ++) {
boolea
103c
n success = false;
try {
children[i] = newChild(executor, args);
success = true;
} catch (Exception e) {
// TODO: Think about if this is a good exception type
throw new IllegalStateException("failed to create a child event loop", e);
} finally {
// 省略掉未创建成功后的资源释放处理
}
}
// 4.完成chooser选择器的赋值,此处是netty一个小的优化点,后续会讲解 **
chooser = chooserFactory.newChooser(children);
// 5.给数组中每一个成员设置监听器处理
final FutureListener<Object> terminationListener = new FutureListener<Object>() {
@Override
public void operationComplete(Future<Object> future) throws Exception {
if (terminatedChildren.incrementAndGet() == children.length) {
terminationFuture.setSuccess(null);
}
}
};

for (EventExecutor e: children) {
e.terminationFuture().addListener(terminationListener);
}
// 6.设置一个只读的set集合
Set<EventExecutor> childrenSet = new LinkedHashSet<EventExecutor>(children.length);
Collections.addAll(childrenSet, children);
readonlyChildren = Collections.unmodifiableSet(childrenSet);
}
3.1)、第4步chooser的赋值
由上面构造器调用过程可知,chooserFactory对应DefaultEventExecutorChooserFactory对象,该对象的newChooser方法如下:
public EventExecutorChooser newChooser(EventExecutor[] executors) {
if (isPowerOfTwo(executors.length)) {
return new PowerOfTwoEventExecutorChooser(executors);
} else {
return new GenericEventExecutorChooser(executors);
}
}
逻辑比较简单,判断数组的长度是不是2的N次幂,如果是,返回PowerOfTwoEventExecutorChooser对象,如果不是则返回GenericEventExecutorChooser对象。这二者有什么区别,netty设计者为什么要这么做呢?如果对HashMap的实现原理有深入了解的园友应该不难想到,如果一个数X是2的N次幂,那么用任意一个数Y对X取模可以用Y&(X-1)来高效的完成,这样做比直接%取模快了好几倍,这也是HashMap用2次幂作为数组长度的主要原因。这里是同样的道理,如下代码所示,这两个chooser类都很简单,内部维护了一个原子递增对象,每次调用next方法都加1,然后用这个数与数组长度取模,得到要对应下标位置的元素。而如果数组长度刚好是2次幂,用PowerOfTwoEventExecutorChooser就会提高效率,如果不是那也没办法,走%取模就是了。netty这种对效率提升的处理,是否在平时的CRUD中也能套用一下呢?
private static final class PowerOfTwoEventExecutorChooser implements EventExecutorChooser {
private final AtomicInteger idx = new AtomicInteger();
private final EventExecutor[] executors;

PowerOfTwoEventExecutorChooser(EventExecutor[] executors) {
this.executors = executors;
}

@Override
public EventExecutor next() {
return executors[idx.getAndIncrement() & executors.length - 1];
}
}

private static final class GenericEventExecutorChooser implements EventExecutorChooser {
private final AtomicInteger idx = new AtomicInteger();
private final EventExecutor[] executors;

GenericEventExecutorChooser(EventExecutor[] executors) {
this.executors = executors;
}

@Override
public EventExecutor next() {
return executors[Math.abs(idx.getAndIncrement() % executors.length)];
}
}
3.2)、第3步newChild方法的逻辑
该方法的实现在NioEventLoopGroup中,由于args长度为3,所以queueFactory为null(暂时未发现哪里的实现args参数长度会是4,或许只是为后续扩展用,如果园友对args长度为4的场景有了解的还请留言指教)。然后调用了NioEventLoop的构造器,下面进入NioEventLoop的初始化。
protected EventLoop newChild(Executor executor, Object... args) throws Exception {
EventLoopTaskQueueFactory queueFactory = args.length == 4 ? (EventLoopTaskQueueFactory) args[3] : null;
return new NioEventLoop(this, executor, (SelectorProvider) args[0],
((SelectStrategyFactory) args[1]).newSelectStrategy(), (RejectedExecutionHandler) args[2], queueFactory);
}
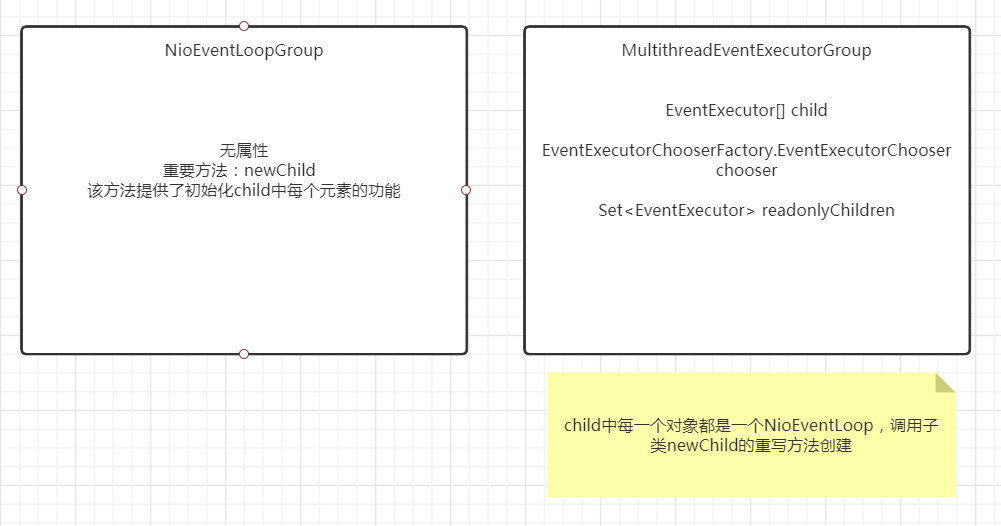
执行完上述初始化方法后NioEventLoopGroup的快照图如下,最重要的就两个属性:child和chooser。
二、NioEventLoop的初始化
1、NioEventLoop的构造器
到这里,有必要将此构造器的入参再梳理一遍。parent即上面的NioEventLoopGroup对象,executor是在MultithreadEventExecutorGroup中初始化的ThreadPerTaskExecutor,selectorProvider是WindowsSelectorProvider,strategy是DefaultSelectStrategyFactory,rejectedExecutionHandler是RejectedExecutionHandler,queueFactory是null。
NioEventLoop(NioEventLoopGroup parent, Executor executor, SelectorProvider selectorProvider,
SelectStrategy strategy, RejectedExecutionHandler rejectedExecutionHandler,
EventLoopTaskQueueFactory queueFactory) {
super(parent, executor, false, newTaskQueue(queueFactory), newTaskQueue(queueFactory),
rejectedExecutionHandler);
if (selectorProvider == null) {
throw new NullPointerException("selectorProvider");
}
if (strategy == null) {
throw new NullPointerException("selectStrategy");
}
provider = selectorProvider;
final SelectorTuple selectorTuple = openSelector();
selector = selectorTuple.selector;// netty封装的selector
unwrappedSelector = selectorTuple.unwrappedSelector;// java NIO原生的selector
selectStrategy = strategy;
}
可以看到只是做了一些赋值,其中newTaskQueue方法创建的是MpscUnboundedArrayQueue队列(多生产单消费无界队列,mpsc是multi provider single consumer的首字母缩写,即多个生产一个消费),继续追查父类构造方法。
2、SingleThreadEventLoop构造器
调用父类构造器,给tailTasks赋值。
protected SingleThreadEventLoop(EventLoopGroup parent, Executor executor,
boolean addTaskWakesUp, Queue<Runnable> taskQueue, Queue<Runnable> tailTaskQueue,
RejectedExecutionHandler rejectedExecutionHandler) {
super(parent, executor, addTaskWakesUp, taskQueue, rejectedExecutionHandler);
tailTasks = ObjectUtil.checkNotNull(tailTaskQueue, "tailTaskQueue");
}
3、SingleThreadEventExecutor构造器
在该构造方法中完成了剩余变量的赋值,其中有两个变量很重要:executor和taskQueue。前者负责创建Reactor线程,后者是实现串行无锁化的任务队列。
protected SingleThreadEventExecutor(EventExecutorGroup parent, Executor executor,
boolean addTaskWakesUp, Queue<Runnable> taskQueue,
RejectedExecutionHandler rejectedHandler) {
super
ad0
(parent);
this.addTaskWakesUp = addTaskWakesUp;
this.maxPendingTasks = DEFAULT_MAX_PENDING_EXECUTOR_TASKS;
this.executor = ThreadExecutorMap.apply(executor, this);
this.taskQueue = ObjectUtil.checkNotNull(taskQueue, "taskQueue");
rejectedExecutionHandler = ObjectUtil.checkNotNull(rejectedHandler, "rejectedHandler");
}
NioEventLoopGroup的对象引用最终记录在了AbstractEventExecutor中:
protected AbstractEventExecutor(EventExecutorGroup parent) {
this.parent = parent;
}
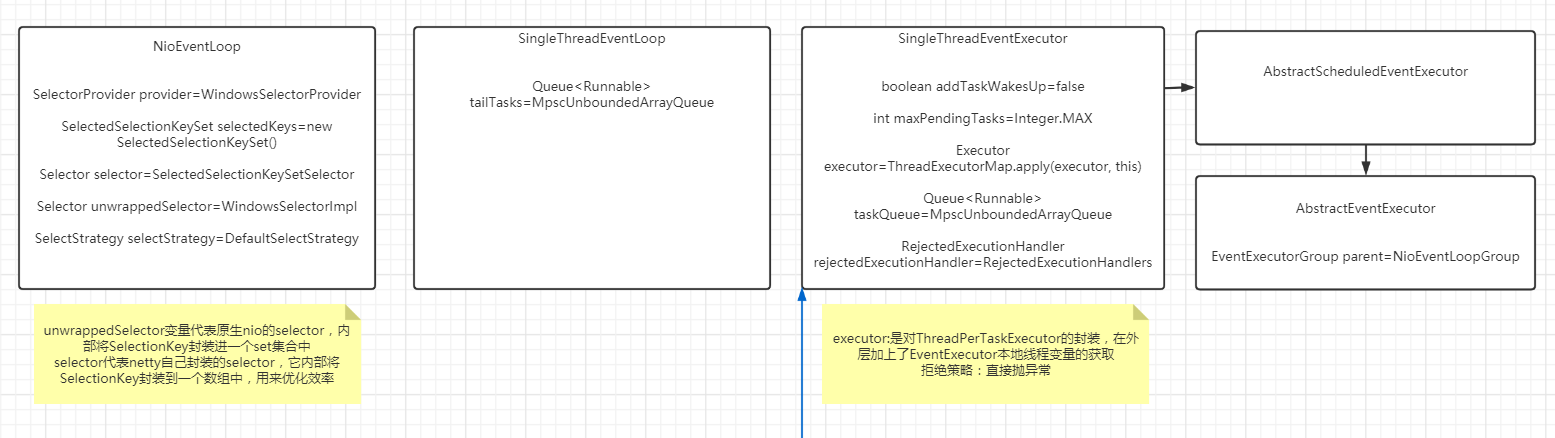
NioeventLoop初始化完成之后的对象快照如下,左边是子类,右边是父类:
小结
本文详细讲述了netty中Reactor线程组概念模型的实现类 -- NioEventLoopGroup的实例化过程。NioEventLoopGroup和其内部数组元素NioEventLoop是netty通信框架的基石,相信本文的内容对初学netty的园友有一点帮助。
下篇将研究ServerBootstrap的初始化过程,敬请期待。

- Netty源码分析(一)--- 核心组件NioEventLoopGroup和NioEventLoop的初始化
- Netty源码学习——EventLoopGroup原理:NioEventLoopGroup分析
- Netty学习之旅------再谈线程模型之源码分析NioEventLoopGroup、SingleThreadEventExecutor
- Netty源码学习(二)NioEventLoopGroup
- Netty线程模型源码分析之NioEventLoopGroup的初始化
- Netty4源码分析—NioEventLoopGroup, NioEventLoop生成Selector
- Netty中NioEventLoopGroup的创建源码分析
- 【Netty4.X】Netty源码分析之NioEventLoopGroup(五)
- Netty源码学习(三)NioEventLoop
- 【Netty源码学习】EventLoopGroup
- 【Netty源码学习】EventLoopGroup
- Netty源码分析 (一)----- NioEventLoopGroup
- netty : NioEventLoopGroup 源码分析
- Netty源码分析:NioEventLoopGroup
- netty源码学习二(EventLoopGroup、EventLoop)
- 【Netty】(3)—源码NioEventLoopGroup
- Netty4(一)NioEventLoopGroup
- netty源码分析(一)EventLoopGroup
- Netty源码分析之NioEventLoop(一)—NioEventLoop的创建
- Netty源码分析之NioEventLoop(三)—NioEventLoop的执行