springboot + aop + Lua分布式限流的最佳实践

一、什么是限流?为什么要限流?
不知道大家有没有做过帝都的地铁,就是进地铁站都要排队的那种,为什么要这样摆长龙转圈圈?答案就是为了限流!因为一趟地铁的运力是有限的,一下挤进去太多人会造成站台的拥挤、列车的超载,存在一定的安全隐患。同理,我们的程序也是一样,它处理请求的能力也是有限的,一旦请求多到超出它的处理极限就会崩溃。为了不出现最坏的崩溃情况,只能耽误一下大家进站的时间。
 限流是保证系统高可用的重要手段!!!
由于互联网公司的流量巨大,系统上线会做一个流量峰值的评估,尤其是像各种秒杀促销活动,为了保证系统不被巨大的流量压垮,会在系统流量到达一定阈值时,拒绝掉一部分流量。
限流会导致用户在短时间内(这个时间段是毫秒级的)系统不可用,一般我们衡量系统处理能力的指标是每秒的QPS或者TPS,假设系统每秒的流量阈值是1000,理论上一秒内有第1001个请求进来时,那么这个请求就会被限流。
二、限流方案
1、计数器
Java内部也可以通过原子类计数器AtomicInteger、Semaphore信号量来做简单的限流。
// 限流的个数
private int maxCount = 10;
// 指定的时间内
private long interval = 60;
// 原子类计数器
private AtomicInteger atomicInteger = new AtomicInteger(0);
// 起始时间
private long startTime = System.currentTimeMillis();

public boolean limit(int maxCount, int interval) {
atomicInteger.addAndGet(1);
if (atomicInteger.get() == 1) {
startTime = System.currentTimeMillis();
atomicInteger.addAndGet(1);
return true;
}
// 超过了间隔时间,直接重新开始计数
if (System.currentTimeMillis() - startTime > interval * 1000) {
startTime = System.currentTimeMillis();
atomicInteger.set(1);
return true;
}
// 还在间隔时间内,check有没有超过限流的个数
if (atomicInteger.get() > maxCount) {
return false;
}
return true;
}
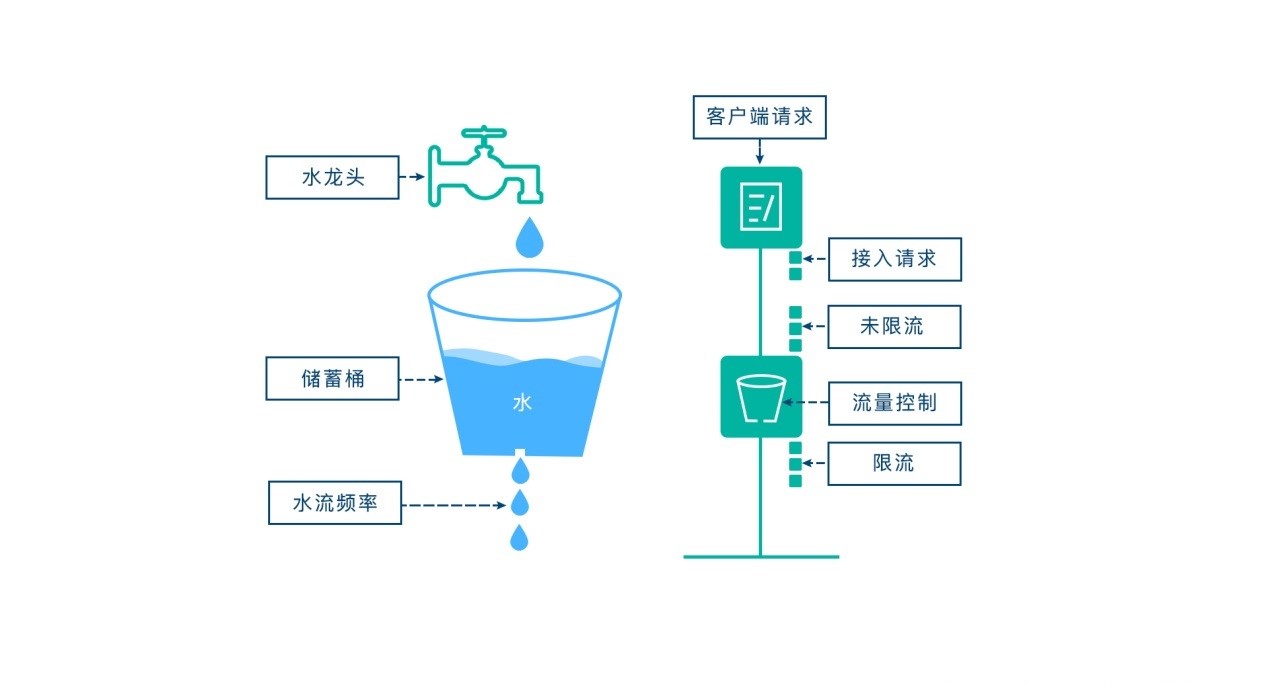
2、漏桶算法
漏桶算法思路很简单,我们把水比作是请求,漏桶比作是系统处理能力极限,水先进入到漏桶里,漏桶里的水按一定速率流出,当流出的速率小于流入的速率时,由于漏桶容量有限,后续进入的水直接溢出(拒绝请求),以此实现限流。
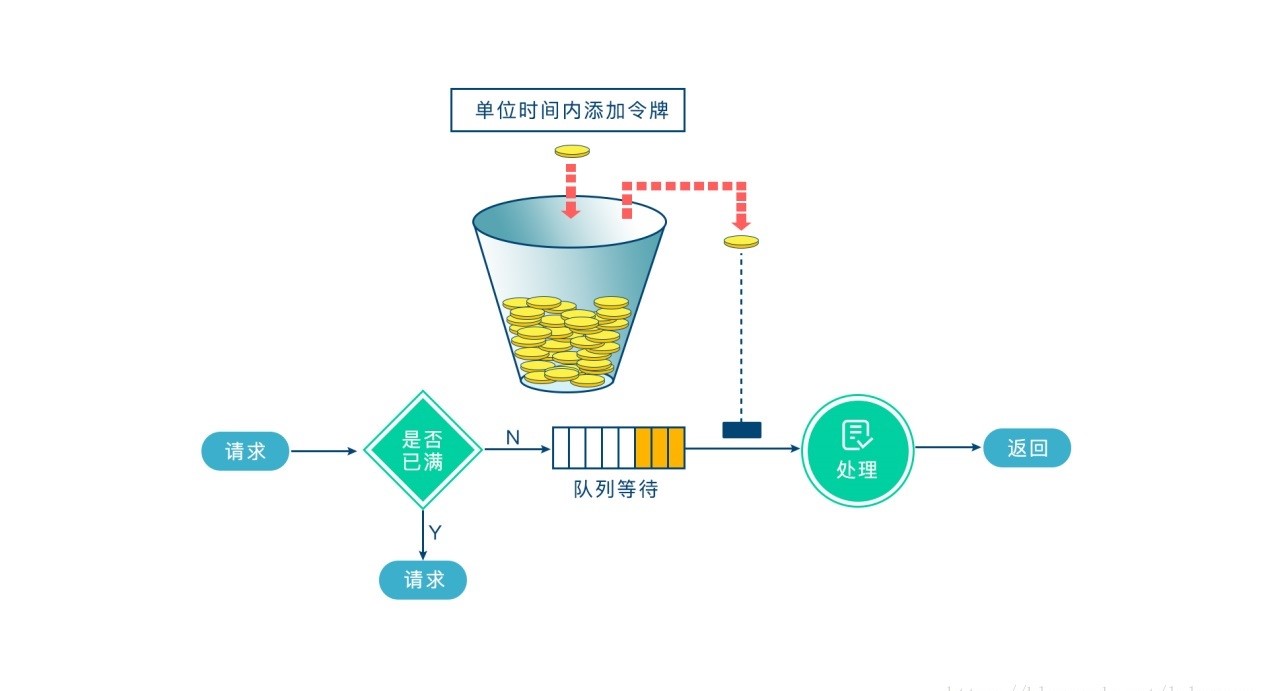
3、令牌桶算法
令牌桶算法的原理也比较简单,我们可以理解成医院的挂号看病,只有拿到号以后才可以进行诊病。
系统会维护一个令牌(token)桶,以一个恒定的速度往桶里放入令牌(token),这时如果有请求进来想要被处理,则需要先从桶里获取一个令牌(token),当桶里没有令牌(token)可取时,则该请求将被拒绝服务。令牌桶算法通过控制桶的容量、发放令牌的速率,来达到对请求的限制。
4、Redis + Lua
很多同学不知道Lua是啥?个人理解,Lua脚本和 MySQL数据库的存储过程比较相似,他们执行一组命令,所有命令的执行要么全部成功或者失败,以此达到原子性。也可以把Lua脚本理解为,一段具有业务逻辑的代码块。
而Lua本身就是一种编程语言,虽然redis 官方没有直接提供限流相应的API,但却支持了 Lua 脚本的功能,可以使用它实现复杂的令牌桶或漏桶算法,也是分布式系统中实现限流的主要方式之一。
相比Redis事务,Lua脚本的优点:
- 减少网络开销: 使用
Lua脚本,无需向Redis发送多次请求,执行一次即可,减少网络传输 - 原子操作:
Redis将整个Lua脚本作为一个命令执行,原子,无需担心并发 - 复用:
Lua脚本一旦执行,会永久保存Redis中,,其他客户端可复用
Lua脚本大致逻辑如下:
-- 获取调用脚本时传入的第一个key值(用作限流的 key)
local key = KEYS[1]
-- 获取调用脚本时传入的第一个参数值(限流大小)
local limit = tonumber(ARGV[1])

-- 获取当前流量大小
local curentLimit = tonumber(redis.call('get', key) or "0")

-- 是否超出限流
if curentLimit + 1 > limit then
-- 返回(拒绝)
return 0
else
-- 没有超出 value + 1
redis.call("INCRBY", key, 1)
-- 设置过期时间
redis.call("EXPIRE", key, 2)
-- 返回(放行)
return 1
end
- 通过
KEYS[1]获取传入的key参数 - 通过
ARGV[1]获取传入的limit参数 redis.call方法,从缓存中get和key相关的值,如果为null那么就返回0- 接着判断缓存中记录的数值是否会大于限制大小,如果超出表示该被限流,返回0
- 如果未超过,那么该key的缓存值+1,并设置过期时间为1秒钟以后,并返回缓存值+1
这种方式是本文推荐的方案,具体实现会在后边做细说。
5、网关层限流
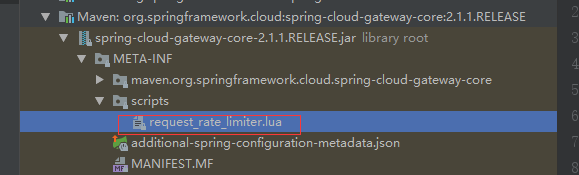
限流常在网关这一层做,比如Nginx、Openresty、kong、zuul、Spring Cloud Gateway等,而像spring cloud - gateway网关限流底层实现原理,就是基于Redis + Lua,通过内置Lua限流脚本的方式。
三、Redis + Lua 限流实现
下面我们通过自定义注解、aop、Redis + Lua 实现限流,步骤会比较详细,为了小白能让快速上手这里啰嗦一点,有经验的老鸟们多担待一下。
1、环境准备
springboot 项目创建地址:https://start.spring.io,很方便实用的一个工具。
2、引入依赖包
pom文件中添加如下依赖包,比较关键的就是 spring-boot-starter-data-redis 和 spring-boot-starter-aop。
<dependencies>
<dependency>
<groupId>org.springframework.boot</groupId>
<artifactId>spring-boot-starter-web</artifactId>
</dependency>
<dependency>
<groupId>org.springframework.boot</groupId>
<artifactId>spring-boot-starter-data-redis</artifactId>
</dependency>
<dependency>
<groupId>org.springframework.boot</groupId>
<artifactId>spring-boot-starter-aop</artifactId>
</dependency>
<dependency>
<groupId>com.google.guava</groupId>
<artifactId>guava</artifactId>
<version>21.0</version>
</dependency>
<dependency>
<groupId>org.springframework.boot</groupId>
<artifactId>spring-boot-starter-test</artifactId>
</dependency>
<dependency>
<groupId>org.apache.commons</groupId>
<artifactId>commons-lang3</artifactId>
</dependency>

<dependency>
<groupId>org.springframework.boot</groupId>
<artifactId>spring-boot-starter-test</artifactId>
<scope>test</scope>
<exclusions>
<exclusion>
<groupId>org.junit.vintage</groupId>
<artifactId>junit-vintage-engine</artifactId>
</exclusion>
</exclusions>
</dependency>
</dependencies>
3、配置application.properties
在 application.properties 文件中配置提前搭建好的 redis 服务地址和端口。
spring.redis.host=127.0.0.1

spring.redis.port=6379
4、配置RedisTemplate实例
@Configuration
public class RedisLimiterHelper {

@Bean
public RedisTemplate<String, Serializable> limitRedisTemplate(LettuceConnectionFactory redisConnectionFactory) {
RedisTemplate<String, Serializable> template = new RedisTemplate<>();
template.setKeySerializer(new StringRedisSerializer());
template.setValueSerializer(new GenericJackson2JsonRedisSerializer());
template.setConnectionFactory(redisConnectionFactory);
return template;
}
}
限流类型枚举类
/**
* @author fu
* @description 限流类型
* @date 2020/4/8 13:47
*/
public enum LimitType {

/**
* 自定义key
*/
CUSTOMER,

/**
* 请求者IP
*/
IP;
}
5、自定义注解
我们自定义个@Limit注解,注解类型为ElementType.METHOD即作用于方法上。
period表示请求限制时间段,count表示在period这个时间段内允许放行请求的次数。limitType代表限流的类型,可以根据请求的IP、自定义key,如果不传limitType属性则默认用方法名作为默认key。
/**
* @author fu
* @description 自定义限流注解
* @date 2020/4/8 13:15
*/
@Target({ElementType.METHOD, ElementType.TYPE})
@Retention(RetentionPolicy.RUNTIME)
@Inherited
@Documented
public @interface Limit {

/**
* 名字
*/
String name() default "";

/**
* key
*/
String key() default "";

/**
* Key的前缀
*/
String prefix() default "";

/**
* 给定的时间范围 单位(秒)
*/
int period();

/**
* 一定时间内最多访问次数
*/
int count();

/**
* 限流的类型(用户自定义key 或者 请求ip)
*/
LimitType limitType() default LimitType.CUSTOMER;
}
6、切面代码实现
/**
* @author fu
* @description 限流切面实现
* @date 2020/4/8 13:04
*/
@Aspect
@Configuration
public class LimitInterceptor {

private static final Logger logger = LoggerFactory.getLogger(LimitInterceptor.class);

private static final String UNKNOWN = "unknown";

private final RedisTemplate<String, Serializable> limitRedisTemplate;

@Autowired
public LimitInterceptor(RedisTemplate<String, Serializable> limitRedisTemplate) {
this.limitRedisTemplate = limitRedisTemplate;
}

/**
* @param pjp
* @author fu
* @description 切面
* @date 2020/4/8 13:04
*/
@Around("execution(public * *(..)) && @annotation(com.xiaofu.limit.api.Limit)")
public Object interceptor(ProceedingJoinPoint pjp) {
MethodSignature signature = (MethodSignature) pjp.getSignature();
Method method = signature.getMethod();
Limit limitAnnotation = method.getAnnotation(Limit.class);
LimitType limitType = limitAnnotation.limitType();
String name = limitAnnotation.name();
String key;
int limitPeriod = limitAnnotation.period();
int limitCount = limitAnnotation.count();

/**
* 根据限流类型获取不同的key ,如果不传我们会以方法名作为key
*/
switch (limitType) {
case IP:
key = getIpAddress();
break;
case CUSTOMER:
key = limitAnnotation.key();
break;
default:
key = StringUtils.upperCase(method.getName());
}

ImmutableList<String> keys = ImmutableList.of(StringUtils.join(limitAnnotation.prefix(), key));
try {
String luaScript = buildLuaScript();
RedisScript<Number> redisScript = new DefaultRedisScript<>(luaScript, Number.class);
Number count = limitRedisTemplate.execute(redisScript, keys, limitCount, limitPeriod);
logger.info("Access try count is {} for name={} and key = {}", count, name, key);
if (count != null && count.intValue() <= limitCount) {
return pjp.proceed();
} else {
throw new RuntimeException("You have been dragged into the blacklist");
}
} catch (Throwable e) {
if (e instanceof RuntimeException) {
throw new RuntimeException(e.getLocalizedMessage());
}
throw new RuntimeException("server exception");
}
}

/**
* @author fu
* @description 编写 redis Lua 限流脚本
* @date 2020/4/8 13:24
*/
public String buildLuaScript() {
StringBuilder lua = new StringBuilder();
lua.append("local c");
lua.append("\nc = redis.call('get',KEYS[1])");
// 调用不超过最大值,则直接返回
lua.append("\nif c and tonumber(c) > tonumber(ARGV[1]) then");
lua.append("\nreturn c;");
lua.append("\nend");
// 执行计算器自加
lua.append("\nc = redis.call('incr',KEYS[1])");
lua.append("\nif tonumber(c) == 1 then");
// 从第一次调用开始限流,设置对应键值的过期
lua.append("\nredis.call('expire',KEYS[1],ARGV[2])");
lua.append("\nend");
lua.append("\nreturn c;");
return lua.toString();
}

/**
* @author fu
* @description 获取id地址
* @date 2020/4/8 13:24
*/
public String getIpAddress() {
HttpServletRequest request = ((ServletRequestAttributes) RequestContextHolder.getRequestAttributes()).getRequest();
String ip = request.getHeader("x-forwarded-for");
if (ip == null || ip.length() == 0 || UNKNOWN.equalsIgnoreCase(ip)) {
ip = request.getHeader("Proxy-Client-IP");
}
if (ip == null || ip.length() == 0 || UNKNOWN.equalsIgnoreCase(ip)) {
ip = request.getHeader("WL-Proxy-Client-IP");
}
if (ip == null || ip.length() == 0 || UNKNOWN.equalsIgnoreCase(ip)) {
ip = request.getRemoteAddr();
}
return ip;
}
}
7、控制层实现
我们将@Limit注解作用在需要进行限流的接口方法上,下边我们给方法设置@Limit注解,在10秒内只允许放行3个请求,这里为直观一点用AtomicInteger计数。
/**
* @Author: fu
* @Description:
*/
@RestController
public class LimiterController {

private static final AtomicInteger ATOMIC_INTEGER_1 = new AtomicInteger();
private static final AtomicInteger ATOMIC_INTEGER_2 = new AtomicInteger();
private static final AtomicInteger ATOMIC_INTEGER_3 = new AtomicInteger();

/**
* @author fu
* @description
* @date 2020/4/8 13:42
*/
@Limit(key = "limitTest", period = 10, count = 3)
@GetMapping("/limitTest1")
public int testLimiter1() {

return ATOMIC_INTEGER_1.incrementAndGet();
}

/**
* @author fu
* @description
* @date 2020/4/8 13:42
*/
@Limit(key = "customer_limit_test", period = 10, count = 3, limitType = LimitType.CUSTOMER)
@GetMapping("/limitTest2")
public int testLimiter2() {

return ATOMIC_INTEGER_2.incrementAndGet();
}

/**
* @author fu
* @description
* @date 2020/4/8 13:42
*/
@Limit(key = "ip_limit_test", period = 10, count = 3, limitType = LimitType.IP)
@GetMapping("/limitTest3")
public int testLimiter3() {

return ATOMIC_INTEGER_3.incrementAndGet();
}

}
8、测试
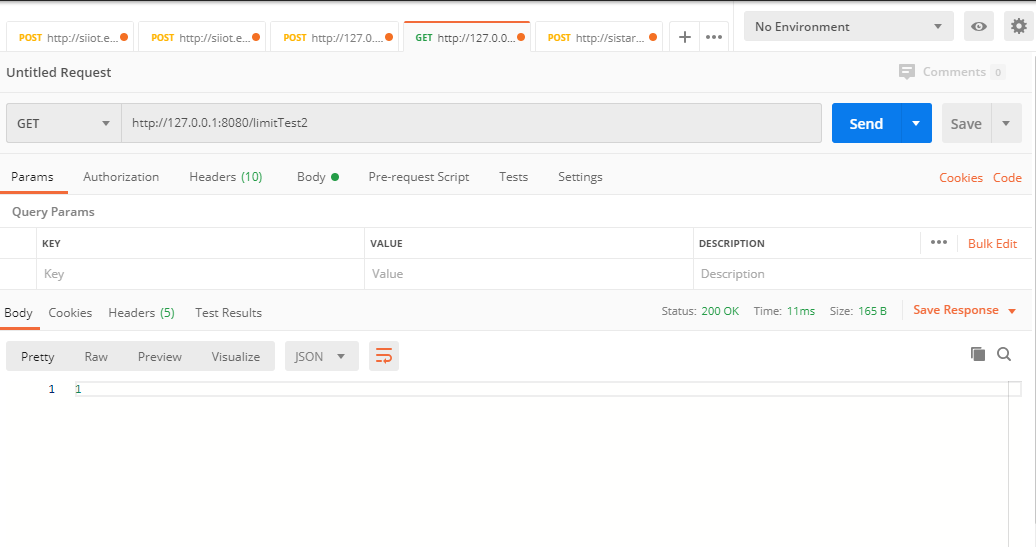
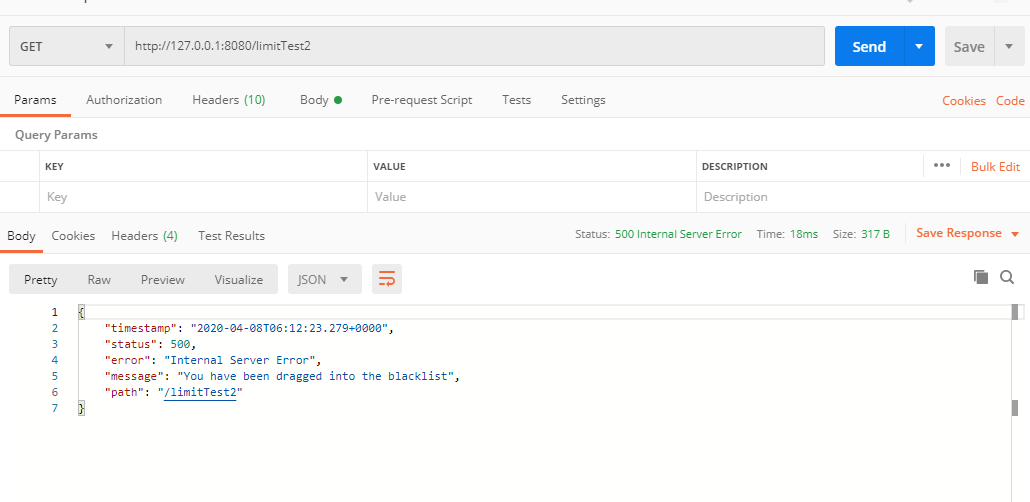
测试预期:连续请求3次均可以成功,第4次请求被拒绝。接下来看一下是不是我们预期的效果,请求地址:http://127.0.0.1:8080/limitTest1,用postman进行测试,有没有postman url直接贴浏览器也是一样。
 可以看到第四次请求时,应用直接拒绝了请求,说明我们的 Springboot + aop + lua 限流方案搭建成功。
总结
以上 springboot + aop + Lua 限流实现是比较简单的,旨在让大家认识下什么是限流?如何做一个简单的限流功能,面试要知道这是个什么东西。上面虽然说了几种实现限流的方案,但选哪种还要结合具体的业务场景,不能为了用而用。
小福利:
获取到一些极客付费课程 ,嘘~,免费 送给小伙伴们。关注公众号回复【极客】自行领取

- 13种提高系统伸缩性的最佳实践
- 判断一个字符串是utf-8还是gb18030编码方法的最佳实践
- Java异常处理最佳实践及陷阱防范
- "性能测试最佳实践" PPT 下载
- 详解Vue3.0 前的 TypeScript 最佳入门实践
- Android最佳性能实践(二)——分析内存的使用情况
- 第一章、软件工程最佳实践
- TensorFlow 下构建高性能神经网络模型的最佳实践
- WWDC 2016 Session笔记 - Session 213 使用最佳实践改进App(Improving Existing Apps with Modern Best Practices)
- 生产SparkStreaming数据零丢失最佳实践(含代码)
- Atitit. 最佳实践 QA----降低cpu占有率--cpu占用太高怎么办
- 将 Flex 集成到 Java EE 应用程序的最佳实践
- iOS核心系统编程最佳实践:并发
- 【Android】Architecture Components最佳实践--Lifecycles
- Vue 3.0前的 TypeScript 最佳入门实践
- web前端之JavaScript DOM编程艺术之最佳实践
- iOS核心系统编程最佳实践:通知
- [置顶]游戏引擎开发与应用最佳 实践 【引擎开发篇】 之三 :模块功能描述与设计抽象思想(设计)
- 10 个项目文档最佳实践
- iOS开发——MD5的最佳实践