单臂路由实现VLAN间互访--实验CISCO
一、实验目的:用路由器使同和不同vlan可以通信
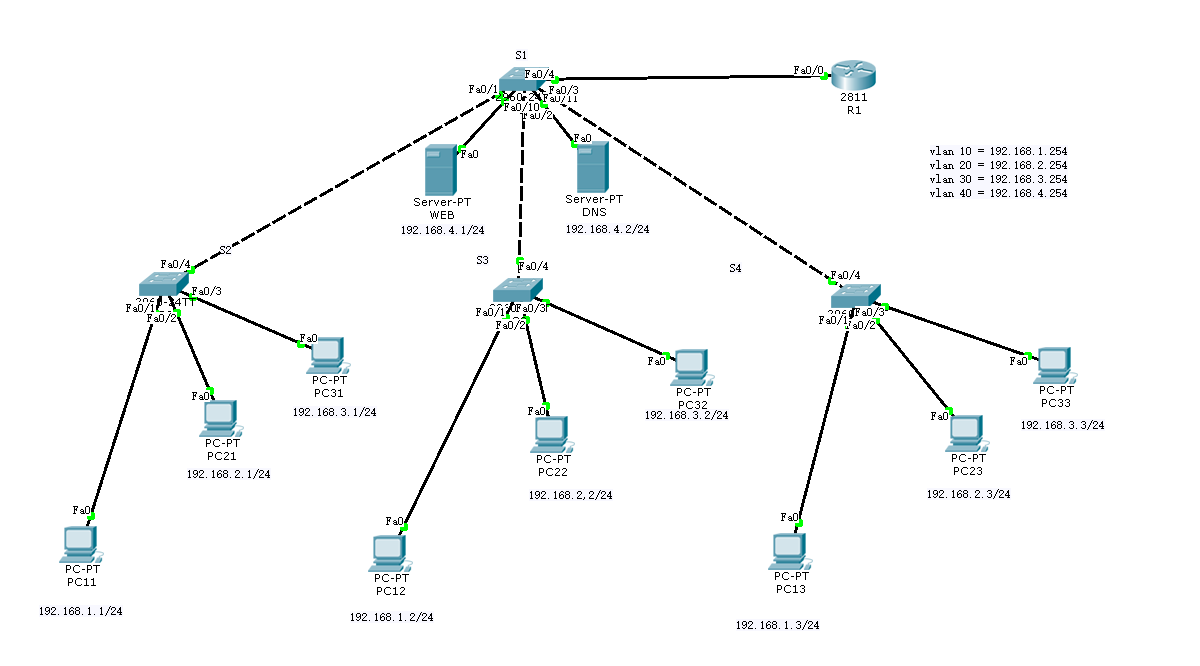
二、拓扑图如下:
三、具体步骤:
(1)R1路由器配置:
Router>en --进入特权模式
Router#conf t --进入全局配置模式
Enter configuration commands, one per line. End with CNTL/Z.
Router(config)#hostname R1 --修改路由器名为R1
R1(config)#interface f0/0 --进入端口
R1(config-if)#no shutdown --开启端口
R1(config-if)#interface f0/0.1 --进入子端口
R1(config-subif)#encapsulation dot1q 10
R1(config-subif)#ip address 192.168.1.254 255.255.255.0 --给子端口设置ip地址
R1(config-subif)#interface f0/0.2 --进入子端口
R1(config-subif)#encapsulation dot1q 20 --封装端口
R1(config-subif)#ip address 192.168.2.254 255.255.255.0 --给子端口设置ip地址
R1(config-subif)#interface f0/0.3 --进入子端口
R1(config-subif)#encapsulation dot1q 30 --封装端口
R1(config-subif)#ip address 192.168.3.254 255.255.255.0 --给子端口设置ip地址
R1(config-subif)#interface f0/0.4 --进入子端口
R1(config-subif)#encapsulation dot1q 40 --封装端口
R1(config-subif)#ip address 192.168.4.254 255.255.255.0 --给子端口设置ip地址
R1(config-subif)#end --返回特权模式
R1#copy running-config startup-config --保存配置
[OK] --保存成功
(2)S1交换机配置
Switch>en --进入全局配置模式
Switch#conf t --进入全局配置模式
Enter configuration commands, one per line. End with CNTL/Z.
Switch(config)#hostname S1 --修改交换机名为S1
S1(config)#vtp domain abc --创建vtp域
Domain name already set to abc.
S1(config)#vtp mode server 设置当前交换机在vtp中为server模式
Device mode already VTP SERVER.
S1(config)#vlan 10 --创建vlan 10
S1(config-vlan)#vlan 20 --创建vlan 20
S1(config-vlan)#vlan 30 --创建vlan 30
S1(config-vlan)#vlan 40 --创建vlan 40
S1(config-vlan)#interface range f0/1-4 --进入f0/1,f0/2,f0/3,f0/4端口
S1(config-if-range)#switchport mode trunk --设置f0/1-f0/4之间所有端口为trunk模式
S1(config-if-range)#interface range f0/10-11 --进入f0/10和f0/11端口
S1(config-if-range)#switchport mode access --设置f0/10,f0/11端口为access模式
S1(config-if-range)#switchport access vlan 40 --将f0/10,f0/11端口划入vlan 40
S1(config-if-range)#end --返回特权模式
S1#copy running-config startup-config --保存配置
[OK] --保存成功
(3)S2交换机配置
Switch>en --进入特权模式
Switch#conf t --进入全局配置模式
Enter configuration commands, one per line. End with CNTL/Z.
Switch(config)#hostname S2 --修改交换机名为S2
S2(config)#vtp mode client --设置当前交换机在vtp中为客户模式
Device mode already VTP CLIENT.
S2(config)#interface f0/1 --进入f0/1端口
S2(config-if)#switchport mode access --设置f0/1端口为access模式
S2(config-if)#switchport access vlan 10 --将f0/1端口划入vlan 10
S2(config-if)#interface f0/2 --进入f0/2端口
S2(config-if)#switchport mode access --设置f0/2端口为access模式
S2(config-if)#switchport access vlan 20 --将f0/2划入vlan2
S2(config-if)#interface f0/3 --进入f0/3端口
S2(config-if)#switchport mode access --设置f0/3端口为access模式
S2(config-if)#switchport access vlan 30 --将f0/3端口划入vlan 30
S2(config-if)#interface f0/4 --进入f0/4端口
S2(config-if)#switchport mode trunk --设置f0/4端口为trunk模式
S2(config-if)#end --返回特权模式
S2#copy running-config startup-config --保存配置
[OK] --保存成功
(4)S3交换机配置
Switch>en --进入特权模式
Switch#conf t --进入全局配置模式
Enter configuration commands, one per line. End with CNTL/Z.
Switch(config)#hostname S3 --修改交换机名为S3
S3(config)#vtp mode client --设置当前交换机在vtp中为客户模式
Device mode already VTP CLIENT.
S3(config)#interface f0/1 --进入f0/1端口
S3(config-if)#switchport mode access --设置f0/1端口为access模式
S3(config-if)#switchport access vlan 10 --将f0/1端口划入vlan 10
S3(config-if)#interface f0/2 --进入f0/2端口
S3(config-if)#switchport mode access --设置f0/2端口为access模式
S3(config-if)#switchport access vlan 20 --将f0/2端口划入vlan 20
S3(config-if)#interface f0/3 --进入f0/3端口
S3(config-if)#switchport mode access --设置f0/3端口为access模式
S3(config-if)#switchport access vlan 30 --将f0/3端口划入vlan 30
S3(config-if)#interface f0/4 --进入f0/4端口
S3(config-if)#switchport mode trunk --设置f0/4端口为trunk模式
S3(config-if)#end --返回特权模式
S3#copy running-config startup-config --保存配置
[OK] --保存成功
(5)S4交换机配置
Switch>en --进入特权模式
Switch#conf t --进入全局配置模式
Enter configuration commands, one per line. End with CNTL/Z.
Switch(config)#hostname S4 --修改交换机名为S4
S4(config)#vtp mode client --设置当前交换机在VTP中为客户模式
Device mode already VTP CLIENT.
S4(config)#interface f0/1 --进入f0/1端口
S4(config-if)#switchport mode access --设置f0/1端口为access模式
S4(config-if)#switchport access vlan 10 --将f0/1划分到vlan 10
S4(config-if)#interface f0/2 --进入f0/2端口
S4(config-if)#switchport mode access --设置f0/2端口为access模式
S4(config-if)#switchport access vlan 20 --将f0/2划分到vlan 20
S4(config-if)#interface f0/3 --进入f0/3端口
S4(config-if)#switchport mode access --设置f0/3端口为access模式
S4(config-if)#switchport access vlan 30 --将f0/3划分到vlan 30
S4(config-if)#interface f0/4 --进入f0/4端口
S4(config-if)#switchport mode trunk --将f0/4端口设置为trunk模式
S4(config-if)#end --返回特权模式
S4#copy running-config startup-config --保存配置
[OK] --保存成功
四、验证不同vlan是否能通讯
(1)PC11与PC22

vlan 10和vlan 20可以通信
(2)PC33与WEB
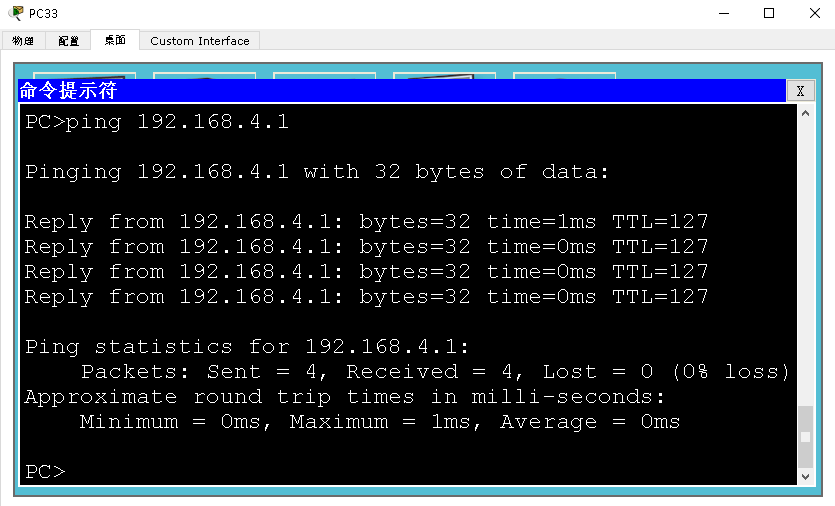
vlan 30 与vlan 40 可以通信
- 点赞
- 收藏
- 分享
- 文章举报
 NoobMaster--CISSP
发布了7 篇原创文章 · 获赞 3 · 访问量 2167
私信
关注
NoobMaster--CISSP
发布了7 篇原创文章 · 获赞 3 · 访问量 2167
私信
关注

- Cisco 3550交换机 Vlan间路由实验(单臂路由实现法)
- 实验四 利用单臂路由实现VLAN间路由
- 思科单臂路由实验配置,实现跨vlan通讯
- Vlan间路由实验(单臂路由实现法)
- CCNA实验之---单臂路由实现VLAN间路由
- 【实验四】利用单臂路由实现VLAN间路由
- 实验四:利用单臂路由实现VLAN间路由
- NA-NP-IE系列实验50: 单臂路由实现VLAN 间路由
- Vlan间路由实验(单臂路由实现法) 推荐
- CCNA实验之---单臂路由实现VLAN间路由
- 通过单臂路由实现两个vlan的互访
- 实验三:利用单臂路由实现VLAN间路由
- 实验4 利用单臂路由实现vlan间路由
- Vlan间路由实验(单臂路由实现法)
- Vlan间路由实验(单臂路由实现法)
- 实验4 利用单臂路由实现VLAN间路由
- 实验4 利用单臂路由实现VLAN间路由
- 实验四 利用单臂路由实现VLAN间路由
- Vlan间路由实验(单臂路由实现法)
- Vlan间路由实验(单臂路由实现法)