IdentityServer4实现.Net Core API接口权限认证(快速入门)
什么是IdentityServer4
官方解释:IdentityServer4是基于ASP.NET Core实现的认证和授权框架,是对OpenID Connect和OAuth 2.0协议的实现。
通俗来讲,就是服务端对需要认证授权的资源(客户端请求资源)在外层使用IdentityServer4框架进行封装加壳,用户只能通过获取IdentityServer4颁发的Token令牌才能进行资源访问。
下面开始进入正题,如何快速搭建实现API接口鉴权。
准备:1.下载准备NetCore sdk环境
2.本文开发环境为VS2019,部分代码可能和之前的版本不同。
第一步,新建权限认证服务项目,本文以Net Core API项目模板为例(也可以选择其他模板)

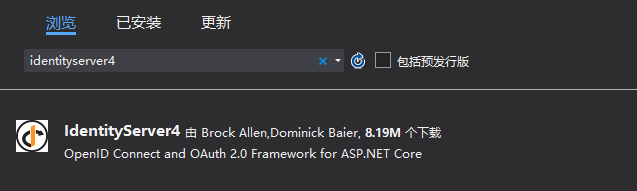
第二步,添加IdentityServer4 Nuget程序包。不同版本依赖的NetCoe sdk环境不同,需手动选择合适版本。
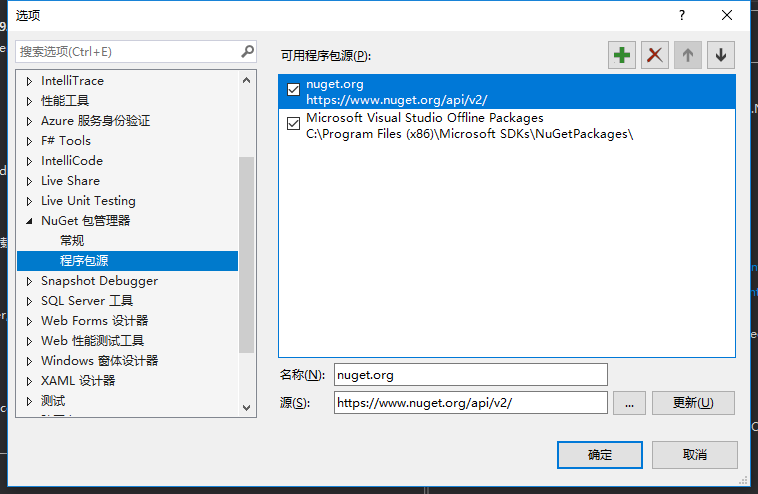
这里提醒一下,有些同学的系统可能添加Nuget程序包时,发现无法找到程序包。我们这里找出了解决方法,点击Nuget程序包添加页面的右上角设置按钮,看到如下页面,手动添加如下的nuget.org,然后重新搜索即可。
第三步,添加IdentityServer4配置管理类。本文以用户密码授权模式为例。
public class Config
{
/// <summary>
/// 定义资源范围
/// </summary>
public static IEnumerable<ApiResource> GetApiResources()
{
return new List<ApiResource>
{
new ApiResource("api1", "我的第一个API")
};
}

/// <summary>
/// 定义访问的资源客户端
/// </summary>
/// <returns></returns>
public static IEnumerable<Client> GetClients()
{
return new List<Client>
{
new Client{
ClientId="client",//定义客户端ID
ClientSecrets=
{
new Secret("secret".Sha256())//定义客户端秘钥
},
AllowedGrantTypes=GrantTypes.ResourceOwnerPassword,//授权方式为用户密码模式授权,类型可参考GrantTypes枚举
AllowedScopes={ "api1"}//允许客户端访问的范围

}
};
}

/// <summary>
/// 这个方法是来规范tooken生成的规则和方法的。一般不进行设置,直接采用默认的即可。
/// </summary>
/// <returns></returns>
public static IEnumerable<IdentityResource> GetIdentityResources()
{
return new IdentityResource[]
{
new IdentityResources.OpenId()
};
}
}
第四步,Startup启动类中注册服务中间件
// This method gets called by the runtime. Use this method to add services to the container.
public void ConfigureServices(IServiceCollection services)
{
services.AddIdentityServer()//注册服务
.AddDeveloperSigningCredential()
.AddInMemoryApiResources(Config.GetApiResources())//配置类定义的授权范围
.AddInMemoryClients(Config.GetClients())//配置类定义的授权客户端
.AddTestUsers(new List<TestUser> { new TestUser { Username = "Admin", Password = "123456", SubjectId = "001", IsActive = true } });//模拟测试用户,这里偷懒了,用户可以单独管理,最好不要直接在这里New
services.AddControllers();
}

// This method gets called by the runtime. Use this method to configure the HTTP request pipeline.
public void Configure(IApplicationBuilder app, IWebHostEnvironment env)
{
if (env.IsDevelopment())
{
app.UseDeveloperExceptionPage();
}

app.UseIdentityServer();//添加中间件

app.UseHttpsRedirection();

app.UseRouting();

app.UseAuthorization();

app.UseEndpoints(endpoints =>
{
endpoints.MapControllers();
});
}
应用程序默认的端口号有两种:1.http://localhost:5000 2.https://localhost:5001.
到这里,Identityserver4鉴权服务已经简单搭建完成。我们直接在VS中启动项目。并在端口号后面加上/.well-known/openid-configuration,出现如下页面则表示配置成功。

第五步,PostMan模拟请求获取token(当然这一步非必须,对postman感兴趣的同学可以试一试)
我们都知道IdentityServer4需要客户端先访问鉴权服务获取token令牌,才能进一步访问加权的服务器资源。我们这里先通过PostMan模拟客户端请求,获取Token。(postman工具大家可以网上下载,也可以使用谷歌自带的postman插件)
1.使用postman请求token时,有个地方需要注意下:
很多同学在使用https请求时,即请求https://localhost:5001,会发现无法成功。因为postman默认把SSL证书认证打开了,我们可以手动关闭掉。找到postman页面右上方的小扳手图标,进入设置页面找到ssl关掉即可。当然同学们直接使用http://localhost:5000请求就无需设置SSL.

2.请求参数
这里的参数value就是我们在鉴权服务配置类设置的client和TestUser信息。
Grant_Type为授权类型,本文我们使用的是用户密码模式,所以这里填password.

这里我们看到,我们已成功模拟请求获取了Token。大功告成,鉴权服务已验证可用,我们赶紧去发布部署吧。
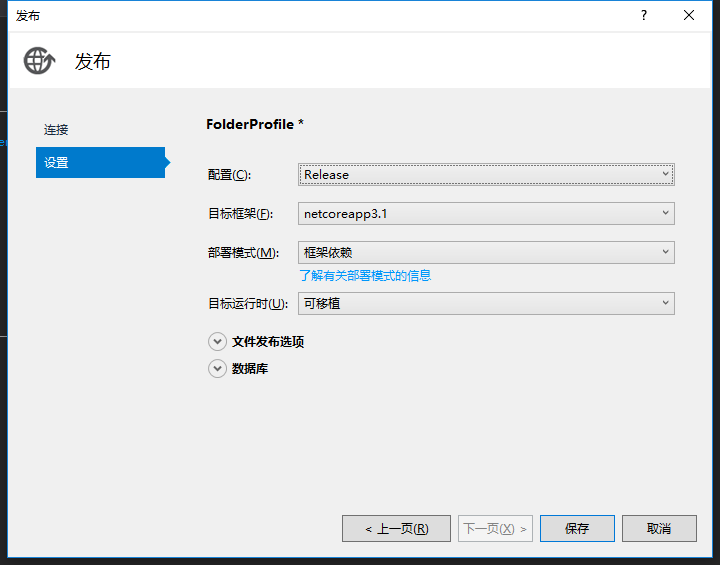
第六步,鉴权服务发布部署。
.Net Core发布模式有三种:
1.框架依赖+可移植
2.框架依赖+运行时环境(带可执行程序exe)
3.独立部署
简单来说,框架依赖模式发布的程序包,都需要部署环境自带.net core等运行环境;而独立部署则不需要考虑,发布包已经包含了运行环境,直接部署即可。
下面本文以框架依赖+可移植发布,做简单介绍。
发布完成后,我们会在发布路径中看到程序dll.我们找到发布路径,通过CMD命令窗口:dotnet xxx.dll可直接启动。

如上,则表示启动成功。(如果其他发布模式,直接双击发布包中可执行exe文件即可启动)
鉴权服务部署完成后,我们API接口如何使用呢,下面开始正式介绍。
第一步:新建Web Api项目

添加Nuget程序包

第二步:配置启动类
public void ConfigureServices(IServiceCollection services)
{
//注册服务
services.AddAuthentication("Bearer")
.AddIdentityServerAuthentication(x =>
{
x.Authority = "http://localhost:5000";//鉴权服务地址
x.RequireHttpsMetadata = false;
x.ApiName = "api1";//鉴权范围
});
services.AddControllers();
}

public void Configure(IApplicationBuilder app, IWebHostEnvironment env)
{
if (env.IsDevelopment())
{
app.UseDeveloperExceptionPage();
}
app.UseAuthentication();//添加鉴权认证
app.UseHttpsRedirection();
app.UseRouting();
app.UseAuthorization();
app.UseEndpoints(endpoints =>
{
endpoints.MapControllers();
});
}
应用程序默认的端口号有两种:1.http://localhost:5000 2.https://localhost:5001.为了避免端口号冲突被占用,我们可以在Program类中修改应用程序启动端口号。
public static IHostBuilder CreateHostBuilder(string[] args) =>
Host.CreateDefaultBuilder(args)

.ConfigureWebHostDefaults(webBuilder =>
{
webBuilder.UseUrls("http://*:5555");//设置启动端口号
webBuilder.UseStartup<Startup>();
});
第三步:创建API DEMO
[Route("api/[controller]")]
[ApiController]
public class TestController : ControllerBase
{
// GET: api/Test
/// <summary>
/// 方法加权
/// </summary>
/// <returns></returns>
[Authorize]
[HttpGet]
public IEnumerable<string> Get()
{
return new string[] { "value1", "value2" };
}

/// <summary>
/// 方法未加权 可直接访问
/// </summary>
/// <param name="id"></param>
/// <returns></returns>
// GET: api/Test/5
[HttpGet("{id}", Name = "Get")]
public string Get(int id)
{
return "value";
}

/// <summary>
/// 开放获取token API 接口
/// </summary>
/// <returns></returns>
[HttpGet("GetToken")]
public async Task<string> GetToken()
{
var client = new HttpClient();
var tokenResponse = await client.RequestPasswordTokenAsync(new PasswordTokenRequest
{
Address = "http://localhost:5000/connect/token",
ClientId = "client",
ClientSecret = "secret",
Scope = "api1",
UserName = "Admin",
Password = "123456",
});

if (tokenResponse.IsError)
{
return tokenResponse.Error;
}

return tokenResponse.AccessToken;

}
}
1.接口方法上加上:
[Authorize]
相当于对接口加权,只有被授权的用户才能访问(即获取token的用户)。此时上文中接口api/Test由于被加权,请求时会报错;但是api/Test/1接口未加权,仍可正常请求。
那么我们如何才能访问被加权的接口呢???Go Next
2.我们这里开放了获取Token的接口GetToken(类似于上文中通过PostMan获取Token)
访问被加权的API接口,我们这里需要先请求获取Token,然后请求加权接口时带上token参数。

3.请求加权接口
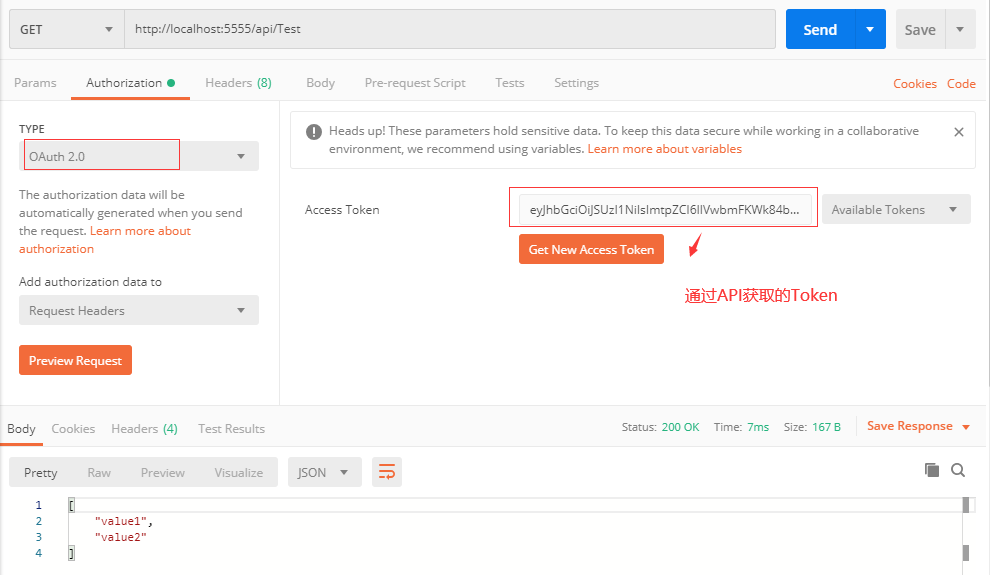
请求加权接口时带上Token,接口请求成功!
OK,关于如何快速开发和调试基于IdentityServer4框架的API接口鉴权服务,至此我们已介绍完毕。
小弟不才,本文中有考虑不周全或错误的地方,欢迎大家指正。
(如果有的同学想通过IIS部署API应用程序,这里有个地方需要注意下,需要在IIS(功能视图――模块)中添加AspNetCoreModule模块。具体原因本文就不在这里介绍了。)
到此这篇关于IdentityServer4实现.Net Core API接口权限认证(快速入门)的文章就介绍到这了,更多相关.Net Core API权限认证内容请搜索脚本之家以前的文章或继续浏览下面的相关文章希望大家以后多多支持脚本之家!
您可能感兴趣的文章:

- SpringBoot入门-快速设置拦截器并实现权限验证
- 如何快速实现SpringSecutity登录认证以及权限验证?!
- Spring boot 入门(四):集成 Shiro 实现登陆认证和权限管理
- IdentityServer4实现Token认证登录以及权限控制
- 认证鉴权与API权限控制在微服务架构中的设计与实现(一)
- asp.net权限认证:OWIN实现OAuth 2.0 之客户端模式(Client Credential)
- Taurus.MVC 2.2.3.4 :WebAPI 实现权限控制认证(及功能增强说明)
- 利用CI钩子实现权限认证 session
- Shiro权限控制框架入门1:Shiro的认证流程以及基本概念介绍
- GPIO模拟I2C快速入门 与程序实现+软件模拟I2C时序
- 通用用户权限系统如何快速实现调查问卷系统
- SpringSecurity 3.2入门(10)自定义权限控制认证及授权的过程
- springmvc+shiro+maven 实现登录认证与权限授权管理
- Spring Cloud与微服务学习总结(6)——认证鉴权与API权限控制在微服务架构中的设计与实现(四)
- SuperSocket快速入门(三):实现你的AppServer和AppSession
- Docker入门之 - 更换源为国内源,实现快速下载image
- 【Shiro权限管理】7.实现Shiro认证流程
- 认证鉴权与API权限控制在微服务架构中的设计与实现(三)
- SpringBoot集成JWT 实现接口权限认证
- SpringBoot快速设置拦截器并实现权限验证的方法