Ozone数据写入过程分析
文章目录
前言
上篇文章Ozone Datanode的分布式元数据管理,笔者阐述了关于Ozone Datanode的分布式元数据相关的内容以及Datanode上的数据layout。既然我们了解了Datanode上元数据的结构,那么一个很自然的问题:Datanode如何进行数据的写入的呢?里面的数据一致性是怎么做的?中间写数据发生错误,Datanode这边怎么来处理?本文我们来细聊Ozone数据写入的内部过程。
Ozone Key(文件)数据的写入
我们知道,Ozone作为对象存储系统,支持K-V模式的键值对存储,文件的数据的put操作实质上代表的key的写入。Ozone在这边是通过OM返回给客户端KeyOutputStream对象,来进行后续数据的写入的。换句话说,client是通过向OM服务申请获取目标key的KeyOutputStream,样例代码如下:
private void writeKey(String key1, OzoneBucket bucket) throws IOException {
OzoneOutputStream out = bucket.createKey(key1, 1024, STAND_ALONE,
ONE, new HashMap<>());
out.write(RandomStringUtils.random(1024).getBytes());
out.close();
}
OzoneOutputStream内部包装的OutputStream对象即为KeyOutputStream。
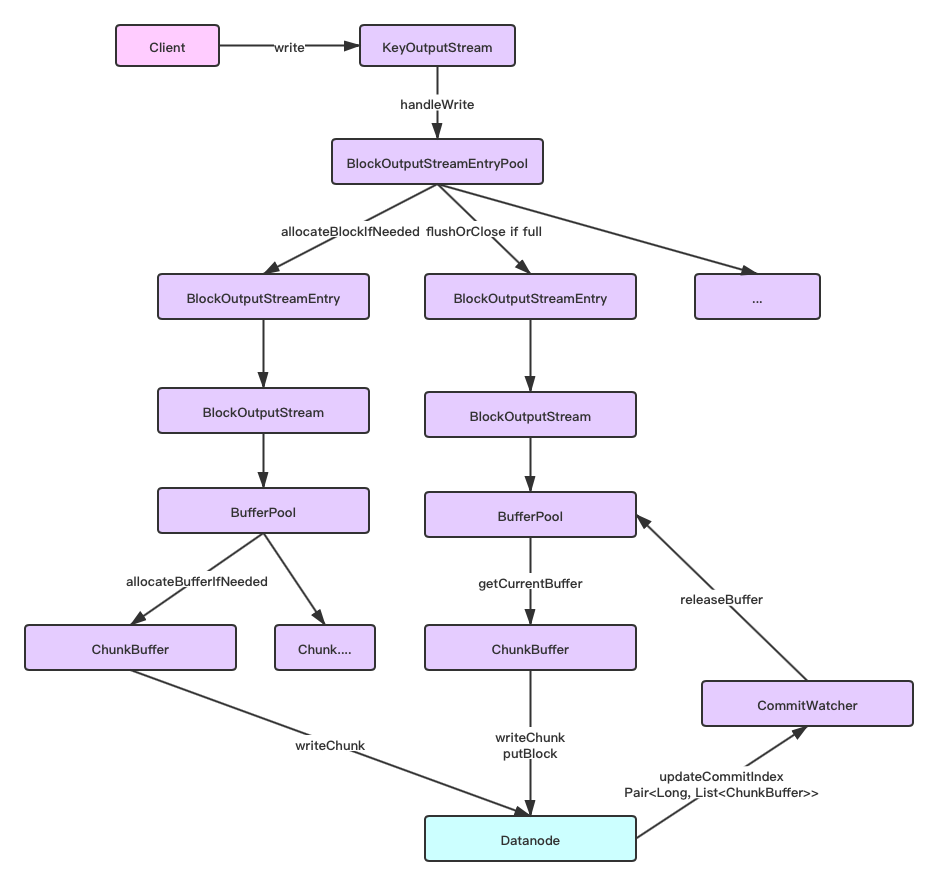
KeyOutputStream代表一个key下的数据文件,如果目标key对应要写的数据文件比较大,就可能会出现需要多block存储的情况。类似于HDFS大文件,需要多个block来存储,每个block根据offset来分隔开。在Ozone中,每个block又对应有独自的BlockOutputStream,这里每个专属的BlockOutputStream全程控制对应词block的数据写操作。
在前篇文章也提到了,Block在Ozone中是虚拟的概念,实际存储的文件叫chunk文件,一个Block由1个或多个chunk文件组成。因此BlockOutputStream的数据写出实质上是chunk文件的数据写出。BlockOutputStream内部维护了一个Chunk Buffer池做临时数据缓存,等数据达到flush触发阈值,BlockOutputStream再进行chunk文件的数据写Datanode操作。
然后执行client向Datanode发起putBlock的元数据更新操作,更新其Container db文件。此操作结束,意味着这个block数据成功地被写出Datanode中了。然后BlockOutputStream内部对应的Chunk Buffer空间也能被释放了。
上述数据的写出过程如下图所示:
KeyOutputStream的write方法代码如下,通过Block池创建多个BlockOutputStream进行数据的写入,
private void handleWrite(byte[] b, int off, long len, boolean retry)
throws IOException {
while (len > 0) {
// 如果当前剩余写入长度还未减少为0,则意为数据还未完全写出到Block,则继续进行循环内的数据写出
try {
// 1.Block Pool新申请块进行数据的写入,返回的BlockOutputStream包装对象
BlockOutputStreamEntry current =
blockOutputStreamEntryPool.allocateBlockIfNeeded();
// length(len) will be in int range if the call is happening through
// write API of blockOutputStream. Length can be in long range if it
// comes via Exception path.
// 2.计算得到应写出的len数据长度,取当前BlockOutputStream和目标写入长度的最小值
int writeLen = Math.min((int) len, (int) current.getRemaining());
long currentPos = current.getWrittenDataLength();

// 3.写出字节数据到BlockOutputStream,数据范围为字节b从offset位置后的writeLen长度
// 此过程如果达到内部buffer触发阈值,会进行chunk的flush写出。
writeToOutputStream(current, retry, len, b, writeLen, off, currentPos);
// 4.如果写完这批数据后,此BlockOutputStream达到最大写入length限制,无剩余,则close此stream
// close操作会flush出最后一个block chunk文件。
if (current.getRemaining() <= 0) {
// since the current block is already written close the stream.
handleFlushOrClose(StreamAction.FULL);
}
// 5.更新offset和len长度值
len -= writeLen;
off += writeLen;
} catch (Exception e) {
// 6.如果发生异常,关闭当前在写的stream
markStreamClosed();
throw new IOException("Allocate any more blocks for write failed", e);
}
}
}
上述执行逻辑还算比较简单,新申请一个BlockOutputStream来进行数据写出,如果写满了,则进行close操作,意为此BlockOutputStream代表的block数据已经成功写出了。这里我们重点关注BlockOutputStream的异常写出情况,Ozone这边会怎么处理呢?
private void writeToOutputStream(BlockOutputStreamEntry current,
boolean retry, long len, byte[] b, int writeLen, int off, long currentPos)
throws IOException {
try {
if (retry) {
current.writeOnRetry(len);
} else {
// 调用BlockOutputStreamEntry的write写出方法
current.write(b, off, writeLen);
offset += writeLen;
}
} catch (IOException ioe) {
...
LOG.debug("writeLen {}, total len {}", writeLen, len);
// 写出过程失败,进行异常处理
handleException(current, ioe);
}
}

private void handleException(BlockOutputStreamEntry streamEntry,
IOException exception) throws IOException {
Throwable t = HddsClientUtils.checkForException(exception);
Preconditions.checkNotNull(t);
boolean retryFailure = checkForRetryFailure(t);
boolean containerExclusionException = false;
if (!retryFailure) {
containerExclusionException = checkIfContainerToExclude(t);
}
Pipeline pipeline = streamEntry.getPipeline();
PipelineID pipelineId = pipeline.getId();
// 1.获取当前stream写出成功的数据长度
long totalSuccessfulFlushedData = streamEntry.getTotalAckDataLength();
// 2.设置stream当前的位置
streamEntry.setCurrentPosition(totalSuccessfulFlushedData);
long bufferedDataLen = blockOutputStreamEntryPool.computeBufferData();
...
// 3.清空当前stream内部的还未写出的buffer数据,并关闭此stream
// 以此确保此block stream写出的数据是成功写出的数据(但不一定是满的block size的)。
streamEntry.cleanup(retryFailure);

...
}
我们可以看到,上面的逻辑确保block当前写出的数据是已经得到ack成功结果返回的数据,然后再关闭写出异常BlockOutputStream,移除其内部的chunk buffer列表。
Ozone Block(Chunk)数据的写出
下面我们继续往内部过程进行分析,来看看BlockOutputStream内部数据写出过程是怎样的。
上文已经提到过,Ozone Block数据的写出实质上是物理chunk文件的写出过程。一个文件达到Block阈值大小限制时,会产生新的Block。同理一个Block内部,如果超过一个chunk大小时,会有新的chunk文件生成。因此,Block数据的write和Key文件的write操作十分类似,代码如下:
public void write(byte[] b, int off, int len) throws IOException {
...

while (len > 0) {
int writeLen;
// 1.Buffer Pool分配ChunkBuffer进行数据写入
final ChunkBuffer currentBuffer = bufferPool.allocateBufferIfNeeded(
bytesPerChecksum);
int pos = currentBuffer.position();
// 2.计算目标应写入长度
writeLen =
Math.min(chunkSize - pos % chunkSize, len);
// 3.往chunk buffer写入数据
currentBuffer.put(b, off, writeLen);
if (!currentBuffer.hasRemaining()) {
// 4.如果buffer数据满了,则写出buffer数据到chunk文件,调用WriteChunk请求
writeChunk(currentBuffer);
}
// 5.更新offset,剩余数据长度值,已写出数据长度
off += writeLen;
len -= writeLen;
writtenDataLength += writeLen;
if (shouldFlush()) {
// 6.如果达到flush长度,进行block metadata的更新,调用PutBlock请求
updateFlushLength();
executePutBlock();
}
// 7.如果BufferPool满了,则进行阻塞等待,直到block数据已经成功写出,收到Datanode的ack回复
if (isBufferPoolFull()) {
handleFullBuffer();
}
}
}
在上述过程中,只有当收到Datanode写数成功返回的Commit Index之后,BlockOutputStream才会最终清空相应应的ChunkBuffer。
private void writeChunk(ChunkBuffer buffer)
throws IOException {
...
if (bufferList == null) {
bufferList = new ArrayList<>();
}
// 加入buffer list
bufferList.add(buffer);
// 写出chunk数据到Datanode的Container中
writeChunkToContainer(buffer.duplicate(0, buffer.position()));
}

private void writeChunkToContainer(ChunkBuffer chunk) throws IOException {
int effectiveChunkSize = chunk.remaining();
final ByteString data = chunk.toByteString(
bufferPool.byteStringConversion());
Checksum checksum = new Checksum(checksumType, bytesPerChecksum);
ChecksumData checksumData = checksum.computeChecksum(chunk);
ChunkInfo chunkInfo = ChunkInfo.newBuilder()
.setChunkName(blockID.get().getLocalID() + "_chunk_" + ++chunkIndex)
.setOffset(0)
.setLen(effectiveChunkSize)
.setChecksumData(checksumData.getProtoBufMessage())
.build();

try {
// 向Datanode发起WriteChunk请求
XceiverClientReply asyncReply =
writeChunkAsync(xceiverClient, chunkInfo, blockID.get(), data);
CompletableFuture<ContainerProtos.ContainerCommandResponseProto> future =
asyncReply.getResponse();
} catch (IOException | InterruptedException | ExecutionException e) {
throw new IOException(
"Unexpected Storage Container Exception: " + e.toString(), e);
}
...
// 同时加入BlockData中,此对象会在后面被PutBlock用到
containerBlockData.addChunks(chunkInfo);
}
WriteChunk文件后是PutBlock请求,
private CompletableFuture<ContainerProtos.
ContainerCommandResponseProto> executePutBlock()
throws IOException {
checkOpen();
long flushPos = totalDataFlushedLength;
Preconditions.checkNotNull(bufferList);
final List<ChunkBuffer> byteBufferList = bufferList;
bufferList = null;
Preconditions.checkNotNull(byteBufferList);

CompletableFuture<ContainerProtos.
ContainerCommandResponseProto> flushFuture;
try {
// 发起PutBlock请求
XceiverClientReply asyncReply =
putBlockAsync(xceiverClient, containerBlockData.build());
CompletableFuture<ContainerProtos.ContainerCommandResponseProto> future =
asyncReply.getResponse();
flushFuture = future.thenApplyAsync(e -> {
blockID.set(responseBlockID);
...
// 加入<Commit Index, buffer list> 到commitWatcher中
commitWatcher
.updateCommitInfoMap(asyncReply.getLogIndex(), byteBufferList);
}
return e;
}, responseExecutor).exceptionally(e -> {
...
commitWatcher.getFutureMap().put(flushPos, flushFuture);
return flushFuture;
}
public XceiverClientReply watchForCommit(long commitIndex)
throws IOException {
long index;
try {
// 阻塞等待Datanode的指定Commit Index
XceiverClientReply reply =
xceiverClient.watchForCommit(commitIndex, watchTimeout);
if (reply == null) {
index = 0;
} else {
index = reply.getLogIndex();
}
// 然后释放Commit Index的chunk buffer
adjustBuffers(index);
return reply;
} catch (TimeoutException | InterruptedException | ExecutionException e) {
// 异常处理
releaseBuffersOnException();
throw ioException;
}
}
当然在此过程中,同样可能会出现执行异常的情况导致Chunk数据写失败的情况,这边BlockOutputStream将只会释放那些已确保成功写出的Chunk数据,逻辑如下:
// only contain data which have not been sufficiently replicated
void releaseBuffersOnException() {
// 获取Datanode上最近一次成功提交的Commit Index,然后释放这次commit之前的buffer
adjustBuffers(xceiverClient.getReplicatedMinCommitIndex());
}

/**
* 释放提交成功的Commit Index值之前的buffer.
* @param commitIndex 给定的Commit Index值
*/
private void adjustBuffers(long commitIndex) {
List<Long> keyList = commitIndex2flushedDataMap.keySet().stream()
.filter(p -> p <= commitIndex).collect(Collectors.toList());
if (!keyList.isEmpty()) {
releaseBuffers(keyList);
}
}
此过程的流程图如下所示:
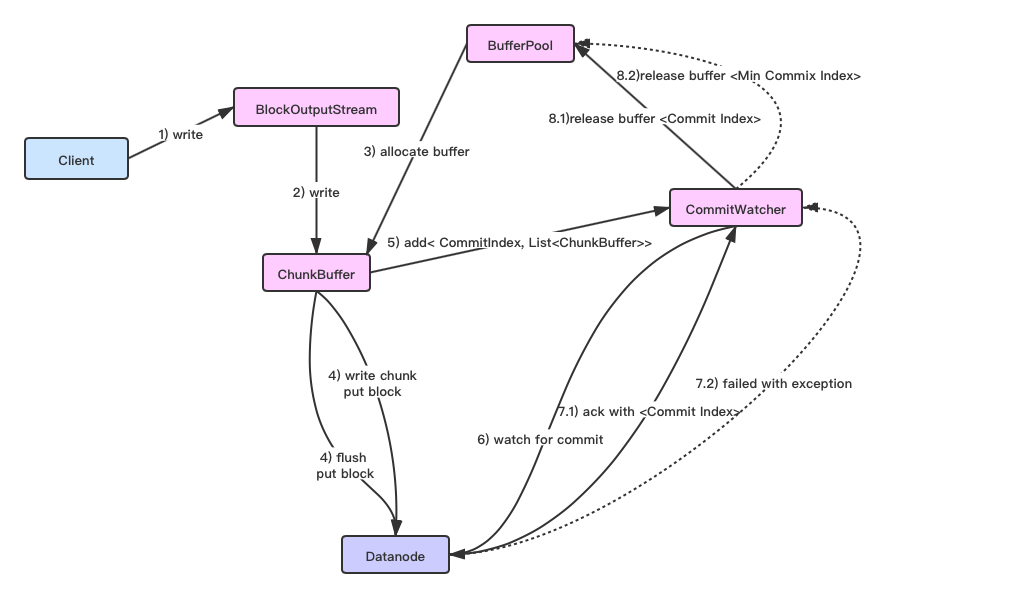
这里阻塞等待Commit Index的逻辑取决于当前的Chunk Buffer是否是满的状态,如果是满的,则等待最小的Commit Index,即阻塞等待较早提交的PutBlock请求执行结束,否则等待最新(近)的PutBlock调用(最大Commit Index)结束。
private void watchForCommit(boolean bufferFull) throws IOException {
checkOpen();
try {
// 根据buffer是否是满的状态,来进行对应Commit Index的阻塞等待
XceiverClientReply reply = bufferFull ?
commitWatcher.watchOnFirstIndex() : commitWatcher.watchOnLastIndex();
if (reply != null) {
//...
}
} catch (IOException ioe) {
setIoException(ioe);
throw getIoException();
}
}
总结
这里我们简单总结几点以上Key数据写出的过程里,Ozone在写数据原子性上做了哪些特别的处理:
- 多副本Pipeline里的Datanode的数据一致性通过Ratis(Raft)协议实现来保证
- 确保每次Block写出的数据是有效的,成功的
- 单个Block内部每次写出的Chunk数据只有被成功写出得到Datanode ack回复后,才会更新Datanode上对应的Container db文件,然后这部分数据才会被外部视为可见的数据。倘若中间block数据发生异常,中间的chunk信息也不会在Container db中存在。
因此我们可以看到,Container db的更新在这里是起到一个很关键的作用,确保了数据正确地存在于Datanode Container之上。
- 点赞 1
- 收藏
- 分享
- 文章举报
 Android路上的人
博客专家
发布了383 篇原创文章 · 获赞 408 · 访问量 206万+
他的留言板
关注
Android路上的人
博客专家
发布了383 篇原创文章 · 获赞 408 · 访问量 206万+
他的留言板
关注

- Ozone数据读取过程分析
- Ozone OM服务HA原理分析
- Ozone OM服务的HA配置搭建
- Ozone Datanode启动过程以及心跳汇报过程分析
- Ozone Datanod Container Replication复制过程
- Ozone SCM基于Container/Pipeline管理的架构模式
- Ozone作为Hadoop FileSystem的配置使用
- Ozone SCM的Pipeline状态转化分析
- C语言解释一下BA无标度网络
- 捍卫数据真实性的卫士-本福特定律
- Kubernetes 将何去何从?
- 疫情肆虐下,程序员们都在哪里?
- 远程办公的 33 种预测
- 一年多的远程办公带给我的感悟
- 远程办公:如何提高自制力?
- 一行 Python 代码能干什么?有意思!
- C++ 过去的这一年
- 整洁的代码,再见!
- Python、Go、JavaScript、Rust 将长盛 5 年!
- 远程工作的约定