kubeadm 安装k8s集群
2020-01-13 10:07
288 查看
kubeadm 安装k8s集群
- kubeadm 安装k8s集群
- 环境准备
- 1.关闭交换分区模式及禁用防火墙
- 2.关闭selinux
- 3.处理路由问题(node节点与master节点都做)
- 4.安装docker(master和node节点都执行)
- 5.安装kubelet kubeadm kubectl
- 6.添加IPVS内核模块
- 7.集群主机配置
- 8.初始化工作
- 9.实验
- 注意事项与技巧
kubeadm 安装k8s集群
本文主要介绍kubeadm安装k8s集群的详细步骤。
环境准备
两台centos7操作系统环境的虚拟机。
1.关闭交换分区模式及禁用防火墙
(1)node节点:
[root@k8s-node ~]# swapoff -a
[root@k8s-node ~]# vi /etc/fstab
[root@k8s-node ~]# systemctl stop firewalld && systemctl disable firewalld
(2)master节点
[root@k8s-master ~]# swapoff -a
[root@k8s-master ~]# vi /etc/fstab
[root@k8s-master ~]# systemctl stop firewalld && systemctl disable firewalld
2.关闭selinux
(1)
setenforce 0
(2)
vi /etc/selinux/config
修改
enforcing=disabled
3.处理路由问题(node节点与master节点都做)
1)添加配置
cat > /etc/sysctl.d/k8s.conf << EOF
net.ipv4.ip_forward = 1
net.bridge.bridge-nf-call-ip6tables = 1
net.bridge.bridge-nf-call-iptables = 1
vm.swappiness=0
EOF
(2)让配置生效
sysctl --system
4.安装docker(master和node节点都执行)
yum安装docekr-ce,版本是v18.06.1
(1)
yum -y install yum-utils device-mapper-persistent-data lvm2
(2)
yum-config-manager --add-repo https://mirrors.aliyun.com/docker-ce/linux/centos/docker-ce.repo
(3)安装Docker
yum -y install docker-ce-18.06.1.ce
(4)设置Docker开机启动
systemctl start docker && systemctl enable docker
(5) 查看版本号
docker --version
5.安装kubelet kubeadm kubectl
cat > /etc/yum.repos.d/kubernetes.repo << EOF
[kubernetes]
name=Kubernetes
baseurl=https://mirrors.aliyun.com/kubernetes/yum/repos/kubernetes-el7-x86_64
enabled=1
gpgcheck=1
Repo_gpgcheck=1
gpgkey=https://mirrors.aliyun.com/kubernetes/yum/doc/yum-key.gpg
https://mirrors.aliyun.com/kubernetes/yum/doc/rpm-package-key.gpg
EOF
或
cat > /etc/yum.repos.d/kubernetes.repo << EOF
[kubernetes]
name=Kubernetes
baseurl=https://mirrors.aliyun.com/kubernetes/yum/repos/kubernetes-el7-x86_64/
enabled=1
gpgcheck=0
EOF
安装key文件
wget https://mirrors.aliyun.com/kubernetes/yum/doc/rpm-package-key.gpg
rpm -import rpm-package-key.gpg
3.安装
yum install -y kubelet kubectl kubeadm
systemctl enable kubelet.service
6.添加IPVS内核模块
modprobe ip_vs
modprobe ip_vs_rr
modprobe ip_vs_wrr
modprobe ip_vs_sh
modprobe nf_conntrack_ipv4

lsmod | grep ip_vs

tee /etc/models-load.d/k8s-ipvs.conf <<-’EOF’
ip_vs
ip_vs_rr
ip_vs_wrr
ip_vs_sh
nf_conntrack_ipv4
net.bridge.bridge-nf-call-ip6tables=1
net.bridge.bridge-nf-call-iptables=1
vm.swappiness=0
EOF
使配置生效
sysctl --systemiptables -P FORWARD ACCEPT
sed -i "13i ExecStartPost=/usr/sbin/iptables -P FORWARD ACCEPT" /usr/lib/systemd/system/docker.service
7.集群主机配置
(1)查看各主机ip
yum install -y net-tools
ifconfig
(2)配置主机集群,可更改主机名
hostnamectl set-hostname 主机名
192.168.1.7 k8s-master
192.168.1.5 k8s-node
(3)验证各主机之间网络互通情况
在master节点上
ping k8s-node
在node节点上
ping k8s-master
8.初始化工作
(1)拉取初始化的相关镜像
kubeadm init --pod-network-cidr=10.244.0.0/16 --image-repository=registry.aliyuncs.com/google_containers
(2)以上命令执行完毕后可以看到最后的信息如下:
[etcd] Creating static Pod manifest for local etcd in "/etc/kubernetes/manifests"
[wait-control-plane] Waiting for the kubelet to boot up the control plane as static Pods from directory "/etc/kubernetes/manifests". This can take up to 4m0s
[apiclient] All control plane components are healthy after 37.504221 seconds
[upload-config] Storing the configuration used in ConfigMap "kubeadm-config" in the "kube-system" Namespace
[kubelet] Creating a ConfigMap "kubelet-config-1.15" in namespace kube-system with the configuration for the kubelets in the cluster
[upload-certs] Skipping phase. Please see --upload-certs
[mark-control-plane] Marking the node k8s-master as control-plane by adding the label "node-role.kubernetes.io/master=''"
[mark-control-plane] Marking the node k8s-master as control-plane by adding the taints [node-role.kubernetes.io/master:NoSchedule]
[bootstrap-token] Using token: 5qvarp.stxruwjb0o3u2z6g
[bootstrap-token] Configuring bootstrap tokens, cluster-info ConfigMap, RBAC Roles
[bootstrap-token] configured RBAC rules to allow Node Bootstrap tokens to post CSRs in order for nodes to get long term certificate credentials
[bootstrap-token] configured RBAC rules to allow the csrapprover controller automatically approve CSRs from a Node Bootstrap Token
[bootstrap-token] configured RBAC rules to allow certificate rotation for all node client certificates in the cluster
[bootstrap-token] Creating the "cluster-info" ConfigMap in the "kube-public" namespace
[addons] Applied essential addon: CoreDNS
[addons] Applied essential addon: kube-proxy

Your Kubernetes control-plane has initialized successfully!

To start using your cluster, you need to run the following as a regular user:

mkdir -p $HOME/.kube
sudo cp -i /etc/kubernetes/admin.conf $HOME/.kube/config
sudo chown $(id -u):$(id -g) $HOME/.kube/config

You should now deploy a pod network to the cluster.
Run "kubectl apply -f [podnetwork].yaml" with one of the options listed at:
https://kubernetes.io/docs/concepts/cluster-administration/addons/

Then you can join any number of worker nodes by running the following on each as root:

kubeadm join 192.168.1.7:6443 --token 5qvarp.stxruwjb0o3u2z6g --discovery-token-ca-cert-hash sha256:a650346021f230d0b716563712910e461c195ce4279cad8c5eec123d420fafeb
(3)root用户的另一种方案
设置环境变量
export KUBECONFIG=/etc/kubernetes/admin.conf
(4)健康状态
kubectl get cs
(5)安装flanner网络插件
kubectl apply -f https://raw.githubusercontent.com/coreos/flannel/62e44c867a2846fefb68bd5f178daf4da3095ccb/Documentation/kube-flannel.yml
(6)node节点执行如下命令,将node节点加入集群
[root@k8s-node ~]# kubeadm join 192.168.1.7:6443 --token 5qvarp.stxruwjb0o3u2z6g --discovery-token-ca-cert-hash sha256:a650346021f230d0b716563712910e461c195ce4279cad8c5eec123d420fafeb
Markdown将文本转换为 HTML。
9.实验
(1)部署nginx应用
[root@k8s-master ~]# kubectl get node
NAME         STATUS   ROLES    AGE    VERSION
k8s-master   Ready    master   59m    v1.15.3
k8s-node     Ready    <none>   9m2s   v1.15.3

[root@k8s-master ~]# kubectl create deployment nginx --image=nginx:alpine
deployment.apps/nginx created
(2)暴露nginx应用
[root@k8s-master ~]# kubectl expose deployment nginx --name=nginx-service --port=80 --target-port=80
service/nginx-service exposed
[root@k8s-master ~]# kubectl expose deployment nginx --type=NodePort --name=nginx-service-nodeport --port=80 --target-port=80
service/nginx-service-nodeport exposed
(3)查看Nginx应用状态
[root@k8s-master ~]# kubectl get deploy
NAME    READY   UP-TO-DATE   AVAILABLE   AGE
nginx   1/1     1            1           2m40s
[root@k8s-master ~]# kubectl get pod
NAME                   READY   STATUS    RESTARTS   AGE
nginx-8f6959bd-gxq8r   1/1     Running   0          2m53s
[root@k8s-master ~]# kubectl get svc
NAME                     TYPE        CLUSTER-IP      EXTERNAL-IP   PORT(S)        AGE
kubernetes               ClusterIP   10.96.0.1       <none>        443/TCP        63m
nginx-service            ClusterIP   10.110.186.66   <none>        80/TCP         2m6s
nginx-service-nodeport   NodePort    10.102.22.91    <none>        80:32086/TCP   40
(4)通过Nod IP访问Nginx应用
nginx-service-nodeport   NodePort    10.102.22.91    <none>        80:32086/TCP   40s
[root@k8s-master ~]# kubectl get pod -o wide
NAME                   READY   STATUS    RESTARTS   AGE   IP           NODE       NOMINATED NODE   READINESS GATES
nginx-8f6959bd-gxq8r   1/1     Running   0          10m   10.244.1.2   k8s-node   <none>           <none>

node/master节点上访问之

curl -I http://10.244.1.3/

HTTP/1.1 200 OK
Server: nginx/1.17.3
Date: Sat, 31 Aug 2019 13:16:15 GMT
Content-Type: text/html
Content-Length: 612
Last-Modified: Tue, 13 Aug 2019 14:43:47 GMT
Connection: keep-alive
ETag: "5d52cca3-264"
Accept-Ranges: bytes
(5)通过Cluster IP 访问Nginx 应用
master执行情况
[root@k8s-master ~]# kubectl get svc nginx-service
NAME            TYPE        CLUSTER-IP      EXTERNAL-IP   PORT(S)   AGE
nginx-service   ClusterIP   10.110.186.66   <none>        80/TCP    14m
[root@k8s-master ~]# ^C
[root@k8s-master ~]# ^C
[root@k8s-master ~]# ^C
[root@k8s-master ~]# curl -I http://10.110.186.66/
HTTP/1.1 200 OK
Server: nginx/1.17.3
Date: Sat, 31 Aug 2019 13:18:55 GMT
Content-Type: text/html
Content-Length: 612
Last-Modified: Tue, 13 Aug 2019 14:43:47 GMT
Connection: keep-alive
ETag: "5d52cca3-264"
Accept-Ranges: bytes
node执行情况
[root@k8s-node ~]# curl -I http://10.110.186.66/
HTTP/1.1 200 OK
Server: nginx/1.17.3
Date: Sat, 31 Aug 2019 13:19:11 GMT
Content-Type: text/html
Content-Length: 612
Last-Modified: Tue, 13 Aug 2019 14:43:47 GMT
Connection: keep-alive
ETag: "5d52cca3-264"
Accept-Ranges: bytes
[root@k8s-node ~]#
(6)通过NodePort Port 访问Nginx应用
查看Nginx应用的Cluster IP:
kubectl get svc nginx-service-nodeport

[root@k8s-master ~]# kubectl get svc nginx-service-nodeport
NAME                     TYPE       CLUSTER-IP     EXTERNAL-IP   PORT(S)        AGE
nginx-service-nodeport   NodePort   10.102.22.91   <none>        80:32086/TCP   19m
[root@k8s-master ~]# curl -I http://k8s-master:32086/
HTTP/1.1 200 OK
Server: nginx/1.17.3
Date: Sat, 31 Aug 2019 13:26:14 GMT
Content-Type: text/html
Content-Length: 612
Last-Modified: Tue, 13 Aug 2019 14:43:47 GMT
Connection: keep-alive
ETag: "5d52cca3-264"
Accept-Ranges: bytes

[root@k8s-master ~]# curl -I http://k8s-node:32086/
HTTP/1.1 200 OK
Server: nginx/1.17.3
Date: Sat, 31 Aug 2019 13:26:25 GMT
Content-Type: text/html
Content-Length: 612
Last-Modified: Tue, 13 Aug 2019 14:43:47 GMT
Connection: keep-alive
ETag: "5d52cca3-264"
Accept-Ranges: bytes
[root@k8s-master ~]#

[root@k8s-node ~]# curl -I http://k8s-master:32086/
HTTP/1.1 200 OK
Server: nginx/1.17.3
Date: Sat, 31 Aug 2019 13:26:37 GMT
Content-Type: text/html
Content-Length: 612
Last-Modified: Tue, 13 Aug 2019 14:43:47 GMT
Connection: keep-alive
ETag: "5d52cca3-264"
Accept-Ranges: bytes
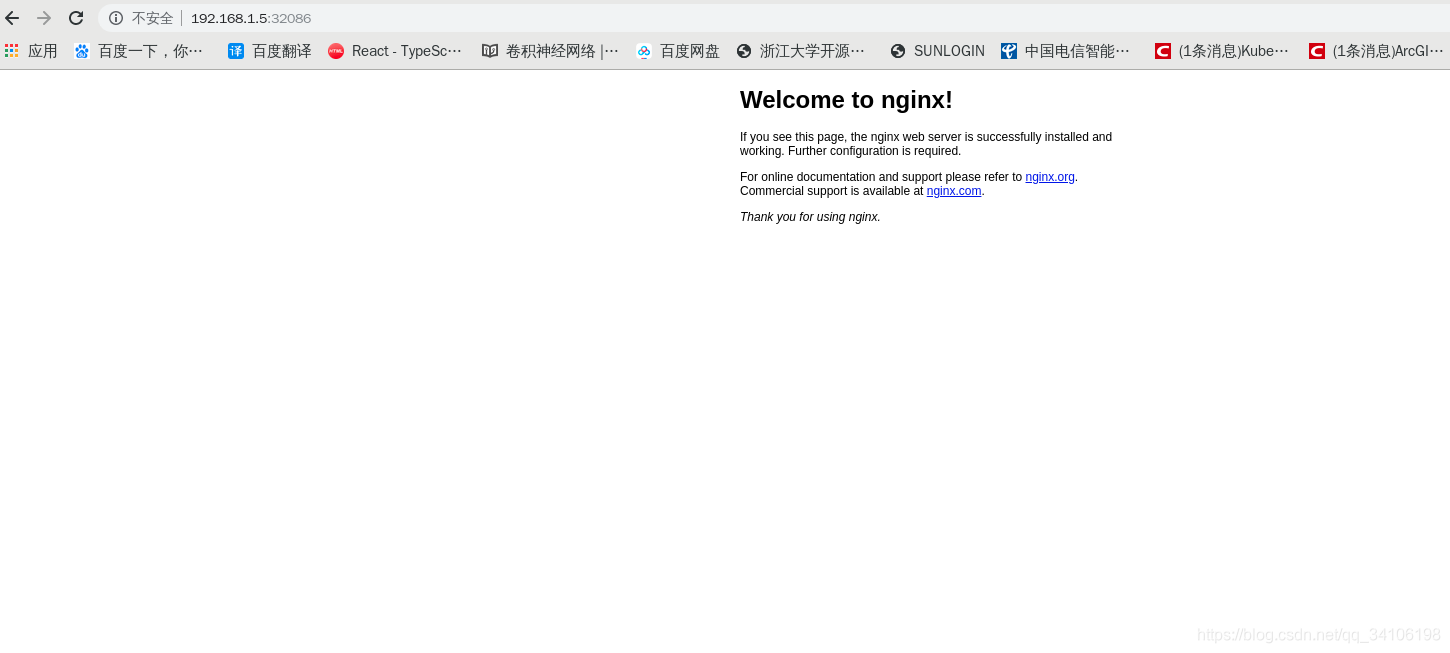
虚拟机宿主主机浏览器访问如下
(7)DNS解析测试
-
部署
[root@k8s-master k8s-config-fiels]# cat >dns-test.yaml<<EOF
> apiVersion: v1
> kind: Pod
> metadata:
>  name: dns-test
> spec:
>  containers:
>  - image: radial/busyboxplus:curl
>    name: dns-test
>    stdin: true
>    tty: true
>    resources:
>      requests:
>        cpu: 50m
>        memory: 50Mi
>      limits:
>        cpu: 100m
>        memory: 100Mi
> EOF

[root@k8s-master k8s-config-fiels]# kubectl apply -f dns-test.yaml
pod/dns-test created
[root@k8s-master k8s-config-fiels]# kubectl get pod dns-test
NAME       READY   STATUS    RESTARTS   AGE
dns-test   1/1     Running   0          22s
-
测试
[root@k8s-master k8s-config-fiels]# kubectl exec dns-test -- nslookup kubernetes
Server:    10.96.0.10
Address 1: 10.96.0.10 kube-dns.kube-system.svc.cluster.local

Name:      kubernetes
Address 1: 10.96.0.1 kubernetes.default.svc.cluster.local
[root@k8s-master k8s-config-fiels]# kubectl exec dns-test -- nslookup nginx-service
Server:    10.96.0.10
Address 1: 10.96.0.10 kube-dns.kube-system.svc.cluster.local

Name:      nginx-service
Address 1: 10.110.186.66 nginx-service.default.svc.cluster.local
[root@k8s-master k8s-config-fiels]# kubectl exec dns-test -- nslookup www.baidu.com
Server:    10.96.0.10
Address 1: 10.96.0.10 kube-dns.kube-system.svc.cluster.local

Name:      www.baidu.com
Address 1: 14.215.177.39
Address 2: 14.215.177.38
-
通过DNS访问Nginx应用
[root@k8s-master k8s-config-fiels]# kubectl exec dns-test -- curl -s -I http://nginx-service/
HTTP/1.1 200 OK
Server: nginx/1.17.3
Date: Sat, 31 Aug 2019 14:21:34 GMT
Content-Type: text/html
Content-Length: 612
Last-Modified: Tue, 13 Aug 2019 14:43:47 GMT
Connection: keep-alive
ETag: "5d52cca3-264"
Accept-Ranges: bytes

[root@k8s-master k8s-config-fiels]# kubectl exec dns-test -- curl -s -I http://www.baidu.com/
HTTP/1.1 200 OK
Accept-Ranges: bytes
Cache-Control: private, no-cache, no-store, proxy-revalidate, no-transform
Connection: keep-alive
Content-Length: 277
Content-Type: text/html
Date: Sat, 31 Aug 2019 14:22:09 GMT
Etag: "575e1f72-115"
Last-Modified: Mon, 13 Jun 2016 02:50:26 GMT
Pragma: no-cache
Server: bfe/1.0.8.18

[root@k8s-master k8s-config-fiels]# kubectl exec dns-test -- curl -s -I https://www.baidu.com/
HTTP/1.1 200 OK
Accept-Ranges: bytes
Cache-Control: private, no-cache, no-store, proxy-revalidate, no-transform
Connection: keep-alive
Content-Length: 277
Content-Type: text/html
Date: Sat, 31 Aug 2019 14:22:16 GMT
Etag: "575e1f72-115"
Last-Modified: Mon, 13 Jun 2016 02:50:26 GMT
Pragma: no-cache
Server: bfe/1.0.8.18
注意事项与技巧
(1)Pod无法启动的排错步骤
1)查看Pod日志

kubectl logs pod-name

2)查看Pod详细信息

kubectl get pod  -o  wide

3)查看Docker日志
找到容器运行的节点

kubectl get pod -o wide

登录到容器运行的节点,找到出错容器

sudo docker logs container-id

4)查看Kubelet及其他组件日志

sudo journalctl -u kubelet
(2)创建集群失败后让集群快速启动起来
sudo kubeadm reset
(3)重新获取集群的join命令
-
获取一个有过期时间的token
sudo kubeadm token create --print-join-command
-
获取一个永不过期的token
sudo kubeadm token create --print-join-command --tt1=0
(4)让masterl 不再接收负载
kubectl taint nodes k8s-master node-role.kubernetes.io/master=true:NoSchedule node/k8s-master
反之:
kubectl taint nodes k8s-master node-role.kubernetes.io/master-node/k8s-master untainted
- 点赞
- 收藏
- 分享
- 文章举报
 Chaudement
发布了3 篇原创文章 · 获赞 0 · 访问量 98
私信
关注
Chaudement
发布了3 篇原创文章 · 获赞 0 · 访问量 98
私信
关注

相关文章推荐
- k8s集群使用kubeadm安装报错 v1.15.1
- 使用kubeadm安装k8s集群故障处理三则
- k8s技术预研3--使用kubeadm安装、配置Kubernetes集群以及进行故障排查的方法
- kubeadm快速搭建k8s集群
- Kubernetes/3.使用Kubeadm部署k8s集群
- K8S 集群二进制安装(未完,代理功能与前端UI未验证通过)
- 使用kubeadm部署k8s集群00-缓存rpm包
- 基于kubeadm安装k8s 1.12.2和dashboard(国内网络环境)
- docker系列6 :k8s集群[ 解压安装 ]
- k8s集群添加node节点(使用kubeadm搭建的集群)
- 深入玩转K8S之使用kubeadm安装Kubernetes v1.10以及常见问题解答
- 在k8s集群中使用helm安装harbor
- kubeadm 安装 k8s 1.14.1版本(HA)
- CentOS7(mini) 安装 Kubernetes 集群(kubeadm方式)
- k8s实战二 使用kubeadm部署集群kubeV1.13 (加入node)