fastjson处理springBoot中json对象的日期数据以及springBoot的json对象的使用
2019-10-09 19:44
393 查看
版权声明:本文为博主原创文章,遵循 CC 4.0 BY-SA 版权协议,转载请附上原文出处链接和本声明。
本文链接:https://blog.csdn.net/m0_45294725/article/details/102468498
步骤一:在pom.xml中导入
</dependency>
<!-- mvc,aop的依赖包。SpringBoot导进来的所有包都是通过这个依赖导进来的,体现maven的依赖性 -->
<dependency>
<groupId>org.springframework.boot</groupId>
<artifactId>spring-boot-starter-web</artifactId>
<!-- 由于我们在上面指定了parent,这里就不需要指定版本号 -->
</dependency>
<!--处理springboot的json数据中日期的依赖-->
<dependency>
<groupId>com.alibaba</groupId>
<artifactId>fastjson</artifactId>
<version>1.2.15</version>
</dependency>
步骤二:在实体类中使用 @JSONField(format = “日期格式”)
将该实体类命名为:Users
package com.qf.entity;

import com.alibaba.fastjson.annotation.JSONField;

import java.text.Format;
import java.util.Date;

public class Users {
private Integer userid;
private String username;
@JSONField(format = "yyyy-MM-dd HH:mm:ss")
private Date birthday;

public Users(Integer userid, String username, Date birthday) {
this.userid = userid;
this.username = username;
this.birthday = birthday;
}

public Integer getUserid() {
return userid;
}

public void setUserid(Integer userid) {
this.userid = userid;
}

public String getUsername() {
return username;
}

public void setUsername(String username) {
this.username = username;
}

public Date getBirthday() {
return birthday;
}

public void setBirthday(Date birthday) {
this.birthday = birthday;
}

@Override
public String toString() {
return "Users{" +
"userid=" + userid +
", username='" + username + '\'' +
", birthday=" + birthday +
'}';
}
}
步骤三:在启动类中继承WebMvcConfigurerAdapter类,重写configureMessageConverters()方法。
将该启动类命名为:Test1。注意该类一定要定义在controller类的父包里,因为controller中含有RestController注解,只有在父包中才能扫描到
package com.qf;

import com.alibaba.fastjson.serializer.SerializerFeature;
import com.alibaba.fastjson.support.config.FastJsonConfig;
import com.alibaba.fastjson.support.spring.FastJsonHttpMessageConverter;
import org.springframework.boot.SpringApplication;
import org.springframework.boot.autoconfigure.SpringBootApplication;
import org.springframework.http.converter.HttpMessageConverter;
import org.springframework.web.servlet.config.annotation.WebMvcConfigurerAdapter;

import java.util.List;

@SpringBootApplication//声明这是springBoot的启动类。该启动类必须放在要启动的类(即含有@RestController)的父包里。不然会运行不成功
public class Test1 extends WebMvcConfigurerAdapter {
@Override
public void configureMessageConverters(List<HttpMessageConverter<?>> converters) {//无返回值方法
FastJsonHttpMessageConverter converter = new FastJsonHttpMessageConverter();//创建 FastJsonHttpMessageConverter对象
FastJsonConfig config = new FastJsonConfig();//创建FastJsonConfig对象
config.setSerializerFeatures(SerializerFeature.PrettyFormat);//设置格式的参数,SerializerFeature是一个枚举,里面有很多参数
converter.setFastJsonConfig(config);
converters.add(converter);

}
public static void main(String[] args) {
SpringApplication.run(Test1.class, args);//固定格式,Test1为本类类名。启动controller类,相当于SSM中启动Tomcat的步骤
}

}
步骤四:定义controller层,处理前台发的请求
package com.qf.controller;

import com.qf.entity.Users;
import org.springframework.web.bind.annotation.RequestMapping;
import org.springframework.web.bind.annotation.RestController;

import javax.servlet.http.HttpServletResponse;
import java.util.Date;

//RestController将方法返回结果转换成json格式并创建当前类对象。
@RestController//RestController注解等价于@ResponseBody+@Controller;ResponseBody将方法返回结果转换成json格式,Controller用于创建当前类对象,但如果依然想跳转页面,仍可单独使用Controller。
public class TestController {
@RequestMapping("/getUsers")
public Users getUsers(HttpServletResponse response){
response.setContentType("text/html;charset=utf-8");//解决页面乱码问题。也可考虑用@RequestMapping(value = "/", produces = "application/json; charset=utf-8")方式解决
Users users=new Users(1,"张三",new Date());
return users;//因为@RestController修饰,此时返回json对象。页面显示效果{ "birthday":"2019-10-09 20:15:31", "userid":1, "username":"张三" }
}

}
springboot类中的注解一个都不能少
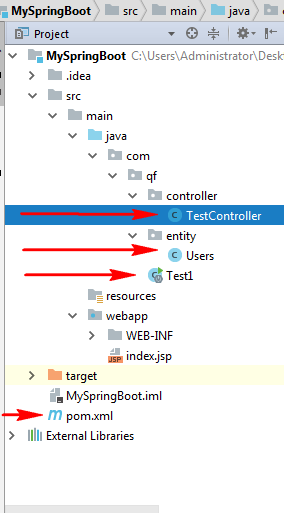
该案例框架结构图:
此案例重点代码片段:


特别注释:
步骤三中重写的方法也可以被这个方法代替,其他不用改:都是设置日期的
//日期转换方式2
@Bean
public HttpMessageConverters a1(){
FastJsonHttpMessageConverter converter = new FastJsonHttpMessageConverter();
FastJsonConfig config = ne
3ff7
w FastJsonConfig();//创建FastJsonConfig对象
config.setSerializerFeatures(SerializerFeature.PrettyFormat);//设置格式的参数,SerializerFeature是一个枚举,里面有很多参数
converter.setFastJsonConfig(config);
HttpMessageConverter converters=(HttpMessageConverter)converter;
return new HttpMessageConverters(converters);//页面得到的结果:{ "birthday":"2019-10-09 20:38:06", "userid":1, "username":"张三" }

}
后端json实体类日期处理
JsonFormat,前提是导入了jackson包并且 在spring.xml中加入了 < mvc:annotation-driven></mvc:annotation-driven>声明,具体看ssm整合


相关文章推荐
- spring boot 使用fastjson 处理json数据中文乱码 默认使用 ISO-8859-1编码格式
- springboot 集成fastjson 以及处理Date和json数据的转换
- spring boot新手教程之使用FastJson解析JSON数据以及解决返回中文乱码问题
- spring boot最新教程(四):返回json数据以及集成fastjson的使用
- SpringBoot学习:Spring Boot使用FastJson解析JSON数据
- 第三章 SpringBoot中对于JSON数据的返回以及处理(一)
- 78. Spring Boot完美使用FastJson解析JSON数据【从零开始学Spring Boot】
- (4)Spring Boot完美使用FastJson解析JSON数据【从零开始学Spring Boot】
- (二)初识springboot之使用fastjson解析数据(解决乱码及简单配置)
- Spring Boot使用FastJson解析JSON数据的方法
- Spring Boot 学习4--完美使用FastJson解析Json数据
- 关于怎么解决从ajax传入的json参数注入到Controller的接收对象 以及如何在Spring Boot项目使用参数校验
- springboot读取自己定义的配置文件的方式以及使用joda_time来处理时间日期
- 78. Spring Boot完美使用FastJson解析JSON数据【从零开始学Spring Boot】
- Spring Boot 完美使用FastJson解析Json数据
- Spring Boot使用FastJson解析JSON数据
- 第四章 SpringBoot对于JSON数据的返回以及处理(二)
- springboot @RequestBody使用JsonSerialize与 JsonDeserialize自定义转参数,处理Date日期格式
- 78. Spring Boot完美使用FastJson解析JSON数据【从零开始学Spring Boot】
- spring boot使用fastJson解析数据