SpringBoot学习:Spring Boot使用FastJson解析JSON数据
2018-01-01 21:22
1031 查看
个人使用比较习惯的json框架是fastjson,所以spring boot默认的jackjson使用起来就很陌生了,所以很自然我就想我能不能使用fastjson进行json解析呢?
引入fastjson依赖库:
<dependencies>
<dependency>
<groupId>com.alibaba</groupId>
<artifactId>fastjson</artifactId>
<version>1.2.15</version>
</dependency>
这里要说下很重要的话,官方文档说的1.2.10以后,会有两个方法支持HttpMessageconvert,一个是FastJsonHttpMessageConverter,支持4.2以下的版本,一个是FastJsonHttpMessageConverter4支持4.2以上的版本,具体有什么区别暂时没有深入研究。这里也就是说:低版本的就不支持了,所以这里最低要求就是1.2.10+。
配置fastjon
支持两种方法:
第一种方法就是:
(1)启动类继承extends WebMvcConfigurerAdapter
(2)覆盖方法configureMessageConverters
具体代码如下:
/**
*
* @author Angel --守护天使
* @version v.0.1
* @date 2016年7月29日下午7:06:11
*/
@SpringBootApplication
public class ApiCoreApp extends WebMvcConfigurerAdapter
{
@Override
public void configureMessageConverters(List<HttpMessageConverter<?>> converters)
{
super.configureMessageConverters(converters);
FastJsonHttpMessageConverter fastConverter = new FastJsonHttpMessageConverter();
FastJsonConfig fastJsonConfig = new FastJsonConfig();
fastJsonConfig.setSerializerFeatures(
SerializerFeature.PrettyFormat
);
fastConverter.setFastJsonConfig(fastJsonConfig);
converters.add(fastConverter);
}
}
第二种方法:
(1)在App.java启动类中,注入Bean : HttpMessageConverters
具体代码如下:
package com.kfit;
import org.springframework.boot.SpringApplication;
import org.springframework.boot.autoconfigure.SpringBootApplication;
import org.springframework.boot.autoconfigure.web.HttpMessageConverters;
import org.springframework.context.annotation.Bean;
import org.springframework.http.converter.HttpMessageConverter;
import com.alibaba.fastjson.serializer.SerializerFeature;
import com.alibaba.fastjson.support.config.FastJsonConfig;
import com.alibaba.fastjson.support.spring.FastJsonHttpMessageConverter;
/**
*
* @author Angel --守护天使
* @version v.0.1
* @date 2016年7月29日下午7:06:11
*/
@SpringBootApplication
public class ApiCoreApp {
@Bean
public HttpMessageConverters fastJsonHttpMessageConverters() {
FastJsonHttpMessageConverter fastConverter = new FastJsonHttpMessageConverter();
FastJsonConfig fastJsonConfig = new FastJsonConfig();
fastJsonConfig.setSerializerFeatures(SerializerFeature.PrettyFormat);
fastConverter.setFastJsonConfig(fastJsonConfig);
HttpMessageConverter<?> converter = fastConverter;
return new HttpMessageConverters(converter);
}
public static void main(String[] args)
{
SpringApplication.run(ApiCoreApp.class, args);
}
}
那么这时候在实体类中使用@JSONField(serialize=false),是不是此字段就不返回了,如果是的话,那么恭喜你配置成功了,其中JSONField的包路径是:com.alibaba.fastjson.annotation.JSONField。
我们从控制台或是打印出来的json都看不出它到底使用了fastjson还是jackson来解析的,所我们在实体类在添加字段来区别它;
2
3
4
5
6
7
8
9
10
11
12
13
14
15
16
17
18
19
20
21
22
23
24
25
26
27
28
29
30
31
32
33
34
35
36
37
38
39
40
41
42
43
44
45
46
47
48
49
50
51
52
53
54
55
56
57
58
59
60
61
62
63
64
65
66
67
68
69
70
71
72
73
74
75
76
77
78
然后到controller给这个对象去赋值:
2
3
4
5
6
7
8
9
10
11
12
13
14
15
16
17
18
19
20
21
22
23
24
25
26
27
28
29
30
31
32
33
34
35
36
去App.class运行,效果如图:
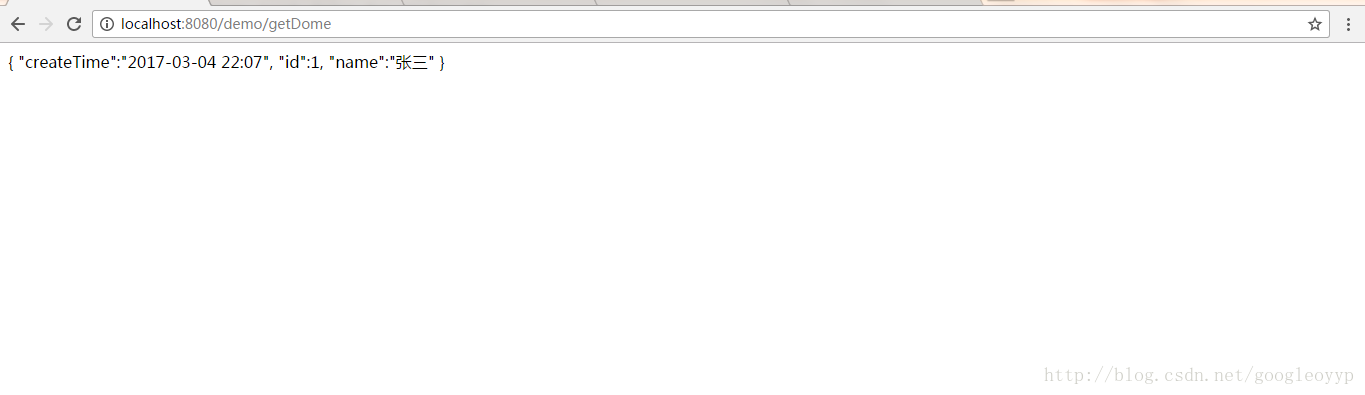
我们可以看到我们成功的使用fastjson解析好了,而且我们的备注信息也没有。这说明我们解析成功了。
引入fastjson依赖库:
<dependencies>
<dependency>
<groupId>com.alibaba</groupId>
<artifactId>fastjson</artifactId>
<version>1.2.15</version>
</dependency>
这里要说下很重要的话,官方文档说的1.2.10以后,会有两个方法支持HttpMessageconvert,一个是FastJsonHttpMessageConverter,支持4.2以下的版本,一个是FastJsonHttpMessageConverter4支持4.2以上的版本,具体有什么区别暂时没有深入研究。这里也就是说:低版本的就不支持了,所以这里最低要求就是1.2.10+。
配置fastjon
支持两种方法:
第一种方法就是:
(1)启动类继承extends WebMvcConfigurerAdapter
(2)覆盖方法configureMessageConverters
具体代码如下:
/**
*
* @author Angel --守护天使
* @version v.0.1
* @date 2016年7月29日下午7:06:11
*/
@SpringBootApplication
public class ApiCoreApp extends WebMvcConfigurerAdapter
{
@Override
public void configureMessageConverters(List<HttpMessageConverter<?>> converters)
{
super.configureMessageConverters(converters);
FastJsonHttpMessageConverter fastConverter = new FastJsonHttpMessageConverter();
FastJsonConfig fastJsonConfig = new FastJsonConfig();
fastJsonConfig.setSerializerFeatures(
SerializerFeature.PrettyFormat
);
fastConverter.setFastJsonConfig(fastJsonConfig);
converters.add(fastConverter);
}
}
第二种方法:
(1)在App.java启动类中,注入Bean : HttpMessageConverters
具体代码如下:
package com.kfit;
import org.springframework.boot.SpringApplication;
import org.springframework.boot.autoconfigure.SpringBootApplication;
import org.springframework.boot.autoconfigure.web.HttpMessageConverters;
import org.springframework.context.annotation.Bean;
import org.springframework.http.converter.HttpMessageConverter;
import com.alibaba.fastjson.serializer.SerializerFeature;
import com.alibaba.fastjson.support.config.FastJsonConfig;
import com.alibaba.fastjson.support.spring.FastJsonHttpMessageConverter;
/**
*
* @author Angel --守护天使
* @version v.0.1
* @date 2016年7月29日下午7:06:11
*/
@SpringBootApplication
public class ApiCoreApp {
@Bean
public HttpMessageConverters fastJsonHttpMessageConverters() {
FastJsonHttpMessageConverter fastConverter = new FastJsonHttpMessageConverter();
FastJsonConfig fastJsonConfig = new FastJsonConfig();
fastJsonConfig.setSerializerFeatures(SerializerFeature.PrettyFormat);
fastConverter.setFastJsonConfig(fastJsonConfig);
HttpMessageConverter<?> converter = fastConverter;
return new HttpMessageConverters(converter);
}
public static void main(String[] args)
{
SpringApplication.run(ApiCoreApp.class, args);
}
}
那么这时候在实体类中使用@JSONField(serialize=false),是不是此字段就不返回了,如果是的话,那么恭喜你配置成功了,其中JSONField的包路径是:com.alibaba.fastjson.annotation.JSONField。
我们从控制台或是打印出来的json都看不出它到底使用了fastjson还是jackson来解析的,所我们在实体类在添加字段来区别它;
package zking.spring_boot_hello1;

import java.util.Date;

import com.alibaba.fastjson.annotation.JSONField;
/**
* 实体类
* @author Administrator
*
*/
public class Dome {

private Integer id;
private String name;

//这个注解是使用了com.alibaba.fastjson.annotation.JSONField
@JSONField(format="yyyy-MM-dd HH:mm")
private Date createTime;//时间
/**
* 在说一个注解就是
*  serialize:是否需要序列化属性.
*  注解之后不返回的该属性的值,在项目中我们有些字段是不想返回,就可以用这个注解来实现
*/
@JSONField(serialize=false)
private String remarks;//备注

public Dome(){

}

public Dome(Integer id, String name) {
super();
this.id = id;
this.name = name;
}

public Integer getId() {
return id;
}

public void setId(Integer id) {
this.id = id;
}

public String getName() {
return name;
}

public void setName(String name) {
this.name = name;
}

public Date getCreateTime() {
return createTime;
}

public void setCreateTime(Date createTime) {
this.createTime = createTime;
}

public String getRemarks() {
return remarks;
}

public void setRemarks(String remarks) {
this.remarks = remarks;
}

}12
3
4
5
6
7
8
9
10
11
12
13
14
15
16
17
18
19
20
21
22
23
24
25
26
27
28
29
30
31
32
33
34
35
36
37
38
39
40
41
42
43
44
45
46
47
48
49
50
51
52
53
54
55
56
57
58
59
60
61
62
63
64
65
66
67
68
69
70
71
72
73
74
75
76
77
78
然后到controller给这个对象去赋值:
package zking.spring_boot_hello1;

import java.util.Date;

import org.springframework.web.bind.annotation.RequestMapping;
import org.springframework.web.bind.annotation.RestController;

/**
* 在这里我们使用RestController  (等价于 @Controller 和 @RequestBody)
* @author Administrator
*
*/
@RestController
@RequestMapping("/demo")
public class HelloController {

@RequestMapping("/hello")
public String hello(){
return "hello";
}
/**
* 返回demo数据:
* 请求地址:http://127.0.0.1:8080/demo/getDemo
* @return
*/
@RequestMapping("/getDome")
public Dome getDome(){
Dome dome=new Dome();
dome.setId(1);
dome.setName("张三");
dome.setCreateTime(new Date());
dome.setRemarks("这是一个备注信息");
return dome;
}
}12
3
4
5
6
7
8
9
10
11
12
13
14
15
16
17
18
19
20
21
22
23
24
25
26
27
28
29
30
31
32
33
34
35
36
去App.class运行,效果如图:
我们可以看到我们成功的使用fastjson解析好了,而且我们的备注信息也没有。这说明我们解析成功了。

相关文章推荐
- Spring Boot 学习4--完美使用FastJson解析Json数据
- 78. Spring Boot完美使用FastJson解析JSON数据【从零开始学Spring Boot】
- Spring Boot使用FastJson解析JSON数据的方法
- 78. Spring Boot完美使用FastJson解析JSON数据【从零开始学Spring Boot】
- 【Spring Boot】完美使用FastJson解析JSON数据
- Spring Boot使用FastJson解析JSON数据
- 78. Spring Boot完美使用FastJson解析JSON数据【从零开始学Spring Boot】
- (4)Spring Boot完美使用FastJson解析JSON数据【从零开始学Spring Boot】
- spring boot新手教程之使用FastJson解析JSON数据以及解决返回中文乱码问题
- Spring Boot 完美使用FastJson解析Json数据
- spring boot使用fastJson解析数据
- 【传智播客郑州校区分享】Spring Boot中使用FastJson解析Json数据
- (二)初识springboot之使用fastjson解析数据(解决乱码及简单配置)
- Spring Boot完美使用FastJson解析JSON数据(十三)
- SpringBoot学习-(2)使用FastJson作为json解析器
- spring-boot实现FastJson解析json数据
- SpringBoot 之 第三方Json解析框架FastJson的使用
- springboot学习(4)springboot使用thymeleaf完成数据的页面展示
- springboot学习(3)springboot使用jsp完成数据的页面展示
- Andorid中使用Gson和Fast-json解析库解析JSON数据---第三方库学习笔记(二)