LinkedHashMap源码剖析
LinkedHashMap源码导读:
1,概述
2,LinkedHashMap与hashMap的一些关系
3,LinkedHashMap核心成员变量
4,LinkedHashMap核心方法
1,概述
前面讲了hashMap的一些原理,LinkedHashMap继承自hashMap,这篇文章我们来大概看看LinkedHashMap的原理。首先说明一下,HashMap是无序的也就是不会基于插入的顺序来读取,这种场景之下就会考虑使用LinkedHashMap。
2,LinkedHashMap与HashMap的一些关系
LinkedHashMap继承自HashMap,也就是是HashMap的子类,在HashMap那篇文章中,有一些回调函数就是子类来实现的,所以等会我们可以来看看。
HashMap数据结构存放的元素是一个内部实现的类:Node<K,V>,同理LinkedHashMap也有个类似的元素Entry,也是继承自HashMap的Node<K,V>:
static class Entry<K,V> extends HashMap.Node<K,V> {
        #多出来两个节点:before、after 可以组成一个双向链表,保持顺序。
Entry<K,V> before, after;
Entry(int hash, K key, V value, Node<K,V> next) {
super(hash, key, value, next);
}
}
3,LinkedHashMap核心成员变量
//用于指向双向链表的头部
transient LinkedHashMap.Entry<K,V> head;
//用于指向双向链表的尾部
transient LinkedHashMap.Entry<K,V> tail;
    //用来指定LinkedHashMap的迭代顺序:true表示的是按照基于访问的顺序来排序,就是把最近读的元素,放在链表的尾部;false表示的是按照插入的顺序来排序。
    final boolean accessOrder;
4,LinkedHashMap核心方法
4.1 put()
通过查看源码可以发现,LinkedHashMap调用的就是HashMap的put()方法。不过LinkedHashMap复写了其中的3个方法:newNode()、afterNodeAccess()、afterNodeInsertion()
newNode():
Node<K,V> newNode(int hash, K key, V value, Node<K,V> e) {
        #构造了一个LinkedHashMap.Entry对象,并调用linkNodeLast方法
LinkedHashMap.Entry<K,V> p =
new LinkedHashMap.Entry<K,V>(hash, key, value, e);

linkNodeLast(p);
return p;
}
下面看看linkNodeLast()方法:
private void linkNodeLast(LinkedHashMap.Entry<K,V> p) {
LinkedHashMap.Entry<K,V> last = tail;
tail = p;
if (last == null)
head = p;
else {
p.before = last;
last.after = p;
}
}
下面简单画个图,看看这个执行过程会怎么样。场景是:三个节点没有冲突,插入的图形是怎么样的(冲突就不画图了,其实很简单,对着源码来画图就可以):
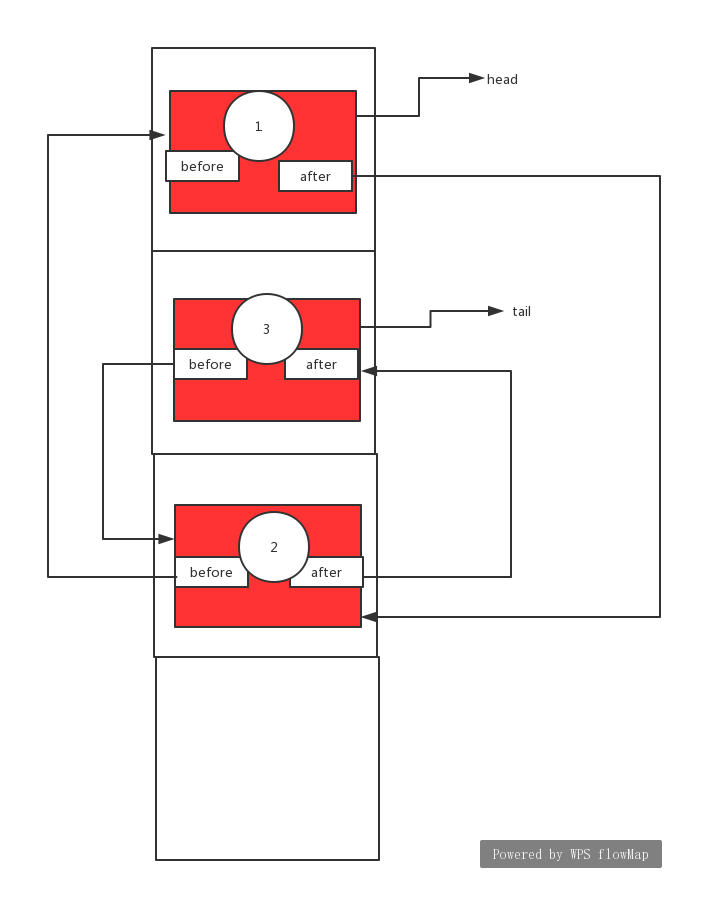
可以看出来是一个双向链表维持了一个顺序,遍历的时候只要知道首尾,就可以维持住顺序。
afterNodeAccess():
void afterNodeAccess(Node<K,V> e) { // move node to last
LinkedHashMap.Entry<K,V> last;
if (accessOrder && (last = tail) != e) {
LinkedHashMap.Entry<K,V> p =
(LinkedHashMap.Entry<K,V>)e, b = p.before, a = p.after;
p.after = null;
if (b == null)
head = a;
else
b.after = a;
if (a != null)
a.before = b;
else
last = b;
if (last == null)
head = p;
else {
p.before = last;
last.after = p;
}
tail = p;
++modCount;
}
}
这里的accessOrder默认是false,并没有执行。
afterNodeInsertion():
void afterNodeInsertion(boolean evict) { // possibly remove eldest
LinkedHashMap.Entry<K,V> first;
if (evict && (first = head) != null && removeEldestEntry(first)) {
K key = first.key;
removeNode(hash(key), key, null, false, true);
}
}
这里的removeEldestEntry总是返回false,所以并不执行。可能又是为了给子类复写,来扩展的。
put()方法需要了解的点:
有了hashMap的铺垫,其实这个还是很简单的。之所以能够按照顺序,是因为插入的时候维护了一个双向链表,秘密就在子类LinkedHashMap复写了newNode方法。所以以后写框架的话也需要扩展出一些方法,能够让子类来回调。
4.2 get()
public V get(Object key) {
Node<K,V> e;
if ((e = getNode(hash(key), key)) == null)
return null;
if (accessOrder)
afterNodeAccess(e);
return e.value;
}
默认情况下get()也是和hashMap走的是一样的。
4.3 LinkedHashMap的迭代器
能够保持顺序,一是插入的时候维护的双向链表,,二是在迭代器中肯定使用了这种数据结构,我们来看看它的迭代器:LinkedEntryIterator,而它的父类是LinkedHashIterator,源码如下
abstract class LinkedHashIterator {
LinkedHashMap.Entry<K,V> next;
LinkedHashMap.Entry<K,V> current;
int expectedModCount;

LinkedHashIterator() {
next = head;
expectedModCount = modCount;
current = null;
}

public final boolean hasNext() {
return next != null;
}

        #遍历的代码。可以看出来非常简单,就是遍历了这个双向链表。
final LinkedHashMap.Entry<K,V> nextNode() {
            #从首节点开始
LinkedHashMap.Entry<K,V> e = next;
if (modCount != expectedModCount)
throw new ConcurrentModificationException();
if (e == null)
throw new NoSuchElementException();
current = e;
            #依次进行遍历。
next = e.after;
return e;
}

public final void remove() {
Node<K,V> p = current;
if (p == null)
throw new IllegalStateException();
if (modCount != expectedModCount)
throw new ConcurrentModificationException();
current = null;
K key = p.key;
removeNode(hash(key), key, null, false, false);
expectedModCount = modCount;
}
}
可以看出来是简单的链表遍历。有兴趣的朋友可以了解下hashMap的遍历流程。hashMap最后一个环节大概就说到这个话题了。可以再去看看源码,记住:源码出真知!!

- 【Java集合源码剖析】LinkedHashmap源码剖析
- Java集合源码剖析(三)【TreeMap、LinkedHashmap】
- 【源码】LinkedHashMap源码剖析
- LinkedHashMap源码剖析
- Java集合源码剖析-LinkedHashmap源码剖析
- 【Java集合源码剖析】LinkedHashmap源码剖析
- 第七篇:JAVA集合之LinkedHashmap源码剖析
- 【Java集合源码剖析】LinkedHashmap源码剖析
- java容器之六_Java集合框架源码剖析:LinkedHashSet 和 LinkedHashMap
- Java集合框架源码剖析:LinkedHashSet 和 LinkedHashMap
- Java集合框架源码剖析:LinkedHashSet 和 LinkedHashMap
- 【Java集合源码剖析】LinkedHashmap源码剖析
- JAVA LinkedHashSet 和 LinkedHashMap源码剖析
- 【Java集合源码剖析】LinkedHashmap源码剖析
- 【源码】LinkedHashMap源码剖析
- 源码剖析——LinkedHashMap
- 转:【Java集合源码剖析】LinkedHashmap源码剖析
- LinkedHashmap源码剖析
- LinkedHashMap源码剖析
- LinkedHashmap源码剖析