Android中BaseAdapter配合ListView的使用(解决分割线显示问题)
2019-08-14 18:34
441 查看
版权声明:本文为博主原创文章,遵循 CC 4.0 by-sa 版权协议,转载请附上原文出处链接和本声明。
本文链接:https://blog.csdn.net/weixin_43219615/article/details/99592406
1.简介
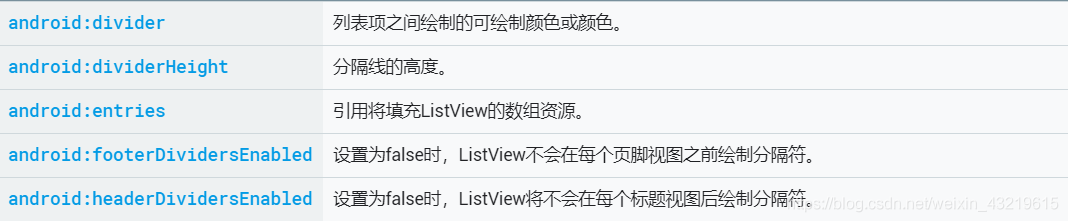
ListView可显示垂直滚动的视图集合,其中每个视图紧邻列表中的上一个视图。xml的主要属性如下图,其中headerDividersEnabled和footerDividersEnabled属性在使用的时候有很多需要注意的地方(特别是headerDividersEnabled属性,不管你怎么搞,顶部的分割线都不会显示,我是真的搞了一下午,最后发现书的代码有点问题 )。
设置分割线需要注意的地方。
- 代码中的setDivider方法只能设置具体的图片,不能设置颜色,即使把颜色值转为ColorDrawable也不行。在布局文件中可对divider属性直接指定颜色值。
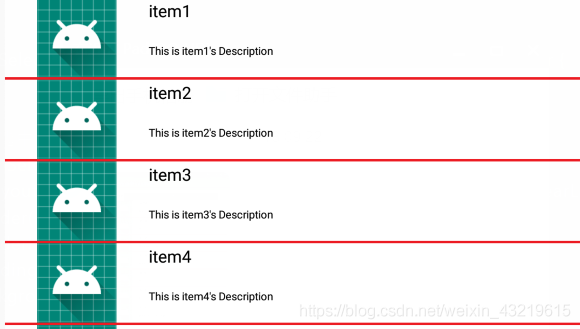
- 代码中要设置分隔线,务必先调用setDivider方法再调用setDividerHeight方法。如果先调用setDividerHeight再调用setDivider,分隔线高度就会变成分隔图片的高度,而不是setDividerHeight设置的高度。如图一,正常应该是图二。
- 想要显示底部的分割线,当前ListView的高度不能为wrap_content,否则就算把footerDividersEnabled设置为true、调用setFooterDividersEnabled方法设置为true,这条底部的分隔线也不会出现。除非把列表的高度设置为match_parent或设置足够高,才会显示底部的分隔线。
- 顶部的分割线是根本不会显示的,不管怎么调(反正我没调出来)。
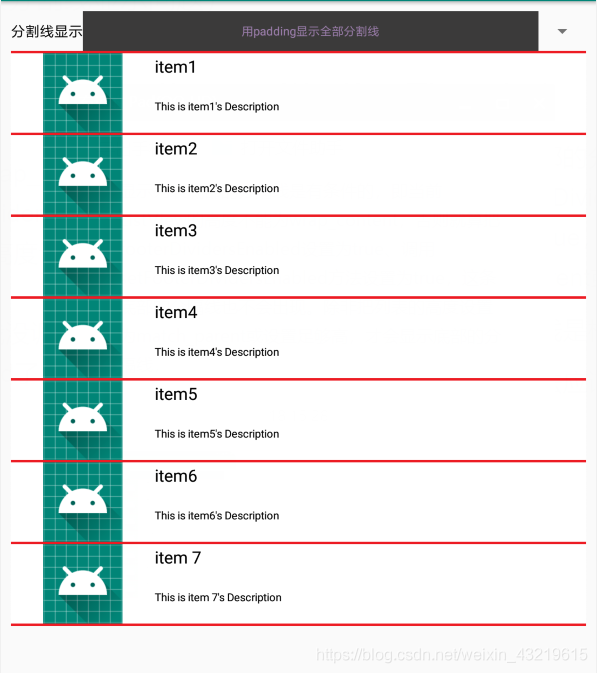
- 显示底部和顶部分割线简单的方法应该就是使用padding+background了(不过还是有坑,具体看例子的注释)。
2.使用例子
下面这个例子基本上把设置分割线的方法都试了各遍,大家可以自己试试。新建ListViewDemoActivity,下面是代码、效果图和分割线图片。

- item_list_view.xml。ListView的列表项的布局文件。
<?xml version="1.0" encoding="utf-8"?>
<LinearLayout
android:id="@+id/ll_item"
xmlns:android="http://schemas.android.com/apk/res/android"
android:orientation="horizontal"
android:layout_width="match_parent"
android:layout_height="wrap_content">

<ImageView
android:id="@+id/iv_icon"
android:layout_width="0dp"
android:layout_height="80dp"
android:layout_weight="1"
android:scaleType="fitCenter"/>

<LinearLayout
android:layout_width="0dp"
android:layout_height="match_parent"
android:layout_weight="3"
android:orientation="vertical">

<TextView
android:id="@+id/tv_name"
android:layout_width="match_parent"
android:layout_height="0dp"
android:layout_weight="1"
android:gravity="left|center"
android:textColor="#000000"
android:textSize="20sp" />

<TextView
android:id="@+id/tv_description"
android:layout_width="match_parent"
android:layout_height="0dp"
android:layout_weight="2"
android:gravity="left|center"
android:textSize="13sp"
android:textColor="#000000" />
</LinearLayout>
</LinearLayout>
- item_dropdown.xml。Spinner的列表项的布局文件。
<?xml version="1.0" encoding="utf-8"?>
<TextView xmlns:android="http://schemas.android.com/apk/res/android"
android:id="@+id/tv_drop_down"
android:layout_width="match_parent"
android:layout_height="40dp"
android:gravity="center"
android:textColor="#000000">
</TextView>
- item_selected.xml。Spinner选中时的布局文件,如图。

<?xml version="1.0" encoding="utf-8"?>
<TextView xmlns:android="http://schemas.android.com/apk/res/android"
android:id="@+id/tv_selected"
android:layout_width="match_parent"
android:layout_height="40dp"
android:gravity="center"
android:textColor="#9B7DAB"
android:background="#3B3A3A">
</TextView>
- ItemDemo.java。ListView的Item代码文件。
package xyz.strasae.androidlearn.myandroidapplication.bean;

import java.util.ArrayList;

import xyz.strasae.androidlearn.myandroidapplication.R;

public class ItemDemo {
private static int[] iconArray = {R.mipmap.ic_launcher, R.mipmap.ic_launcher, R.mipmap.ic_launcher, R.mipmap.ic_launcher
, R.mipmap.ic_launcher, R.mipmap.ic_launcher, R.mipmap.ic_launcher};
private static String[] nameArray = {"item1", "item2", "item3", "item4", "item5", "item6", "item 7"};
private static String[] descriptionArray = {"This is item1's Description", "This is item2's Description", "This is item3's Description",
"This is item4's Description", "This is item5's Description", "This is item6's Description", "This is item 7's Description"};

public int image;
public String name;
public String description;

public ItemDemo() {
image = 0;
name = "";
description = "";
}

public ItemDemo(int image, String name, String description) {
this.image = image;
this.name = name;
this.description = description;
}

public static ArrayList<ItemDemo> getDefaultList() {
ArrayList<ItemDemo> arrayList = new ArrayList<>();
for(int i = 0; i < iconArray.length; i++) {
arrayList.add(new ItemDemo(iconArray[i], nameArray[i], descriptionArray[i]));
}
return arrayList;
}
}
- MyBaseAdapter.java。ListView的适配器,同时实现了AdapterView.OnItemClickListener和AdapterView.OnItemLongClickListener接口。
package xyz.strasae.androidlearn.myandroidapplication.adapter;

import android.content.Context;
import android.view.LayoutInflater;
import android.view.View;
import android.view.ViewGroup;
import android.widget.AdapterView;
import android.widget.BaseAdapter;
import android.widget.ImageView;
import android.widget.LinearLayout;
import android.widget.TextView;
import android.widget.Toast;

import java.util.ArrayList;

import xyz.strasae.androidlearn.myandroidapplication.R;
import xyz.strasae.androidlearn.myandroidapplication.bean.ItemDemo;

public class MyBaseAdapter extends BaseAdapter implements AdapterView.OnItemClickListener, AdapterView.OnItemLongClickListener {
private LayoutInflater layoutInflater;
private Context context;
private int layoutId;
private int background;
private ArrayList<ItemDemo> itemDemoArrayList;

/**
*
* @param context 设备上下文
* @param layoutId 列表项的视图id
* @param itemDemoArrayList 数据
* @param background 列表项的背景颜色
*/
public MyBaseAdapter(Context context, int layoutId, ArrayList<ItemDemo> itemDemoArrayList, int background) {
this.context = context;
layoutInflater = LayoutInflater.from(this.context);
this.itemDemoArrayList = itemDemoArrayList;
this.background = background;
this.layoutId = layoutId;
}

@Override
public int getCount() {
return itemDemoArrayList.size();
}

@Override
public Object getItem(int i) {
return itemDemoArrayList.get(i);
}

@Override
public long getItemId(int i) {
return i;
}

@Override
public View getView(int position, View convertView, ViewGroup parent) {
ViewHolder viewHolder;
if(convertView == null) {
viewHolder = new ViewHolder();
convertView = layoutInflater.inflate(layoutId, null);
viewHolder.ll_item = convertView.findViewById(R.id.ll_item);
viewHolder.iv_icon = convertView.findViewById(R.id.iv_icon);
viewHolder.tv_name = convertView.findViewById(R.id.tv_name);
viewHolder.tv_description = convertView.findViewById(R.id.tv_description);
convertView.setTag(viewHolder);
} else {
viewHolder = (ViewHolder) convertView.getTag();
}
ItemDemo itemDemo = itemDemoArrayList.get(position);
viewHolder.ll_item.setBackgroundColor(background);
viewHolder.iv_icon.setImageResource(itemDemo.image);
viewHolder.tv_name.setText(itemDemo.name);
viewHolder.tv_description.setText(itemDemo.description);
return convertView;
}

@Override
public void onItemClick(AdapterView<?> adapterView, View view, int i, long l) {
Toast.makeText(context, "你选择的是" + itemDemoArrayList.get(i).name, Toast.LENGTH_SHORT).show();
}

@Override
public boolean onItemLongClick(AdapterView<?> adapterView, View view, int i, long l) {
Toast.makeText(context, "你长按了" + itemDemoArrayList.get(i).name, Toast.LENGTH_SHORT).show();
return true;
}

public final class ViewHolder {
private LinearLayout ll_item;
private ImageView iv_icon;
private TextView tv_name;
private TextView tv_description;
}
}
- activity_list_view_demo.xml。ListViewDemoActivity的布局文件。
<?xml version="1.0" encoding="utf-8"?>
<LinearLayout xmlns:android="http://schemas.android.com/apk/res/android"
xmlns:app="http://schemas.android.com/apk/res-auto"
xmlns:tools="http://schemas.android.com/tools"
android:layout_width="match_parent"
android:layout_height="match_parent"
tools:context=".ListViewDemoActivity"
android:orientation="vertical"
android:padding="10dp">

<RelativeLayout
android:layout_width="match_parent"
android:layout_height="40dp">
<TextView
android:id="@+id/tv_type"
android:layout_width="wrap_content"
android:layout_height="match_parent"
android:layout_alignParentLeft="true"
android:gravity="center"
android:text="分割线显示"
android:textColor="#000000"
android:textSize="17sp"/>

<Spinner
android:id="@+id/sp_divider_type"
android:layout_width="match_parent"
android:layout_height="match_parent"
android:layout_toRightOf="@id/tv_type"
android:gravity="left|center"
android:spinnerMode="dialog"/>
</RelativeLayout>

<ListView
android:id="@+id/lv_demo"
android:layout_width="match_parent"
android:layout_height="wrap_content"
android:headerDividersEnabled="true"
android:footerDividersEnabled="true"
android:divider="@null"
android:dividerHeight="5dp"/>
</LinearLayout>
- ListViewDemoActivity.java。
package xyz.strasae.androidlearn.myandroidapplication;

import androidx.appcompat.app.AppCompatActivity;

import android.graphics.Color;
import android.graphics.drawable.Drawable;
import android.os.Bundle;
import android.view.View;
import android.widget.AdapterView;
import android.widget.ArrayAdapter;
import android.widget.LinearLayout;
import android.widget.ListView;
import android.widget.Spinner;

import java.util.ArrayList;

import xyz.strasae.androidlearn.myandroidapplication.adapter.MyBaseAdapter;
import xyz.strasae.androidlearn.myandroidapplication.bean.ItemDemo;

public class ListViewDemoActivity extends AppCompatActivity {
private ListView lv_demo;
private ArrayList<ItemDemo> itemDemoArrayList;
private Spinner sp_divider_type;
private Drawable drawable;
private int dividerHeight = 5;
private String[] dividerArray = {
"不显示分割线(分割线高度为0)",
"不显示分割线(设置为null)",
"只显示内部分割线(先设置分割线高度,再设置分割线图片)",
"只显示内部分割线(先设置分割线图片,后设置分割线高度)",
"显示底部分割线(ListView高度为wrap_content)",
"显示底部分割线(ListView高度为match_parent)",
"显示顶部分割线(其实显示不了)",
"用padding显示全部分割线"
};

@Override
protected void onCreate(Bundle savedInstanceState) {
super.onCreate(savedInstanceState);
setContentView(R.layout.activity_list_view_demo);
lv_demo = findViewById(R.id.lv_demo);
itemDemoArrayList = ItemDemo.getDefaultList();
MyBaseAdapter myBaseAdapter = new MyBaseAdapter(ListViewDemoActivity.this, R.layout.item_list_view, itemDemoArrayList, Color.WHITE);
lv_demo.setAdapter(myBaseAdapter);
lv_demo.setOnItemClickListener(myBaseAdapter);
lv_demo.setOnItemLongClickListener(myBaseAdapter);
drawable = this.getResources().getDrawable(R.drawable.divider_red2, null);

sp_divider_type = findViewById(R.id.sp_divider_type);
ArrayAdapter<String> arrayAdapter = new ArrayAdapter<>(ListViewDemoActivity.this, R.layout.item_selected, dividerArray);
arrayAdapter.setDropDownViewResource(R.layout.item_dropdown);
sp_divider_type.setPrompt("请选择分割线显示方式");
sp_divider_type.setAdapter(arrayAdapter);
sp_divider_type.setOnItemSelectedListener(new DividerSelectedListener());
sp_divider_type.setSelection(0);
}

private class DividerSelectedListener implements AdapterView.OnItemSelectedListener {

@Override
//第二个参数代表选中的(0开始)
public void onItemSelected(AdapterView<?> adapterView, View view, int i, long l) {
LinearLayout.LayoutParams layoutParams = new LinearLayout.LayoutParams(LinearLayout.LayoutParams.MATCH_PARENT, LinearLayout.LayoutParams.WRAP_CONTENT);
lv_demo.setDivider(drawable);
lv_demo.setDividerHeight(dividerHeight);
lv_demo.setPadding(0, 0, 0, 0);
lv_demo.setBackgroundColor(Color.TRANSPARENT);
if(i == 0) {
lv_demo.setDividerHeight(0);
} else if(i == 1) {
lv_demo.setDivider(null);
lv_demo.setDividerHeight(dividerHeight);
} else if(i == 2) {
lv_demo.setDividerHeight(dividerHeight);
lv_demo.setDivider(drawable);
}else if(i == 3) {
lv_demo.setDivider(drawable);
lv_demo.setDividerHeight(dividerHeight);
}else if(i == 4) {
lv_demo.setFooterDividersEnabled(true);
}else if(i == 5) {
//第二个参数代表height 第三个参数代表权重
layoutParams = new LinearLayout.LayoutParams(LinearLayout.LayoutParams.MATCH_PARENT, 0, 1);
lv_demo.setFooterDividersEnabled(true);
}else if(i == 6) {
layoutParams = new LinearLayout.LayoutParams(LinearLayout.LayoutParams.MATCH_PARENT, 0, 1);
lv_demo.setFooterDividersEnabled(true);
lv_demo.setHeaderDividersEnabled(true);
} else if(i == 7) {
//注意这里必须先把Divider设置为null padding+background才会有用
lv_demo.setDivider(null);
lv_demo.setDividerHeight(dividerHeight);
lv_demo.setPadding(0, dividerHeight, 0, dividerHeight);
lv_demo.setBackground(drawable);
}
lv_demo.setLayoutParams(layoutParams);
}

@Override
public void onNothingSelected(AdapterView<?> adapterView) {

}
}
}

相关文章推荐
- Android 解决ListView、GridView在首次显示时adapter可能多次调用getView的问题
- 【Android】 解决listview和BaseAdapter配合因加入button导致整个item点击失效
- 安卓学习之使用listview设置adapter时,解决动态显示图片的问题
- Android深入浅出系列之实例应用—简单的手指拖动图片,图片滑来滑去显示应用Gallery和BaseAdapter以及ImageView的使用
- Android杂谈--ListView之BaseAdapter的使用
- android ListView之BaseAdapter的使用方式
- Android ListView滑动过程中图片显示重复错乱闪烁问题解决
- Android杂谈--ListView之BaseAdapter的使用
- 有关ViewPager的使用及解决Android下ViewPager和PagerAdapter中调用notifyDataSetChanged失效的问题
- Android复写BaseAdapter并显示ListView视图
- 布局文件Android ListView入门知识--各种Adapter配合使用
- Android ListView入门知识--各种Adapter配合使用
- [Android]ListView性能优化之视图缓存 解决listView显示重复问题
- 【Android界面实现】解决ScrollView中嵌套Listview,Listview中嵌套Listview显示不完整和滑动冲突的问题
- Android深入浅出系列之实例应用—简单的手指拖动图片,图片滑来滑去显示应用Gallery和BaseAdapter以及ImageView的使用
- Android杂谈--ListView之BaseAdapter的使用
- Android高手进阶教程(十六)之---Android中万能的BaseAdapter(Spinner,ListView,GridView)的使用!
- Android ListView入门知识--各种Adapter配合使用
- Android高手进阶教程(十六)之---Android中万能的BaseAdapter(Spinner,ListView,GridView)的使用!
- Android高手进阶教程(十六)之---Android中万能的BaseAdapter(Spinner,ListView,GridView)的使用!