Docker部署xxl-job 通用反射执行器
2019-07-31 10:15
190 查看
原因
最近在公司写一些job,公司使用的是spring boot提供的注解形式实现的。
这样在自测的时候很麻烦,而且测试提测的时候需要修改cron表达式->提交git->jenkins打包重启
解决方案
查阅资料后决定选用任务调度平台,有很多优秀的任务调度平台,选择xxl-job是因为文档清晰、使用简单、基于远程RPC调用、官方提供spring boot例子。
部署
首先需要执行官网提供的sql 使用docker下载镜像 这里最新版本是2.0.2
docker pull xuxueli/xxl-job-admin:2.0.2
然后运行docker镜像 注意修改参数
docker run -e PARAMS="--spring.datasource.url=jdbc:mysql://数据库地址:3306/xxl-job?Unicode=true&characterEncoding=UTF-8 --spring.datasource.password=数据库密码 --spring.mail.host=smtp.163.com --spring.mail.username=邮箱名 --spring.mail.password=邮箱密码 --xxl.job.login.password=登录密码" -p 8080:8080 -v /tmp:/data/applogs --name xxl-job-admin --privileged=true -d xuxueli/xxl-job-admin:2.0.2
注意一些参数如邮箱可以省略
在项目中配置
这里配置使用官网示例中的spring boot配置
@Configuration
public class XxlJobConfig {
private Logger logger = LoggerFactory.getLogger(XxlJobConfig.class);

@Value("${xxl.job.admin.addresses}")
private String adminAddresses;

@Value("${xxl.job.executor.appname}")
private String appName;

@Value("${xxl.job.executor.ip}")
private String ip;

@Value("${xxl.job.executor.port}")
private int port;

@Value("${xxl.job.accessToken}")
private String accessToken;

@Value("${xxl.job.executor.logpath}")
private String logPath;

@Value("${xxl.job.executor.logretentiondays}")
private int logRetentionDays;

@Bean(initMethod = "start", destroyMethod = "destroy")
public XxlJobSpringExecutor xxlJobExecutor() {
logger.info(">>>>>>>>>>> xxl-job config init.");
XxlJobSpringExecutor xxlJobSpringExecutor = new XxlJobSpringExecutor();
xxlJobSpringExecutor.setAdminAddresses(adminAddresses);
xxlJobSpringExecutor.setAppName(appName);
xxlJobSpringExecutor.setIp(ip);
xxlJobSpringExecutor.setPort(port);
xxlJobSpringExecutor.setAccessToken(accessToken);
xxlJobSpringExecutor.setLogPath(logPath);
xxlJobSpringExecutor.setLogRetentionDays(logRetentionDays);

return xxlJobSpringExecutor;
}
}
官网给出的执行器配置说明
### 调度中心部署跟地址 [选填]:如调度中心集群部署存在多个地址则用逗号分隔。执行器将会使用该地址进行"执行器心跳注册"和"任务结果回调";为空则关闭自动注册;
xxl.job.admin.addresses=http://127.0.0.1:8080/xxl-job-admin

### 执行器AppName [选填]:执行器心跳注册分组依据;为空则关闭自动注册
xxl.job.executor.appname=xxl-job-executor-sample

### 执行器IP [选填]:默认为空表示自动获取IP,多网卡时可手动设置指定IP,该IP不会绑定Host仅作为通讯实用;地址信息用于 "执行器注册" 和 "调度中心请求并触发任务";
xxl.job.executor.ip=

### 执行器端口号 [选填]:小于等于0则自动获取;默认端口为9999,单机部署多个执行器时,注意要配置不同执行器端口;
xxl.job.executor.port=9999

### 执行器通讯TOKEN [选填]:非空时启用;
xxl.job.accessToken=

### 执行器运行日志文件存储磁盘路径 [选填] :需要对该路径拥有读写权限;为空则使用默认路径;
xxl.job.executor.logpath=/data/applogs/xxl-job/jobhandler

### 执行器日志保存天数 [选填] :值大于3时生效,启用执行器Log文件定期清理功能,否则不生效;
xxl.job.executor.logretentiondays=-1
执行器
官方给出了不少执行器,但是要在原有项目上改造需要自己写执行器,当然可以使用一个任务写一个执行器,这样执行器就会很多,很难以维护。所以这里采用反射的方式
首先是全类名执行器使用反射的方式
@Component
@JobHandler(value = "BeanByClassHandler")
public class BeanByClassHandler extends IJobHandler {
@Autowired
private ApplicationContext applicationContext;

//根据完整类名 通过反射执行指定方法
@Override
public ReturnT<String> execute(String param) throws Exception {
XxlJobLogger.log(param);
if (param == null || param.equals("")) {
return new ReturnT<>(ReturnT.FAIL_CODE, "参数不能为空!");
}
String[] split = param.split(",");
if (split == null || split.length < 2) {
return new ReturnT<>(ReturnT.FAIL_CODE, "参数格式错误,应为 完整类名,方法名");
}
Class taskBeanClass = null;
try {
taskBeanClass = Class.forName(split[0]);
} catch (Exception e) {
return new ReturnT<>(ReturnT.FAIL_CODE, "类" + split[0] + "不存在");
}
Method method = null;
try {
method = taskBeanClass.getMethod(split[1]);
} catch (Exception e) {
return new ReturnT<>(ReturnT.FAIL_CODE, "方法" + split[1] + "不存在");
}
Object o = applicationContext.getBean(taskBeanClass);
if (o == null) {
return new ReturnT<>(ReturnT.FAIL_CODE, "在Application中类不存在");
}
try {
method.invoke(o);
} catch (Exception e) {
return new ReturnT<>(ReturnT.FAIL_CODE, "方法执行失败");
}
return new ReturnT<>(ReturnT.SUCCESS_CODE, "执行成功");

}
}
这样全类名很长所以可以使用spring管理beanName获得实例进行反射
@Component
@JobHandler(value = "BeanByNameHandler")
public class BeanByNameHandler extends IJobHandler {
@Autowired
private ApplicationContext applicationContext;
//根据spring管理的bean name获取指定类
@Override
public ReturnT<String> execute(String param) throws Exception {
XxlJobLogger.log(param);
if (param == null || param.equals("")) {
return new ReturnT<>(ReturnT.FAIL_CODE, "参数不能为空!");
}
String[] split = param.split(",");
if (split == null || split.length < 2) {
return new ReturnT<>(ReturnT.FAIL_CODE, "参数格式错误,应为bean名称,方法名");
}
Object o = applicationContext.getBean(split[0]);
if(o == null){
return new ReturnT<>(ReturnT.FAIL_CODE,"类在applicationContext中不存在");
}
Method method;
try {
method = o.getClass().getMethod(split[1]);
}catch (Exception e){
return new ReturnT<>(ReturnT.FAIL_CODE,"方法"+split[1]+"不存在");
}
try {
method.invoke(o);
}catch (Exception e){
return new ReturnT<>(ReturnT.FAIL_CODE,"调用方法失败");
}
return new ReturnT<>(ReturnT.SUCCESS_CODE,"调用job成功");
}
}
调用
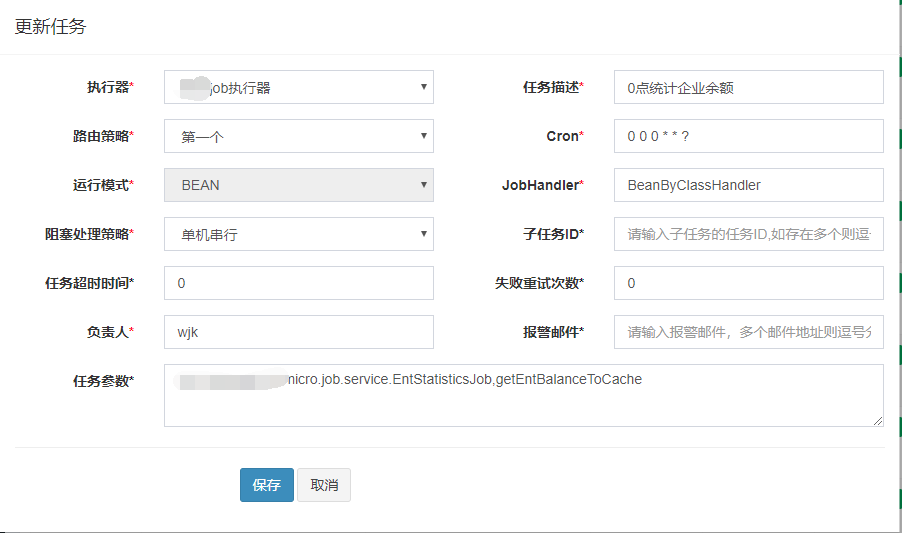
在web界面新建任务 参数为 全类名,方法名即可。如下图所示
 当然也可以执行shell脚本

缺点
- xxl-job只支持mysql数据库,公司使用的Oracle 所以docker需要运行一个mysql数据库
- xxl-job截至2.0.2版本没有提供多用户及权限管理
补充
好消息xxl-job在最新的 6.27 版本 v2.1.2 Release Notes[2019-12-12]中支持了方法级别的Handler注解,不需要再写反射啦!

相关文章推荐
- 发布xxl-job executor dotnet core 执行器的实现
- XXL-JOB部署开发
- 学习笔记---分布式调度之xxlJob执行器的启动源码解析
- 使用xxl-job调度平台时,启动执行器工程报错:unknown code for readObject at 0x3c (<)
- 如果在docker中部署tomcat,并且部署java应用程序
- 浅析docker-compose部署mysql无法访问的问题
- 基于docker部署的微服务架构(一):服务注册中心
- Docker+Jenkins+Git+Maven自动化构建部署
- Atiti qq空间破解(3)------------gui图形化通用cli执行器atiuse
- 离线手动部署docker镜像仓库——harbor仓库(一)
- Jenkins一键部署java应用脚本(jar,war,docker)
- Docker部署Django+Mysql+Redis+Gunicorn+Nginx的实现
- docker部署项目 <三>
- 一文读懂分布式任务调度平台XXL-JOB
- docker 部署odoo 访问宿主机数据库
- Ubuntu16_x64下安装docker及部署web应用
- 彻底摆脱配置文件 四(基于反射的通用resolve详解)
- 阿里云通过Docker部署Jenkins服务过程(支持Maven)
- 使用docker部署ipfs节点
- [实战] 基于Docker的EFK日志系统与使用经验( 一 )-EFK部署