如何搭建GPU深度学习环境
这篇文章将带领你彻底安装好以下内容:
Tensorflow-gpu
CUDA
cudnn
Vs
首先我们默认你已经安装了anaconda,如果没有那就去安装一个。至于怎么安装,可以随便百度一个教程,因为安装anaconda的教程实在太多了。记得添加环境变量,这个教程里也肯定有。
好,现在你已经安装好了anaconda,请你这样操作:
先看一下你的显卡能不能跑gpu。
首先,你要打开你的英伟达控制面板(不知道咋打开的可以百度一下,为了节省篇幅这里不写了)
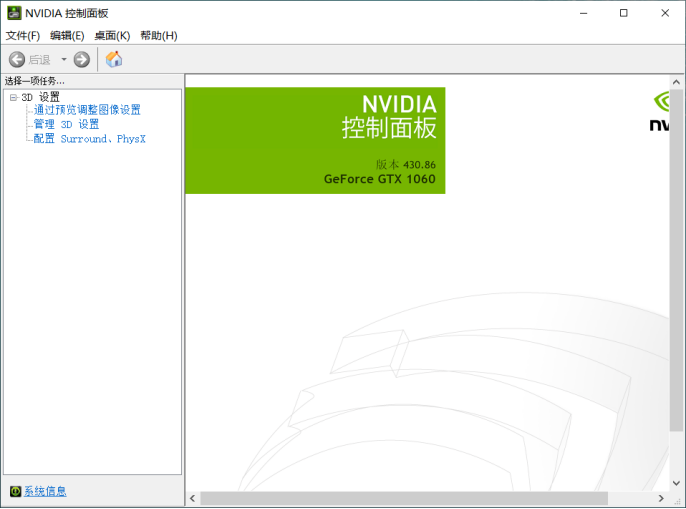
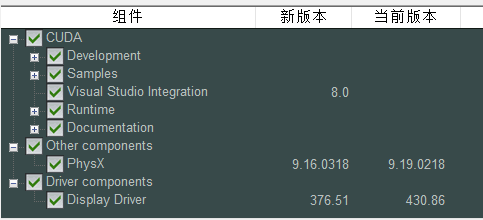
点击帮助-系统信息-组件,然后看到这里:

OK,说明你的显卡目前最高支持CUDA10.2.120的版本,当然比这个版本低的你也可以安装,不过也是有要求的,我们后面再讲。
现在,你要确定你要用哪个版本的tensorflow-gpu,我个人认为,要先确定tensorflow-gpu的版本才能确认CUDA和cudnn。一般说来,版本越高对硬件的要求就越高,我为了折中,选择了1.8.0的版本。至于你怎么选择呢,可以看你的硬件了,如果硬件还不错,可以选择高一点的版本。而且有的代码特别娇气,只能用特定版本的tensorflow跑,所以在安装前最好选择一个合适的gpu版本,而不是瞎装。
我们可以从tensorflow的官网上看到这样一幅图:
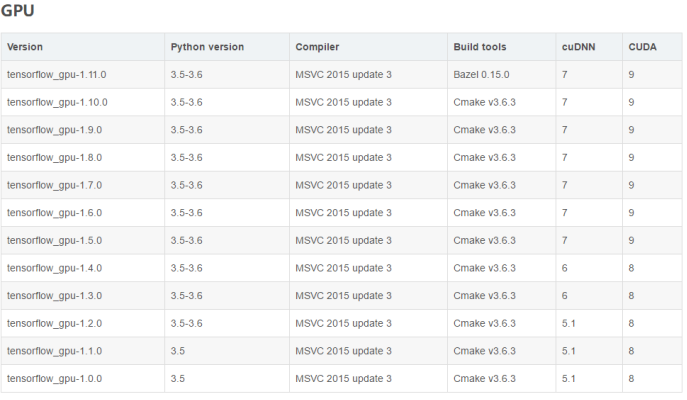
不过对你来说这张图一定比较老了,因为google公司不断地推陈出新,在你看到这篇攻略的时候,估计已经升级了好几代了。不过没关系,选一个差不多的就行,不要喜新厌旧,最新的版本有可能存在兼容问题。
我选择的是1.8.0的版本,可以看到它的要求是python3.5-3.6,我们选择3.6,还需要VS2015,还需要CUDA9和cudnn7.
OK,这就是我们需要的所有材料了,下面就是去下载了!
下载的内容放在这里,老老实实下载下来:
CUDA:https://developer.nvidia.com/cuda-toolkit-archive
Cudnn:https://developer.nvidia.com/rdp/cudnn-archive
Vs2015:ed2k://|file|cn_visual_studio_community_2015_x86_dvd_6847368.iso|4013920256|EB7F6605EDE67509E218E29173AC6574|/
Tensorflow:https://github.com/fo40225/tensorflow-windows-wheel
DXSDK_jun10.exe :https://www.microsoft.com/en-us/download/details.aspx?id=6812
微软的DirectX Software Development Kit ,安装它为了编译后年的cuda_samples
打开上面的链接选择你想要的版本,下载下来,一定注意CUDA和cudnn的版本搭配。
下面开始安装咯!
首先在anaconda里创建一个新的环境,像这样
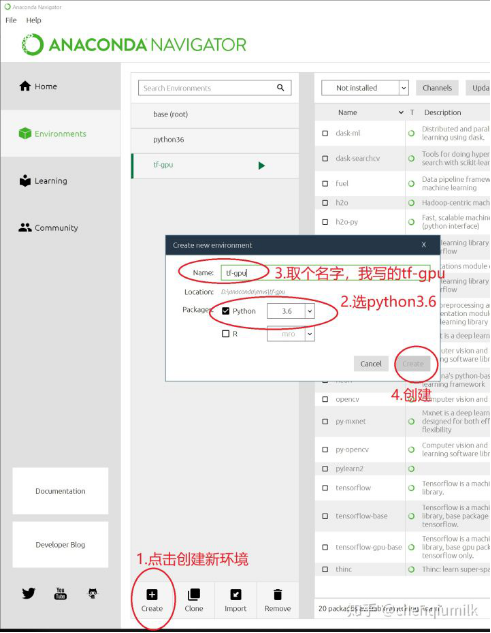
这里设定的是python3.6,这是出于上面tensorflow那张图,如果你安装的gpu版本较低,可能需要安装python3.5。
创建完成后什么都不需要做,我们去做别的事。
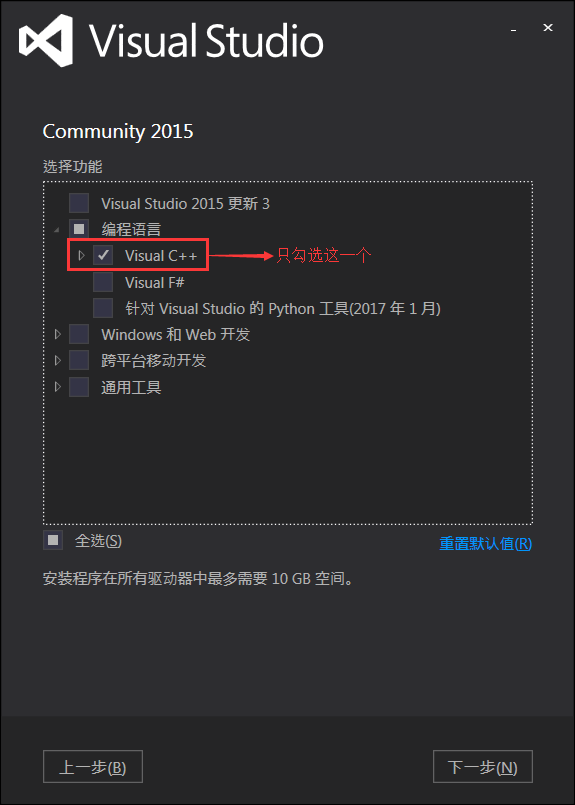
现在你需要打开你的vs2015进行安装,下载完成后应该是得到这些东西:

双击
 ,等待一段时间,
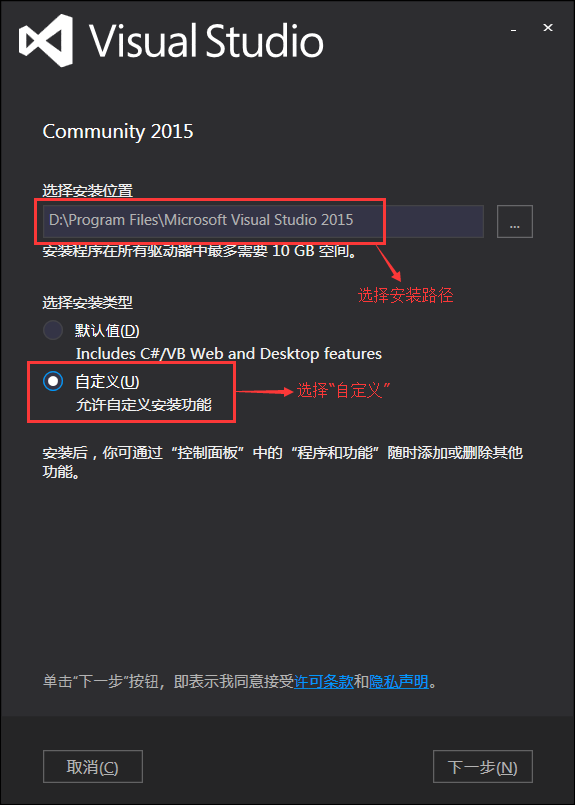
按照图示操作,然后点击下一步。
我们选择vs只是为了这个c++环境,如果你想用vs跑python也可以,不过我是用的pycharm。毕竟先入为主了。
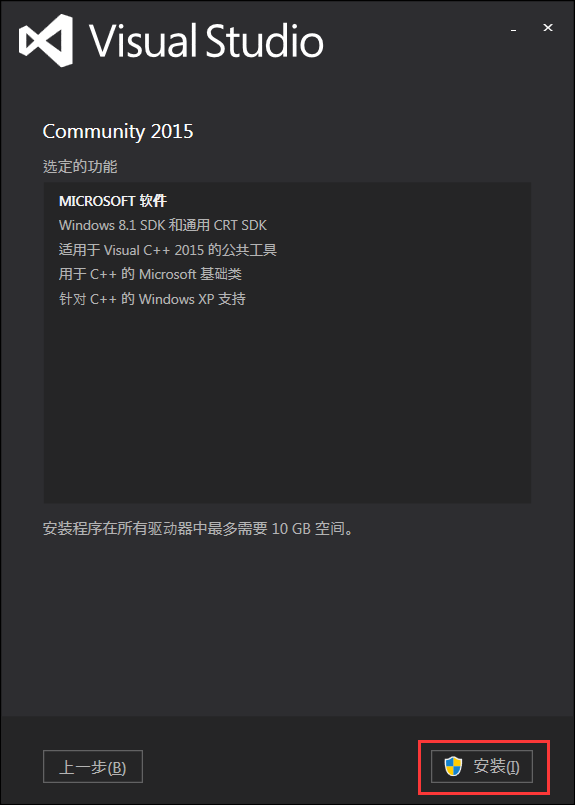
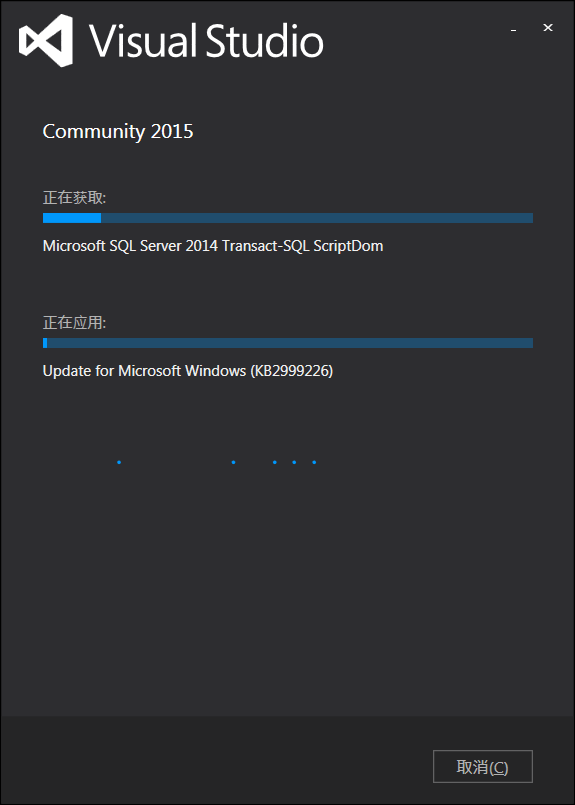
等安装完成我们进入下一步。
对了,这里有个事要说,如果你是第一次安装vs,那么恭喜你。如果你之前安装过vs,那就太好了,你需要把原来的vs彻底清除干净。至于怎么清除,你可以看看这个:
https://blog.csdn.net/a359877454/article/details/52679041
好的,现在需要安装的是这个:
DXSDK_jun10.exe
不用管,直接安装就可以,不管最后有没有error,只要过一遍就ok
接下来就是重头戏CUDA了,你要把你安装版本的全部内容下载下来,包括补丁包,然后先安装本体,再安装补丁包。

这是我下载的所有CUDA,一个本体+4个补丁包
如果一开始提示你不兼容,也没关系,只要把
里最后面那个driver components取消掉就可以了。
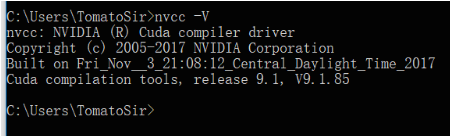
都安装完之后,检测一下是否安装成功:
解压cudnn,

里面有bin、include、lib三个目录,将三个文件夹复制到CUDA对应文件夹(实际上是将cuDNN这三个目录中的文件,添加到CUDA对应bin、include、lib文件夹中,CUDA对应文件夹不需要删除,也不会有文件被覆盖),默认文件夹在:C:\ProgramFiles\NVIDIA GPU Computing Toolkit\CUDA\v9.0,解压后的cudnn里除了这三个文件夹外还有一个文件,也需要放到v9.0的文件夹下
这一步完成之后需要编译一下cuda_samples,就是打开
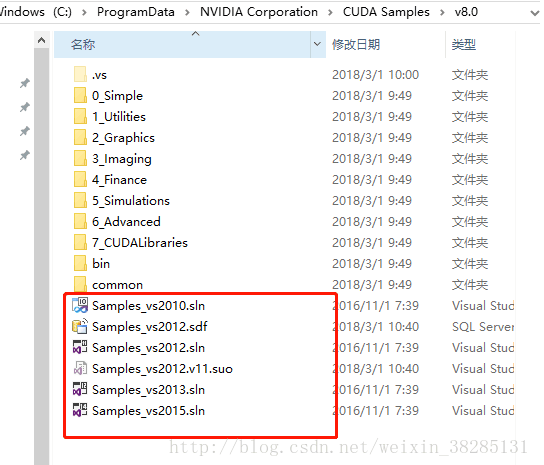
的文件,这里要选择你对应版本的vs文件,比如我用的vs2015,所以我打开vs2015.sln
打开后是这儿样的:

注意上面红框部分要选为64位和Release
然后在有边框找到1_ Utilities,然后右键选择Build
稍等片刻,下方会出现这样的字样:

那就对咯!
配置完成后,我们可以验证是否配置成功,主要使用CUDA内置的deviceQuery.exe 和 bandwithTest.exe:首先启动cmd,cd到安装目录下的C:\ProgramFiles\NVIDIA GPU Computing Toolkit\CUDA\v9.0\extras\demo_suite,然后分别执行bandwidthTest.exe和deviceQuery.exe,
我们需要关注的是最后的result是不是=pass
现在环境基本搭建完成了,最后一步就是安装gpu了。
我安装gpu的方法有点另类,是下载完成后再安装,而很多博主的安装方法是直接用pip或者是conda
我是小白哈,所以就下载后安装了,因为pip的速度太慢了
我们要做的就是找到下载好的whl文件

然后打开
首先要输入activate tf-gpu,这个tf-gpu是你当初给anaconda新建的环境记得名字
然后输入pip install,按一下空格,别回车,把你的whl文件拖进来,然后回车
接下来又是漫长的等待,直到安装完成。
安装完成,你的gpu就彻底搭建好了。现在你只需要打开你的pycharm,然后在file-setting-project;code里指定anaconda新环境的python(比如我这里是tf-gpu的python3.6)
然后点击确定就可以了。现在你就可以试试你的代码能不能在gpu里运行了!
需要注意一点,既然你已经装了gpu的tensorflow,就不要再装cpu了,一个环境下有俩tensorflow会起冲突。
在安装完这一切之后,我们可以输入以下代码,来检测还存在哪些问题:
import ctypes
import imp
import sys

def main():
try:
import tensorflow as tf
print("TensorFlow successfully installed.")
if tf.test.is_built_with_cuda():
print("The installed version of TensorFlow includes GPU support.")
else:
print("The installed version of TensorFlow does not include GPU support.")
sys.exit(0)
except ImportError:
print("ERROR: Failed to import the TensorFlow module.")

candidate_explanation = False

python_version = sys.version_info.major, sys.version_info.minor
print("\n- Python version is %d.%d." % python_version)
if not (python_version == (3, 5) or python_version == (3, 6)):
candidate_explanation = True
print("- The official distribution of TensorFlow for Windows requires "
"Python version 3.5 or 3.6.")

try:
_, pathname, _ = imp.find_module("tensorflow")
print("\n- TensorFlow is installed at: %s" % pathname)
except ImportError:
candidate_explanation = False
print("""
- No module named TensorFlow is installed in this Python environment. You may
install it using the command `pip install tensorflow`.""")

try:
msvcp140 = ctypes.WinDLL("msvcp140.dll")
except OSError:
candidate_explanation = True
print("""
- Could not load 'msvcp140.dll'. TensorFlow requires that this DLL be
installed in a directory that is named in your %PATH% environment
variable. You may install this DLL by downloading Microsoft Visual
C++ 2015 Redistributable Update 3 from this URL:
https://www.microsoft.com/en-us/download/details.aspx?id=53587""")

try:
cudart64_80 = ctypes.WinDLL("cudart64_80.dll")
except OSError:
candidate_explanation = True
print("""
- Could not load 'cudart64_80.dll'. The GPU version of TensorFlow
requires that this DLL be installed in a directory that is named in
your %PATH% environment variable. Download and install CUDA 8.0 from
this URL: https://developer.nvidia.com/cuda-toolkit""")

try:
nvcuda = ctypes.WinDLL("nvcuda.dll")
except OSError:
candidate_explanation = True
print("""
- Could not load 'nvcuda.dll'. The GPU version of TensorFlow requires that
this DLL be installed in a directory that is named in your %PATH%
environment variable. Typically it is installed in 'C:\Windows\System32'.
If it is not present, ensure that you have a CUDA-capable GPU with the
correct driver installed.""")

cudnn5_found = False
try:
cudnn5 = ctypes.WinDLL("cudnn64_5.dll")
cudnn5_found = True
except OSError:
candidate_explanation = True
print("""
- Could not load 'cudnn64_5.dll'. The GPU version of TensorFlow
requires that this DLL be installed in a directory that is named in
your %PATH% environment variable. Note that installing cuDNN is a
separate step from installing CUDA, and it is often found in a
different directory from the CUDA DLLs. You may install the
necessary DLL by downloading cuDNN 5.1 from this URL:
https://developer.nvidia.com/cudnn""")

cudnn6_found = False
try:
cudnn = ctypes.WinDLL("cudnn64_6.dll")
cudnn6_found = True
except OSError:
candidate_explanation = True

if not cudnn5_found or not cudnn6_found:
print()
if not cudnn5_found and not cudnn6_found:
print("- Could not find cuDNN.")
elif not cudnn5_found:
print("- Could not find cuDNN 5.1.")
else:
print("- Could not find cuDNN 6.")
print("""
The GPU version of TensorFlow requires that the correct cuDNN DLL be installed
in a directory that is named in your %PATH% environment variable. Note that
installing cuDNN is a separate step from installing CUDA, and it is often
found in a different directory from the CUDA DLLs. The correct version of
cuDNN depends on your version of TensorFlow:

* TensorFlow 1.2.1 or earlier requires cuDNN 5.1. ('cudnn64_5.dll')
* TensorFlow 1.3 or later requires cuDNN 6. ('cudnn64_6.dll')

You may install the necessary DLL by downloading cuDNN from this URL:
https://developer.nvidia.com/cudnn""")

if not candidate_explanation:
print("""
- All required DLLs appear to be present. Please open an issue on the
TensorFlow GitHub page: https://github.com/tensorflow/tensorflow/issues""")

sys.exit(-1)

if __name__ == "__main__":
main()
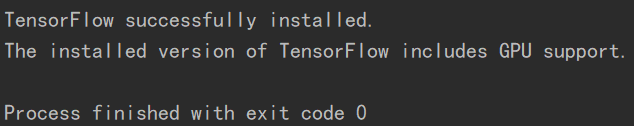
如果得到的结果是这样的,那么恭喜你,你成功安装了tensorflow-gpu,之后你可以随便检测你编写的代码了!
说明:以上内容是博主总结大量安装攻略后得出的,自己也是按照这方法安装的,虽然出了很多差错,但最后还是成功搭建了gpu环境。
上述内容不一定对任何人都有用,只是博主自己这样安装的,如实地总结了出来。如果你按照上述方法安装失败,可以百度一下别人的方法,放心,安装失败不会对你的电脑造成影响,我安装失败了3次,用了三天时间,最后才安装成功。

- 环境搭建 | 深度学习爱好者如何配置带GPU电脑环境
- Ubuntu16.04 深度学习环境搭建流程GPU版
- 深度学习环境搭建(Win10+CUDA+CuDNN+Tensorflow-GPU)
- ubuntu+cuda+theano+keras搭建基于GPU的深度学习环境
- 深度学习caffe无GPU环境搭建记录
- 使用Amazon AWS搭建GPU版tensorflow深度学习环境
- 深度学习tensorflow-gpu环境搭建避坑指南-win10_anaconda_python3.5_cuda8.0
- 搭建个人深度学习环境(一)—— 单GPU主机配置
- deepin linux 15.5 + 小米笔记本pro 下的深度学习环境tensorflow-gpu 1.4版本搭建过程
- Ubuntu18.04安装CUDA9.0,cudnn7.1.3,opencv3.4 tensorflow GPU 1.10 搭建GTX1070深度学习环境
- 深度学习环境搭建之CentOS 7+NVIDIA GPU+CUDA8.0+CUDNN6.0+TensorFlow
- Win10搭建深度学习环境tensorflow-gpu+keras,把GPU调用起来
- 【深度学习】笔记13 win10+cuda7.5+caffe+vs2013环境搭建(GPU版本)
- 深度学习平台Theano环境搭建【GPU版】
- 深度学习环境搭建及GPU运算
- 深度学习pytorch环境搭建+nvidia驱动+cuda+pytorch-gpu
- 【深度学习】笔记1_Ubuntu14.04下caffe环境的搭建,无GPU版本以及python可视化环境的配置
- 深度学习GPU环境搭建:ubuntu16.04+GTX1070+Cuda8.0+tensorflow build from source
- 如何在Windows 10中搭建深度学习环境
- 如何在Ubuntu下安装Anaconda及搭建环境安装TensorFlow深度学习框架