基于Tensorflow和CNN实现验证码图片识别
卷积神经网络自从被提出开始,就受到人们的广泛欢迎,它在图像识别、语音识别、自然语言处理任务中扮演着重要的角色,在此基础上衍生出的网络模型更是层出不穷。进行验证码识别时,使用传统的Tesseract OCR、OpenCV等方法都需要对验证码进行分割,而且在字符粘连的情况下不宜分割,得到的结果很差。本文利用Tensorflow深度学习框架,使用CNN算法完成验证码图像的端到端识别。
作为一只入门的DL小白,在此总结了自己学习CNN识别验证码图片的心得。代码主要参考的是这位大佬的博客tensorflow实现验证码识别。
1.实验整体设计
本实验采用了4层卷积层和池化层分别实现特征提取与降维,把卷积得到的二维特征图转换成一维特征作为全连接层的输入,进行高度的特征提纯,然后把输出送到softmax层的分类器。

2.实验步骤
2.1 验证码图片生成
验证码类型是由0到9十个数字组成的字符型验证码(为了节省时间和资源,采用最简单的数字字符),使用python的Captcha库产生验证码图像。主要代码如下:
def gen_verifycode_img(gen_dir, total_size, chars_set, chars_num, img_height, img_width, font_sizes):
if not os.path.exists(gen_dir):
os.makedirs(gen_dir)
image = ImageCaptcha(width=img_width, height=img_height, font_sizes=font_sizes)
for i in range(total_size):
label = ''.join(random.sample(chars_set, chars_num))
image.write(label, os.path.join(gen_dir, label+'_num'+str(i)+'.png'))
其中可以自定义font_sizes调整图片中生成的字符大小。
2.2 图片的预处理
对图片的标签进行独热编码,最后把图片数据和标签数据保存为TFRecords文件方便训练时数据的读取。
我们的数据样本有四位,每位上有10种不同的取值,使用One-hot编码可以表示出10000种特征。
例如5178的one-hot编码如下:

TFRecords文件是TensorFlow专门使用的数据文件格式。这种文件格式包含了tf.train.Example协议内存块,它的数据格式只包括数据特征值与数据内容。
tf.train.Example中有若干数据的特征(Features) ,并且Features 中又存在着Feature字典。而且任意一个Feature字典中的数据类型来自FloatList,ByteList,或者Int64List这3种数据类型。TFRecords通过含有二进制文件的数据文件保存用于TensorFlow读取数据的特征和标签。
以下是Example的结构:

保存为TFRecords文件之前,由于图像中有很多噪点和干扰线,这里进行了降噪的处理。首先对图片进行灰度化和二值化,然后使用8邻域降噪,最后采用了中值滤波进一步去噪。中值滤波的过程:把每个像素点的某邻域窗口内的全部像素点灰度值的中值赋为该像素点的灰度值,对消除椒盐噪声的效果较好。(然而降噪这一步完全可以省略,在相同条件下,我发现不降噪的图片的准确率更高(96.8%),而做了处理的为95.4%,我认为降噪过程导致了一些图片丢失了重要的信息,因为相同的降噪参数不会可能满足所有的图片,严重的可能导致图片失真,人眼都难以识别。)下面是字符9731降噪后不同的效果:

2.3 构建CNN训练模块
本实验采用的卷积神经网络结构为4层卷积层+4层池化层+2层全连接网络+1层softmax层,具体的结构如下:

下面是网络的训练过程:

2.4 验证码识别测试
测试流程:

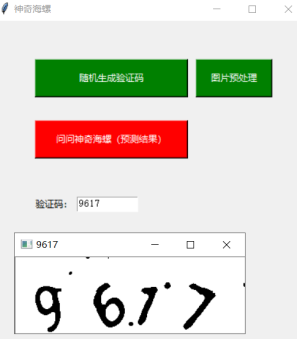
2.5 图形界面
通过captcha库随机产生一张验证码图片,再对其进行预处理作为预测的输入。对输入的图片像素进行归一化处理,将训练好的模型参数提取出来,将图片送入网络模型,输出结果的shape=[1,4,10],取其第三维最大值对应的下标并返回,再将下标转换成文本便得到了验证码的字符串。
训练集为10000张验证码图片,图片大小为60*160,测试集为6000张,使用测试集在训练好的模型上测试,测试的准确率为95.4%。
以下是一次预测的过程:

3.实验总结
- 使用BP算法计算梯度时需要大规模数据,耗费大量计算时间
- 在池化层可能丢失大量有用信息,忽略了局部和整体之间的关联性
- 训练时最好使用GPU,需要不断调整超参数(我使用1050ti训练1w数据花了33分钟,CPU的话10h+。。。。)
- 物理含义不明确,不清楚每个卷积层具体提取的特征是什么(CNN就像一个黑盒子)
4.源代码
import random
import os
from captcha.image import ImageCaptcha
import cv2
import numpy as np
import tensorflow as tf
from PIL import Image
import scipy.signal as signal
from os import listdir

TRAIN_SIZE = 10000
VALID_SIZE = 6000
CHAR_SET = '0123456789'
CHAR_NUM = 4
IMG_HEIGHT = 60
IMG_WIDTH = 160
FONT_SIZES = [60]
TRAIN_IMG_PATH = './train_image'
VALID_IMG_PATH = './valid_image'
TRAIN_RECORDS_NAME = 'traindata.tfrecords'
TRAIN_VALIDATE_NAME = 'validatedata.tfrecords'
LOG_DIR = './log_/'
MODEL_DIR = './model'
BATCH_SIZE = 80

#生成验证码图片
def gen_verifycode_img(gen_dir, total_size, chars_set, chars_num, img_height, img_width, font_sizes):
if not os.path.exists(gen_dir):
os.makedirs(gen_dir)
image = ImageCaptcha(width=img_width, height=img_height, font_sizes=font_sizes)
for i in range(total_size):
label = ''.join(random.sample(chars_set, chars_num))
image.write(label, os.path.join(gen_dir, label+'_num'+str(i)+'.png'))
#灰度化、二值化
def binarizing(img,threshold=200):
image = Image.open(img).convert('L')
pixdata = image.load()
w,h = image.size
for y in range(h):
for x in range(w):
if pixdata[x,y]<threshold:
pixdata[x,y] = 0
else:
pixdata[x,y] = 255
return image
#8邻域降噪
def depoint(img):
pixdata = img.load()
w,h = img.size
for y in range(1,h-1):
for x in range(1,w-1):
count = 0.0
if pixdata[x,y-1] > 245:
count += 1
if pixdata[x, y+1] > 245:
count += 1
if pixdata[x-1,y] > 245:
count += 1
if pixdata[x+1,y] > 245:
count += 1
if pixdata[x+1,y+1] > 245:
count += 0.5
if pixdata[x+1,y-1] > 245:
count += 0.5
if pixdata[x-1,y+1] > 245:
count += 0.5
if pixdata[x-1,y-1] > 245:
count += 0.5
if count > 3:
pixdata[x,y] = 255
return img

def arrayConvert(img):
return np.array(img)
#图片预处理
def preprocess(path):
imgList = listdir(path)
m = len(imgList)
for i in range(m):
strName = imgList[i].split('.')[0]
gray = depoint(binarizing(path+'/'+imgList[i]))
res = cv2.medianBlur(arrayConvert(gray),5)
cv2.imwrite(path+'/'+strName+'.png',res)
return None

#生成不落地的验证码图片
def gen_a_verifycode():
image = ImageCaptcha(width=IMG_WIDTH, height=IMG_HEIGHT, font_sizes=FONT_SIZES)
#join()将列表转换成字符串
label = ''.join(random.sample(CHAR_SET, CHAR_NUM))
img = image.generate_image(label)
return np.array(img), label

#独热码转文本
def one_hot_to_texts(one_hot_code):
texts = []
#print(one_hot_code.shape)shape=[1,4]
for i in range(one_hot_code.shape[0]):#one_hot_code.shape[0]=1
index = one_hot_code[i]#得到长度为4的列表
texts.append(''.join([CHAR_SET[i] for i in index]))
return texts

#文本转独热码
def label_to_one_hot(label, chars_num=CHAR_NUM, char_set=CHAR_SET):
one_hot_label = np.zeros([chars_num, len(char_set)])
offset = []
index = []
for i, c in enumerate(label):
offset.append(i)
index.append(char_set.index(c))
one_hot_index = [offset, index]
one_hot_label[one_hot_index] = 1.0
return one_hot_label.astype(np.float32)

#转换成TFrecords
def conver_to_tfrecords(data_set, label_set, name):
def _int64_feature(value):
return tf.train.Feature(int64_list=tf.train.Int64List(value=[value]))

def _bytes_feature(value):
return tf.train.Feature(bytes_list=tf.train.BytesList(value=[value]))

print('正在转换成tfrecords', name)
writer = tf.python_io.TFRecordWriter(name)
num_examples = len(data_set)
for index in range(num_examples):
image = data_set[index]
height = image.shape[0]
width = image.shape[1]
# toString 方法返回一个字符串,该字符串由数组中的每个元素的 toString()
# 返回值经调用 join() 方法连接(由逗号隔开)组成
image_raw = image.tostring()
label = label_set[index]
label_raw = label_to_one_hot(label).tostring()
example = tf.train.Example(features=tf.train.Features(feature={
'height': _int64_feature(height),
'width': _int64_feature(width),
'label_raw': _bytes_feature(label_raw),
'image_raw': _bytes_feature(image_raw)}))
writer.write(example.SerializeToString())
writer.close()
print('转换完毕!')

#生成名字列表和标签列表
def create_data_list(image_dir):
if not os.path.exists(image_dir):
return None, None
images = []
labels = []
for file_name in os.listdir(image_dir):
image = cv2.imread(os.path.join(image_dir, file_name), 0)
input_img = np.array(image, dtype='float32')
label_name = os.path.basename(file_name).split('_')[0]
images.append(input_img)
labels.append(label_name)
#print(images[0])每个元素是图像灰度值组成的60*160的矩阵
#print(labels[0])每个元素是图像的标签(验证码数字)
return images, labels

def read_and_decode(filename_queue, img_height=IMG_HEIGHT, img_width=IMG_WIDTH, chars_num=CHAR_NUM, classes_num=len(CHAR_SET)):
reader = tf.TFRecordReader()
#使用reader函数读入tfrecords内容,返回的是(key,value)
_, serialized_example = reader.read(filename_queue)
#返回一个dict,映射功能键到tensor
features = tf.parse_single_example(
serialized_example,
features={
'image_raw': tf.FixedLenFeature([], tf.string),
'label_raw': tf.FixedLenFeature([], tf.string),
})

#tf.decode_raw是将原来编码为字符串类型的变量重新变回来,图片在存储是以字符串存储的矩阵
image = tf.decode_raw(features['image_raw'], tf.float32)
image.set_shape([img_height * img_width])
#tf.cast用于数据类型的转变,不会改变原始数据的值还有形状
#在流中抛出img张量,归一化像素
image = tf.cast(image, tf.float32) * (1.0 / 255)-0.5
reshape_image = tf.reshape(image, [img_height, img_width, 1])
label = tf.decode_raw(features['label_raw'], tf.float32)
label.set_shape([chars_num * classes_num])
reshape_label = tf.reshape(label, [chars_num, classes_num])
return tf.cast(reshape_image, tf.float32), tf.cast(reshape_label, tf.float32)

#tf.train.batch() 按顺序读取队列中的数据
#队列中的数据始终是一个有序的队列.队头一直按顺序补充,队尾一直按顺序出队.
#tf.train.shuffle_batch() 将队列中数据打乱后再读取出来.
#函数是先将队列中数据打乱,然后再从队列里读取出来,因此队列中剩下的数据也是乱序的.
def inputs(train, batch_size, epoch):
filename = os.path.join('./', TRAIN_RECORDS_NAME if train else TRAIN_VALIDATE_NAME)

with tf.name_scope('input'):
filename_queue = tf.train.string_input_producer([filename], num_epochs=epoch)
image, label = read_and_decode(filename_queue)
# 如果现在是训练,打乱顺序再一个一个batch的拿数据,如果是验证就按顺序拿batch
if train:
images, sparse_labels = tf.train.shuffle_batch([image, label], batch_size=batch_size, num_threads=6, capacity=2000 + 3 * batch_size, min_after_dequeue=2000)
else:
images, sparse_labels = tf.train.batch([image, label], batch_size=batch_size, num_threads=6, capacity=2000 + 3 * batch_size)

return images, sparse_labels

if __name__ == '__main__':
print('在%s生成%d个验证码' % (TRAIN_IMG_PATH, TRAIN_SIZE))
gen_verifycode_img(TRAIN_IMG_PATH, TRAIN_SIZE, CHAR_SET, CHAR_NUM, IMG_HEIGHT, IMG_WIDTH, FONT_SIZES)
print('在%s生成%d个验证码' % (VALID_IMG_PATH, VALID_SIZE))
gen_verifycode_img(VALID_IMG_PATH, VALID_SIZE, CHAR_SET, CHAR_NUM, IMG_HEIGHT, IMG_WIDTH, FONT_SIZES)
print('生成完毕')
#开始生成record文件
#把训练图转成tfrecords
preprocess(TRAIN_IMG_PATH)
training_data, training_label = create_data_list(TRAIN_IMG_PATH)
conver_to_tfrecords(training_data, training_label, TRAIN_RECORDS_NAME)
# 把验证图转成tfrecords
preprocess(VALID_IMG_PATH)
validation_data, validation_label = create_data_list(VALID_IMG_PATH)
conver_to_tfrecords(validation_data, validation_label, TRAIN_VALIDATE_NAME)
import tensorflow as tf
import numpy as np
import time
from datetime import datetime
import utility
import math
import os
import cv2

class verify_code_network(object):
def __init__(self, is_training=True):
#一堆常量
self.__IMAGE_HEIGHT = utility.IMG_HEIGHT
self.__IMAGE_WIDTH = utility.IMG_WIDTH
self.__CHAR_SETS = utility.CHAR_SET
self.__CLASSES_NUM = len(self.__CHAR_SETS)
self.__CHARS_NUM = utility.CHAR_NUM
self.__TRAIN_IMG_DIR = utility.TRAIN_IMG_PATH
self.__VALID_DIR = utility.VALID_IMG_PATH
self.__BATCH_SIZE = utility.BATCH_SIZE
if is_training == False:
self.__image = tf.placeholder(tf.float32, shape=[1, utility.IMG_HEIGHT, utility.IMG_WIDTH, 1])
self.__logits = self.__inference(self.__image, keep_prob=1)
self.__result = self.output(self.__logits)
self.__sess = tf.Session()
saver = tf.train.Saver()
saver.restore(self.__sess, tf.train.latest_checkpoint('./1e-3/model_1e-4'))

'''
一堆在定义model的时候要用到的小工具函数
'''
def __conv2d(self, value, weight):
#padding参数的作用是决定在进行卷积或池化操作时,是否对输入的图像矩阵边缘补0,'SAME' 为补零,'VALID' 则不补,
#其原因是因为在这些操作过程中过滤器可能不能将某个方向上的数据刚好处理完
return tf.nn.conv2d(value, weight, strides=[1, 1, 1, 1], padding='SAME')

def __max_pool_2x2(self, value, name):
return tf.nn.max_pool(value, ksize=[1, 2, 2, 1], strides=[1, 2, 2, 1], padding='SAME', name=name)

def __weight_variable(self, name, shape):
#truncated_normal_initializer从截断的正态分布中输出随机值
#生成的值服从具有指定平均值和标准偏差的正态分布,stddev是要生成随机值的标准方差
initializer = tf.truncated_normal_initializer(stddev=0.1)
var = tf.get_variable(name, shape, initializer=initializer, dtype=tf.float32)
return var

def __bias_variable(self, name, shape):
#偏置项被初始化为0.1
initializer = tf.constant_initializer(0.1)
var = tf.get_variable(name, shape, initializer=initializer, dtype=tf.float32)
return var

#推理
def __inference(self, images, keep_prob):
#-1代表的含义是不用我们自己指定这一维的大小,函数会自动计算,但列表中只能存在一个-1。
#卷积的输入图像,batch_size,高度,宽度,通道数
#其中通道数为1,tensor被解释为灰度图像
images = tf.reshape(images, (-1, utility.IMG_HEIGHT, utility.IMG_WIDTH, 1))
# 用于tensorboard中可视化原图
#将【计算图】中的【图像数据】写入TensorFlow中的【日志文件】
tf.summary.image('src_img', images, 5)#输出带有图像的summary协议缓冲区
#使用tf.variable_scope共享变量
#必须要在tf.variable_scope的作用域下使用tf.get_variable()函数
#tf.get_variable拥有一个变量检查机制,会检测已经存在的变量是否设置为共享变量,如果已经存在的变量没有设置为共享变量,
# TensorFlow 运行到第二个拥有相同名字的变量的时候,就会报错。
with tf.variable_scope('conv1') as scope:
#高度,宽度,图像通道数,卷积核个数
kernel = self.__weight_variable('weights_1', shape=[5, 5, 1, 64])
biases = self.__bias_variable('biases_1', [64])
#一个叫bias的向量加到一个叫value的矩阵上,是向量与矩阵的每一行进行相加,得到的结果和value矩阵大小相同。
pre_activation = tf.nn.bias_add(self.__conv2d(images, kernel), biases)
conv1 = tf.nn.relu(pre_activation, name=scope.name)#tf.nn.relu()是将大于0的数保持不变,小于0的数置为0
tf.summary.histogram('conv1/weights_1', kernel)#输出带有直方图的summary协议缓冲区
tf.summary.histogram('conv1/biases_1', biases)
#经过第一次卷积后图像的通道数变为64,64个特征图
kernel_2 = self.__weight_variable('weights_2', shape=[5, 5, 64, 64])
biases_2 = self.__bias_variable('biases_2', [64])
pre_activation = tf.nn.bias_add(self.__conv2d(conv1, kernel_2), biases_2)
conv2 = tf.nn.relu(pre_activation, name=scope.name)#shape:[80,60,160,64]
tf.summary.histogram('conv1/weights_2', kernel_2)
tf.summary.histogram('conv1/biases_2', biases_2)
# 用于可视化第一层卷积后的图像
conv1_for_show1 = tf.reshape(conv1[:, :, :, 1], (-1, 60, 160, 1))
conv1_for_show2 = tf.reshape(conv1[:, :, :, 2], (-1, 60, 160, 1))
conv1_for_show3 = tf.reshape(conv1[:, :, :, 3], (-1, 60, 160, 1))
tf.summary.image('conv1_for_show1', conv1_for_show1, 5)#输出带有5张图像的summary协议缓存区,通道1
tf.summary.image('conv1_for_show2', conv1_for_show2, 5)#输出带有5张图像的summary协议缓存区,通道2
tf.summary.image('conv1_for_show3', conv1_for_show3, 5)#输出带有5张图像的summary协议缓存区,通道3
# max pooling
pool1 = self.__max_pool_2x2(conv1, name='pool1')#shape:[80,30,80,64]

with tf.variable_scope('conv2') as scope:
kernel = self.__weight_variable('weights_1', shape=[5, 5, 64, 64])
biases = self.__bias_variable('biases_1', [64])
pre_activation = tf.nn.bias_add(self.__conv2d(pool1, kernel), biases)
conv2 = tf.nn.relu(pre_activation, name=scope.name)
tf.summary.histogram('conv2/weights_1', kernel)
tf.summary.histogram('conv2/biases_1', biases)

kernel_2 = self.__weight_variable('weights_2', shape=[5, 5, 64, 64])
biases_2 = self.__bias_variable('biases_2', [64])
pre_activation = tf.nn.bias_add(self.__conv2d(conv2, kernel_2), biases_2)
conv2 = tf.nn.relu(pre_activation, name=scope.name)#shape:[80,30,80,64]
tf.summary.histogram('conv2/weights_2', kernel_2)
tf.summary.histogram('conv2/biases_2', biases_2)
# 用于可视化第二层卷积后的图像
conv2_for_show1 = tf.reshape(conv2[:, :, :, 1], (-1, 30, 80, 1))
conv2_for_show2 = tf.reshape(conv2[:, :, :, 2], (-1, 30, 80, 1))
conv2_for_show3 = tf.reshape(conv2[:, :, :, 3], (-1, 30, 80, 1))
tf.summary.image('conv2_for_show1', conv2_for_show1, 5)
tf.summary.image('conv2_for_show2', conv2_for_show2, 5)
tf.summary.image('conv2_for_show3', conv2_for_show3, 5)
# max pooling
pool2 = self.__max_pool_2x2(conv2, name='pool2')

with tf.variable_scope('conv3') as scope:
kernel = self.__weight_variable('weights', shape=[3, 3, 64, 64])
biases = self.__bias_variable('biases', [64])
pre_activation = tf.nn.bias_add(self.__conv2d(pool2, kernel), biases)
conv3 = tf.nn.relu(pre_activation, name=scope.name)
tf.summary.histogram('conv3/weights', kernel)
tf.summary.histogram('conv3/biases', biases)
kernel_2 = self.__weight_variable('weights_2', shape=[3, 3, 64, 64])
biases_2 = self.__bias_variable('biases_2', [64])
pre_activation = tf.nn.bias_add(self.__conv2d(conv3, kernel_2), biases_2)
conv3 = tf.nn.relu(pre_activation, name=scope.name)#shape:[80,15,40,64]
tf.summary.histogram('conv3/weights_2', kernel_2)
tf.summary.histogram('conv3/biases_2', biases_2)
conv3_for_show1 = tf.reshape(conv3[:, :, :, 1], (-1, 15, 40, 1))
conv3_for_show2 = tf.reshape(conv3[:, :, :, 2], (-1, 15, 40, 1))
conv3_for_show3 = tf.reshape(conv3[:, :, :, 3], (-1, 15, 40, 1))
tf.summary.image('conv3_for_show1', conv3_for_show1, 5)
tf.summary.image('conv3_for_show2', conv3_for_show2, 5)
tf.summary.image('conv3_for_show3', conv3_for_show3, 5)
pool3 = self.__max_pool_2x2(conv3, name='pool3')#shape:[80,8,20,64]

with tf.variable_scope('conv4') as scope:
kernel = self.__weight_variable('weights', shape=[3, 3, 64, 64])
biases = self.__bias_variable('biases', [64])
pre_activation = tf.nn.bias_add(self.__conv2d(pool3, kernel), biases)
conv4 = tf.nn.relu(pre_activation, name=scope.name)#shape:[80,8,20,64]

tf.summary.histogram('conv4/weights', kernel)
tf.summary.histogram('conv4/biases', biases)

conv4_for_show1 = tf.reshape(conv4[:, :, :, 1], (-1, 8, 20, 1))
conv4_for_show2 = tf.reshape(conv4[:, :, :, 2], (-1, 8, 20, 1))
conv4_for_show3 = tf.reshape(conv4[:, :, :, 3], (-1, 8, 20, 1))
tf.summary.image('conv4_for_show1', conv4_for_show1, 5)
tf.summary.image('conv4_for_show2', conv4_for_show2, 5)
tf.summary.image('conv4_for_show3', conv4_for_show3, 5)
pool4 = self.__max_pool_2x2(conv4, name='pool4')#shape:[80,4,10,64]

#全连接层
with tf.variable_scope('local1') as scope:
reshape = tf.reshape(pool4, [images.get_shape()[0].value, -1])
weights = self.__weight_variable('weights', shape=[4*10*64, 1024])#2560*1024,输入层2560个神经元,隐藏层1024个神经元
biases = self.__bias_variable('biases', [1024])
#tf.matmul进行矩阵乘法
local1 = tf.nn.relu(tf.matmul(reshape, weights) + biases, name=scope.name)
tf.summary.histogram('local1/weights', kernel)
tf.summary.histogram('local1/biases', biases)
#dropout防止或者减轻过拟合
local1_drop = tf.nn.dropout(local1, keep_prob)
tf.summary.tensor_summary('local1/dropout', local1_drop)#输出一个序列化的协议缓冲区

#输出层,神经元个数为40个
with tf.variable_scope('softmax_linear') as scope:
weights = self.__weight_variable('weights', shape=[1024, self.__CHARS_NUM * self.__CLASSES_NUM])
biases = self.__bias_variable('biases', [self.__CHARS_NUM * self.__CLASSES_NUM])
result = tf.add(tf.matmul(local1_drop, weights), biases, name=scope.name)

reshaped_result = tf.reshape(result, [-1, self.__CHARS_NUM, self.__CLASSES_NUM])#shape:[80,4,10]
return reshaped_result

#计算cost
def __loss(self, logits, labels):
#先对网络最后一层的输出做一个softmax,这一步通常是求取输出属于某一类的概率
#第二步是softmax的输出向量[Y1,Y2,Y3...]和样本的实际标签做一个交叉熵,返回一个向量
cross_entropy = tf.nn.softmax_cross_entropy_with_logits(labels=labels, logits=logits, name='corss_entropy_per_example')
#对向量求均值
cross_entropy_mean = tf.reduce_mean(cross_entropy, name='cross_entropy')
#tf.add_to_collection:对当前计算图添加张量集合
tf.add_to_collection('losses', cross_entropy_mean)
#tf.get_collection:返回当前计算图中手动添加的张量集合
#tf.add_n实现列表元素的相加
total_loss = tf.add_n(tf.get_collection('losses'), name='total_loss')
# print(total_loss)
# print(total_loss.shape)
tf.summary.scalar('loss', total_loss)#输出仅有一个标量值的summary协议缓冲区
return total_loss

#训练
def __training(self, loss):
#tf.train.AdamOptimizer()
#AdamOptimizer是利用自适应学习率的优化算法
#通过计算梯度的一阶矩估计和二 阶矩估计而为不同的参数设计独立的自适应性学习率。
#Adam 也是基于梯度下降的方法,但是每次迭代参数的学习步长都有一个确定的范围,
# 不会因为很大的梯度导致很大的学习步长,参数的值比较稳定
#optimizer = tf.train.AdamOptimizer(1e-4).minimize(loss)

optimizer = tf.train.AdamOptimizer(1e-3).minimize(loss)
return optimizer

#评估正确度
def __evaluation(self, logits, labels):
with tf.name_scope('evaluation'):
#根据axis取值的不同返回该维度最大值的索引
#logits:[80,4,10],labels:[80,4,10]
#tf.equal返回布尔值
#比较网络输出的第三维的最大值的索引是否和数据标签的索引一致,若一致则卷积神经网络输出正确
correct_prediction = tf.equal(tf.argmax(logits, 2), tf.argmax(labels, 2))
#对每一行求平均值
correct_batch = tf.reduce_mean(tf.cast(correct_prediction, tf.int32), 1)
accuracy = tf.reduce_sum(tf.cast(correct_batch, tf.int32))
tf.summary.scalar('accuracy', accuracy)
return accuracy

def train(self):
if not os.path.exists(utility.LOG_DIR):
os.mkdir(utility.LOG_DIR)
if not os.path.exists(utility.MODEL_DIR):
os.mkdir(utility.MODEL_DIR)
step = 0
#images:[80,60,160,1]
#labels:[80,4,10]
images, labels = utility.inputs(train=True, batch_size=utility.BATCH_SIZE, epoch=200)
#print(labels)
logits = self.__inference(images, 0.5)#得到的logits:[80,4,10]
loss = self.__loss(logits, labels)
train_op = self.__training(loss)
accuracy = self.__evaluation(logits, labels)#计算正确的个数
saver = tf.train.Saver()#用来保存训练模型
summary_op = tf.summary.merge_all()#merge_all 可以将所有summary全部保存到磁盘,以便tensorboard显示。
with tf.Session() as sess:
#初始化模型的参数
tf.global_variables_initializer().run()
tf.local_variables_initializer().run()
#指定一个文件用来保存图
writer = tf.summary.FileWriter(utility.LOG_DIR, sess.graph)
#实例化一个线程协调器,主线程从队列里拿数据进行训练,子线程用于给队列送数据
coord = tf.train.Coordinator()
tf.train.start_queue_runners()
#tf.train.start_queue_runners会把graph里的所有队列run起来,并返回管理队列的对应的子线程
threads = tf.train.start_queue_runners(sess=sess, coord=coord)
try:
step = 0
#只要有任何一个线程调用了Coordinator的request_stop方法,
#所有的线程都可以通过should_stop方法感知并停止当前线程。
while not coord.should_stop():
start_time = time.time()
_, loss_value, performance, summaries = sess.run([train_op, loss, accuracy, summary_op])
duration = time.time() - start_time
if step % 2 == 0:
print('>> 已训练%d个批次: loss = %.2f (%.3f sec), 该批正确数量 = %d' % (step, loss_value, duration, performance))
if step % 100 == 0:
#调用train_writer的add_summary方法将训练过程以及训练步数保存
writer.add_summary(summaries, step)
saver.save(sess, utility.MODEL_DIR, global_step=step)#调用 saver.save() 方法,
# 向文件夹中写入包含当前模型中所有可训练变量的 checkpoint 文件
step += 1
#epoch读完后产生该错误
except tf.errors.OutOfRangeError:
print('训练结束')
saver.save(sess, utility.MODEL_DIR, global_step=step)
coord.request_stop()

finally:
coord.request_stop()
#等待所有线程退出
coord.join(threads)

def valid(self):
images, labels = utility.inputs(train=False, batch_size=100, epoch=None)
logits = self.__inference(images, keep_prob=1)
eval_correct = self.__evaluation(logits, labels)#计算正确的个数
sess = tf.Session()
saver = tf.train.Saver()
#将训练好的参数从最新的checkpoint文件中提取出来
#Saver类训练完后,是以checkpoints文件形式保存。提取的时候也是从checkpoints文件中恢复变量
# Checkpoints文件是一个二进制文件,它把变量名映射到对应的tensor值 。
saver.restore(sess, tf.train.latest_checkpoint(utility.MODEL_DIR))
coord = tf.train.Coordinator()
#启动计算图中的所有队列线程
threads = tf.train.start_queue_runners(sess=sess, coord=coord)
try:
num_iter = utility.VALID_SIZE/100#迭代次数=样本数/bitch-size
true_count = 0
total_true_count = 0
total_sample_count = utility.VALID_SIZE
step = 0
while step < num_iter and not coord.should_stop():
true_count = sess.run(eval_correct)#计算正确的个数
total_true_count += true_count
step += 1
precision = total_true_count / total_sample_count
print('正确数量/总数: %d/%d 正确率 = %.3f' % (total_true_count, total_sample_count, precision))
except Exception as e:
coord.request_stop(e)
finally:
coord.request_stop()
coord.join(threads)
sess.close()

def predict(self, image):
#image = cv2.cvtColor(image, cv2.COLOR_BGR2GRAY)
image = image.reshape((utility.IMG_HEIGHT, utility.IMG_WIDTH, 1))
input_img = np.array(image, dtype='float32')
input_img = input_img/255.0-0.5#归一化像素
#输入图片进行推断,输出的shape=[1,4]
predict_result = self.__sess.run(self.__result, feed_dict={self.__image : [input_img]})
text = utility.one_hot_to_texts(predict_result)#独热码转换成文本
return text

def output(self, logits):
#返回第三位最大值的索引,shape=[1,4]
return tf.argmax(logits, 2)
import tensorflow as tf
import os
from verifyCodeNetwork import verify_code_network

if __name__ == '__main__':
vcn = verify_code_network()
vcn.train()#训练时使用
#vcn.valid()#测试时使用
import tkinter as tk
from tkinter import *
from verifyCodeNetwork import verify_code_network
import utility
import cv2

#窗体
class Application(Frame):
def __init__(self, master=None):
super().__init__(master)
self._text_answers = None
self._master = master
self._capchas_img = None
self._create_widgets(master)
#加载模型
self._vcn = verify_code_network(is_training=False)

#构建窗体
def _create_widgets(self, master):
master.title('神奇海螺')
master.geometry("410x420")
Button(master, text='随机生成验证码',bg='green',fg='white', command=self.gen_a_verifycode).place(x=55, y=50, width=200, height=50)
Button(master,text = '图片预处理',bg='green',fg='white', command=self.process).place(x=265, y=50, width=100, height=50)

Button(master, text='问问神奇海螺(预测结果)',bg='red',fg='white', command=self.predict_captchas).place(x=55, y=130, width=200, height=50)
Label(master, text='验证码:').place(x=-20, y=220, width=200, height=40)
self._text_answers = Text(master, height=10)
self._text_answers.place(x=110, y=230, width=80, height=20)

#识别验证码
def predict_captchas(self):
if self._capchas_img is not None:
result = self._vcn.predict(self._capchas_img)
self._text_answers.delete(1.0, END)
self._text_answers.insert(1.0, ''.join(result))

#打开文件对话框并图像图像
def gen_a_verifycode(self):
img, label = utility.gen_a_verifycode()
self._capchas_img = img
self._label = label
to_show = img.copy()
to_show = cv2.resize(to_show, (300, 100))
cv2.imshow(label, to_show)
cv2.imwrite('test.png',to_show)

def process(self):
if self._capchas_img is not None:
gray = utility.depoint(utility.binarizing('test.png'))
res = cv2.medianBlur(utility.arrayConvert(gray), 9)
cv2.imshow(self._label,res)
res2 = cv2.resize(res,(160,60))#原来的尺寸为300*100
self._capchas_img = res2

if __name__=='__main__':
root = Tk()#创建控件
app = Application(master=root)#指定控件的master
app.mainloop()#进入消息循环

- TensorFlow学习-基于CNN实现手写数字识别
- python tensorflow 基于cnn实现手写数字识别
- python tensorflow基于cnn实现手写数字识别
- 基于Tensorflow框架CNN实现手写数字识别(二):识别数字
- 基于Tensorflow框架的CNN卷积神经网络图片识别小案例
- 模式识别hw2-------基于matconvnet,用CNN实现人脸图片性别识别
- 基于Tensorflow实现Android人脸表情识别APP
- 基于python3 OpenCV3实现静态图片人脸识别
- cnn 实现图片识别
- tensorflow实现基于CNN残差网络的一个简化版YOLO
- Tensorflow模型实现预测或识别单张图片
- 基于 TensorFlow 的图像识别(R实现)
- Tensorflow - Tutorial (4) :基于CNN的手写数字识别
- cnn、rnn实现中文文本分类(基于tensorflow)
- 用c++实现获取ie网页的验证码图片识别后输入到验证码框
- [TensorFlow深度学习深入]实战二·使用CNN网络识别破解数字验证码
- c#实现识别图片上的验证码数字
- CNN+GRU实现验证码端到端识别
- 基于KNN算法实现的单个图片数字识别
- 基于pytorch和Fashion Mnist数据集建立简单的CNN网络来实现图片分类