Linux(Ubuntu18.4、GPU服务器)Tensorflow object detection API使用配置教程(特别详细)tensorflow目标检测教程
windows系统请查看博主的文章:https://www.geek-share.com/detail/2769967872.html
一、 环境配置;
⑴ Anaconda (可不装,但在教程之后的教程中,请直接使用系统环境):
Anaconda是一个开源的包、环境管理器,可以用于在同一个机器上安装不同版本的软件包及其依赖,并能够在不同的环境之间切换
https://repo.anaconda.com/archive/Anaconda3-2019.03-MacOSX-x86_64.pkg
这是python3.7版的Linux64位下载
其他版本:
https://www.anaconda.com/distribution/#download-section
请在官网下载(对应自己的操作系统下载python3.7版本);
可以新建一个tensorflow(python环境请选择3.6或者3.7)环境,也可以使用基础base(默认python3.7)环境
新建一个环境
conda create -n tensorflow python=3.6
简单conda命令:
查看系统内的环境:
conda info --e
创建环境
conda create -n xxx python=2.7//创建以xxx为名的带有python27的环境
环境激活
source activate xxx
退出环境
deactivate xxx
删除环境
conda remove -n xxx --all
conda install package//安装包
conda list//查看已安装的包
conda update package//更新包
conda remove package//移除包
需要的库有:tensorflow(GPU或者CPU版) , pillow, lxml, matplotlib, jupyter, 请自行pip安装。
安装包前我们需要激活环境
source activate tensorflow(需要激活的环境)
pip install (所需要的包)
⑵ 下载Tensorflow object detection API:
https://github.com/tensorflow/models (GitHub)
新建一个文件夹用于存放包:
mkdir pakege
cd pakeage
然后使用git克隆包
如果没有安装git,则先安装git:
sudo apt-get install git
克隆包
git clone https://github.com/tensorflow/models (需要git的地址)
它基于tensorflow构造的开源框架,易于构建、训练和部署目标检测模型,在GitHub中下载。由于国内的网络限制使用下载速度很慢,可以选择我分享的百度云连接进行下载:
链接:https://pan.baidu.com/s/1zp22K5zHVRyrpoQqB5xi1g
提取码:2xiu
复制这段内容后打开百度网盘手机App,操作更方便哦
然后使用ptf进行传输:
详细博主博客:https://blog.csdn.net/m0_43505377/article/details/90668779
⑶ 下载protoc:
1、Google Protocol Buffer( 简称 Protobuf) 是 Google 公司内部的混合语言数据标准
在GitHub中下载
https://github.com/protocolbuffers/protobuf
下载对应自己的系统的版本,如:protoc-3.7.1-win64.zip
克隆protoc
git clone https://github.com/protocolbuffers/protobuf
2、找到Tensorflow object detection API的目录,命令行cd到models\research文件
A:输入activate 激活anconda环境
如: source activate tensorflow
B:继续输入:
protoc object_detection/protos/*.proto --python_out=.
3、在系统变量中新建名为:“PYTHONPATH”的变量,将Tensorflow object detection API目录下的research/ 及 research/slim 两个文件夹的完整目录进行添加。(注意用分号隔开)同时将…\models-master\research\object_detection路径加入到系统变量中(自己的路径)
Linux直接执行:
export PYTHONPATH=$PYTHONPATH:`pwd`:`pwd`/slim
4、加载slim文件夹模块:
A:cd 切换到research/slim文件夹下(方法:输入在哪个分区下 如:E: 继续输入: cd 路径)将路径改为research/slim文件夹下的完整路径。
输入:
python setup.py install
5、安装pycocotools:
A:在GitHub上下载COCO
https://github.com/philferriere/cocoapi
git clone https://github.com/philferriere/cocoapi
cd到PythonAPI目录,输入:
python setup.py install
如果报错找不到vcversall.bat,请安装安装Visual Studio2015
二、 训练准备:
⑴ 图片标注
在开始训练之前我们需要制作训说需要的标注图片,推荐大家使用labelImg标注软件(下载链接)
https://github.com/tzutalin/labelImg/releases
安装labelImg
sudo apt-get install pyqt5-dev-tools

sudo pip install -r requirements / requirements-linux-python3.txt
运行
python3 labelImg.py
或者: python3 labelImg.py [IMAGE_PATH] [预先定义的类文件]
使用 LabelImg 这款小软件,进行人工标注。
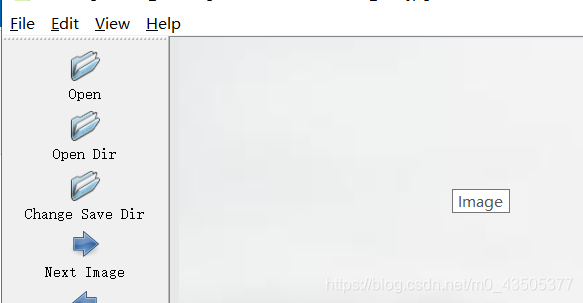
Open dir 打开文件夹
Change save dir 生成文件保存文件夹
标注方法:快捷键 w 框选感兴趣区域
A 向左切换图片
D 向右切换图片
⑵ 生成csv表格:
根据提示信息修改代码后直接使用
"""
Created on Tue Jan 16 00:52:02 2018
@author: Xiang Guo
将文件夹内所有XML文件的信息记录到CSV文件中
"""

import os
import glob
import pandas as pd
import xml.etree.ElementTree as ET

os.chdir('  #输入图片文件夹   ')

path = '#cvs表格输出文件夹 '

def xml_to_csv(path):
xml_list = []
for xml_file in glob.glob(path + '/*.xml'):
tree = ET.parse(xml_file)
root = tree.getroot()
for member in root.findall('object'):
value = (root.find('filename').text,
int(root.find('size')[0].text),
int(root.find('size')[1].text),
member[0].text,
int(member[4][0].text),
int(member[4][1].text),
int(member[4][2].text),
int(member[4][3].text)
)
xml_list.append(value)
column_name = ['filename', 'width', 'height', 'class', 'xmin', 'ymin', 'xmax', 'ymax']
xml_df = pd.DataFrame(xml_list, columns=column_name)
return xml_df

def main():
image_path = path
xml_df = xml_to_csv(image_path)
xml_df.to_csv('tv_vehicle_labels.csv', index=None)
print('Successfully converted xml to csv.')

main()
⑶ 因为这个模型只支持输入TFRecord格式,我们需要通过出CSV表格来将数据转换为此格式。
参照代码进行修改
cd (位置)
在research\object_detection下新建一个 generate_tfrecord.py 文件 ,将代码复制,根据提示进行修改
touch generate_tfrecord.py
转换代码:
# -*- coding: utf-8 -*-
"""
Created on Tue Jan 16 01:04:55 2018
@author: Xiang Guo
由CSV文件生成TFRecord文件
"""

"""
Usage:
# From tensorflow/models/
# Create train data:
python generate_tfrecord.py --csv_input=data/tv_vehicle_labels.csv  --output_path=train.record
# Create test data:
python generate_tfrecord.py --csv_input=data/test_labels.csv  --output_path=test.record
"""

import os
import io
import pandas as pd
import tensorflow as tf

from PIL import Image
from research.object_detection.utils import dataset_util
from collections import namedtuple, OrderedDict

os.chdir('#工作目录就是object_detection的位置')
#如:...\\models-master\\research\\object_detection\\
flags = tf.app.flags
flags.DEFINE_string('csv_input', '', 'Path to the CSV input')
flags.DEFINE_string('output_path', '', 'Path to output TFRecord')
FLAGS = flags.FLAGS

# TO-DO replace this with label map
# 注意将对应的label改成自己的类别!!!!!!!!!!
def class_text_to_int(row_label):
if row_label == 'cherry': #改为自己的标签
return 1 #返回的数值从1 开始
elif row_label == "Areca":
return 2
elif row_label == "xiakucao":
return 3
elif row_label == "mudanpi":
return 4
else:
None

def split(df, group):
data = namedtuple('data', ['filename', 'object'])
gb = df.groupby(group)
return [data(filename, gb.get_group(x)) for filename, x in zip(gb.groups.keys(), gb.groups)]

def create_tf_example(group, path):
with tf.gfile.GFile(os.path.join(path, '{}'.format(group.filename)), 'rb') as fid:
encoded_jpg = fid.read()
encoded_jpg_io = io.BytesIO(encoded_jpg)
image = Image.open(encoded_jpg_io)
width, height = image.size

filename = group.filename.encode('utf8')
image_format = b'jpg'
xmins = []
xmaxs = []
ymins = []
ymaxs = []
classes_text = []
classes = []

for index, row in group.object.iterrows():
xmins.append(row['xmin'] / width)
xmaxs.append(row['xmax'] / width)
ymins.append(row['ymin'] / height)
ymaxs.append(row['ymax'] / height)
classes_text.append(row['class'].encode('utf8'))
classes.append(class_text_to_int(row['class']))

tf_example = tf.train.Example(features=tf.train.Features(feature={
'image/height': dataset_util.int64_feature(height),
'image/width': dataset_util.int64_feature(width),
'image/filename': dataset_util.bytes_feature(filename),
'image/source_id': dataset_util.bytes_feature(filename),
'image/encoded': dataset_util.bytes_feature(encoded_jpg),
'image/format': dataset_util.bytes_feature(image_format),
'image/object/bbox/xmin': dataset_util.float_list_feature(xmins),
'image/object/bbox/xmax': dataset_util.float_list_feature(xmaxs),
'image/object/bbox/ymin': dataset_util.float_list_feature(ymins),
'image/object/bbox/ymax': dataset_util.float_list_feature(ymaxs),
'image/object/class/text': dataset_util.bytes_list_feature(classes_text),
'image/object/class/label': dataset_util.int64_list_feature(classes),
}))
return tf_example

def main(_):
writer = tf.python_io.TFRecordWriter(FLAGS.output_path)
path = os.path.join(os.getcwd(), 'images')
examples = pd.read_csv(FLAGS.csv_input)
grouped = split(examples, 'filename')
for group in grouped:
tf_example = create_tf_example(group, path)
writer.write(tf_example.SerializeToString())

writer.close()
output_path = os.path.join(os.getcwd(), FLAGS.output_path)
print('Successfully created the TFRecords: {}'.format(output_path))

if __name__ == '__main__':
tf.app.run()
在object_detection 文件夹下新建一个images文件夹,将每次需要转换的图片及xml标注信息放入。
打开cmd 切换到tensorflow环境(安装tensorflow的环境)
再切换到将位置切换到:object_detection 文件夹下
生成测试集的命令:
python generate_tfrecord.py --csv_input=data/tv_vehicle_labels.csv
代码文件名                 CVS文件路径及文件名
生成训练集:
python generate_tfrecord.py --csv_input=data/test_labels.csv
三、 开始训练:
下载配置文件地址:
https://github.com/tensorflow/models/blob/master/research/object_detection/g3doc/detection_model_zoo.md
1、配置训练文件
以 ssd_mobilenet_v1_coco.config 为例,在 object_dection文件夹下,解压下载的文件,如:t_v1_coco_2017_11_17.tar.gz,
将ssd_mobilenet_v1_coco.config 放在training 文件夹下,用文本编辑器打开(我用的sublime 3),进行如下操作:
1、搜索其中的 PATH_TO_BE_CONFIGURED ,将对应的路径改为自己的路径,注意不要把test跟train弄反了;
2、将 num_classes 按照实际情况更改
示例:(代码后面有注释)
model {
ssd {
num_classes: 4   #你的多少种标签就更改为多少
box_coder {
faster_rcnn_box_coder {
y_scale: 10.0
x_scale: 10.0
height_scale: 5.0
width_scale: 5.0
}
}
matcher {
argmax_matcher {
matched_threshold: 0.5
unmatched_threshold: 0.5
ignore_thresholds: false
negatives_lower_than_unmatched: true
force_match_for_each_row: true
}
}
similarity_calculator {
iou_similarity {
}
}
anchor_generator {
ssd_anchor_generator {
num_layers: 6
min_scale: 0.2
max_scale: 0.95
aspect_ratios: 1.0
aspect_ratios: 2.0
aspect_ratios: 0.5
aspect_ratios: 3.0
aspect_ratios: 0.3333
}
}
image_resizer {
fixed_shape_resizer {
height: 300
width: 300
}
}
box_predictor {
convolutional_box_predictor {
min_depth: 0
max_depth: 0
num_layers_before_predictor: 0
use_dropout: false
dropout_keep_probability: 0.8
kernel_size: 1
box_code_size: 4
apply_sigmoid_to_scores: false
conv_hyperparams {
activation: RELU_6,
regularizer {
l2_regularizer {
weight: 0.00004
}
}
initializer {
truncated_normal_initializer {
stddev: 0.03
mean: 0.0
}
}
batch_norm {
train: true,
scale: true,
center: true,
decay: 0.9997,
epsilon: 0.001,
}
}
}
}
feature_extractor {
type: 'ssd_mobilenet_v1'
min_depth: 16
depth_multiplier: 1.0
conv_hyperparams {
activation: RELU_6,
regularizer {
l2_regularizer {
weight: 0.00004
}
}
initializer {
truncated_normal_initializer {
stddev: 0.03
mean: 0.0
}
}
batch_norm {
train: true,
scale: true,
center: true,
decay: 0.9997,
epsilon: 0.001,
}
}
}
loss {
classification_loss {
weighted_sigmoid {
}
}
localization_loss {
weighted_smooth_l1 {
}
}
hard_example_miner {
num_hard_examples: 3000
iou_threshold: 0.99
loss_type: CLASSIFICATION
max_negatives_per_positive: 3
min_negatives_per_image: 0
}
classification_weight: 1.0
localization_weight: 1.0
}
normalize_loss_by_num_matches: true
post_processing {
batch_non_max_suppression {
score_threshold: 1e-8
iou_threshold: 0.6
max_detections_per_class: 100
max_total_detections: 100
}
score_converter: SIGMOID
}
}
}

train_config: {
batch_size: 8
optimizer {
rms_prop_optimizer: {
learning_rate: {
exponential_decay_learning_rate {
initial_learning_rate: 0.004
decay_steps: 800720
decay_factor: 0.95
}
}
momentum_optimizer_value: 0.9
decay: 0.9
epsilon: 1.0
}
}
#fine_tune_checkpoint: "E:\\asdas\\models-master\\research\\object_detection\\training\\model.ckpt"
#from_detection_checkpoint: true

num_steps: 200000
data_augmentation_options {
random_horizontal_flip {
}
}
data_augmentation_options {
ssd_random_crop {
}
}
}

train_input_reader: {
tf_record_input_reader {
input_path: "   "     **#更改为自己的训练集路径**
}
label_map_path: "   "   **#对应的pbtxt文件**
}

eval_config: {
num_examples: 8000
# Note: The below line limits the evaluation process to 10 evaluations.
# Remove the below line to evaluate indefinitely.
max_evals: 10
}

eval_input_reader: {
tf_record_input_reader {
input_path: "      "     **#更改为自己的测试集路径**
}
label_map_path: "    "   **#对应的pbtxt文件**
shuffle: false
num_readers: 1
}
config文件中 label_map_path: “data/tv_vehicle_detection.pbtxt” 需要保持一致。
此时在对应目录(/data)下,创建一个 的文本文件(可以复制一个后缀一样其他名字的文件,然后用文本编辑软件打开修改),写入我们的标签,我的例子中是两个,id序号注意与前面创建CSV文件时保持一致,从1开始。
touch tv_vehicle_detection.pbtxt
item {
id: 1
name: 'tv'
}
item {
id: 2
name: 'vehicle'
}
2、开始训练:
cd 切换到安装tensorflow的环境。
定位到 models\research\object_detection文件夹下,运行如下命令:
# From the tensorflow/models/research/ directory
python object_detection/model_main.py \
--pipeline_config_path=object_detection/training/ssd_mobilenet_v1_coco.config \
--model_dir=object_detection/training \
--num_train_steps=50000 \
--num_eval_steps=2000 \
--alsologtostderr
pipeline_config_path=(ssd_mobilenet_v1_coco.config路径)
num_train_steps= (训练轮数)
num_eval_steps= (多少次进行一次测试)
model_dir= (模型保存位置)
开始训练后不会每次都打印信息
使用建议打开另一个命令行,激活anconda环境
运行以下代码打开 tensorboard:
tensorboard --logdir=(模型保存位置) --host=127.0.0.1

运行成功后将显示的网址复制到浏览器打开,即可打开tensorboard


- 从0.1开始Tensorflow object detection API使用教程(特别详细)tensorflow目标检测教程
- 基于win10,GPU的Tensorflow Object Detection API部署及USB摄像头目标检测
- 使用tensorflow object detection API 训练自己的目标检测模型 (三)
- Ubuntu17.04 TensorFlow Object Detection API 安装配置过程
- Ubuntu 16.04下安装TensorFlow Object Detection API(对象检测API)
- 使用TensorFlow Object Detection API进行图像物体检测
- Tensorflow object_detection API 目标检测环境搭建
- 目标检测 - Tensorflow Object Detection API
- (三论文)目标检测 - Tensorflow Object Detection API几种模型的对比
- (更新视频教程)Tensorflow object detection API 搭建属于自己的物体识别模型(2)——训练并使用自己的模型
- TensorFlow Object Detection API 在Windows10和Ubuntu上的配置
- 计算机视觉实时目标检测 TensorFlow Object Detection API
- tensorflow object detection api 详细实践教程
- 谷歌开源的TensorFlow Object Detection API的使用教程
- 目标检测 - Tensorflow Object Detection API
- Ubuntu18.04下安装TensorFlow Object Detection API
- (Ubuntu)Tensorflow object detection API——(1)环境搭建
- Tensorflow Object Detection API使用
- tensorflow object_detection 用自己的数据训练目标检测模型Mobilenet
- tensorflow object detection API 使用记录3