OpenCV实现给图片添加边框功能
2019-02-17 00:10
309 查看
目标:
基于OpenCV的函数cv::copyMakeBorder给图像添加边框
函数简介:
copyMakeBorder( src, dst, top, bottom, left, right, borderType, value );
参数:
src: 原图像
dst: 目标图像
top, bottom, left, right: 每一个边界方向上像素的宽度.在这里使用图像原始大小的 5% .
borderType:边框的类型 。当前例子中位纯色或者边界的复制.
value: 如果borderType 设置位 BORDER_CONSTANT, 这个将作为边框的颜色.
边框的类型
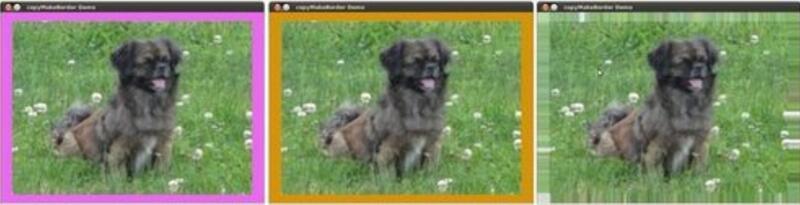
1)纯色边框
BORDER_CONSTANT,边框设置位某种单一的颜色,比如黑色
2)图像边界扩展
BORDER_REPLICATE,复制原图的边界进行扩展
代码
/**
* @file copyMakeBorder_demo.cpp
* @brief Sample code that shows the functionality of copyMakeBorder
* @author OpenCV team
*/

#include "opencv2/imgproc.hpp"
#include "opencv2/imgcodecs.hpp"
#include "opencv2/highgui.hpp"

using namespace cv;

//![variables]
Mat src, dst;
int top, bottom, left, right;
int borderType;
const char* window_name = "copyMakeBorder Demo";
RNG rng(12345);
//![variables]

/**
* @function main
*/
int main( int, char** argv )
{

int c;

//![load]
src = imread( argv[1], IMREAD_COLOR ); // Load an image

if( src.empty() )
{
printf(" No data entered, please enter the path to an image file \n");
return -1;
}
//![load]

/// Brief how-to for this program
printf( "\n \t copyMakeBorder Demo: \n" );
printf( "\t -------------------- \n" );
printf( " ** Press 'c' to set the border to a random constant value \n");
printf( " ** Press 'r' to set the border to be replicated \n");
printf( " ** Press 'ESC' to exit the program \n");

//![create_window]
namedWindow( window_name, WINDOW_AUTOSIZE );
//![create_window]

//![init_arguments]
/// Initialize arguments for the filter
top = (int) (0.05*src.rows); bottom = (int) (0.05*src.rows);
left = (int) (0.05*src.cols); right = (int) (0.05*src.cols);
//![init_arguments]

dst = src;
imshow( window_name, dst );

for(;;)
{
//![check_keypress]
c = waitKey(500);

if( (char)c == 27 )
{ break; }
else if( (char)c == 'c' )
{ borderType = BORDER_CONSTANT; }
else if( (char)c == 'r' )
{ borderType = BORDER_REPLICATE; }
//![check_keypress]

//![update_value]
Scalar value( rng.uniform(0, 255), rng.uniform(0, 255), rng.uniform(0, 255) );
//![update_value]

//![copymakeborder]
copyMakeBorder( src, dst, top, bottom, left, right, borderType, value );
//![copymakeborder]

//![display]
imshow( window_name, dst );
//![display]
}

return 0;
}
效果
以上就是本文的全部内容,希望对大家的学习有所帮助,也希望大家多多支持脚本之家。
您可能感兴趣的文章:

相关文章推荐
- python+opencv实现简单的图片搜索功能
- C# 图片添加旋转字体文字,实现图片装逼功能
- CSS3尝鲜(三):利用CSS3的新功能实现(椭)圆角边框和图片边框
- 一个iOS图片选择器的DEMO(实现图片添加,宫格排列,图片长按删除,以及图片替换等功能)
- EyesBaby功能实现之图片控件上添加字符
- IE7 添加图片时浏览本地图片功能实现
- Java使用OpenCV实现人脸识别/人眼检测/图片截取/合成/添加水印
- fastdfs 新添加一个项目的图片目录 实现独立的上传下载功能
- 安卓实现为图片添加滤镜功能
- php实现图片添加水印功能
- opencv实现图片HDR功能
- 基于OpenCV给图片添加边框
- javacpp-opencv图像处理之2:实时视频添加图片水印,实现不同大小图片叠加,图像透明度控制,文字和图片双水印
- javacpp-opencv图像处理之2:实时视频添加图片水印,实现不同大小图片叠加,图像透明度控制,文字和图片双水印
- 实现TextView的添加图片的功能
- opencv实现图片HDR功能
- 利用CSS3的新功能实现(椭)圆角边框和图片边框 (圆角)
- javacpp-opencv图像处理之1:实时视频添加文字水印并截取视频图像保存成图片,实现文字水印的字体、位置、大小、粗度、翻转、平滑等操作
- opencv实现图片无边框的一个例子
- JS实现动态给图片添加边框的方法