Shiro官方快速入门10min例子源码解析框架3-Authentication(身份认证)
在作完预备的初始化和session测试后,到了作为一个权鉴别框架的核心功能部分,确认你是谁--身份认证(Authentication)。
通过提交给shiro身份信息来验证是否与储存的安全信息数据是否相符来判断用户身份的真实性
本文涉及到token的构建,框架结构下认证行为的调用,realm中授权数据的获取、登录信息比较,login过程中对已有有subject、session的处理
同样,本篇本文使用的是shiro 1.3.2版本,配合源码最佳~

官方例子代码流程如下
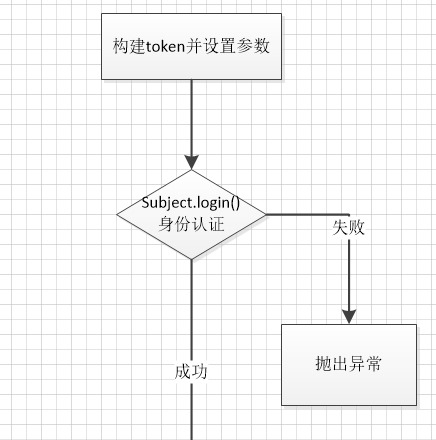
if (!currentUser.isAuthenticated()) {
UsernamePasswordToken token = new UsernamePasswordToken("lonestarr", "vespa");
token.setRememberMe(true);
try {
currentUser.login(token);
} catch (UnknownAccountException uae) {
log.info("There is no user with username of " + token.getPrincipal());
} catch (IncorrectCredentialsException ice) {
log.info("Password for account " + token.getPrincipal() + " was incorrect!");
} catch (LockedAccountException lae) {
log.info("The account for username " + token.getPrincipal() + " is locked.  " +
"Please contact your administrator to unlock it.");
}
// ... catch more exceptions here (maybe custom ones specific to your application?
catch (AuthenticationException ae) {
//unexpected condition?  error?
}
}
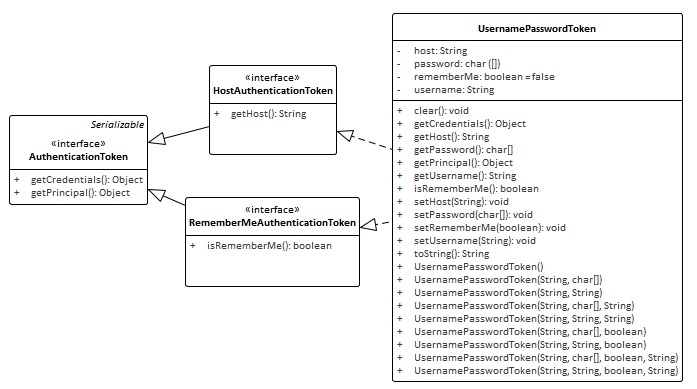
3.1首先构造token,其中 UsernamePasswordToken 实现了HostAuthenticationToken和RememberMeAuthenticationToken接口,他们都继承自AuthenticationToken接口
HostAuthenticationToken接口指定了token的域,RememberMeAuthenticationToken接口指定了token是否实现RememberMe(认证跨session)
ps:shiro 认证状态区分Authenticated和Remembered,Authenticated指当前session(或流程)下已经过认证,Remembered指曾经获得认证,如果是web状态下RememberMe相关信息保存在cookie中
二者可以调用 subject.isAuthenticated() 及subject.isRemembered()区分
其中UsernamePasswordToken 的Principal(身份)概念即Username,Credentials(凭证)概念即Password
在token 中设置用户名和密码
UsernamePasswordToken token = new UsernamePasswordToken("lonestarr", "vespa");
设置是否使用RememberMe(此案例中不具体起作用,只是作为示例在token中设置
token.setRememberMe(true);
案例中不对host进行设置
3.2完成对token的构建设置后,便进行认证(Authentication)操作
currentUser.login(token);
首先先借用官方的例图来了解一下整个的流程
1-调用subject的login入口传入token
2-subject实际调用SecurityManager的login
3-securityManager再调用
authenticator实例的doAuthenticate方法,一般这个是ModularRealmAuthenticator的实例4-判断realm的状况,如果是单realm则直接调用realm,如果是多realm则要判断认证策略(AuthenticationStrategy)
5-调用对应realm中的getAuthenticationInfo实现进行认证

DelegatingSubject.login代码如下,下面对认证流程进行详细的解读
public void login(AuthenticationToken token) throws AuthenticationException {
clearRunAsIdentitiesInternal();
Subject subject = securityManager.login(this, token);

PrincipalCollection principals;

String host = null;

if (subject instanceof DelegatingSubject) {
DelegatingSubject delegating = (DelegatingSubject) subject;
//we have to do this in case there are assumed identities - we don't want to lose the 'real' principals:
principals = delegating.principals;
host = delegating.host;
} else {
principals = subject.getPrincipals();
}

if (principals == null || principals.isEmpty()) {
String msg = "Principals returned from securityManager.login( token ) returned a null or " +
"empty value.  This value must be non null and populated with one or more elements.";
throw new IllegalStateException(msg);
}
this.principals = principals;
this.authenticated = true;
if (token instanceof HostAuthenticationToken) {
host = ((HostAuthenticationToken) token).getHost();
}
if (host != null) {
this.host = host;
}
Session session = subject.getSession(false);
if (session != null) {
this.session = decorate(session);
} else {
this.session = null;
}
}
3.2.1首先是初始化
clearRunAsIdentitiesInternal();
如果subject已含session则获取session并清除其中参数
3.2.2调用securityManager中的()login()开始认证
Subject subject = securityManager.login(this, token);
这里调用的是DefaultSecurityManager中的login
public Subject login(Subject subject, AuthenticationToken token) throws AuthenticationException {
AuthenticationInfo info;
try {
info = authenticate(token);//调用AbstractAuthenticator.authenticate,
} catch (AuthenticationException ae) {
try {
onFailedLogin(token, ae, subject);//认证失败,清除remenberMe的信息使之失效
} catch (Exception e) {
if (log.isInfoEnabled()) {
log.info("onFailedLogin method threw an " +
"exception.  Logging and propagating original AuthenticationException.", e);
}
}
throw ae; //propagate
}

Subject loggedIn = createSubject(token, info, subject);

onSuccessfulLogin(token, info, loggedIn);

return loggedIn;
}
3.2.2.1
调用AbstractAuthenticator.authenticate(),其中调用ModularRealmAuthenticator.doAuthenticate
protected AuthenticationInfo doAuthenticate(AuthenticationToken authenticationToken) throws AuthenticationException {
assertRealmsConfigured();
Collection<Realm> realms = getRealms();
if (realms.size() == 1) {
return doSingleRealmAuthentication(realms.iterator().next(), authenticationToken);
} else {
return doMultiRealmAuthentication(realms, authenticationToken);
}
}
判断realms可用由于是配置的是单realm
则调用ModularRealmAuthenticator.doSingleRealmAuthentication(),其中调用realm实现判断token类型是否支持,然后执行realm实现中的getAuthenticationInfo方法
protected AuthenticationInfo doSingleRealmAuthentication(Realm realm, AuthenticationToken token) {
if (!realm.supports(token)) {
String msg = "Realm [" + realm + "] does not support authentication token [" +
token + "].  Please ensure that the appropriate Realm implementation is " +
"configured correctly or that the realm accepts AuthenticationTokens of this type.";
throw new UnsupportedTokenException(msg);
}
AuthenticationInfo info = realm.getAuthenticationInfo(token);
if (info == null) {
String msg = "Realm [" + realm + "] was unable to find account data for the " +
"submitted AuthenticationToken [" + token + "].";
throw new UnknownAccountException(msg);
}
return info;
}
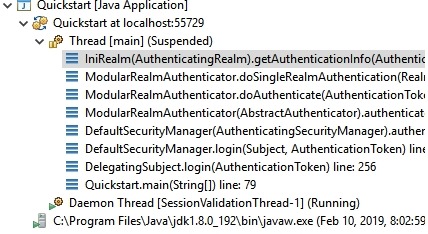
从下图中看出这里的realm是配置后的iniRealm实例,其方法在AuthenticatingRealm中实现,由于inirealm直接在初始化onInit()时就在内存加载了所有授权数据信息,例子并没有使用cache。
public final AuthenticationInfo getAuthenticationInfo(AuthenticationToken token) throws AuthenticationException {

AuthenticationInfo info = getCachedAuthenticationInfo(token);
if (info == null) {
//otherwise not cached, perform the lookup:
info = doGetAuthenticationInfo(token);
log.debug("Looked up AuthenticationInfo [{}] from doGetAuthenticationInfo", info);
if (token != null && info != null) {
cacheAuthenticationInfoIfPossible(token, info);
}
} else {
log.debug("Using cached authentication info [{}] to perform credentials matching.", info);
}

if (info != null) {
assertCredentialsMatch(token, info);
} else {
log.debug("No AuthenticationInfo found for submitted AuthenticationToken [{}].  Returning null.", token);
}

return info;
}
3.2.2.1.1调用SimpleAccountRealm.doGetAuthenticationInfo通过用户名从Map users 取出对应的SimpleAccount,并判断是否被锁,是否过期
protected AuthenticationInfo doGetAuthenticationInfo(AuthenticationToken token) throws AuthenticationException {
UsernamePasswordToken upToken = (UsernamePasswordToken) token;
SimpleAccount account = getUser(upToken.getUsername());

if (account != null) {

if (account.isLocked()) {
throw new LockedAccountException("Account [" + account + "] is locked.");
}
if (account.isCredentialsExpired()) {
String msg = "The credentials for account [" + account + "] are expired";
throw new ExpiredCredentialsException(msg);
}

}

return account;
}
对应getUser方法使用了读锁保证了map读操作的原子性
protected SimpleAccount getUser(String username) {
USERS_LOCK.readLock().lock();
try {
return this.users.get(username);
} finally {
USERS_LOCK.readLock().unlock();
}
}
3.2.2.1.2调用AuthenticatingRealm.assertCredentialsMatch,获取密码比较器(CredentialsMatcher),其中调用doCredentialsMatch获取对比token和info(上面从realm通过用户名获取的AuthenticationInfo实例)中的密码(核心的一步),并返回结果
public boolean doCredentialsMatch(AuthenticationToken token, AuthenticationInfo info) {
Object tokenCredentials = getCredentials(token);
Object accountCredentials = getCredentials(info);
return equals(tokenCredentials, accountCredentials);
}
3.2.2.2随后通知认证监听器AuthenticationListener(本例未设置)层层返回info至DefaultSecurityManager创建新的有登录信息的subject
Subject loggedIn = createSubject(token, info, subject);
并将现有subject中的信息赋予新的subject
protected Subject createSubject(AuthenticationToken token, AuthenticationInfo info, Subject existing) {
SubjectContext context = createSubjectContext();
context.setAuthenticated(true);
context.setAuthenticationToken(token);
context.setAuthenticationInfo(info);
if (existing != null) {
context.setSubject(existing);
}
return createSubject(context);
}
3.2.2.3设置rememberMe(本例未实现
onSuccessfulLogin(token, info, loggedIn);
3.2.3 继续获取信息principals,host(本例无),设置session到subject,
if (subject instanceof DelegatingSubject) {
DelegatingSubject delegating = (DelegatingSubject) subject;
//we have to do this in case there are assumed identities - we don't want to lose the 'real' principals:
principals = delegating.principals;
host = delegating.host;
} else {
principals = subject.getPrincipals();
}

if (principals == null || principals.isEmpty()) {
String msg = "Principals returned from securityManager.login( token ) returned a null or " +
"empty value.  This value must be non null and populated with one or more elements.";
throw new IllegalStateException(msg);
}
this.principals = principals;
this.authenticated = true;
if (token instanceof HostAuthenticationToken) {
host = ((HostAuthenticationToken) token).getHost();
}
if (host != null) {
this.host = host;
}
Session session = subject.getSession(false);
if (session != null) {
this.session = decorate(session);
} else {
this.session = null;
}
3.3完成认证后测试一下Principal(用户名)是否正确
log.info("User [" + currentUser.getPrincipal() + "] logged in successfully.");

可见用户信息正确
至此完成了一个简单的Authentication过程
参考:
http://shiro.apache.org/10-minute-tutorial.html
http://shiro.apache.org/authentication.html
http://www.apache.org/dyn/closer.cgi/shiro/1.3.2/shiro-root-1.3.2-source-release.zip
转载请注明作者及来源:https://www.cnblogs.com/codflow/

- Shiro官方快速入门10min例子源码解析框架2-Session
- Shiro官方快速入门10min例子源码解析框架1-初始化
- 安全认证框架Shiro(三)- 源码角度解析shiro的权限验证
- Shiro登录认证框架源码解析
- 第四章:Shiro的身份认证(Authentication)——深入浅出学Shiro细粒度权限开发框架
- [置顶] 《伸手系列》第一集-Shiro安全认证框架的从入门到“出门”
- Shiro第四篇【Shiro与Spring整合、快速入门、Shiro过滤器、登陆认证】
- 第四章:Shiro的身份认证(Authentication)
- Shiro安全框架入门篇(登录验证实例详解与源码)
- Shiro安全框架入门篇(登录验证实例详解与源码)
- Log4Qt快速入门——Log4Qt日志输出重定向源码解析
- Shiro安全框架入门篇(登录验证实例详解与源码)
- Shiro安全框架【快速入门】就这一篇!
- 【Shiro】Apache Shiro架构之身份认证(Authentication)
- shiro权限框架简单快速入门
- 【Shiro】Apache Shiro架构之身份认证(Authentication)
- 【Shiro】Apache Shiro架构之身份认证(Authentication)
- Shiro安全框架入门篇(登录验证实例详解与源码)
- ASP.NET Core的身份认证框架IdentityServer4--入门【转】
- Apache Shiro身份认证(Authentication)