Linux环境快速搭建elasticsearch6.5.4集群和Head插件
今天来一起实战Linux环境下搭建elasticsearch6.5.4集群和Head插件;
环境信息
操作系统:Ubuntu 16.04.5 LTS
JDK:1.8.0_191
elasticsearch:6.5.4
nodejs:v10.15.0
本次实战准备了两台机器,它们的基本情况如下所示:
| IP地址 | hostname | 备注 |
|---|---|---|
| 192.168.119.152 | node-0 | 节点0 |
| 192.168.119.153 | node-1 | 节点1 |
操作步骤整理
整个实战由以下操作步骤组成,注意:有的步骤需要在两台机器上都要做,在具体操作的地方,我会用红字说明:
- 修改主机名;
- 修改hosts;
- 修改linux文件描述符限制;
- 修改内存限制;
- 安装JDK;
- 创建用户;
- 给es用户增加sudo权限
- 安装elasticsearch;
- 在node-0机器安装nodejs
- 设置elasticsearch;
- 启动elasticsearch
- 安装head组件(只在node-0上安装)
- 验证
修改主机名
注意:以下的操作在node-0和node-1两台机器上都要做
打开文件/etc/hostname,将内容修改为本次实战所需的hostname(node-0和node-1);
修改hosts
注意:以下的操作在node-0和node-1两台机器上都要做
打开文件令/etc/hosts,增加以下两行,读者请注意改为自己机器的IP地址:
192.168.119.152 node-0
192.168.119.153 node-1
修改linux文件描述符限制
注意:以下的操作在node-0和node-1两台机器上都要做
- 执行命令ulimit -Hn,查看硬限制:
[root@localhost es]# ulimit -Hn
4096
- 执行命令ulimit -Sn,查看软限制(程序中可以提升):
[root@localhost es]# ulimit -Sn
1024
上述限制会导致elasticsearch启动失败,所以需要调整;
3. 打开文件
/etc/security/limits.conf,增加以下两行设置(注意,如果是已有配置就修改对应的值):
*               soft    nofile           65536
*               hard    nofile           65536
- 修改完成后退出重新登录,再次查看发现配置已经生效:
[root@localhost ~]# ulimit -Hn
65536
[root@localhost ~]# ulimit -Sn
65536
修改内存限制
注意:以下的操作在node-0和node-1两台机器上都要做
- 修改进程中内存映射区域的最大数量,修改/etc/sysctl.conf文件,增加以下配置(注意,如果是已有配置就修改对应的值):
vm.max_map_count=262144
- 修改完成后,重启生效;
安装JDK
注意:以下的操作在node-0和node-1两台机器上都要做
- 在官网下载JDK,地址是https://www.oracle.com/technetwork/java/index.html,在上面选择合适的版本下载;
- 将下载的JDK安装文件放在目录/usr/lib/jvm,解压;
- 我这边JDK解压后的完整路径是/usr/lib/jvm/jdk1.8.0_191,在/etc/profile文件增加以下内容:
export JAVA_HOME=/usr/lib/jvm/jdk1.8.0_191
export JRE_HOME=${JAVA_HOME}/jre
export CLASSPATH=.:${JAVA_HOME}/lib:${JRE_HOME}/lib
export PATH=${JAVA_HOME}/bin:$PATH
- 修改完毕后执行命令source /etc/profile使设置立即生效,执行java -version查看设置是否成功:
[root@localhost jdk1.8.0_191]# java -version
java version "1.8.0_191"
Java(TM) SE Runtime Environment (build 1.8.0_191-b12)
Java HotSpot(TM) 64-Bit Server VM (build 25.191-b12, mixed mode)
创建用户
注意:以下的操作在node-0和node-1两台机器上都要做
es不允许root用户启动应用,因此需要创建用户:
- 执行命令useradd es,即可创建用户es;
- 执行命令passwd es,按照提示修改用户密码;
给es用户增加sudo权限
注意:以下的操作在node-0和node-1两台机器上都要做
- 给文件/etc/sudoers增加写权限:
chmod a+w /etc/sudoers
- 打开文件/etc/sudoers;
- 增加以下一行内容:
es ALL=(ALL:ALL) ALL
- 保存后,修改sudoers文件的权限:
chmod 440 /etc/sudoers
安装elasticsearch
注意:以下的操作在node-0和node-1两台机器上都要做
- 在官网下载安装包,地址是:https://artifacts.elastic.co/downloads/elasticsearch/elasticsearch-6.5.4.tar.gz
- 解压后的完整目录是/usr/local/work/es/elasticsearch-6.5.4,执行以下命令将文件夹的所有者和群组设置为es:
chown -R es:es /usr/local/work/es/elasticsearch-6.5.4
- 执行ls命令确认一下所属用户和群组:
root@node-0:/usr/local/work/es# ls -al
total 12
drwxr-xr-x 3 root root 4096 Jan 11 18:54 .
drwxr-xr-x 6 root root 4096 Jan 11 18:43 ..
drwxr-xr-x 8 es   es   4096 Dec 17 13:21 elasticsearch-6.5.4
在node-0机器安装nodejs
- 在node-0机器安装nodejs,详细的操作步骤请参照文章《Ubuntu16安装nodejs10》,其实就是下载、解压、设置等操作,很快就能完成;
- 执行以下命令,确保es账号能访问nodejs目录,是nodejs安装的目录:
sudo chmod 777 -R /usr/local/work/nodejs/node-v10.15.0-linux-x64
设置elasticsearch
- 打开node-0机器的文件,新增或者修改以下配置信息:
| 参数名 | 参数值 | 作用 |
|---|---|---|
| boling_cavalry | 集群名称 | |
| node.name | node-0 | 节点名字 |
| network.host | 0.0.0.0 | 绑定IP |
| http.port | 9200 | 服务端口 |
| discovery.zen.ping.unicast.hosts | [“node-0”, “node-1”] | 集群节点主机的host |
| discovery.zen.minimum_master_nodes | 1 | 一个节点需要看到的具有master节点资格的最小数量, 当前有两台机器,只能设置为1 |
| http.cors.enabled | true | head插件配置 |
| http.cors.allow-origin | “*” | head插件配置 |
- 打开node-1机器的文件,新增或者修改以下配置信息:
| 参数名 | 参数值 | 作用 |
|---|---|---|
| cluster.name | boling_cavalry | 集群名称 |
| node.name | node-1 | 节点名字 |
| network.host | 0.0.0.0 | 绑定IP |
| http.port | 9200 | 服务端口 |
| discovery.zen.ping.unicast.hosts | [“node-0”, “node-1”] | 集群节点主机的host |
| discovery.zen.minimum_master_nodes | 1 | 一个节点需要看到的具有master节点资格的最小数量, 当前有两台机器,只能设置为1 |
| http.cors.enabled | true | head插件配置 |
| http.cors.allow-origin | “*” | head插件配置 |
两台机器的配置中,只有node.name这个参数的值不同,其他的一模一样,在node-0机器上修改后的elasticsearch.yml文件如下所示:

启动elasticsearch
- 如果当前用户是root,执行命令su - es,切换到es用户;
- 执行以下命令启动node-0的elasticsearch:
/usr/local/work/es/elasticsearch-6.5.4/bin/elasticsearch
- 在node-1机器上执行步骤1和2,node-1的elasticsearch启动成功后,在node-0的控制台可以看到node-1加入集群的信息如下:
[2019-01-11T19:54:02,548][INFO ][o.e.c.s.MasterService    ] [node-0] zen-disco-node-join[{node-1}{bYrSztiTTzOi_SLAW_UdkA}{pC5ozVjZQF-jtHTWwyOXJA}{192.168.119.153}{192.168.119.153:9300}{ml.machine_memory=2078556160, ml.max_open_jobs=20, xpack.installed=true, ml.enabled=true}], reason: added {{node-1}{bYrSztiTTzOi_SLAW_UdkA}{pC5ozVjZQF-jtHTWwyOXJA}{192.168.119.153}{192.168.119.153:9300}{ml.machine_memory=2078556160, ml.max_open_jobs=20, xpack.installed=true, ml.enabled=true},}
[2019-01-11T19:54:03,206][INFO ][o.e.c.s.ClusterApplierService] [node-0] added {{node-1}{bYrSztiTTzOi_SLAW_UdkA}{pC5ozVjZQF-jtHTWwyOXJA}{192.168.119.153}{192.168.119.153:9300}{ml.machine_memory=2078556160, ml.max_open_jobs=20, xpack.installed=true, ml.enabled=true},}, reason: apply cluster state (from master [master {node-0}{Qc3orkESRHSTTySc2DSJyA}{p0rWBQu_TweRS3TofB4NMA}{192.168.119.152}{192.168.119.152:9300}{ml.machine_memory=2078556160, xpack.installed=true, ml.max_open_jobs=20, ml.enabled=true} committed version [15] source [zen-disco-node-join[{node-1}{bYrSztiTTzOi_SLAW_UdkA}{pC5ozVjZQF-jtHTWwyOXJA}{192.168.119.153}{192.168.119.153:9300}{ml.machine_memory=2078556160, ml.max_open_jobs=20, xpack.installed=true, ml.enabled=true}]]])
[2019-01-11T19:54:03,209][WARN ][o.e.d.z.ElectMasterService] [node-0] value for setting "discovery.zen.minimum_master_nodes" is too low. This can result in data loss! Please set it to at least a quorum of master-eligible nodes (current value: [1], total number of master-eligible nodes used for publishing in this round: [2])
- 在浏览器上访问192.168.119.153:9300,可以返回基本信息如下图所示:

5.至此,elasticsearch集群搭建成功,接下来安装head组件;
安装head组件(只在node-0上安装)
- 下载插件,地址:https://github.com/mobz/elasticsearch-head
- 可以用git clone命令下载,也可以在网页上下载,如下图所示:

- 下载到本地的是个名为elasticsearch-head-master的文件夹,放在目录/usr/local/work/es之下;
- 确保文件夹的权限属于用户es,以下命令以root账号身份执行:
chown -R es:es /usr/local/work/es/elasticsearch-head-master
- 以es账号的身份,在elasticsearch-head-master文件夹下执行命令npm install -g grunt-cli:
$ cd ../es/elasticsearch-head-master/
$ npm install -g grunt-cli
/usr/local/work/nodejs/node-v10.15.0-linux-x64/bin/grunt -> /usr/local/work/nodejs/node-v10.15.0-linux-x64/lib/node_modules/grunt-cli/bin/grunt
+ grunt-cli@1.3.2
added 152 packages from 122 contributors in 18.241s
上述命令安装了grunt-cli,是用于构建的,接下来安装head;
6. 在elasticsearch-head-master文件夹下执行命令npm install,用于安装head,由于网络问题有可能安装失败,提示信息类似以下:
$ npm install
npm WARN deprecated coffee-script@1.10.0: CoffeeScript on NPM has moved to "coffeescript" (no hyphen)
npm WARN deprecated http2@3.3.7: Use the built-in module in node 9.0.0 or newer, instead

> phantomjs-prebuilt@2.1.16 install /usr/local/work/es/elasticsearch-head-master/node_modules/phantomjs-prebuilt
> node install.js

PhantomJS not found on PATH
Downloading https://github.com/Medium/phantomjs/releases/download/v2.1.1/phantomjs-2.1.1-linux-x86_64.tar.bz2
Saving to /tmp/phantomjs/phantomjs-2.1.1-linux-x86_64.tar.bz2
Receiving...

Error making request.
Error: connect ECONNREFUSED 52.216.82.80:443
at TCPConnectWrap.afterConnect [as oncomplete] (net.js:1117:14)

Please report this full log at https://github.com/Medium/phantomjs
npm WARN elasticsearch-head@0.0.0 license should be a valid SPDX license expression
npm WARN optional SKIPPING OPTIONAL DEPENDENCY: fsevents@1.2.4 (node_modules/fsevents):
npm WARN notsup SKIPPING OPTIONAL DEPENDENCY: Unsupported platform for fsevents@1.2.4: wanted {"os":"darwin","arch":"any"} (current: {"os":"linux","arch":"x64"})

npm ERR! code ELIFECYCLE
npm ERR! errno 1
npm ERR! phantomjs-prebuilt@2.1.16 install: `node install.js`
npm ERR! Exit status 1
npm ERR!
npm ERR! Failed at the phantomjs-prebuilt@2.1.16 install script.
npm ERR! This is probably not a problem with npm. There is likely additional logging output above.

npm ERR! A complete log of this run can be found in:
npm ERR!     /.npm/_logs/2019-01-12T05_41_50_161Z-debug.log
出现此问题时建议重试几次,成功后的提示信息如下:
$ npm install

> phantomjs-prebuilt@2.1.16 install /usr/local/work/es/elasticsearch-head-master/node_modules/phantomjs-prebuilt
> node install.js

PhantomJS not found on PATH
Downloading https://github.com/Medium/phantomjs/releases/download/v2.1.1/phantomjs-2.1.1-linux-x86_64.tar.bz2
Saving to /tmp/phantomjs/phantomjs-2.1.1-linux-x86_64.tar.bz2
Receiving...
[=====================================---] 93%
Received 22866K total.
Extracting tar contents (via spawned process)
Removing /usr/local/work/es/elasticsearch-head-master/node_modules/phantomjs-prebuilt/lib/phantom
Copying extracted folder /tmp/phantomjs/phantomjs-2.1.1-linux-x86_64.tar.bz2-extract-1547271795685/phantomjs-2.1.1-linux-x86_64 -> /usr/local/work/es/elasticsearch-head-master/node_modules/phantomjs-prebuilt/lib/phantom
Writing location.js file
Done. Phantomjs binary available at /usr/local/work/es/elasticsearch-head-master/node_modules/phantomjs-prebuilt/lib/phantom/bin/phantomjs
npm notice created a lockfile as package-lock.json. You should commit this file.
npm WARN elasticsearch-head@0.0.0 license should be a valid SPDX license expression
npm WARN optional SKIPPING OPTIONAL DEPENDENCY: fsevents@1.2.4 (node_modules/fsevents):
npm WARN notsup SKIPPING OPTIONAL DEPENDENCY: Unsupported platform for fsevents@1.2.4: wanted {"os":"darwin","arch":"any"} (current: {"os":"linux","arch":"x64"})

added 67 packages from 69 contributors and audited 1751 packages in 16.681s
found 24 vulnerabilities (17 low, 1 moderate, 6 high)
run `npm audit fix` to fix them, or `npm audit` for details
- 在elasticsearch-head-master文件夹下执行命令grunt server,启动head,控制台提示如下:
$ grunt server
Running "connect:server" (connect) task
Waiting forever...
Started connect web server on http://localhost:9100
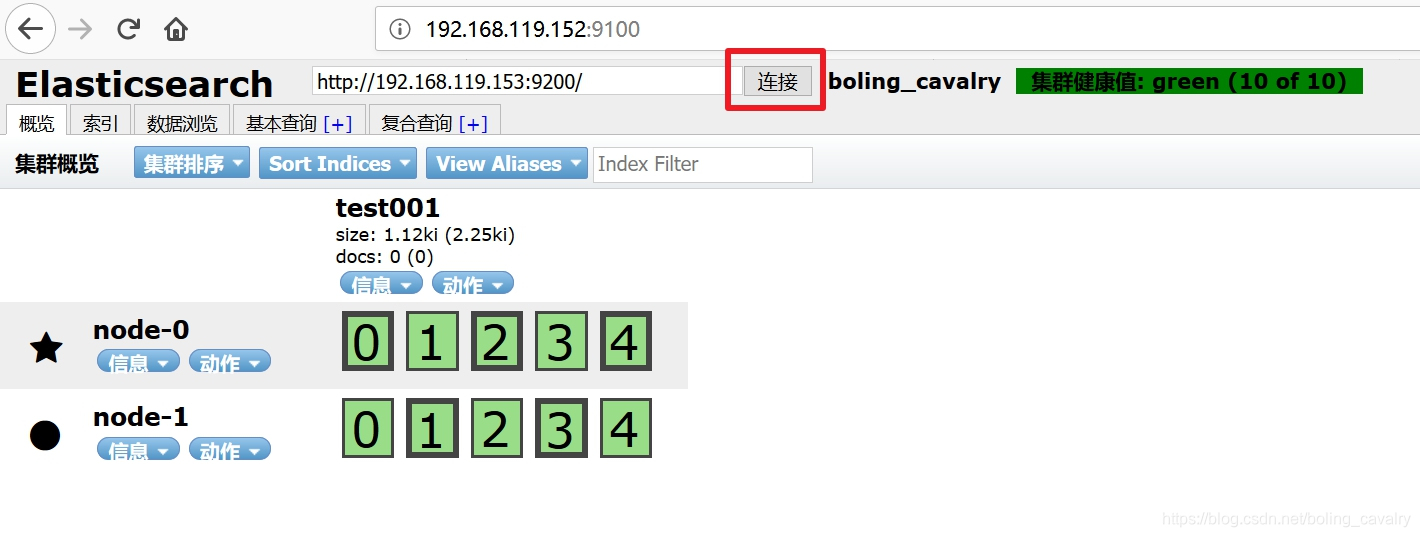
- 在浏览器输入地址:http://192.168.119.152:9100,可见如下图信息,在红框中输入http://192.168.119.153:9200,再点击绿框中的"连接"按钮,即可见到elasticsharch的基本情况:

验证
这里我用的是postman来验证基本功能,读者请选择自己熟悉的http工具,或者写代码来执行;
- 新建所以的操作如下图,选择类型为PUT,地址是:http://192.168.119.152:9200/test001
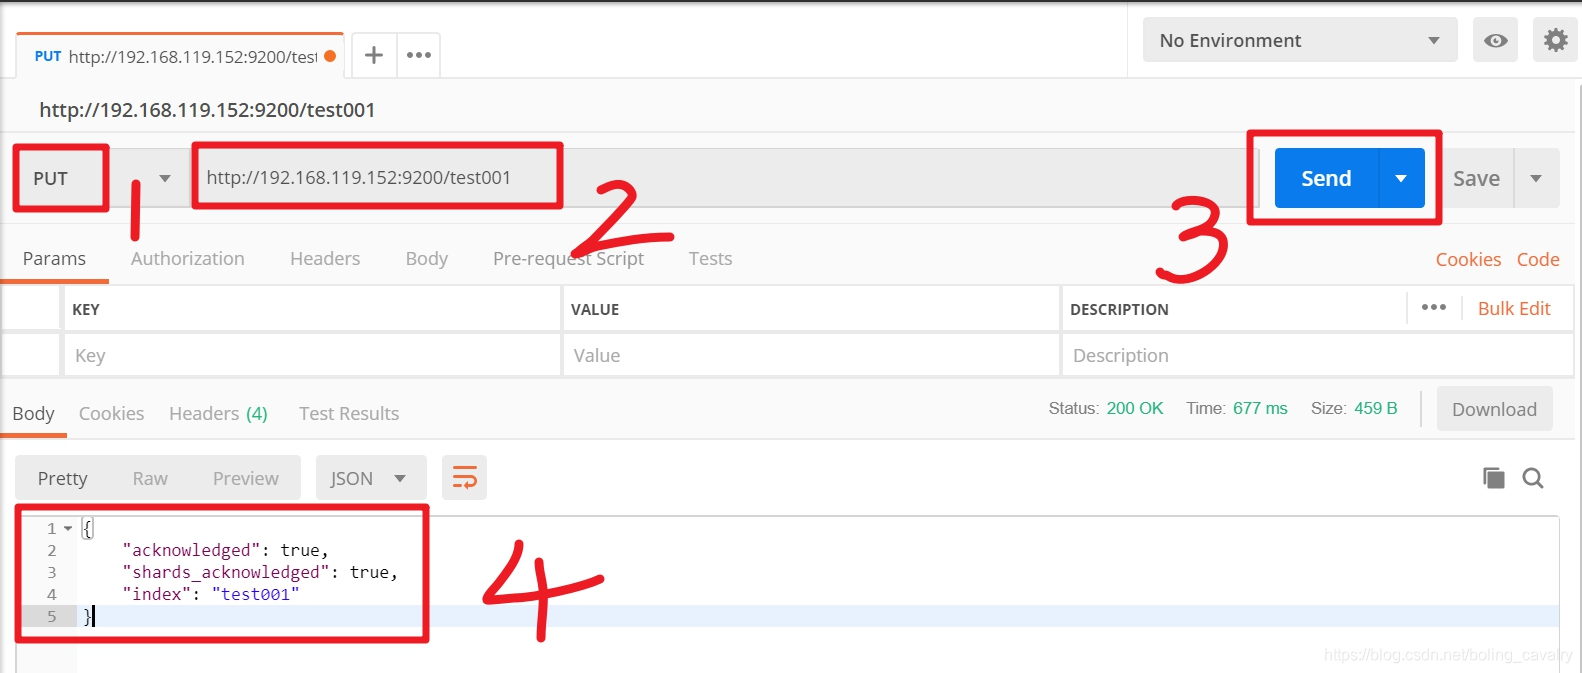
上图中,红框4是elasticsearch的响应信息,表示创建成功;
2. 去head的操作页面,点击下图红框中的“连接”按钮,可见最新的索引创建情况,以及副本分布:
至此,Ubuntu16环境搭建elasticsearch6.5.4集群和head插件实战就全部完成了,希望能在您安装的时候提供一些参考。

- ElasticSearch-5.3.1集群环境搭建,安装ElasticSearch-head插件,安装错误解决
- ElasticSearch-5.3.1集群环境搭建,安装ElasticSearch-head插件,安装错误解决
- [置顶] ElasticSearch-5.3.1集群环境搭建,安装ElasticSearch-head插件,安装错误解决
- ElasticSearch-5.3.1集群环境搭建,安装ElasticSearch-head插件,安装错误解决
- linux环境下Elasticsearch2.3.2集群搭建和插件安装
- 20-linux下ElasticSearch.6.2.2集群安装与head、Kibana、X-Pack..插件的配置安装
- 安装Elasticsearch5.2.2和head 插件环境搭建
- Linux系统下ElasticSearch的环境搭建(含插件)
- centos7下Elasticsearch5.2.2和head 插件环境搭建
- 【elasticsearch】elasticsearch 2.x 环境搭建以及常用插件(head,hq,ik)安装
- ElasticSearch集群搭建及插件安装
- Linux(Ubuntu)下快速搭建C的开发环境(转发)
- Linux环境下快速搭建维基网站
- CentOS6.5使用yum快速搭建LAMP(Linux+Apache+MySQL+PHP)环境
- ElasticSearch5.4.3 环境搭建 2017 (6-IK中文分词插件)
- 【Linux】ubuntu下kafka集群环境搭建
- Linux下搭建集群环境(1)-----------linux下安装JDK1.7
- Linux下搭建spark集群开发环境
- Linux下Hadoop2.7.1集群环境的搭建(超详细版)
- Linux下Kafka集群环境搭建