【码歌】Mybatis框架源码解读
本内容均属原创内容,转载请注明出处:https://www.jianshu.com/p/dc9fd739d829
有一起学习的小伙伴可以加老薛qq:1811112688 一起努力。
从今天开始,我们需要详细花一段时间系统的深入学习一下MyBatis框架底层的内容,我们会从一下几个方向展开讨论:
- MyBatis执行过程
- MyBatis的
Executor
、StatementHandler
、ParameterHandler
、ResultSetHandler
- MyBatis的一级缓存,二级缓存
- MyBatis事务管理机制
- 锁机制
(一):MyBatis执行过程
1-1:编写测试用例
1-1-1: 环境要求
[code]测试用例环境:
Maven:3.6  Idea:2018-3  jdk:11  Mybatis:3.4.6  MySql:8.0
MySql驱动包:8.0.13
1-1-2:测试用例配置
1-1-2-1:pom文件配置
[code]<?xml version="1.0" encoding="UTF-8"?>
<project xmlns="http://maven.apache.org/POM/4.0.0" xmlns:xsi="http://www.w3.org/2001/XMLSchema-instance"
  xsi:schemaLocation="http://maven.apache.org/POM/4.0.0 http://maven.apache.org/xsd/maven-4.0.0.xsd">
  <modelVersion>4.0.0</modelVersion>
  <groupId>com.mage</groupId>
  <artifactId>helloMybatis01</artifactId>
  <version>1.0-SNAPSHOT</version>
  <name>helloMybatis01</name>
  <!-- FIXME change it to the project's website -->
  <url>http://www.example.com</url>
  <properties>
    <project.build.sourceEncoding>UTF-8</project.build.sourceEncoding>
    <maven.compiler.source>1.11</maven.compiler.source>
    <maven.compiler.target>1.11</maven.compiler.target>
  </properties>
  <dependencies>
    <!-- mybatis核心包 -->
    <dependency>
      <groupId>org.mybatis</groupId>
      <artifactId>mybatis</artifactId>
      <version>3.4.6</version>
    </dependency>
    <!-- mysql驱动包 -->
    <dependency>
      <groupId>mysql</groupId>
      <artifactId>mysql-connector-java</artifactId>
      <version>8.0.13</version>
    </dependency>
    <!-- junit测试包 -->
    <dependency>
      <groupId>junit</groupId>
      <artifactId>junit</artifactId>
      <version>4.11</version>
      <scope>test</scope>
    </dependency>
    <!-- 日志文件管理包 -->
    <dependency>
      <groupId>log4j</groupId>
      <artifactId>log4j</artifactId>
      <version>1.2.17</version>
    </dependency>
    <dependency>
      <groupId>org.slf4j</groupId>
      <artifactId>slf4j-api</artifactId>
      <version>1.7.12</version>
    </dependency>
    <dependency>
      <groupId>org.slf4j</groupId>
      <artifactId>slf4j-log4j12</artifactId>
      <version>1.7.12</version>
    </dependency>
  </dependencies>
  <!-- 加载资源配置文件 -->
  <build>
    <resources>
      <resource>
        <directory>src/main/java</directory>
        <includes>
          <include>**/*.xml</include>
        </includes>
      </resource>
    </resources>
  </build>
</project>
1-1-2-2:mybatis.xml文件配置
[code]<?xml version="1.0" encoding="UTF-8" ?>
<!DOCTYPE configuration
        PUBLIC "-//mybatis.org//DTD Config 3.0//EN"
        "http://mybatis.org/dtd/mybatis-3-config.dtd">
<configuration>
    <!-- 环境配置 -->
    <environments default="development">
        <environment id="development">
            <transactionManager type="JDBC"/>
            <!-- 数据库连接相关配置 ,这里动态获取config.properties文件中的内容-->
            <dataSource type="POOLED">
                <property name="driver" value="com.mysql.cj.jdbc.Driver" />
                <property name="url" value="jdbc:mysql://localhost:3306/user" />
                <property name="username" value="root" />
                <property name="password" value="mage1234" />
            </dataSource>
        </environment>
    </environments>
     <mappers>
        <mapper class="com.mage.dao.UserDao"></mapper>
    </mappers>
</configuration>
1-1-2-3:UserDao.java
[code]public interface UserDao {
    public User queryById(int id);
}
1-1-2-4:UserDao.xml配置
[code]<?xml version="1.0" encoding="UTF-8" ?>
<!DOCTYPE mapper
        PUBLIC "-//mybatis.org//DTD Mapper 3.0//EN"
        "http://mybatis.org/dtd/mybatis-3-mapper.dtd">
<mapper namespace="com.mage.dao.UserDao" >
    <sql id="QueryUserSql">
     select * from t_user
    </sql>
    <select id="queryById" resultType="com.mage.vo.User" parameterType="int">
        <include refid="QueryUserSql"></include>
        where id = #{id}
    </select>
</mapper>
1-1-2-5:测试类
[code]public class HiMyBatis{
    private SqlSession session;
    @Before
    public void start() throws IOException {
        //1:读取配置信息 加载配置
        InputStream is = Resources.getResourceAsStream("mybatis.xml");
        //2:构建SqlSessionFactory回话工厂
        SqlSessionFactory sqlSessionFactory = new SqlSessionFactoryBuilder().build(is);
        //3:获取SqlSession回话
        this.session = sqlSessionFactory.openSession();
    }
    @After
    public void destory(){
        if(session!=null){
            //关闭会话
            session.close();
        }
    }
    @Test
    public void test() throws IOException {
        //4:获取代理对象
        UserDao dao = session.getMapper(UserDao.class);
        //5:获取查询结果
        User user = dao.queryById(1);
        System.out.println(user);
    }
}
1-2:MyBatis层次结构
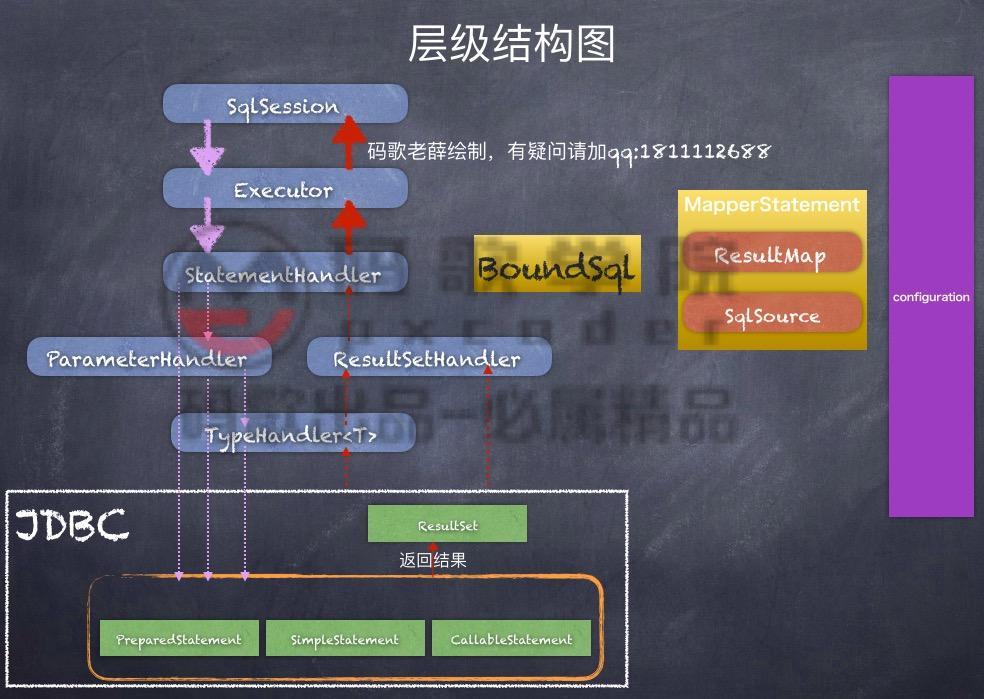
层级结构图
1-2-1:SqlSession:
接收开发人员提供Statement Id 和参数.并返回操作结果:
主要负责【Connection获取】和【Statement对象管理方案】
Statement对象管理方案
- 1)简单管理方案:一个Statement接口对象只执行一次。执行完毕 就会Statement接口对象进行销毁。
- 2)可重用方案: 使用一个Map集合,关键字就是一条Sql语句。对应
内容Statement接口对象,等到SqlSession再次接收到相同命令时,就从map集合找到对应Statement接口使用。
map.put("select * from order", Statement1) - 3)批处理管理方案:将多个Statement包含的SQL语句,交给一个Statement对象 输送到数据库,形成批处理操作
1-2-2: Executor:
MyBatis执行器,是MyBatis 调度的核心,负责SQL语句的生成和查询缓存的维护。
Executor的继承关系
- BaseExecutor:抽象类;减轻Executor接口实现难度。
- CachingExecutour:提高查询效率,在查询时首先到缓存中寻找对应的数据。如果有直接返回,MyBatis框架默认情况下使用执行器缓存执行器,
如果缓存执行器没有得到对应结果时,才会交给其他的执行器执行
1-2-3: StatementHandler:
封装了JDBC Statement操作,负责对JDBC statement 的操作,如设置参数、将Statement结果集转换成List集合。
1-2-4: ParameterHandler:
负责对用户传递的参数转换成JDBC Statement 所需要的参数
1-2-5: ResultSetHandler:
负责将JDBC返回的ResultSet结果集对象转换成List类型的集合
1-2-6 : TypeHandler:
负责java数据类型和jdbc数据类型之间的映射和转换
1-1-7: MappedStatement:
维护了一条节点的封装
1-1-8: SqlSource:
负责根据用户传递的parameterObject,动态地生成SQL语句,将信息封装到BoundSql对象中,并返回BoundSql表示动态生成的SQL语句以及相应的参数信息
1-1-9: Configuration:
MyBatis所有的配置信息都维持在Configuration对象之中
1-3:MyBatis 架构图
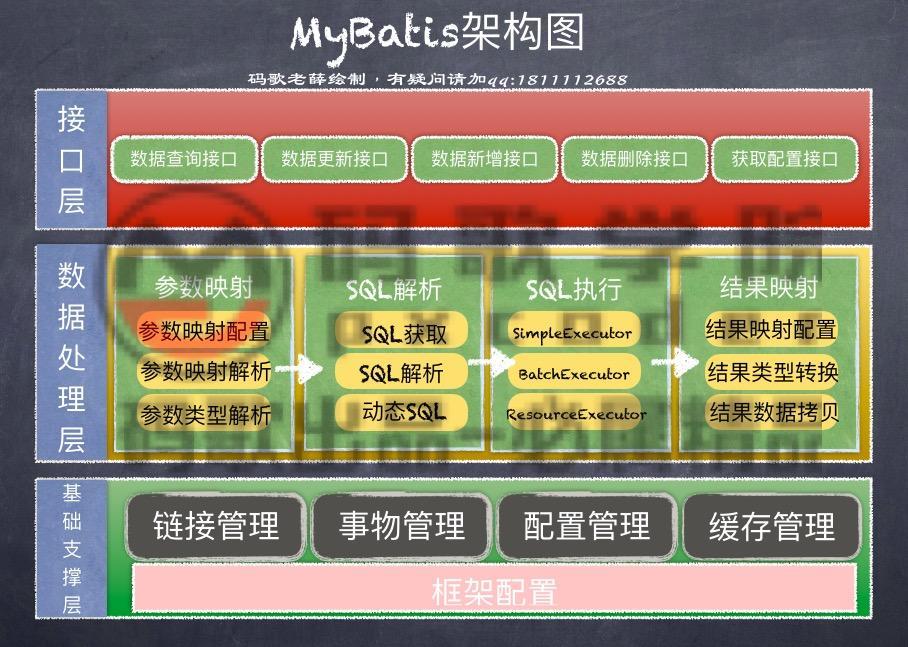
MyBatis 架构图
PS:这个架构图,通过理解MyBatis的层级结构尝试理解就可以了。其实和层级结构图阐述的思想是一致的。
1-4:SqlSessionFactory接口:
作用:主要负责【Connection获取】和【Statement对象管理方案】
1-4-1:SqlSessionFactory的类图

SqlSessionFactory的类图
1-4-2:SqlSessionManager分析
1-4-2-1:源码
[code]public class SqlSessionManager implements SqlSessionFactory, SqlSession {
    private final SqlSessionFactory sqlSessionFactory;
    private final SqlSession sqlSessionProxy;
    //请注意这里
    private final ThreadLocal<SqlSession> localSqlSession = new ThreadLocal();
    //第二步:内部构建SqlSeesion的代理对象
    private SqlSessionManager(SqlSessionFactory sqlSessionFactory) {
        this.sqlSessionFactory = sqlSessionFactory;
        this.sqlSessionProxy = (SqlSession)Proxy.newProxyInstance(SqlSessionFactory.class.getClassLoader(), new Class[]{SqlSession.class}, new SqlSessionManager.SqlSessionInterceptor());
    }
    //第一步:假设调用当前构造器
    public static SqlSessionManager newInstance(Reader reader) {
        return new SqlSessionManager((new SqlSessionFactoryBuilder()).build(reader, (String)null, (Properties)null));
    }
}
1-4-2-2:源码解读
这里老薛将大部分的构造器删除掉了,因为其实核心的代码已经在上面了,就是调用private的构造器创建对象
第一步:读取流数据,调用私有的构造器,创建返回
SqlSession对象
第二步:这里私有的构造器内部就是通过java提供的动态代理创建了一个与之对应的
SqlSession的代理对象。
第三步:耐心的读一下代理对象的创建方式,其实和我们之前聊过的动态代理,和多级代理 一回顾其实很容易。
监控
SqlSession.class这个接口中的所有方法,这里的方法都是核心业务方法,一旦被发现执行,则交由
SqlSessionManager中的内部类
SqlSessionInterceptor对象去实现。
1-4-2-2-1:SqlSessionInterceptor类的源码:
[code]private class SqlSessionInterceptor implements InvocationHandler {
        public SqlSessionInterceptor() {
        }
        public Object invoke(Object proxy, Method method, Object[] args) throws Throwable {
            //注意这里的sqlSession的创建
            SqlSession sqlSession = (SqlSession)SqlSessionManager.this.localSqlSession.get();
            if (sqlSession != null) {
                try {
                    return method.invoke(sqlSession, args);
                } catch (Throwable var12) {
                    throw ExceptionUtil.unwrapThrowable(var12);
                }
            } else {
                //如果代理对象没有将sqlSession对象创建则会重新创建一个
                SqlSession autoSqlSession = SqlSessionManager.this.openSession();
                Object var7;
                try {
                    Object result = method.invoke(autoSqlSession, args);
                    autoSqlSession.commit();
                    var7 = result;
                } catch (Throwable var13) {
                    autoSqlSession.rollback();
                    throw ExceptionUtil.unwrapThrowable(var13);
                } finally {
                    autoSqlSession.close();
                }
                return var7;
            }
        }
    }
1-4-2-2-2:SqlSessionInterceptor源码解读:
1:这里明显是一个代理实现类对象
2:在内部类中的SqlSession对象其实是从外部类中的ThreadLocal中获取的。
3:如果ThreadLocal中不存在,根据跟踪源码,我们发现其实是通过创建的SqlSessionFactory重新带开了一个SqlSession对象,那么重点就在于创建的SqlSessionFactory是那个实现类了。
[code]public SqlSession openSession() {
    return this.sqlSessionFactory.openSession();
}
1-4-2-2-3:为什么目前SqlSessionManager用的不多了?
原因就在与SqlSessionManager中的SqlSession为了保护线程安全,通过ThreadLocal做了线程安全,但是一般情况下,我们的MyBatis框架会和Spring框架一起使用,而此时SqlSession对象的线程安全就显得不那么好用了。
1-4-3:DefaultSqlSessionFactory分析:
1-4-3-1:源码
[code]public class DefaultSqlSessionFactory implements SqlSessionFactory {
    private final Configuration configuration;
    //1:会将配置文件读取到Configuration对象中
    public DefaultSqlSessionFactory(Configuration configuration) {
        this.configuration = configuration;
    }
    //方法1
     private SqlSession openSessionFromDataSource(ExecutorType execType, TransactionIsolationLevel level, boolean autoCommit) {
        Transaction tx = null;
        DefaultSqlSession var8;
        try {
            Environment environment = this.configuration.getEnvironment();
            TransactionFactory transactionFactory = this.getTransactionFactoryFromEnvironment(environment);
            tx = transactionFactory.newTransaction(environment.getDataSource(), level, autoCommit);
            Executor executor = this.configuration.newExecutor(tx, execType);
            var8 = new DefaultSqlSession(this.configuration, executor, autoCommit);
        } catch (Exception var12) {
            this.closeTransaction(tx);
            throw ExceptionFactory.wrapException("Error opening session.  Cause: " + var12, var12);
        } finally {
            ErrorContext.instance().reset();
        }

        return var8;
    }
    //方法2
    private SqlSession openSessionFromConnection(ExecutorType execType, Connection connection) {
        DefaultSqlSession var8;
        try {
            boolean autoCommit;
            try {
                autoCommit = connection.getAutoCommit();
            } catch (SQLException var13) {
                autoCommit = true;
            }
            Environment environment = this.configuration.getEnvironment();
            TransactionFactory transactionFactory = this.getTransactionFactoryFromEnvironment(environment);
            Transaction tx = transactionFactory.newTransaction(connection);
            Executor executor = this.configuration.newExecutor(tx, execType);
            var8 = new DefaultSqlSession(this.configuration, executor, autoCommit);
        } catch (Exception var14) {
            throw ExceptionFactory.wrapException("Error opening session.  Cause: " + var14, var14);
        } finally {
            ErrorContext.instance().reset();
        }
        return var8;
    }
}
1-4-3-2:源码解读
这里老薛也将大部分的内容都删减了一下,留了一个对外可以访问的构造器以及两个核心方法。所有的构造器的调用都是通过从数据源或者是链接中创建返回的。也就是两个私有方法中获取的。这里老薛解读一个:openSessionFromDataSource();方法
- 第一步:首先会将Configuration对象创建好,其实在MyBatis框架启动时,就会读取核心配置文件,即mybatis.xml文件,通过XMLConfigBuilder对象去将xml文件中的数据信息挨个进行填充。
- 第二步:读取Configuration中的Environment,其实就是我们配置的环境,可以获取到配置的数据源、事物提交方式等信息。
- 第三步:获取到TransactionFactory对象以及Executor执行器对象。
- 第四步:通过配置对象、执行器对象创建DefaultSqlSession
ps:最后留个小作业:
1:查看一下SqlSession接口的实现类和源码,你是否发现相似之处呢?
2:通过run我们的第一个代码,和对于层架结构图以及结构图,你是否可以通过DeBug方式,画出来整个程序的流程图呢?
参考内容:http://www.mybatis.org/mybatis-3/zh/
以及MyBatis技术内幕和深入浅出MyBatis技术原理书籍

- 匠心独运解读Mybatis源码,纯手工打造开源框架
- Mybatis如何加载配置文件 源码解读parameterType
- spring事务解读,结合mybatis源码
- SpringMVC+Mybatis框架整合源码
- springmvc4 mybatis 整合 框架源码 bootstrap maven
- springmvc4 mybatis 整合 框架源码 bootstrap SSM
- 源码级别解读 mybatis 插件
- spring 框架整合mybatis的源码分析
- SpringMVC+Mybatis框架整合源码
- SpringMVC+Mybatis框架整合源码 项目SSM
- mybatis--源码解读---XML的解析
- 阿里大牛为你进行源码级别解读 mybatis 插件
- ACE框架解读 - 源码篇
- Java权限框架Shiro过滤连源码解读
- springmvc整合mybatis框架源码 bootstrap html5
- springmvc4 mybatis 整合 框架源码 bootstrap html5 mysql oracle sqlsever spring SSM
- fh admin bootstrap 模版下载 框架 源码 SpringMVC mybatis or hibernate
- 【mybatis源码分析】原理分析之二:框架整体设计
- springmvc4 mybatis 整合 框架源码 bootstrap maven
- SpringMVC+Mybatis框架整合java源码 maven mysql