SpringCloud——服务注册(consul)
一、consul 简介
Consul通过HTTP API和DNS提供服务发现服务。Spring Cloud Consul利用HTTP API进行服务注册和发现。这不会阻止非Spring Cloud应用程序利用DNS界面。Consul代理服务器在通过八卦协议进行通信的集群中运行,并使用Raft协议协议。
1、功能
- 服务发现:Consul client 可以提供服务,例如api或mysql,也可以使用Consul client来发现指定服务的提供者。 使用DNS或HTTP,应用程序可以轻松找到他们所依赖的服务。
- 健康检查:Consul client 可以提供任何数量的健康检查,或者与给定的服务(“Web服务器是否返回200 OK”),或与本地节点(“内存利用率是否低于90%”)相关联。 可以使用此信息来监控集群运行状况,服务发现组件使用此信息将流量从有问题的主机中移除出去。
- KV Store:应用程序可以使用Consul的分层键/值存储,包括动态配置,功能标记,协调,leader选举等等。 简单的HTTP API使其易于使用。
- 多数据中心:Consul支持多个数据中心。 这意味着Consul的用户不必担心构建额外的抽象层以扩展到多个区域。
2、基本架构
Consul 是一个分布式,高可用的系统。 向Consul提供服务的每个节点都运行一个Consul代理。 发现其他服务或获取/设置键/值数据不需要运行代理。 代理负责健康检查节点上的服务以及节点本身。代理与一个或多个Consul服务器通信。Consul 服务器是数据存储和复制的地方。 服务器自己选出一个 leader。 虽然Consul可以在一台服务器上运行,但推荐使用3到5台来避免数据丢失的情况。 每个数据中心都建议使用一组Consul服务器。需要发现其他服务或节点的基础架构组件可以查询任何Consul服务器或任何Consul代理。 代理自动将查询转发到服务器。每个数据中心都运行Consul服务器集群。 当跨数据中心服务发现或配置请求时,本地Consul服务器将请求转发到远程数据中心并返回结果。
3、安装(Centos7)
官网下载地址:https://www.consul.io/downloads.html
解压:
[code]unzip consul_1.2.3_linux_amd64.zip
就会在当前目下看到consul文件
[code]inflating: consul
[root@localhost soft]# ll
total 44540
-rwxr-xr-x. 1 root root 36003713 Feb 14 20:15 consul
-rw-r--r--. 1 root root  8764587 Mar  1 08:50 consul_1.2.3_linux_amd64.zip
执行以下 ./consul 出现以下信息就说明安装成功
[code][root@localhost soft]# ./consul
usage: consul [--version] [--help] <command> [<args>]

Available commands are:
agent          Runs a Consul agent
configtest     Validate config file
event          Fire a new event
exec           Executes a command on Consul nodes
force-leave    Forces a member of the cluster to enter the "left" state
info           Provides debugging information for operators
join           Tell Consul agent to join cluster
keygen         Generates a new encryption key
keyring        Manages gossip layer encryption keys
kv             Interact with the key-value store
leave          Gracefully leaves the Consul cluster and shuts down
lock           Execute a command holding a lock
maint          Controls node or service maintenance mode
members        Lists the members of a Consul cluster
monitor        Stream logs from a Consul agent
operator       Provides cluster-level tools for Consul operators
reload         Triggers the agent to reload configuration files
rtt            Estimates network round trip time between nodes
snapshot       Saves, restores and inspects snapshots of Consul server state
version        Prints the Consul version
watch          Watch for changes in Consul
启动consul (我的虚拟机IP是192.168.0.132)
[code]./consul agent -dev -ui -node=consul-dev -client=192.168.0.132
出现以下信息,说明consul已在启动
[code][root@localhost soft]# ./consul agent -dev -ui -node=consul-dev -client=192.168.0.132
==> Starting Consul agent...
==> Starting Consul agent RPC...
==> Consul agent running!
Version: 'v1.2.3'
Node ID: '564da851-08d0-5ca7-732d-220ea19adae9'
Node name: 'consul-dev'
Datacenter: 'dc1'
Server: true (bootstrap: false)
Client Addr: 192.168.0.132 (HTTP: 8500, HTTPS: -1, DNS: 8600, RPC: 8400)
Cluster Addr: 127.0.0.1 (LAN: 8301, WAN: 8302)
Gossip encrypt: false, RPC-TLS: false, TLS-Incoming: false
Atlas: <disabled>

==> Log data will now stream in as it occurs:

2018/09/22 19:14:43 [DEBUG] Using unique ID "564da851-08d0-5ca7-732d-220ea19adae9" from host as node ID
2018/09/22 19:14:43 [INFO] raft: Initial configuration (index=1): [{Suffrage:Voter ID:127.0.0.1:8300 Address:127.0.0.1:8300}]
2018/09/22 19:14:43 [INFO] raft: Node at 127.0.0.1:8300 [Follower] entering Follower state (Leader: "")
2018/09/22 19:14:43 [INFO] serf: EventMemberJoin: consul-dev 127.0.0.1
2018/09/22 19:14:43 [INFO] consul: Adding LAN server consul-dev (Addr: tcp/127.0.0.1:8300) (DC: dc1)
2018/09/22 19:14:43 [INFO] serf: EventMemberJoin: consul-dev.dc1 127.0.0.1
2018/09/22 19:14:43 [INFO] consul: Adding WAN server consul-dev.dc1 (Addr: tcp/127.0.0.1:8300) (DC: dc1)
2018/09/22 19:14:50 [WARN] raft: Heartbeat timeout from "" reached, starting election
2018/09/22 19:14:50 [INFO] raft: Node at 127.0.0.1:8300 [Candidate] entering Candidate state in term 2
2018/09/22 19:14:50 [DEBUG] raft: Votes needed: 1
2018/09/22 19:14:50 [DEBUG] raft: Vote granted from 127.0.0.1:8300 in term 2. Tally: 1
2018/09/22 19:14:50 [INFO] raft: Election won. Tally: 1
2018/09/22 19:14:50 [INFO] raft: Node at 127.0.0.1:8300 [Leader] entering Leader state
2018/09/22 19:14:50 [INFO] consul: cluster leadership acquired
2018/09/22 19:14:50 [INFO] consul: New leader elected: consul-dev
2018/09/22 19:14:50 [DEBUG] consul: reset tombstone GC to index 3
2018/09/22 19:14:50 [INFO] consul: member 'consul-dev' joined, marking health alive
2018/09/22 19:14:51 [INFO] agent: Synced service 'consul'
2018/09/22 19:14:51 [DEBUG] agent: Node info in sync
==> Failed to check for updates: Get https://checkpoint-api.hashicorp.com/v1/check/consul?arch=amd64&os=linux&signature=&version=1.2.3: net/http: TLS handshake timeout
2018/09/22 19:15:19 [DEBUG] agent: Service 'consul' in sync
2018/09/22 19:15:19 [DEBUG] agent: Node info in sync
2018/09/22 19:16:15 [DEBUG] agent: Service 'consul' in sync
2018/09/22 19:16:15 [DEBUG] agent: Node info in sync
2018/09/22 19:16:44 [DEBUG] http: Request GET /v1/catalog/datacenters (49.937碌s) from=192.168.0.132:38143
2018/09/22 19:16:49 [DEBUG] http: Request GET /v1/catalog/datacenters (28.699碌s) from=192.168.0.132:38143
2018/09/22 19:16:49 [DEBUG] http: Request GET /v1/internal/ui/nodes?dc=dc1&token=<hidden> (526.341碌s) from=192.168.0.132:38144
2018/09/22 19:16:49 [DEBUG] http: Request GET /v1/coordinate/nodes?dc=dc1&token=<hidden> (99.51碌s) from=192.168.0.132:38143
2018/09/22 19:16:49 [DEBUG] http: Request GET /v1/internal/ui/services?dc=dc1&token=<hidden> (92.846碌s) from=192.168.0.132:38143
2018/09/22 19:16:49 [DEBUG] agent: Service 'consul' in sync
2018/09/22 19:16:49 [DEBUG] agent: Service 'consul' in sync
2018/09/22 19:16:49 [DEBUG] agent: Node info in sync
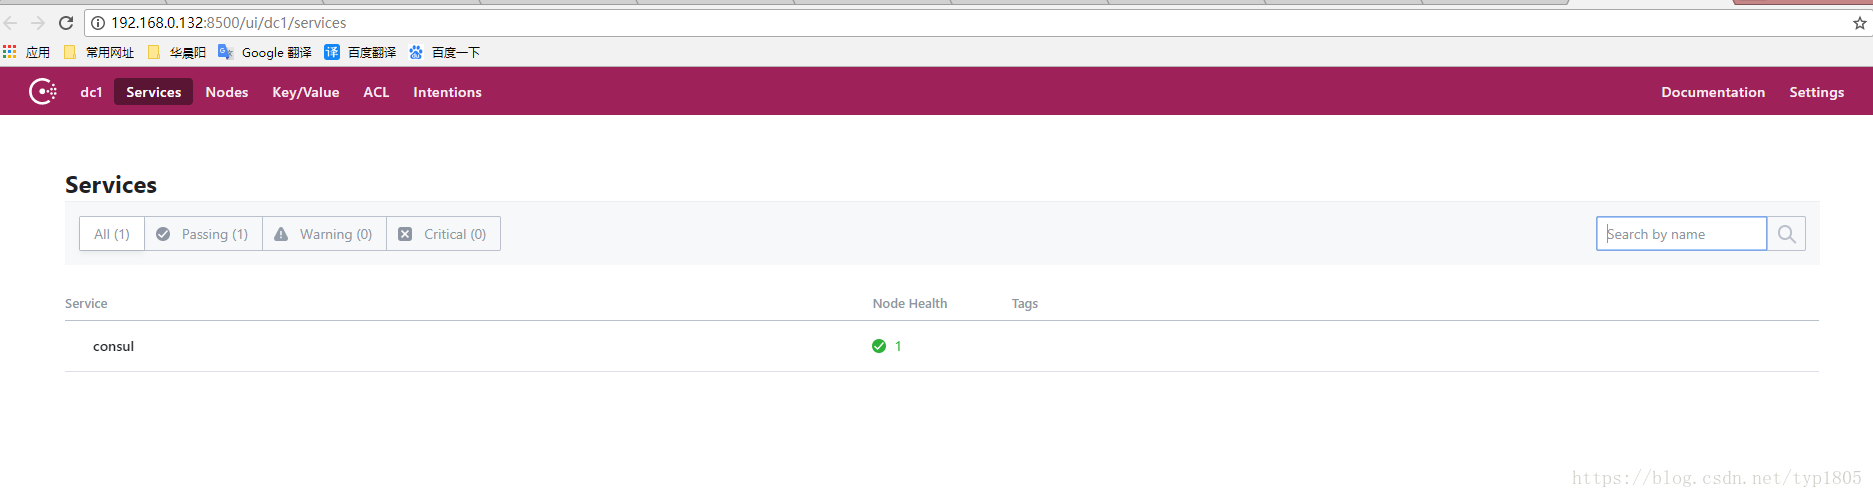
设置防火墙,开通8500端口,浏览器访问http://192.168.0.132:8500 ,效果如下:
二、springcloud consul实现
1、创建名springcloud-consul的springboot工程
pom.xml依赖文件:
[code]<?xml version="1.0" encoding="UTF-8"?>
<project xmlns="http://maven.apache.org/POM/4.0.0" xmlns:xsi="http://www.w3.org/2001/XMLSchema-instance"
xsi:schemaLocation="http://maven.apache.org/POM/4.0.0 http://maven.apache.org/xsd/maven-4.0.0.xsd">
<modelVersion>4.0.0</modelVersion>

<groupId>com.example.demo</groupId>
<artifactId>springcloud-consul</artifactId>
<version>0.0.1-SNAPSHOT</version>
<packaging>pom</packaging>

<name>springcloud-consul</name>
<description>Demo project for Spring Boot</description>

<parent>
<groupId>com.example</groupId>
<artifactId>springcloud-master</artifactId>
<version>0.0.1-SNAPSHOT</version>
</parent>

<properties>
<project.build.sourceEncoding>UTF-8</project.build.sourceEncoding>
<project.reporting.outputEncoding>UTF-8</project.reporting.outputEncoding>
<java.version>1.8</java.version>
<spring-cloud.version>Finchley.RELEASE</spring-cloud.version>
</properties>

<dependencies>
<dependency>
<groupId>org.springframework.boot</groupId>
<artifactId>spring-boot-starter</artifactId>
</dependency>

<dependency>
<groupId>org.springframework.cloud</groupId>
<artifactId>spring-cloud-starter-consul-discovery</artifactId>
</dependency>
<dependency>
<groupId>org.springframework.boot</groupId>
<artifactId>spring-boot-starter-web</artifactId>
</dependency>

<dependency>
<groupId>org.springframework.boot</groupId>
<artifactId>spring-boot-starter-test</artifactId>
<scope>test</scope>
</dependency>
</dependencies>

<dependencyManagement>
<dependencies>
<dependency>
<groupId>org.springframework.cloud</groupId>
<artifactId>spring-cloud-dependencies</artifactId>
<version>${spring-cloud.version}</version>
<type>pom</type>
<scope>import</scope>
</dependency>
</dependencies>
</dependencyManagement>

<build>
<plugins>
<plugin>
<groupId>org.springframework.boot</groupId>
<artifactId>spring-boot-maven-plugin</artifactId>
</plugin>
</plugins>
</build>

</project>
2、application.yml配置文件:
[code]server:
port: 8081

spring:
cloud:
consul:
host: 192.168.0.132
port: 8500
discovery:
healthCheckPath: ${management.context-path}/health
healthCheckInterval: 15s
instance-id: consul-server
application:
name: consul-server
3、启动类添加注解@EnableDiscoveryClient
[code]package com.example.demo.consul;

import org.springframework.boot.SpringApplication;
import org.springframework.boot.autoconfigure.SpringBootApplication;
import org.springframework.cloud.client.discovery.EnableDiscoveryClient;

@SpringBootApplication
@EnableDiscoveryClient
public class SpringcloudConsulApplication {

public static void main(String[] args) {
SpringApplication.run(SpringcloudConsulApplication.class, args);
}
}
4、创建访问接口TestController.java文件
[code]package com.example.demo.consul.controller;

import org.springframework.web.bind.annotation.GetMapping;
import org.springframework.web.bind.annotation.RestController;

/**
* 路径:com.example.demo.consul.controller
* 类名:
* 功能:《用一句描述一下》
* 备注:
* 创建人:typ
* 创建时间:2018/9/22 19:55
* 修改人:
* 修改备注:
* 修改时间:
*/
@RestController
public class TestController {

@GetMapping("/test")
public String test(){
return "Holle World!";
}
}
启动工程,访问http://localhost:8081/test
[code]Holle World!
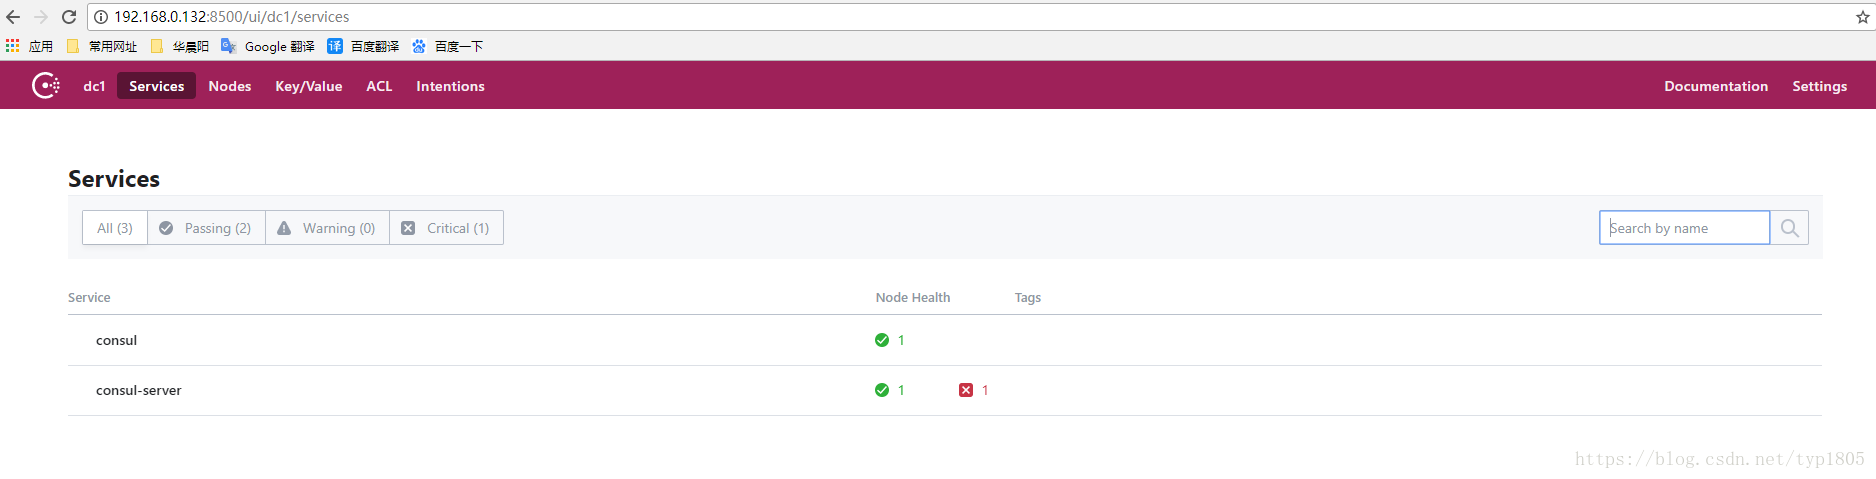
刷新http://192.168.0.132:8500,可以发现consul-server被注册了
源码下载:https://download.csdn.net/download/typ1805/10682977
阅读更多

- springcloud consul +consul 实现服务注册及发现
- Spring Cloud Consul使用——服务注册与发现(注册中心)
- 使用Spring Cloud Consul实现服务的注册和发现
- Spring cloud 服务注册(consul)
- Spring Cloud 服务注册与发现 [ consul ]
- 使用Spring Cloud Consul实现服务的注册和发现
- Spring Cloud构建微服务架构:服务注册与发现(Eureka、Consul)【Dalston版】
- SpringCloud+Consul 服务注册与服务发现
- 使用Spring Cloud Consul实现服务的注册和发现
- 详解Spring Cloud Consul 实现服务注册和发现
- 服务注册发现consul之一:spring cloud consul介绍及安装
- SpringCloud+Consul 服务注册与服务发现
- Spring Cloud构建微服务架构:Consul服务注册与发现
- Spring Cloud构建微服务架构:服务注册与发现(Eureka、Consul)【Dalston版】
- Spring Cloud构建微服务架构:服务注册与发现(Eureka、Consul)【Dalston版】
- SpringCloud之consul (服务注册发现)客户端的安装与简单使用|第十三章-yellowcong
- 详解使用Spring Cloud Consul实现服务的注册和发现
- Spring Cloud Spring Boot mybatis 企业分布式微服务云(二)服务注册与发现(Consul)
- Spring Cloud构建微服务架构:服务注册与发现(Eureka、Consul)【Dalston版】
- SpringCloud之consul(服务注册发现,客户端安装) |第十四章 -yellowcong