Volley(1)
2018-08-29 20:45
176 查看
本文示例下载地址:https://github.com/cmyeyi/NetFramework.git
1、Volley简介
Volley是一个网络通信框架,在2013年的Google I/O被推出。
Volley是一个优秀的网路访问框架,即可以通过它访问普通的网络数据,如json格式的数据,也可以下载图片。
2、Volley的使用场景:
Volley适合进行数据量不大但是通信频繁的网络操作,而对于数据量比较大的网络操作其表现就很糟糕了,比如使用Volley经行下载文件操作等。
3、Volley的基本用法
3.1、Volley的引入
3.1.1 Volley的下载
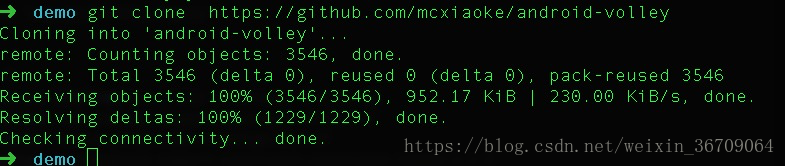
使用git命令下载一份Volley到本地
下载地址:https://github.com/mcxiaoke/android-volley
命令:git clone https://github.com/mcxiaoke/android-volley
3.1.2 新建一个android工程将Volle作为一个模块引入
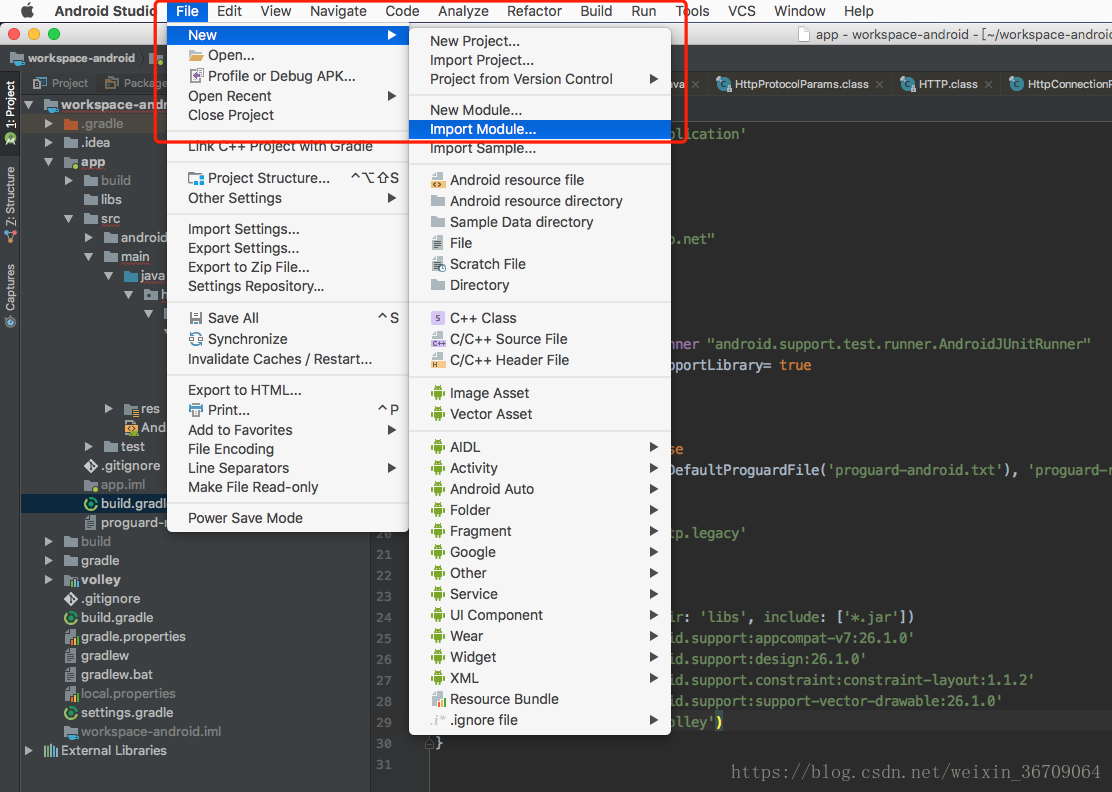
工程中的配置,一般在这样引入后AS会给我们自动配置
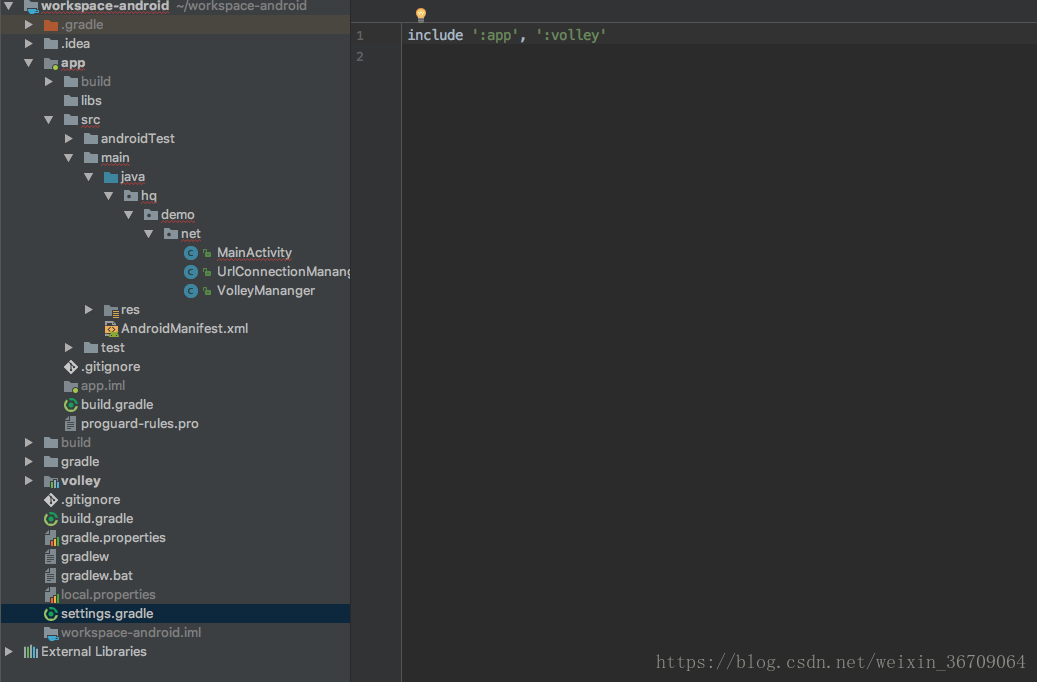
settings.gradle文件中配置如下
然后在app的builde.gradle文件中配置
在引入Volley之后可能会抱一个错误:Error:Gradle DSL method not found: 'has()'
这是因为has()方法已经不能使用了,并且从Grandle3.0中移除了,使用 hasProperty() 或 ext.has() 方法代替。

经过以上配置就可以在项目中使用Volley了
3.1.3 Volley的基本使用
打印结果:
{
"success": "1",
"result": [
{
"weaid": "1",
"week": "星期一",
"cityno": "beijing",
"citynm": "北京",
"cityid": "101010100",
"uptime": "2015-07-20 00:50:00",
"temperature": "22℃",
"humidity": "97%",
"aqi": "101",
"weather": "晴",
"weather_icon": "http://api.k780.com/upload/weather/d/0.gif",
"wind": "东北风",
"winp": "1级",
"temp": "22",
"weatid": "1",
"windid": "13",
"winpid": "201",
"weather_iconid": "0"
},
{
"weaid": "1",
"week": "星期一",
"cityno": "beijing",
"citynm": "北京",
"cityid": "101010100",
"uptime": "2015-07-20 01:50:00",
"temperature": "22℃",
"humidity": "99%",
"aqi": "102",
"weather": "晴",
"weather_icon": "http://api.k780.com/upload/weather/d/0.gif",
"wind": "东北风",
"winp": "1级",
"temp": "22",
"weatid": "1",
"windid": "13",
"winpid": "201",
"weather_iconid": "0"
}
]
}
3.1.3.2实践 JsonRequest
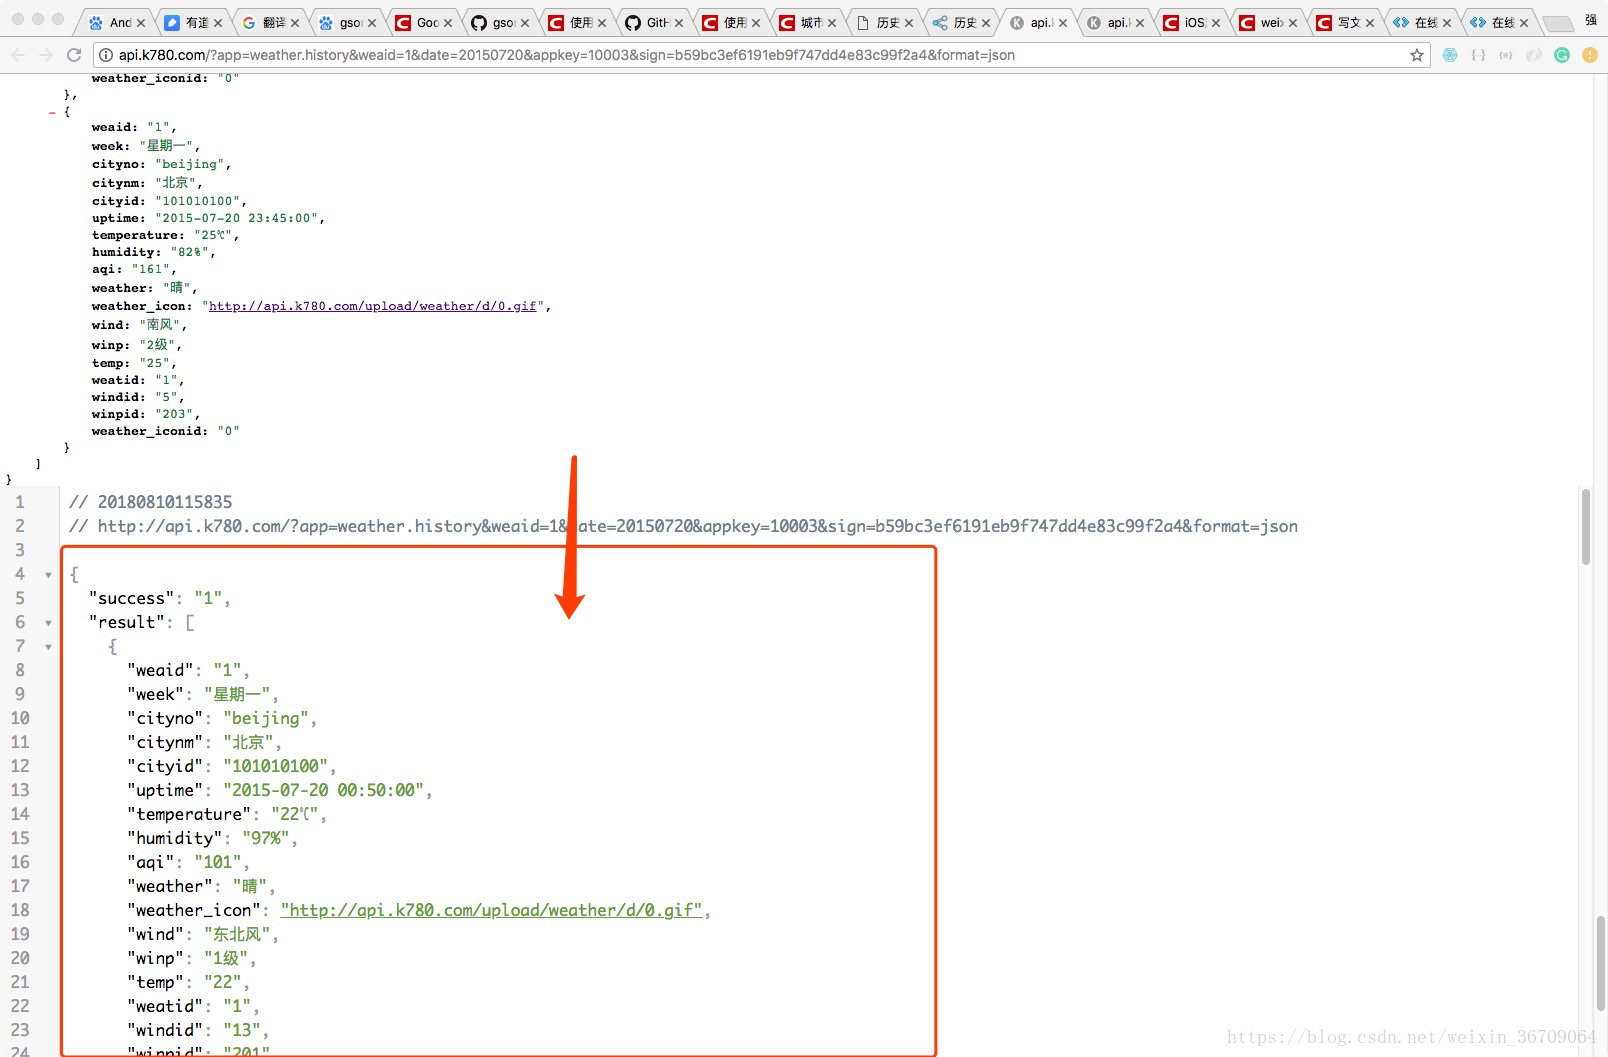
在使用JsonRequest的之前我们需要先配置一下,因为我们需要将返回的json格式的数据转换成一个java实体类,所以首先我们需要根据json数据创建两个类,在浏览器上访问:
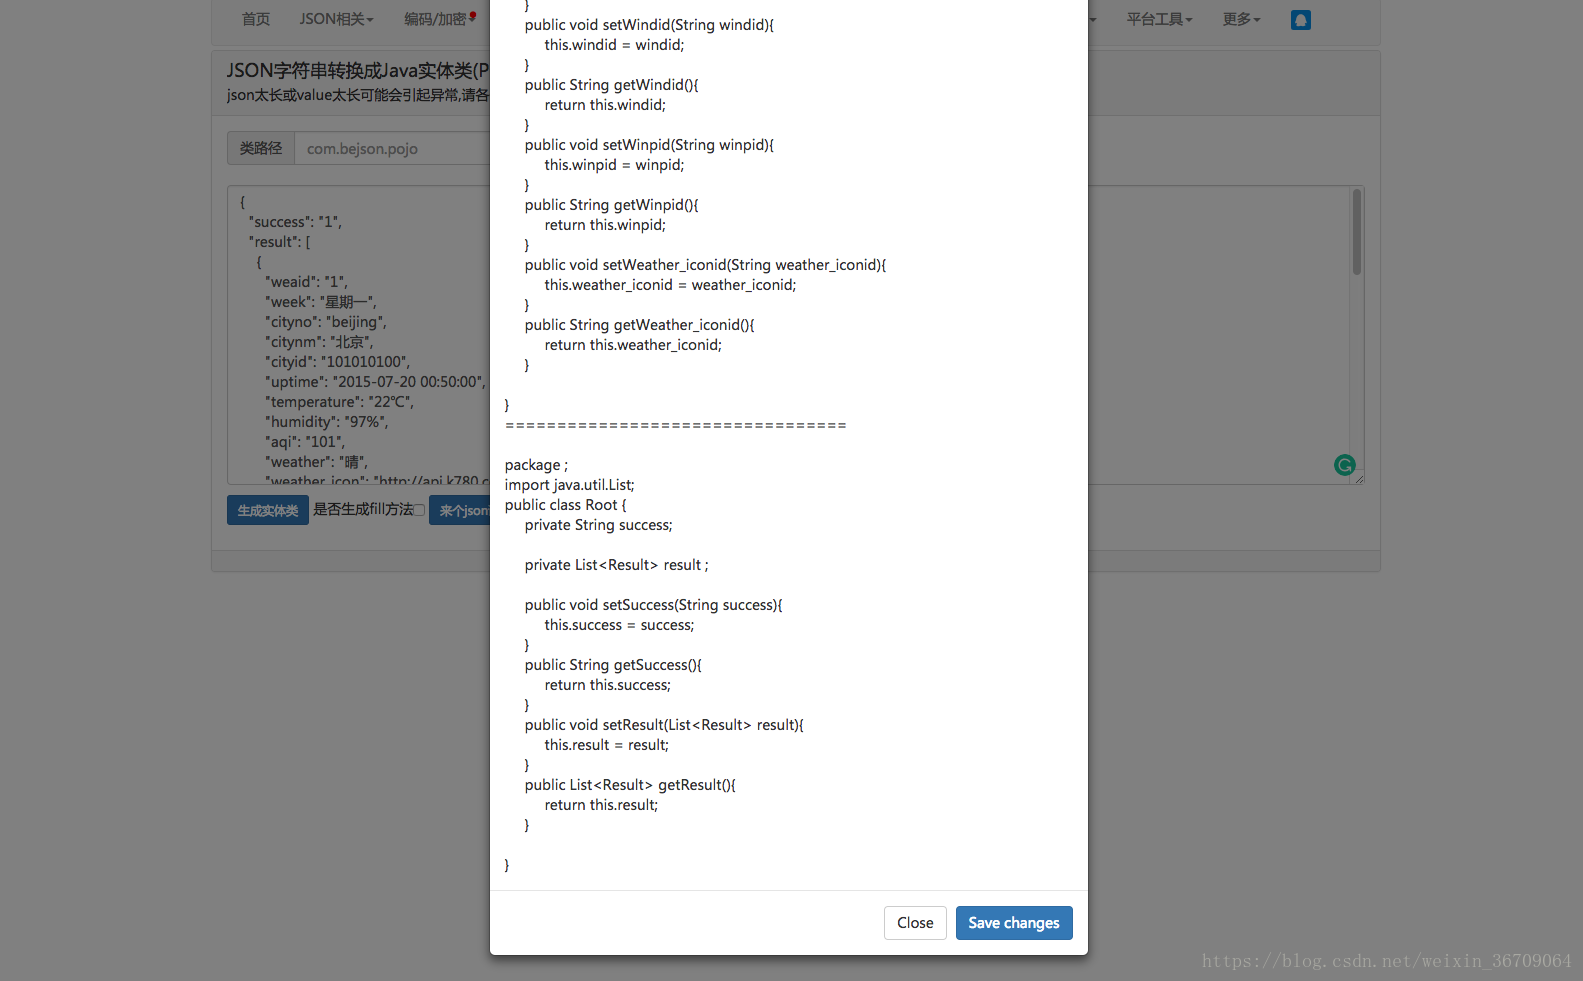
从网页上将json数据复制,然后粘贴到:https://www.bejson.com/json2javapojo/这个工具中生成实体类,具体自己修改,注意可能json数据可是有问题稍微调整一下,选取下面的数据,如下图指引
生成两个类:
实体类:WeatherList
实体类:Result
这里将要使用Gson所以还要在build.gradle中配置
经过上面准备,就可以实践操作来了
结果:
08-12 16:45:27.063 7403-7403/hq.demo.net D/##result##: city:北京weather:晴
08-12 16:45:27.063 7403-7403/hq.demo.net D/##result##: city:北京weather:晴
08-12 16:45:27.063 7403-7403/hq.demo.net D/##result##: city:北京weather:晴
08-12 16:45:27.064 7403-7403/hq.demo.net D/##result##: city:北京weather:晴
08-12 16:45:27.064 7403-7403/hq.demo.net D/##result##: city:北京weather:雷阵雨
08-12 16:45:27.064 7403-7403/hq.demo.net D/##result##: city:北京weather:雷阵雨
08-12 16:45:27.064 7403-7403/hq.demo.net D/##result##: city:北京weather:雷阵雨
08-12 16:45:27.064 7403-7403/hq.demo.net D/##result##: city:北京weather:雷阵雨
08-12 16:45:27.064 7403-7403/hq.demo.net D/##result##: city:北京weather:雷阵雨
08-12 16:45:27.064 7403-7403/hq.demo.net D/##result##: city:北京weather:雷阵雨
08-12 16:45:27.064 7403-7403/hq.demo.net D/##result##: city:北京weather:雷阵雨
08-12 16:45:27.064 7403-7403/hq.demo.net D/##result##: city:北京weather:雷阵雨
08-12 16:45:27.064 7403-7403/hq.demo.net D/##result##: city:北京weather:晴
08-12 16:45:27.064 7403-7403/hq.demo.net D/##result##: city:北京weather:雷阵雨
08-12 16:45:27.064 7403-7403/hq.demo.net D/##result##: city:北京weather:晴
08-12 16:45:27.064 7403-7403/hq.demo.net D/##result##: city:北京weather:雷阵雨
08-12 16:45:27.064 7403-7403/hq.demo.net D/##result##: city:北京weather:晴
08-12 16:45:27.064 7403-7403/hq.demo.net D/##result##: city:北京weather:晴
08-12 16:45:27.064 7403-7403/hq.demo.net D/##result##: city:北京weather:晴
08-12 16:45:27.064 7403-7403/hq.demo.net D/##result##: city:北京weather:晴
08-12 16:45:27.065 7403-7403/hq.demo.net D/##result##: city:北京weather:晴
08-12 16:45:27.065 7403-7403/hq.demo.net D/##result##: city:北京weather:晴
08-12 16:45:27.065 7403-7403/hq.demo.net D/##result##: city:北京weather:晴
08-12 16:45:27.065 7403-7403/hq.demo.net D/##result##: city:北京weather:晴
注意上面使用
JsonObjectRequest的时候要注意,它有两个构造方法,
上面使用的是
public JsonObjectRequest(String url, JSONObject jsonRequest, Listener<JSONObject> listener, ErrorListener errorListener);
如果使用
public JsonObjectRequest(int method, String url, JSONObject jsonRequest, Listener<JSONObject> listener, ErrorListener errorListener)
就要注意了,第一个参数我们可以:Request.Method.POST,如果这样那么就需要我们构造第三个参数,jsonRequest,如下
上面使用的的post请求,但是上面是获取不到数据的,因为我们服务端是对于访问的格式不支持paramJsonObject在请求的时候再url中是一个json串,服务端不识别,这要求服务端支持。一般来说在访问之前是会登录的,会带着token过去,这样可以防止接口被攻击,所以这里记录一下。如果我们不传第一个参数,那么从源码我们可以看到,会判断第三个参数是否为null,如果为null请求方式是GET,否则是POST;
下面是源码:
3.1.3.3实践 ImageRequest加载图片
图片的地址自己可以修改,不能保证目前使用的图片地址在被看到的时候还能够使用
上面使用的方法对应接口如下,从源码中复制过来的,可以看到如果我们使用下面第二个接口,也就是不传scaleType,默认使用的缩放方式是:ScaleType.CENTER_INSIDE
3.1.3.4 实践ImageLoader
实际上ImageLoader内部同样使用的是ImageRequest;
ImageLoader 部分源码:
这里是简单使用ImageLoader来实现图片的加载,后面将单独出来讲解ImageLoader相关原理;
3.1.3.5 NetworkImageView的使用
NetworkImageView继承至ImageVIew,里面封装了ImageLoader,可以看下面的源码部分,实际上跟使用ImageLoader是一个道理
源码
项目下载地址:
1、Volley简介
Volley是一个网络通信框架,在2013年的Google I/O被推出。
Volley是一个优秀的网路访问框架,即可以通过它访问普通的网络数据,如json格式的数据,也可以下载图片。
2、Volley的使用场景:
Volley适合进行数据量不大但是通信频繁的网络操作,而对于数据量比较大的网络操作其表现就很糟糕了,比如使用Volley经行下载文件操作等。
3、Volley的基本用法
3.1、Volley的引入
3.1.1 Volley的下载
使用git命令下载一份Volley到本地
下载地址:https://github.com/mcxiaoke/android-volley
命令:git clone https://github.com/mcxiaoke/android-volley
3.1.2 新建一个android工程将Volle作为一个模块引入
工程中的配置,一般在这样引入后AS会给我们自动配置
settings.gradle文件中配置如下
include ':app', ':volley'
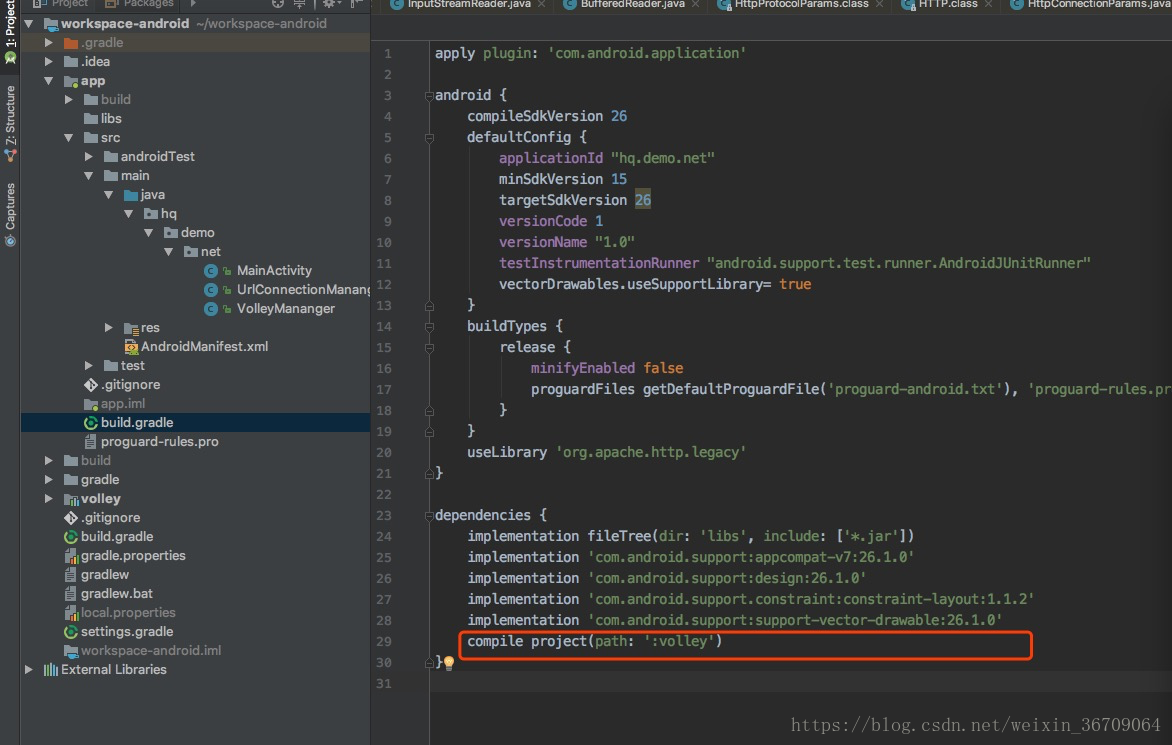
然后在app的builde.gradle文件中配置
dependencies {
implementation fileTree(dir: 'libs', include: ['*.jar'])
implementation 'com.android.support:appcompat-v7:26.1.0'
implementation 'com.android.support:design:26.1.0'
implementation 'com.android.support.constraint:constraint-layout:1.1.2'
implementation 'com.android.support:support-vector-drawable:26.1.0'
compile project(path: ':volley')
}
在引入Volley之后可能会抱一个错误:Error:Gradle DSL method not found: 'has()'
这是因为has()方法已经不能使用了,并且从Grandle3.0中移除了,使用 hasProperty() 或 ext.has() 方法代替。
经过以上配置就可以在项目中使用Volley了
3.1.3 Volley的基本使用
3.1.3.1实践 StringRequest
private void testStringRequest() {
String url = "http://api.k780.com/?app=weather.history&weaid=1&date=2015-07-20&appkey=10003&sign=b59bc3ef6191eb9f747dd4e83c99f2a4&format=json";
RequestQueue queue = Volley.newRequestQueue(getApplicationContext());
StringRequest stringRequest = new StringRequest(Request.Method.GET, url, new Response.Listener<String>() {
@Override
public void onResponse(String response) {
Log.i("response:", response);
}
}, new Response.ErrorListener() {
@Override
public void onErrorResponse(VolleyError error) {
Log.e("error",error.getMessage());
}
}
);
queue.add(stringRequest);
}
打印结果:
{
"success": "1",
"result": [
{
"weaid": "1",
"week": "星期一",
"cityno": "beijing",
"citynm": "北京",
"cityid": "101010100",
"uptime": "2015-07-20 00:50:00",
"temperature": "22℃",
"humidity": "97%",
"aqi": "101",
"weather": "晴",
"weather_icon": "http://api.k780.com/upload/weather/d/0.gif",
"wind": "东北风",
"winp": "1级",
"temp": "22",
"weatid": "1",
"windid": "13",
"winpid": "201",
"weather_iconid": "0"
},
{
"weaid": "1",
"week": "星期一",
"cityno": "beijing",
"citynm": "北京",
"cityid": "101010100",
"uptime": "2015-07-20 01:50:00",
"temperature": "22℃",
"humidity": "99%",
"aqi": "102",
"weather": "晴",
"weather_icon": "http://api.k780.com/upload/weather/d/0.gif",
"wind": "东北风",
"winp": "1级",
"temp": "22",
"weatid": "1",
"windid": "13",
"winpid": "201",
"weather_iconid": "0"
}
]
}
3.1.3.2实践 JsonRequest
在使用JsonRequest的之前我们需要先配置一下,因为我们需要将返回的json格式的数据转换成一个java实体类,所以首先我们需要根据json数据创建两个类,在浏览器上访问:
http://api.k780.com/?app=weather.history&weaid=1&date=2015-07-20&appkey=10003&sign=b59bc3ef6191eb9f747dd4e83c99f2a4&format=json
从网页上将json数据复制,然后粘贴到:https://www.bejson.com/json2javapojo/这个工具中生成实体类,具体自己修改,注意可能json数据可是有问题稍微调整一下,选取下面的数据,如下图指引
生成两个类:
实体类:WeatherList
import java.util.List;

public class WeatherList {
private String success;

private List<Result> result;

public void setSuccess(String success) {
this.success = success;
}

public String getSuccess() {
return this.success;
}

public void setResult(List<Result> result) {
this.result = result;
}

public List<Result> getResult() {
return this.result;
}
}
实体类:Result
public class Result {
private String weaid;

private String week;

private String cityno;

private String citynm;

private String cityid;

private String uptime;

private String temperature;

private String humidity;

private String aqi;

private String weather;

private String weather_icon;

private String wind;

private String winp;

private String temp;

private String weatid;

private String windid;

private String winpid;

private String weather_iconid;

public void setWeaid(String weaid) {
this.weaid = weaid;
}

public String getWeaid() {
return this.weaid;
}

public void setWeek(String week) {
this.week = week;
}

public String getWeek() {
return this.week;
}

public void setCityno(String cityno) {
this.cityno = cityno;
}

public String getCityno() {
return this.cityno;
}

public void setCitynm(String citynm) {
this.citynm = citynm;
}

public String getCitynm() {
return this.citynm;
}

public void setCityid(String cityid) {
this.cityid = cityid;
}

public String getCityid() {
return this.cityid;
}

public void setUptime(String uptime) {
this.uptime = uptime;
}

public String getUptime() {
return this.uptime;
}

public void setTemperature(String temperature) {
this.temperature = temperature;
}

public String getTemperature() {
return this.temperature;
}

public void setHumidity(String humidity) {
this.humidity = humidity;
}

public String getHumidity() {
return this.humidity;
}

public void setAqi(String aqi) {
this.aqi = aqi;
}

public String getAqi() {
return this.aqi;
}

public void setWeather(String weather) {
this.weather = weather;
}

public String getWeather() {
return this.weather;
}

public void setWeather_icon(String weather_icon) {
this.weather_icon = weather_icon;
}

public String getWeather_icon() {
return this.weather_icon;
}

public void setWind(String wind) {
this.wind = wind;
}

public String getWind() {
return this.wind;
}

public void setWinp(String winp) {
this.winp = winp;
}

public String getWinp() {
return this.winp;
}

public void setTemp(String temp) {
this.temp = temp;
}

public String getTemp() {
return this.temp;
}

public void setWeatid(String weatid) {
this.weatid = weatid;
}

public String getWeatid() {
return this.weatid;
}

public void setWindid(String windid) {
this.windid = windid;
}

public String getWindid() {
return this.windid;
}

public void setWinpid(String winpid) {
this.winpid = winpid;
}

public String getWinpid() {
return this.winpid;
}

public void setWeather_iconid(String weather_iconid) {
this.weather_iconid = weather_iconid;
}

public String getWeather_iconid() {
return this.weather_iconid;
}
}
这里将要使用Gson所以还要在build.gradle中配置
dependencies {
implementation fileTree(dir: 'libs', include: ['*.jar'])
implementation 'com.android.support:appcompat-v7:26.1.0'
implementation 'com.android.support:design:26.1.0'
implementation 'com.android.support.constraint:constraint-layout:1.1.2'
implementation 'com.android.support:support-vector-drawable:26.1.0'
compile project(path: ':volley')
compile 'com.google.code.gson:gson:2.8.5'
}
经过上面准备,就可以实践操作来了
private void testJsonRequest() {
String url = "http://api.k780.com/?app=weather.history&weaid=1&date=2015-07-20&appkey=10003&sign=b59bc3ef6191eb9f747dd4e83c99f2a4&format=json";
RequestQueue queue = Volley.newRequestQueue(getApplicationContext());
JsonObjectRequest jsonObjectRequest = new JsonObjectRequest(url, null, new Response.Listener<JSONObject>() {

@Override
public void onResponse(JSONObject response) {
WeatherList weatherList = new Gson().fromJson(response.toString(), WeatherList.class);
if(weatherList != null) {
for(Result r : weatherList.getResult()) {
Log.d("##result##", "city:"+r.getCitynm() + "weather:"+ r.getWeather() +"\n");
}
}

}
}, new Response.ErrorListener() {
@Override
public void onErrorResponse(VolleyError error) {

}
});
queue.add(jsonObjectRequest);
}
结果:
08-12 16:45:27.063 7403-7403/hq.demo.net D/##result##: city:北京weather:晴
08-12 16:45:27.063 7403-7403/hq.demo.net D/##result##: city:北京weather:晴
08-12 16:45:27.063 7403-7403/hq.demo.net D/##result##: city:北京weather:晴
08-12 16:45:27.064 7403-7403/hq.demo.net D/##result##: city:北京weather:晴
08-12 16:45:27.064 7403-7403/hq.demo.net D/##result##: city:北京weather:雷阵雨
08-12 16:45:27.064 7403-7403/hq.demo.net D/##result##: city:北京weather:雷阵雨
08-12 16:45:27.064 7403-7403/hq.demo.net D/##result##: city:北京weather:雷阵雨
08-12 16:45:27.064 7403-7403/hq.demo.net D/##result##: city:北京weather:雷阵雨
08-12 16:45:27.064 7403-7403/hq.demo.net D/##result##: city:北京weather:雷阵雨
08-12 16:45:27.064 7403-7403/hq.demo.net D/##result##: city:北京weather:雷阵雨
08-12 16:45:27.064 7403-7403/hq.demo.net D/##result##: city:北京weather:雷阵雨
08-12 16:45:27.064 7403-7403/hq.demo.net D/##result##: city:北京weather:雷阵雨
08-12 16:45:27.064 7403-7403/hq.demo.net D/##result##: city:北京weather:晴
08-12 16:45:27.064 7403-7403/hq.demo.net D/##result##: city:北京weather:雷阵雨
08-12 16:45:27.064 7403-7403/hq.demo.net D/##result##: city:北京weather:晴
08-12 16:45:27.064 7403-7403/hq.demo.net D/##result##: city:北京weather:雷阵雨
08-12 16:45:27.064 7403-7403/hq.demo.net D/##result##: city:北京weather:晴
08-12 16:45:27.064 7403-7403/hq.demo.net D/##result##: city:北京weather:晴
08-12 16:45:27.064 7403-7403/hq.demo.net D/##result##: city:北京weather:晴
08-12 16:45:27.064 7403-7403/hq.demo.net D/##result##: city:北京weather:晴
08-12 16:45:27.065 7403-7403/hq.demo.net D/##result##: city:北京weather:晴
08-12 16:45:27.065 7403-7403/hq.demo.net D/##result##: city:北京weather:晴
08-12 16:45:27.065 7403-7403/hq.demo.net D/##result##: city:北京weather:晴
08-12 16:45:27.065 7403-7403/hq.demo.net D/##result##: city:北京weather:晴
注意上面使用
JsonObjectRequest的时候要注意,它有两个构造方法,
上面使用的是
public JsonObjectRequest(String url, JSONObject jsonRequest, Listener<JSONObject> listener, ErrorListener errorListener);
如果使用
public JsonObjectRequest(int method, String url, JSONObject jsonRequest, Listener<JSONObject> listener, ErrorListener errorListener)
就要注意了,第一个参数我们可以:Request.Method.POST,如果这样那么就需要我们构造第三个参数,jsonRequest,如下
private void testJsonRequest() {
String url = "http://api.k780.com/?app=weather.history";
Map<String, String> params = new HashMap<String, String>();
params.put("weaid", "1");
params.put("date", "2015-07-20");
params.put("appkey", "10003");
params.put("sign", "b59bc3ef6191eb9f747dd4e83c99f2a4");
params.put("format", "json");
JSONObject paramJsonObject = new JSONObject(params);

RequestQueue queue = Volley.newRequestQueue(getApplicationContext());
JsonObjectRequest jsonObjectRequest = new JsonObjectRequest(Request.Method.POST,paramJsonObject, null, new Response.Listener<JSONObject>() {

@Override
public void onResponse(JSONObject response) {
WeatherList weatherList = new Gson().fromJson(response.toString(), WeatherList.class);
if(weatherList != null) {
Log.d("##getSuccess##", "city:"+weatherList.getSuccess()+ "\n");
for(Result r : weatherList.getResult()) {
Log.d("##result##", "city:"+r.getCitynm() + "weather:"+ r.getWeather() +"\n");
}
}

}
}, new Response.ErrorListener() {
@Override
public void onErrorResponse(VolleyError error) {

}
});
queue.add(jsonObjectRequest);
}
上面使用的的post请求,但是上面是获取不到数据的,因为我们服务端是对于访问的格式不支持paramJsonObject在请求的时候再url中是一个json串,服务端不识别,这要求服务端支持。一般来说在访问之前是会登录的,会带着token过去,这样可以防止接口被攻击,所以这里记录一下。如果我们不传第一个参数,那么从源码我们可以看到,会判断第三个参数是否为null,如果为null请求方式是GET,否则是POST;
下面是源码:
/**
* A request for retrieving a {@link JSONObject} response body at a given URL, allowing for an
* optional {@link JSONObject} to be passed in as part of the request body.
*/
public class JsonObjectRequest extends JsonRequest<JSONObject> {

/**
* Creates a new request.
* @param method the HTTP method to use
* @param url URL to fetch the JSON from
* @param jsonRequest A {@link JSONObject} to post with the request. Null is allowed and
*   indicates no parameters will be posted along with request.
* @param listener Listener to receive the JSON response
* @param errorListener Error listener, or null to ignore errors.
*/
public JsonObjectRequest(int method, String url, JSONObject jsonRequest,
Listener<JSONObject> listener, ErrorListener errorListener) {
super(method, url, (jsonRequest == null) ? null : jsonRequest.toString(), listener,
errorListener);
}

/**
* Constructor which defaults to <code>GET</code> if <code>jsonRequest</code> is
* <code>null</code>, <code>POST</code> otherwise.
*
* @see #JsonObjectRequest(int, String, JSONObject, Listener, ErrorListener)
*/
public JsonObjectRequest(String url, JSONObject jsonRequest, Listener<JSONObject> listener,
ErrorListener errorListener) {
this(jsonRequest == null ? Method.GET : Method.POST, url, jsonRequest,
listener, errorListener);
}

@Override
protected Response<JSONObject> parseNetworkResponse(NetworkResponse response) {
try {
String jsonString = new String(response.data,
HttpHeaderParser.parseCharset(response.headers, PROTOCOL_CHARSET));
return Response.success(new JSONObject(jsonString),
HttpHeaderParser.parseCacheHeaders(response));
} catch (UnsupportedEncodingException e) {
return Response.error(new ParseError(e));
} catch (JSONException je) {
return Response.error(new ParseError(je));
}
}
}
3.1.3.3实践 ImageRequest加载图片
图片的地址自己可以修改,不能保证目前使用的图片地址在被看到的时候还能够使用
private void testImageRequest() {
String url = "http://img3.imgtn.bdimg.com/it/u=2568996661,777819818&fm=27&gp=0.jpg";

RequestQueue queue = Volley.newRequestQueue(getApplicationContext());
ImageRequest jsonObjectRequest = new ImageRequest(url, new Response.Listener<Bitmap>() {

@Override
public void onResponse(Bitmap response) {
if(response != null) {
mImageView.setImageBitmap(response);
}

}
}, 0, 0, ImageView.ScaleType.CENTER_CROP, Bitmap.Config.RGB_565, new Response.ErrorListener() {
@Override
public void onErrorResponse(VolleyError error) {

}
});
queue.add(jsonObjectRequest);
}
上面使用的方法对应接口如下,从源码中复制过来的,可以看到如果我们使用下面第二个接口,也就是不传scaleType,默认使用的缩放方式是:ScaleType.CENTER_INSIDE
/**
* Creates a new image request, decoding to a maximum specified width and
* height. If both width and height are zero, the image will be decoded to
* its natural size. If one of the two is nonzero, that dimension will be
* clamped and the other one will be set to preserve the image's aspect
* ratio. If both width and height are nonzero, the image will be decoded to
* be fit in the rectangle of dimensions width x height while keeping its
* aspect ratio.
*
* @param url URL of the image
* @param listener Listener to receive the decoded bitmap
* @param maxWidth Maximum width to decode this bitmap to, or zero for none
* @param maxHeight Maximum height to decode this bitmap to, or zero for
*            none
* @param scaleType The ImageViews ScaleType used to calculate the needed image size.
* @param decodeConfig Format to decode the bitmap to
* @param errorListener Error listener, or null to ignore errors
*/
public ImageRequest(String url, Response.Listener<Bitmap> listener, int maxWidth, int maxHeight,
ScaleType scaleType, Config decodeConfig, Response.ErrorListener errorListener) {
super(Method.GET, url, errorListener);
setRetryPolicy(new DefaultRetryPolicy(DEFAULT_IMAGE_TIMEOUT_MS, DEFAULT_IMAGE_MAX_RETRIES,
DEFAULT_IMAGE_BACKOFF_MULT));
mListener = listener;
mDecodeConfig = decodeConfig;
mMaxWidth = maxWidth;
mMaxHeight = maxHeight;
mScaleType = scaleType;
}
/**
* For API compatibility with the pre-ScaleType variant of the constructor. Equivalent to
* the normal constructor with {@code ScaleType.CENTER_INSIDE}.
*/
@Deprecated
public ImageRequest(String url, Response.Listener<Bitmap> listener, int maxWidth, int maxHeight,
Config decodeConfig, Response.ErrorListener errorListener) {
this(url, listener, maxWidth, maxHeight,
ScaleType.CENTER_INSIDE, decodeConfig, errorListener);
}3.1.3.4 实践ImageLoader
实际上ImageLoader内部同样使用的是ImageRequest;
private void testImageLoader() {
String url = "http://img3.imgtn.bdimg.com/it/u=2568996661,777819818&fm=27&gp=0.jpg";
RequestQueue queue = Volley.newRequestQueue(getApplicationContext());
ImageLoader.ImageCache imageCache = new ImageLoader.ImageCache() {
@Override
public Bitmap getBitmap(String url) {
return null;
}

@Override
public void putBitmap(String url, Bitmap bitmap) {

}
};
ImageLoader.ImageListener imageListener = ImageLoader.getImageListener(mImageView,R.mipmap.ic_launcher,R.mipmap.ic_launcher);
ImageLoader imageLoader = new ImageLoader(queue,imageCache);
imageLoader.get(url,imageListener);
}
ImageLoader 部分源码:
/**
* Returns an ImageContainer for the requested URL.
*
* The ImageContainer will contain either the specified default bitmap or the loaded bitmap.
* If the default was returned, the {@link ImageLoader} will be invoked when the
* request is fulfilled.
*
* @param requestUrl The URL of the image to be loaded.
*/
public ImageContainer get(String requestUrl, final ImageListener listener) {
return get(requestUrl, listener, 0, 0);
}

/**
* Equivalent to calling {@link #get(String, ImageListener, int, int, ScaleType)} with
* {@code Scaletype == ScaleType.CENTER_INSIDE}.
*/
public ImageContainer get(String requestUrl, ImageListener imageListener,
int maxWidth, int maxHeight) {
return get(requestUrl, imageListener, maxWidth, maxHeight, ScaleType.CENTER_INSIDE);
}

/**
* Issues a bitmap request with the given URL if that image is not available
* in the cache, and returns a bitmap container that contains all of the data
* relating to the request (as well as the default image if the requested
* image is not available).
* @param requestUrl The url of the remote image
* @param imageListener The listener to call when the remote image is loaded
* @param maxWidth The maximum width of the returned image.
* @param maxHeight The maximum height of the returned image.
* @param scaleType The ImageViews ScaleType used to calculate the needed image size.
* @return A container object that contains all of the properties of the request, as well as
*     the currently available image (default if remote is not loaded).
*/
public ImageContainer get(String requestUrl, ImageListener imageListener,
int maxWidth, int maxHeight, ScaleType scaleType) {

// only fulfill requests that were initiated from the main thread.
throwIfNotOnMainThread();

final String cacheKey = getCacheKey(requestUrl, maxWidth, maxHeight, scaleType);

// Try to look up the request in the cache of remote images.
Bitmap cachedBitmap = mCache.getBitmap(cacheKey);
if (cachedBitmap != null) {
// Return the cached bitmap.
ImageContainer container = new ImageContainer(cachedBitmap, requestUrl, null, null);
imageListener.onResponse(container, true);
return container;
}

// The bitmap did not exist in the cache, fetch it!
ImageContainer imageContainer =
new ImageContainer(null, requestUrl, cacheKey, imageListener);

// Update the caller to let them know that they should use the default bitmap.
imageListener.onResponse(imageContainer, true);

// Check to see if a request is already in-flight.
BatchedImageRequest request = mInFlightRequests.get(cacheKey);
if (request != null) {
// If it is, add this request to the list of listeners.
request.addContainer(imageContainer);
return imageContainer;
}

// The request is not already in flight. Send the new request to the network and
// track it.
Request<Bitmap> newRequest = makeImageRequest(requestUrl, maxWidth, maxHeight, scaleType,
cacheKey);

mRequestQueue.add(newRequest);
mInFlightRequests.put(cacheKey,
new BatchedImageRequest(newRequest, imageContainer));
return imageContainer;
}
这里是简单使用ImageLoader来实现图片的加载,后面将单独出来讲解ImageLoader相关原理;
3.1.3.5 NetworkImageView的使用
NetworkImageView继承至ImageVIew,里面封装了ImageLoader,可以看下面的源码部分,实际上跟使用ImageLoader是一个道理
private void testNetImageView() {
String url = "http://img3.imgtn.bdimg.com/it/u=2568996661,777819818&fm=27&gp=0.jpg";
RequestQueue queue = Volley.newRequestQueue(getApplicationContext());
ImageLoader.ImageCache imageCache = new ImageLoader.ImageCache() {
@Override
public Bitmap getBitmap(String url) {
return null;
}

@Override
public void putBitmap(String url, Bitmap bitmap) {

}
};
ImageLoader imageLoader = new ImageLoader(queue,imageCache);
mNetworkImageView.setDefaultImageResId(R.mipmap.ic_launcher);
mNetworkImageView.setErrorImageResId(R.mipmap.ic_launcher);
mNetworkImageView.setImageUrl(url,imageLoader);
}
源码
/**
* Sets URL of the image that should be loaded into this view. Note that calling this will
* immediately either set the cached image (if available) or the default image specified by
* {@link NetworkImageView#setDefaultImageResId(int)} on the view.
*
* NOTE: If applicable, {@link NetworkImageView#setDefaultImageResId(int)} and
* {@link NetworkImageView#setErrorImageResId(int)} should be called prior to calling
* this function.
*
* @param url The URL that should be loaded into this ImageView.
* @param imageLoader ImageLoader that will be used to make the request.
*/
public void setImageUrl(String url, ImageLoader imageLoader) {
mUrl = url;
mImageLoader = imageLoader;
// The URL has potentially changed. See if we need to load it.
loadImageIfNecessary(false);
}

/**
* Sets the default image resource ID to be used for this view until the attempt to load it
* completes.
*/
public void setDefaultImageResId(int defaultImage) {
mDefaultImageId = defaultImage;
}

/**
* Sets the error image resource ID to be used for this view in the event that the image
* requested fails to load.
*/
public void setErrorImageResId(int errorImage) {
mErrorImageId = errorImage;
}

/**
* Loads the image for the view if it isn't already loaded.
* @param isInLayoutPass True if this was invoked from a layout pass, false otherwise.
*/
void loadImageIfNecessary(final boolean isInLayoutPass) {
int width = getWidth();
int height = getHeight();
ScaleType scaleType = getScaleType();

boolean wrapWidth = false, wrapHeight = false;
if (getLayoutParams() != null) {
wrapWidth = getLayoutParams().width == LayoutParams.WRAP_CONTENT;
wrapHeight = getLayoutParams().height == LayoutParams.WRAP_CONTENT;
}

// if the view's bounds aren't known yet, and this is not a wrap-content/wrap-content
// view, hold off on loading the image.
boolean isFullyWrapContent = wrapWidth && wrapHeight;
if (width == 0 && height == 0 && !isFullyWrapContent) {
return;
}

// if the URL to be loaded in this view is empty, cancel any old requests and clear the
// currently loaded image.
if (TextUtils.isEmpty(mUrl)) {
if (mImageContainer != null) {
mImageContainer.cancelRequest();
mImageContainer = null;
}
setDefaultImageOrNull();
return;
}

// if there was an old request in this view, check if it needs to be canceled.
if (mImageContainer != null && mImageContainer.getRequestUrl() != null) {
if (mImageContainer.getRequestUrl().equals(mUrl)) {
// if the request is from the same URL, return.
return;
} else {
// if there is a pre-existing request, cancel it if it's fetching a different URL.
mImageContainer.cancelRequest();
setDefaultImageOrNull();
}
}

// Calculate the max image width / height to use while ignoring WRAP_CONTENT dimens.
int maxWidth = wrapWidth ? 0 : width;
int maxHeight = wrapHeight ? 0 : height;

// The pre-existing content of this view didn't match the current URL. Load the new image
// from the network.
ImageContainer newContainer = mImageLoader.get(mUrl,
new ImageListener() {
@Override
public void onErrorResponse(VolleyError error) {
if (mErrorImageId != 0) {
setImageResource(mErrorImageId);
}
}

@Override
public void onResponse(final ImageContainer response, boolean isImmediate) {
// If this was an immediate response that was delivered inside of a layout
// pass do not set the image immediately as it will trigger a requestLayout
// inside of a layout. Instead, defer setting the image by posting back to
// the main thread.
if (isImmediate && isInLayoutPass) {
post(new Runnable() {
@Override
public void run() {
onResponse(response, false);
}
});
return;
}

if (response.getBitmap() != null) {
setImageBitmap(response.getBitmap());
} else if (mDefaultImageId != 0) {
setImageResource(mDefaultImageId);
}
}
}, maxWidth, maxHeight, scaleType);

// update the ImageContainer to be the new bitmap container.
mImageContainer = newContainer;
}
项目下载地址:
https://github.com/cmyeyi/NetFramework.git

相关文章推荐
- Android Volley框架的使用(四)图片的三级缓存策略(内存LruCache+磁盘DiskLruCache+网络Volley)
- volley
- Volley框架
- ym—— Android网络框架Volley(终极篇)
- Volley使用JsonObjectRequest发送Post请求失败
- Volley源码分析(四)NetWork与ResponseDelivery工作原理
- volley源码分析
- Volley的任务执行
- Volley的基本使用
- 2、volley 官方教程-发送一个简单的请求
- android开发笔记之Volley (1)
- Volley应用与源码分析(一)
- Android Volley 实用总结
- XVolley-基于Volley的封装的工具类
- Volley加载图片
- Volley的使用
- Volley源码之使用方式和使用场景详解
- Android Volley完全解析之定制自己的Request XMLRequest GsonRequest
- volley请求超时重复请求问题