树莓派上使用 LCD1602 显示基本状态
2018-06-15 01:04
627 查看
最近入手了一个新玩具,没错,就是树莓派了,这里我使用的是树莓派 3B+。但是在玩儿的时候遇到了一些问题,比如树莓派开机有时候特别慢,且 IP 地址什么的记不住,于是就买了一块便宜的 LCD1602 显示屏(5V).
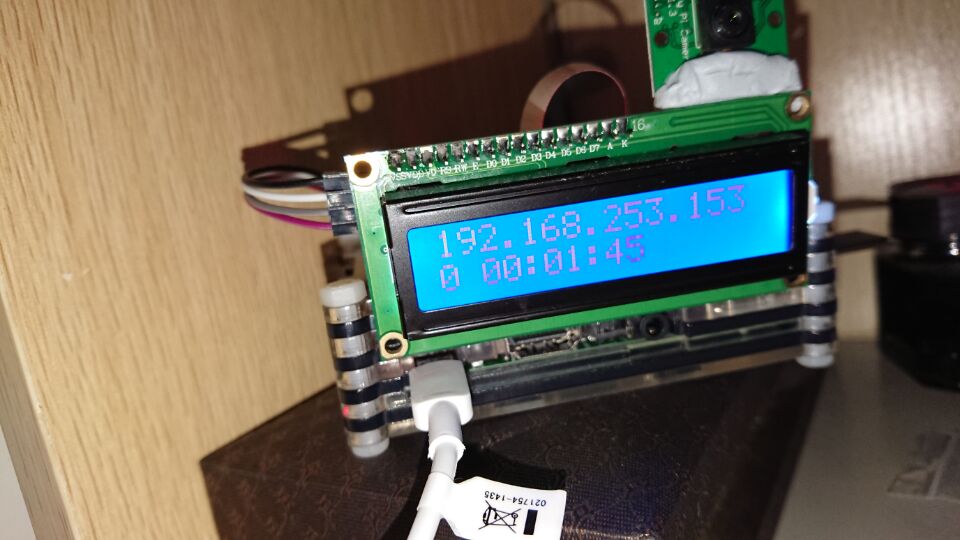
先上效果图
这显示屏可以显示 16个 * 2行 (32)字符,且只标准 ASCII 码字符和日文希腊文字符,LCD1602 一共有 16 个针脚,如果直接将其连接在树莓派上的话非常占用资源,所以我们买的是和 IIC(I2C)模块集成在一起的板子。IIC 只有四个针脚,这样就可以大幅度节约树莓派针脚去干其他事,I2C接口引脚如下:
GND --- GND
VCC --- 电源 (接树莓派5V)
SDA --- I2C 数据
SCL --- I2C 时钟
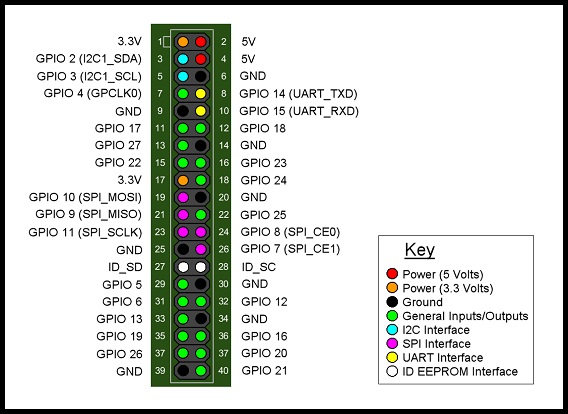
将四个引脚接到树莓派同名 GPIO 引脚即可,VCC接5V,树莓派引脚如图:
接好了 LCD1602 后,我们就要登入树莓派了,首先安装 i2c-tools,和 Python 需要用到的 smbus , 然后查看 I2C 设备地址,这个地址将在后面用到。
看到地址为 0x27 .这说明 已经成功连接了 LCD1602 。接下来就可以用 Python 控制 LCD1602 显示信息了。
由于对 LCD1602 的指令不了解,这里从网上找了一个很好例子,并优化了以下,保存在 /home/lcd/lcd1602.py
, 运行该 脚本,即可看到效果。
在这个基础上,我们还需要添加一些功能,在每次开启自动启动为守护进程,在 LCD 上显示主机 ip 和已运行时间。
代码 > GitHub
deamon.py : 守护进程父类
host_status.py : 树莓派 IP ,可以添加更多内容,比如获取蓝牙状态显示到LCD
LCD1602.py : LCD1602 工具,上面的代码,用于在LCD上打印字符
pi_status.py : 主脚本,这里会开启的一个名为 pi-status 的守护进程,不断刷新 LCD 内容
先将代码下载到树莓派的 /home/lcd/ 目录下,使用命令:
启动
查看进程状态, PID
重启进程
停止
我们还需要将这个脚本加入到开机启动,每次开启将显示状态。
在 exit 0 之前插入一下内容,其中路径根据实际情况更改。
个人博客同步
(完)
先上效果图
这显示屏可以显示 16个 * 2行 (32)字符,且只标准 ASCII 码字符和日文希腊文字符,LCD1602 一共有 16 个针脚,如果直接将其连接在树莓派上的话非常占用资源,所以我们买的是和 IIC(I2C)模块集成在一起的板子。IIC 只有四个针脚,这样就可以大幅度节约树莓派针脚去干其他事,I2C接口引脚如下:
GND --- GND
VCC --- 电源 (接树莓派5V)
SDA --- I2C 数据
SCL --- I2C 时钟
将四个引脚接到树莓派同名 GPIO 引脚即可,VCC接5V,树莓派引脚如图:
接好了 LCD1602 后,我们就要登入树莓派了,首先安装 i2c-tools,和 Python 需要用到的 smbus , 然后查看 I2C 设备地址,这个地址将在后面用到。
pi[@raspberrypi](https://my.oschina.net/raspberrypi):~ $ sudo apt-get install i2c-tools
pi[@raspberrypi](https://my.oschina.net/raspberrypi):~ $ sudo apt-get install python-smbus
pi[@raspberrypi](https://my.oschina.net/raspberrypi):~ $ sudo i2cdetect -y 1

0  1  2  3  4  5  6  7  8  9  a  b  c  d  e  f
00:          -- -- -- -- -- -- -- -- -- -- -- -- --
10: -- -- -- -- -- -- -- -- -- -- -- -- -- -- -- --
20: -- -- -- -- -- -- -- 27 -- -- -- -- -- -- -- --
30: -- -- -- -- -- -- -- -- -- -- -- -- -- -- -- --
40: -- -- -- -- -- -- -- -- -- -- -- -- -- -- -- --
50: -- -- -- -- -- -- -- -- -- -- -- -- -- -- -- --
60: -- -- -- -- -- -- -- -- -- -- -- -- -- -- -- --
70: -- -- -- -- -- -- -- --
看到地址为 0x27 .这说明 已经成功连接了 LCD1602 。接下来就可以用 Python 控制 LCD1602 显示信息了。
由于对 LCD1602 的指令不了解,这里从网上找了一个很好例子,并优化了以下,保存在 /home/lcd/lcd1602.py
, 运行该 脚本,即可看到效果。
import time
import smbus
import logx
import logging

BUS = smbus.SMBus(1)
LCD_ADDR = 0x27
BLEN = 1 #turn on/off background light

def turn_light(key):
global BLEN
BLEN = key
if key ==1 :
BUS.write_byte(LCD_ADDR ,0x08)
logging.info('LCD executed turn on BLight')
else:
BUS.write_byte(LCD_ADDR ,0x00)
logging.info('LCD executed turn off BLight')

def write_word(addr, data):
global BLEN
temp = data
if BLEN == 1:
temp |= 0x08
else:
temp &= 0xF7
BUS.write_byte(addr ,temp)

def send_command(comm):
# Send bit7-4 firstly
buf = comm & 0xF0
buf |= 0x04               # RS = 0, RW = 0, EN = 1
write_word(LCD_ADDR ,buf)
time.sleep(0.002)
buf &= 0xFB               # Make EN = 0
write_word(LCD_ADDR ,buf)

# Send bit3-0 secondly
buf = (comm & 0x0F) << 4
buf |= 0x04               # RS = 0, RW = 0, EN = 1
write_word(LCD_ADDR ,buf)
time.sleep(0.002)
buf &= 0xFB               # Make EN = 0
write_word(LCD_ADDR ,buf)

def send_data(data):
# Send bit7-4 firstly
buf = data & 0xF0
buf |= 0x05               # RS = 1, RW = 0, EN = 1
write_word(LCD_ADDR ,buf)
time.sleep(0.002)
buf &= 0xFB               # Make EN = 0
write_word(LCD_ADDR ,buf)

# Send bit3-0 secondly
buf = (data & 0x0F) << 4
buf |= 0x05               # RS = 1, RW = 0, EN = 1
write_word(LCD_ADDR ,buf)
time.sleep(0.002)
buf &= 0xFB               # Make EN = 0
write_word(LCD_ADDR ,buf)

def init_lcd():
try:
send_command(0x33) # Must initialize to 8-line mode at first
time.sleep(0.005)
send_command(0x32) # Then initialize to 4-line mode
time.sleep(0.005)
send_command(0x28) # 2 Lines & 5*7 dots
time.sleep(0.005)
send_command(0x0C) # Enable display without cursor
time.sleep(0.005)
send_command(0x01) # Clear Screen
logging.info('LCD init over')
BUS.write_byte(LCD_ADDR ,0x08)
logging.info('LCD turning on BLight')
except:
return False
else:
return True

def clear_lcd():
send_command(0x01) # Clear Screen

def print_lcd(x, y, str):

if x < 0:
x = 0
if x > 15:
x = 15
if y <0:
y = 0
if y > 1:
y = 1

# Move cursor
addr = 0x80 + 0x40 * y + x
send_command(addr)

for chr in str:
send_data(ord(chr))

if __name__ == '__main__':
init_lcd()
print_lcd(0, 0, 'Hello, world!')
print_lcd(8, 1, 'by Jerry')
在这个基础上,我们还需要添加一些功能,在每次开启自动启动为守护进程,在 LCD 上显示主机 ip 和已运行时间。
代码 > GitHub
deamon.py : 守护进程父类
host_status.py : 树莓派 IP ,可以添加更多内容,比如获取蓝牙状态显示到LCD
LCD1602.py : LCD1602 工具,上面的代码,用于在LCD上打印字符
pi_status.py : 主脚本,这里会开启的一个名为 pi-status 的守护进程,不断刷新 LCD 内容
先将代码下载到树莓派的 /home/lcd/ 目录下,使用命令:
启动
pi[@raspberrypi](https://my.oschina.net/raspberrypi):/home/lcd $ sudo python pi_status.py
ready to starting ......
查看进程状态, PID
pi[@raspberrypi](https://my.oschina.net/raspberrypi):/home/lcd $ sudo python pi_status.py status
is running ... PID 1116
重启进程
pi@raspberrypi:/home/lcd $ sudo python pi_status.py restart
stopping ...
Stopped!
ready to starting ......
停止
pi@raspberrypi:/home/lcd $ sudo python pi_status.py stop
stopping ...
Stopped!
我们还需要将这个脚本加入到开机启动,每次开启将显示状态。
vi /etc/rc.local
在 exit 0 之前插入一下内容,其中路径根据实际情况更改。
sudo python /home/lcd/pi-status.py
个人博客同步
(完)

相关文章推荐
- eclipse中使用 svn 插件不显示状态
- BCG中使用状态栏显示状态信息
- BCG中使用状态栏显示状态信息
- Silverlight Telerik控件学习:TreeView数据绑定并初始化选中状态、PanelBar的Accordion效果、TabPanel、Frame基本使用
- 使用Libx264实现状态显示
- vi编译器的使用(命令状态和输入状态的基本操作)
- Eclipse3.2使用VSS签出状态不显示问题解决
- (转载) UITableView 系列一 :基本使用方法 (显示,删除,添加图片,添加样式等
- 有关针对数据中以0,1,2等来区别使用状态,而在页面中显示为其表达的可用以及无法使用。。。。
- 使用Libx264实现状态显示
- libgdx基本使用——中文显示与汉字绘制
- 动态设置Button、ImageView等组件在不同状态下的背景/前景显示效果。 扩展下的话可以前景/背景的显示效果可以使用网络图片。
- IOS 构造和使用TableView(基于storyboard) (一)基本的数据显示
- 使用JMeter往Mysql中插入数据,数据时成功插入了,但是JDBC请求为什么显示的是报错状态
- 使用Response.Flush方法实时显示处理过程的状态信息(转)
- 使用jQuery Uploadify借助Dorado平台实现批量上传文件动态显示实时上传文件状态
- asp.net中使用文本输入框输入文本,保留文本基本格式,打印和显示的方法
- UITableView 系列一 :基本使用方法 (显示,删除,添加图片,添加样式等) (实例)
- 使用JavaScript切换DOM元素显示状态方法
- 在sharepoint中使用NameCtrl显示人员状态