NFS服务搭建.
2018-06-10 11:31
218 查看
NFS服务搭建图解:

服务端:
一、关闭防火墙
[root@localhost ~]# systemctl stop firewalld.service
[root@localhost ~]# setenforce 0
[root@localhost ~]# systemctl disable firewalld.service
[root@localhost ~]# systemctl enable firewalld.service
二、下载nfs-utils软件
[root@localhost ~]# yum install -y nfs-utils
三、设置网页存放目录,并写一个简单的网页
[root@localhost ~]# mkdir /webdate
[root@localhost ~]# echo abc123 > /webdate/index.html
四、设置哪个目录被访问(网页存放目录)?掩码、权限?

五、启动nfs-utils软件
[root@localhost ~]# systemctl start nfs-server.service
附):查看一些本主机提供可以被访问的目录
[root@localhost ~]# exportfs -v
客户端:
一、关闭防火墙
[root@localhost ~]# systemctl stop firewalld.service
[root@localhost ~]# setenforce 0
[root@localhost ~]# systemctl disable firewalld.service
[root@localhost ~]# systemctl enable firewalld.service
二、下载nfs-utils和http
[root@localhost ~]# yum install -y nfs-utils httpd
三、启动httpd 和 nfs-utils
[root@localhost ~]# systemctl start httpd
[root@localhost ~]# systemctl enable httpd
[root@localhost ~]# systemctl start nfs-utils
[root@localhost ~]# systemctl enable nfs-utils
附):查看一下服务端给客户端提供挂载的资料目录

四、挂载到服务端
[root@localhost ~]# mount -t nfs 192.168.1.182:/webdate /var/www/html
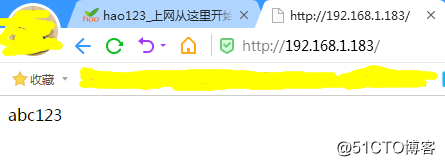
附):访问下客户端挂载成功后的效果
服务端:
一、关闭防火墙
[root@localhost ~]# systemctl stop firewalld.service
[root@localhost ~]# setenforce 0
[root@localhost ~]# systemctl disable firewalld.service
[root@localhost ~]# systemctl enable firewalld.service
二、下载nfs-utils软件
[root@localhost ~]# yum install -y nfs-utils
三、设置网页存放目录,并写一个简单的网页
[root@localhost ~]# mkdir /webdate
[root@localhost ~]# echo abc123 > /webdate/index.html
四、设置哪个目录被访问(网页存放目录)?掩码、权限?
五、启动nfs-utils软件
[root@localhost ~]# systemctl start nfs-server.service
附):查看一些本主机提供可以被访问的目录
[root@localhost ~]# exportfs -v
客户端:
一、关闭防火墙
[root@localhost ~]# systemctl stop firewalld.service
[root@localhost ~]# setenforce 0
[root@localhost ~]# systemctl disable firewalld.service
[root@localhost ~]# systemctl enable firewalld.service
二、下载nfs-utils和http
[root@localhost ~]# yum install -y nfs-utils httpd
三、启动httpd 和 nfs-utils
[root@localhost ~]# systemctl start httpd
[root@localhost ~]# systemctl enable httpd
[root@localhost ~]# systemctl start nfs-utils
[root@localhost ~]# systemctl enable nfs-utils
附):查看一下服务端给客户端提供挂载的资料目录
四、挂载到服务端
[root@localhost ~]# mount -t nfs 192.168.1.182:/webdate /var/www/html
附):访问下客户端挂载成功后的效果

相关文章推荐
- Linux操作系统下NFS服务的搭建过程
- centos 6 nfs服务的搭建
- Linux搭建—NFS服务的安装与配置
- SUSE_NFS、Samba服务搭建
- NFS服务搭建(复习题)
- 用 KVM 搭建web集群实验笔记 - NFS & Samba 服务
- ubuntu下的NFS服务搭建
- CentOS搭建NFS服务
- 嵌入式软件开发培训笔记——ARM架构Linux系统下交叉编译环境搭建、NFS、TFTP服务配置及Nandflash的读写
- NFS服务的搭建与配置
- exportfs命令、NFS客户端问题、FTP介绍、使用vsftpd搭建ftp服务
- day 56 NFS服务搭建(续)与FTP服务搭建与配置
- 【Ubuntu】 Ubuntu16.04搭建NFS服务
- ubuntu下nfs服务的搭建-AMR板挂载
- ubuntu下nfs服务的搭建
- 笔记12(MySQL常用操作、NFS服务搭建与配置)
- NFS文件共享服务搭建
- nfs和ftp服务的搭建
- NFS服务搭建方案
- Linux 下 NFS服务的搭建