Ceph分布式存储学习笔记之ISCSI服务配置
2018-06-05 15:00
531 查看
本文分两部分分别介绍Ceph Luminous版集群的安装以及配置ISCSI服务。
一、部署ceph集群
[root@ceph01 ~]# yum -y install ceph
1.1 Ceph Monitor部署
[root@ceph01 ~]# mkdir ceph;cd ceph
[root@ceph01 ceph]# ceph-deploy new ceph01 ceph02 ceph03
[root@ceph01 ceph]# ceph-deploy mon create  ceph01 ceph02 ceph03
1.2 节点认证
[root@ceph01 ceph]# ceph-deploy gatherkeys ceph01 ceph02 ceph03
1.3 分发ceph配置到其他节点
[root@ceph01 ceph]# ceph-deploy admin ceph01 ceph02 ceph03
[root@ceph01 ceph]# ceph -s
cluster:
id:     97291641-fb19-49c5-9fd2-d42fe7d78243
health: HEALTH_OK

services:
mon: 3 daemons, quorum ceph01,ceph02,ceph03
mgr: no daemons active
osd: 0 osds: 0 up, 0 in

data:
pools:   0 pools, 0 pgs
objects: 0 objects, 0 bytes
usage:   0 kB used, 0 kB / 0 kB avail
pgs:
1.4 Ceph manager部署
[root@ceph01 ceph]# ceph-deploy mgr create ceph01 ceph02 ceph03
[root@ceph01 ceph]# ceph -s
cluster:
id:     97291641-fb19-49c5-9fd2-d42fe7d78243
health: HEALTH_OK

services:
mon: 3 daemons, quorum ceph01,ceph02,ceph03
mgr: ceph01(active), standbys: ceph02, ceph03
osd: 0 osds: 0 up, 0 in

data:
pools:   0 pools, 0 pgs
objects: 0 objects, 0 bytes
usage:   0 kB used, 0 kB / 0 kB avail
pgs:
--启用dashboard
[root@ceph01 ceph]# ceph mgr module enable dashboard
Dashboard的port默认为7000,可以执行ceph config-key set mgr/dashboard/server_port $PORT修改port。也可以执行ceph config-key set mgr/dashboard/server_addr $IP指定dashboard的访问IP。
1.5 Ceph OSD部署
[root@ceph01 ceph]# ceph-deploy disk zap ceph01:sdb ceph02:sdb ceph03:sdb
[root@ceph01 ceph]# ceph-deploy disk zap ceph01:sdc ceph02:sdc ceph03:sdc
[root@ceph01 ceph]# ceph-deploy osd create ceph01:sdb ceph02:sdb ceph03:sdb
[root@ceph01 ceph]# ceph-deploy osd create ceph01:sdc ceph02:sdc ceph03:sdc
[root@ceph01 ceph]# ceph -s
cluster:
id:     97291641-fb19-49c5-9fd2-d42fe7d78243
health: HEALTH_OK

services:
mon: 3 daemons, quorum ceph01,ceph02,ceph03
mgr: ceph01(active), standbys: ceph02, ceph03
osd: 6 osds: 6 up, 6 in

data:
pools:   0 pools, 0 pgs
objects: 0 objects, 0 bytes
usage:   6162 MB used, 1193 GB / 1199 GB avail
pgs:
1.6 官方建议调整的参数
[root@ceph01 ~]# ceph tell osd.* injectargs '--osd_client_watch_timeout 15'
[root@ceph01 ~]# ceph tell osd.* injectargs '--osd_heartbeat_grace 20'
[root@ceph01 ~]# ceph tell osd.* injectargs '--osd_heartbeat_interval 5'
二、部署ISCSI服务
2.1 安装软件
ceph相关的ISCSI软件包可以从redhat通过的源代码进行编译或者下载centos已经编译好的。
[root@ceph01 ~]# yum install ceph-iscsi-cli tcmu-runner ceph-iscsi-tools
[root@ceph01 ceph]# ceph osd pool create rbd 150 150
[root@ceph01 ceph]# ceph osd pool application enable rbd rbd --yes-i-really-mean-it
2.2 创建配置文件
创建iscsi-gateway.cfg,此文件主要设置iscsi服务的网关。
[root@ceph01 ~]# vi /etc/ceph/iscsi-gateway.cfg
[config]
# Name of the Ceph storage cluster. A suitable Ceph configuration file allowing
# access to the Ceph storage cluster from the gateway node is required, if not
# colocated on an OSD node.
cluster_name = ceph

# Place a copy of the ceph cluster's admin keyring in the gateway's /etc/ceph
# drectory and reference the filename here
gateway_keyring = ceph.client.admin.keyring

# API settings.
# The API supports a number of options that allow you to tailor it to your
# local environment. If you want to run the API under https, you will need to
# create cert/key files that are compatible for each iSCSI gateway node, that is
# not locked to a specific node. SSL cert and key files *must* be called
# 'iscsi-gateway.crt' and 'iscsi-gateway.key' and placed in the '/etc/ceph/' directory
# on *each* gateway node. With the SSL files in place, you can use 'api_secure = true'
# to switch to https mode.

# To support the API, the bear minimum settings are:
api_secure = false

# Additional API configuration options are as follows, defaults shown.
# api_user = admin
# api_password = admin
# api_port = 5001
trusted_ip_list = 192.168.120.81,192.168.120.82,192.168.120.83
2.3 同步文件到其他节点
[root@ceph01 ~]# scp /etc/ceph/iscsi-gateway.cfg ceph02:/etc/ceph
[root@ceph01 ~]# scp /etc/ceph/iscsi-gateway.cfg ceph03:/etc/ceph
2.4 启动API服务
[root@ceph01 ~]# systemctl daemon-reload
[root@ceph01 ~]# systemctl enable rbd-target-api
[root@ceph01 ~]# systemctl start rbd-target-api
[root@ceph01 ~]# systemctl status rbd-target-api
● rbd-target-api.service - Ceph iscsi target configuration API
Loaded: loaded (/usr/lib/systemd/system/rbd-target-api.service; enabled; vendor preset: disabled)
Active: active (running) since Thu 2018-05-31 11:35:04 CST; 4s ago
Main PID: 25372 (rbd-target-api)
CGroup: /system.slice/rbd-target-api.service
└─25372 /usr/bin/python /usr/bin/rbd-target-api

May 31 11:35:04 ceph01 systemd[1]: Started Ceph iscsi target configuration API.
May 31 11:35:04 ceph0
b60
1 systemd[1]: Starting Ceph iscsi target configuration API...
May 31 11:35:05 ceph01 rbd-target-api[25372]: Started the configuration object watcher
May 31 11:35:05 ceph01 rbd-target-api[25372]: Checking for config object changes every 1s
May 31 11:35:05 ceph01 rbd-target-api[25372]:  * Running on http://0.0.0.0:5000/
三、配置ISCSI服务
3.1 创建target
[root@ceph01 ~]# gwcli
/> cd iscsi-target
/iscsi-target> create iqn.2003-01.com.redhat.iscsi-gw:iscsi-igw
3.2 创建ISCSI网关
/iscsi-target...-igw/gateways> create ceph01 192.168.120.81 skipchecks=true
OS version/package checks have been bypassed
Adding gateway, sync'ing 0 disk(s) and 0 client(s)
ok
/iscsi-target...-igw/gateways> create ceph02 192.168.120.82 skipchecks=true
OS version/package checks have been bypassed
Adding gateway, sync'ing 0 disk(s) and 0 client(s)
ok
/iscsi-target...-igw/gateways> create ceph03 192.168.120.83 skipchecks=true
OS version/package checks have been bypassed
Adding gateway, sync'ing 0 disk(s) and 0 client(s)
ok
/iscsi-target...-igw/gateways> ls
o- gateways .................................................................................................. [Up: 3/3, Portals: 3]
o- ceph01 .................................................................................................. [192.168.120.81 (UP)]
o- ceph02 .................................................................................................. [192.168.120.82 (UP)]
o- ceph03 .................................................................................................. [192.168.120.83 (UP)]
如果操作系统非Centos或redhat,则需要加skipchecks=true参数。
3.3 创建RBD image
/iscsi-target...-igw/gateways> cd /disks
/disks> create Oracle vol01 100G
ok
/disks> create Oracle vol02 300G
ok
3.4 创建客户端名称
Linux平台可以查看/etc/iscsi/initiatorname.iscsi文件获取InitiatorName。如果修改了默认的名称,必须重启iscsid服务,否则在登录iscsi服务端的时候会报错。
/disks> cd /iscsi-target/iqn.2003-01.com.redhat.iscsi-gw:iscsi-igw/hosts
/iscsi-target...csi-igw/hosts>create iqn.1988-12.com.oracle:3d93d2aa7f1:odb03
ok
/iscsi-target...csi-igw/hosts>create iqn.1988-12.com.oracle:ccd061606e1:odb04
ok
3.5 设置客户端认证
/iscsi-target...csi-igw/hosts> cd  iqn.1988-12.com.oracle:3d93d2aa7f1:odb03
/iscsi-target...odb03> auth chap=admin/redhat
/iscsi-target...odb04> auth chap=admin/redhat
3.6 客户端映射磁盘
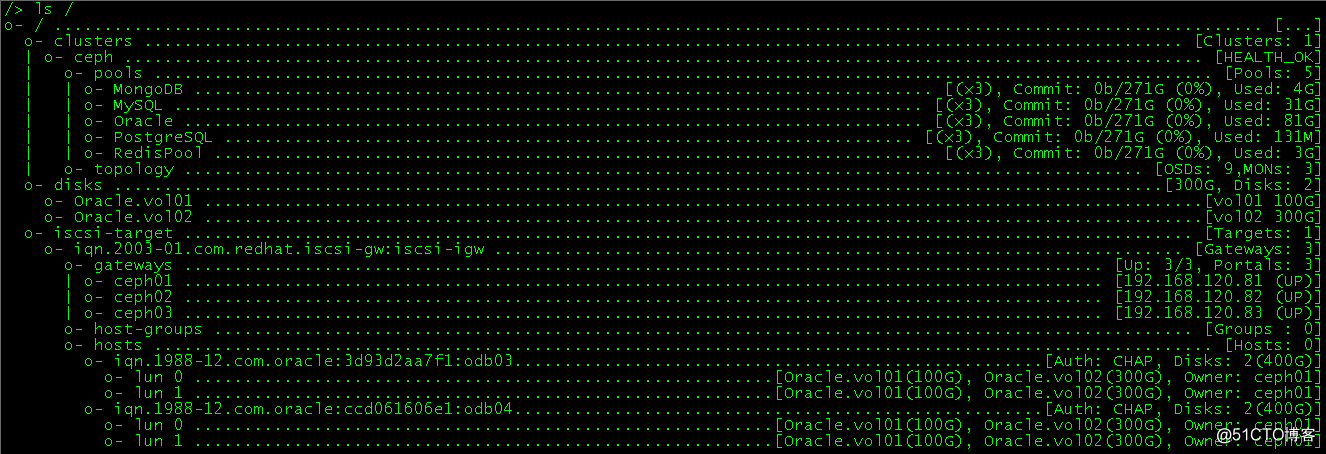
/iscsi-target...odb03> disk add vol01 ok /iscsi-target...odb03> disk add vol02 ok /iscsi-target...odb04> disk add vol01 ok /iscsi-target...odb04> disk add vol02 ok< 111c /pre>最后的结果如下图所示:

相关文章推荐
- Iptables服务全攻略之实战配置 之学习笔记(1)
- 微软StockTrader 2.03 学习笔记(7)--配置服务实现示例指南(三)
- RedHat 学习笔记 基于ssl的httpd服务配置 (openssl创建CA)
- 学习笔记(3)——实验室集群WMS服务配置
- Sharepoint2013商务智能学习笔记之Secure Store Service服务配置(二)
- AD学习笔记8——活动目录服务的基本安装和配置
- 微软StockTrader 2.03 学习笔记(6)--配置服务实现示例指南(二)
- rh9 linux服务配置学习笔记--------dns
- FreeBSD学习笔记之vsftpd服务配置
- FTP服务学习笔记之ssl/tls安全认证配置(3)
- rh9 linux服务配置学习笔记--------dns
- 【RHCE学习笔记】RHEL7下ISCSI存储的配置过程
- Sharepoint2013商务智能学习笔记之Excel Service服务配置(四)
- 微软StockTrader 2.03 学习笔记(2)--什么是配置网站和配置服务、配置存储库
- FTP服务学习笔记之vsftpd安装和配置(2)
- 微软StockTrader 2.03 学习笔记(8)--配置服务实现示例指南(四)
- 学习笔记:NFS服务的配置
- 微软StockTrader 4.0 学习笔记--配置服务实现示例指南(一)
- linux网络服务学习笔记--基本网络配置