Vue 2.0的响应式原理的一点理解
2018-05-06 11:59
375 查看
一点无关的废话(为什么突然转到vue?因为项目需要,所以在学习的时候做一下成果总结。)
Vue官方文档对响应式原理的实现给出了一个大体的介绍,通过对象的访问器属性监视数据,通过观察者模式实现Module和View的绑定监听。如果不熟悉观察者模式的可以移步观察者模式。可以大概的想一下实现方式:需要一个发布者类监听数据,一个订阅者类对数据变化做出反应,一个收集器类收集依赖,对模板的操作需要一系列的指令。这里,我主要想写一下三个类的关系。
从初始化一个Vue实例开始,看下代码流程。
function Vue (options) {
if ("development" !== 'production' &&
!(this instanceof Vue)
) {
warn('Vue is a constructor and should be called with the `new` keyword');
}
this._init(options);
} 主要就是_init方法,这个是Vue原型上的方法,在initMixin函数中定义,源码如下:function initMixin (Vue) {
Vue.prototype._init = function (options) {
var vm = this;
// a uid
vm._uid = uid$3++;
var startTag, endTag;
/* istanbul ignore if */
if ("development" !== 'production' && config.performance && mark) {
startTag = "vue-perf-start:" + (vm._uid);
endTag = "vue-perf-end:" + (vm._uid);
mark(startTag);
}
// a flag to avoid this being observed
vm._isVue = true;
// merge options
if (options && options._isComponent) {
// optimize internal component instantiation
// since dynamic options merging is pretty slow, and none of the
// internal component options needs special treatment.
initInternalComponent(vm, options);
} else {
vm.$options = mergeOptions(
resolveConstructorOptions(vm.constructor),
options || {},
vm
);
}
/* istanbul ignore else */
{
initProxy(vm);
}
// expose real self
vm._self = vm;
initLifecycle(vm);
initEvents(vm);
initRender(vm);
callHook(vm, 'beforeCreate');
initInjections(vm); // resolve injections before data/props
initState(vm);
initProvide(vm); // resolve provide after data/props
callHook(vm, 'created');
/* istanbul ignore if */
if ("development" !== 'production' && config.performance && mark) {
vm._name = formatComponentName(vm, false);
mark(endTag);
measure(("vue " + (vm._name) + " init"), startTag, endTag);
}
if (vm.$options.el) {
vm.$mount(vm.$options.el);
}
};
} _init方法中靠后的方法是不是很眼熟(initLifecycle开始),看看官方给出的生命周期图示,结合源码,可以很清楚看出每个钩子函数的执行时间点。对于数据绑定,是在initState方法中完成的,下面看看initState方法中做了哪些事:function initState (vm) {
vm._watchers = [];
var opts = vm.$options;
if (opts.props) { initProps(vm, opts.props); }
if (opts.methods) { initMethods(vm, opts.methods); }
if (opts.data) {
initData(vm);
} else {
observe(vm._data = {}, true /* asRootData */);
}
if (opts.computed) { initComputed(vm, opts.computed); }
if (opts.watch && opts.watch !== nativeWatch) {
initWatch(vm, opts.watch);
}
} opts取到的是我们在初始化一个Vue实例时传入的对象,对于某一个vue组件,vm.$options就是我们在script标签下export抛出的对象。方法中各种init实现的就是数据代理,简单来说就是让我们通过vm.xx间接访问vm.A.xx,A是opts的某个属性。以initData(vm)为例,先看下initData的源码:function initData (vm) {
var data = vm.$options.data;
data = vm._data = typeof data === 'function'
? getData(data, vm)
: data || {};
if (!isPlainObject(data)) {
data = {};
"development" !== 'production' && warn(
'data functions should return an object:\n' +
'https://vuejs.org/v2/guide/components.html#data-Must-Be-a-Function',
vm
);
}
// proxy data on instance
var keys = Object.keys(data);
var props = vm.$options.props;
var methods = vm.$options.methods;
var i = keys.length;
while (i--) {
var key = keys[i];
{
if (methods && hasOwn(methods, key)) {
warn(
("Method \"" + key + "\" has already been defined as a data property."),
vm
);
}
}
if (props && hasOwn(props, key)) {
"development" !== 'production' && warn(
"The data property \"" + key + "\" is already declared as a prop. " +
"Use prop default value instead.",
vm
);
} else if (!isReserved(key)) {
proxy(vm, "_data", key);
}
}
// observe data
observe(data, true /* asRootData */);
} 说点无关的,在看到对data进行类型判断的时候,是不是想到了官方文档写的“组件中的data只能是方法”。回到正题,定义了keys保存data的属性,通过遍历。对每个key执行proxy(先会去判断这个属性是否在methods和props中存在了),isReserved(key)是判断该属性是否是预留属性(判断属性是否是以'_'或者'$'开头,可以自己看下源码)。然后看下proxy方法源码:function proxy (target, sourceKey, key) {
sharedPropertyDefinition.get = function proxyGetter () {
return this[sourceKey][key]
};
sharedPropertyDefinition.set = function proxySetter (val) {
this[sourceKey][key] = val;
};
Object.defineProperty(target, key, sharedPropertyDefinition);
} 首先说下三个参数,target是初始化Vue的一个实例vm,sourceKey是字符串“_data”,key是data下面的某个属性。通过Object.defineProperty劫持数据,设置vm.A的setter/getter。当我们访问vm.A时,获取的值实际时vm._data.A,设置vm.A=x,实际上是给vm._data.A赋值。 然后再回到initData方法,在做完数据代理之后,调用了observe方法,然后看下相应源码:
function observe (value, asRootData) {
if (!isObject(value) || value instanceof VNode) {
return
}
var ob;
if (hasOwn(value, '__ob__') && value.__ob__ instanceof Observer) {
ob = value.__ob__;
} else if (
shouldObserve &&
!isServerRendering() &&
(Array.isArray(value) || isPlainObject(value)) &&
Object.isExtensible(value) &&
!value._isVue
) {
ob = new Observer(value);
}
if (asRootData && ob) {
ob.vmCount++;
}
return ob
} 先是对value(即传入的data对象)做了一系列的类型判断(是否是引用类型object,是否是VNode的实例,是否自身有'_ob_'属性等),最终要完成的就是初始化一个Observer实例。接下来要看的就是Observer类有什么作用:var Observer = function Observer (value) {
this.value = value;
this.dep = new Dep();
this.vmCount = 0;
def(value, '__ob__', this);
if (Array.isArray(value)) {
var augment = hasProto
? protoAugment
: copyAugment;
augment(value, arrayMethods, arrayKeys);
this.observeArray(value);
} else {
this.walk(value);
}
};
/**
* Walk through each property and convert them into
* getter/setters. This method should only be called when
* value type is Object.
*/
Observer.prototype.walk = function walk (obj) {
var keys = Object.keys(obj);
for (var i = 0; i < keys.length; i++) {
defineReactive(obj, keys[i]);
}
};
/**
* Observe a list of Array items.
*/
Observer.prototype.observeArray = function observeArray (items) {
for (var i = 0, l = items.length; i < l; i++) {
observe(items[i]);
}
}; 每个Observer实例有一个属性value保存传入的data对象,初始化了一个Dep实例,给value添加一个属性'_ob_'保存该Observer实例。然后判断value是否是一个数组,如果是,则对数组的每一项执行observe()方法,最终结果就是对每一项执行Observer的原型方法walk。如果value不是数组,则直接执行walk方法。而walk方法则是对data对象的每个属性执行defineReactive方法。所以接下来我们需要去看Dep类和defineReactive分别做了什么。显示Dep类:var uid = 0;
/**
* A dep is an observable that can have multiple
* directives subscribing to it.
*/
var Dep = function Dep () {
this.id = uid++;
this.subs = [];
};
Dep.prototype.addSub = function addSub (sub) {
this.subs.push(sub);
};
Dep.prototype.removeSub = function removeSub (sub) {
remove(this.subs, sub);
};
Dep.prototype.depend = function depend () {
if (Dep.target) {
Dep.target.addDep(this);
}
};
Dep.prototype.notify = function notify () {
// stabilize the subscriber list first
var subs = this.subs.slice();
for (var i = 0, l = subs.length; i < l; i++) {
subs[i].update();
}
};
// the current target watcher being evaluated.
// this is globally unique because there could be only one
// watcher being evaluated at any time.
Dep.target = null;
var targetStack = [];
function pushTarget (_target) {
if (Dep.target) { targetStack.push(Dep.target); }
Dep.target = _target;
}
function popTarget () {
Dep.target = targetStack.pop();
} 先不对Dep做说明,再看下defineReactive方法的源码:function defineReactive (
obj,
key,
val,
customSetter,
shallow
) {
var dep = new Dep();
var property = Object.getOwnPropertyDescriptor(obj, key);
if (property && property.configurable === false) {
return
}
// cater for pre-defined getter/setters
var getter = property && property.get;
var setter = property && property.set;
if ((!getter || setter) && arguments.length === 2) {
val = obj[key];
}
var childOb = !shallow && observe(val);
Object.defineProperty(obj, key, {
enumerable: true,
configurable: true,
get: function reactiveGetter () {
var value = getter ? getter.call(obj) : val;
if (Dep.target) {
dep.depend();
if (childOb) {
childOb.dep.depend();
if (Array.isArray(value)) {
dependArray(value);
}
}
}
return value
},
set: function reactiveSetter (newVal) {
var value = getter ? getter.call(obj) : val;
/* eslint-disable no-self-compare */
if (newVal === value || (newVal !== newVal && value !== value)) {
return
}
/* eslint-enable no-self-compare */
if ("development" !== 'production' && customSetter) {
customSetter();
}
if (setter) {
setter.call(obj, newVal);
} else {
val = newVal;
}
childOb = !shallow && observe(newVal);
dep.notify();
}
});
} 可以看到,defineReactive方法实现了给每个data的属性初始化一个Dep实例,然后再给这些属性设置getter/setter。- getter
- 获取属性的值value
- 判断Dep.target,即该属性是否被用到(回顾一下Dep类相关代码,发现Dep.target是在pushTarget方法中赋值的,而pushTarget方法是在Watcher类的方法中调用的,后面再详细说)。如果没有,直接返回值value。
- 执行dep.depend()方法,回顾一下源码,发现又涉及到了Dep.target,而且还有addDep方法,都与Watcher有关。后面再说。
- setter
- 获取属性值value,判断值是否有变化,赋值
- 主要关注点在dep.notify()方法,回到Dep类源码,发现又涉及到Watcher类。
现在就看看Watcher源码,解开上面提到的谜团:
var Watcher = function Watcher (
vm,
expOrFn,
cb,
options,
isRenderWatcher
) {
this.vm = vm;
if (isRenderWatcher) {
vm._watcher = this;
}
vm._watchers.push(this);
// options
if (options) {
this.deep = !!options.deep;
this.user = !!options.user;
this.computed = !!options.computed;
this.sync = !!options.sync;
this.before = options.before;
} else {
this.deep = this.user = this.computed = this.sync = false;
}
this.cb = cb;
this.id = ++uid$1; // uid for batching
this.active = true;
this.dirty = this.computed; // for computed watchers
this.deps = [];
this.newDeps = [];
this.depIds = new _Set();
this.newDepIds = new _Set();
this.expression = expOrFn.toString();
// parse expression for getter
if (typeof expOrFn === 'function') {
this.getter = expOrFn;
} else {
this.getter = parsePath(expOrFn);
if (!this.getter) {
this.getter = function () {};
"development" !== 'production' && warn(
"Failed watching path: \"" + expOrFn + "\" " +
'Watcher only accepts simple dot-delimited paths. ' +
'For full control, use a function instead.',
vm
);
}
}
if (this.computed) {
this.value = undefined;
this.dep = new Dep();
} else {
this.value = this.get();
}
};
Watcher.prototype.get = function get () {
pushTarget(this);
var value;
var vm = this.vm;
try {
value = this.getter.call(vm, vm);
} catch (e) {
if (this.user) {
handleError(e, vm, ("getter for watcher \"" + (this.expression) + "\""));
} else {
throw e
}
} finally {
// "touch" every property so they are all tracked as
// dependencies for deep watching
if (this.deep) {
traverse(value);
}
popTarget();
this.cleanupDeps();
}
return value
};
/**
* Add a dependency to this directive.
*/
Watcher.prototype.addDep = function addDep (dep) {
var id = dep.id;
if (!this.newDepIds.has(id)) {
this.newDepIds.add(id);
this.newDeps.push(dep);
if (!this.depIds.has(id)) {
dep.addSub(this);
}
}
}; Watcher原型方法代码比较多,这里只展示上面提到的两个方法。现在遇到一个问题,Watcher的实例什么时候初始化的,实例是什么。 Vue的双向数据绑定是采用的数据劫持和观察者模式,数据劫持前面提到了,是通过Object.defineProperty实现的。前面说到的Observer类很明显是用来监视数据的,也就是发布者,Dep类存储了一些与Watcher有关的东西,起到了一个收集器的作用,那么Watcher就是订阅者了。我们在页面中写的双括号"{{}}"或者一些vue指令,在相关代码的解析下,分别就初始化了一个Watcher的实例。例如页面中:
<span class="text">{{item.name}}</span> 对应的就会给item.name初始化一个Watcher的实例。初始化的过程中就会调用get方法,将Dep.target指向自己,并在try语句中触发了属性的getter,最终的结果就是将自身保存在属性对应的Dep实例的subs数组中,完成依赖收集。 最后给出一张图总结:
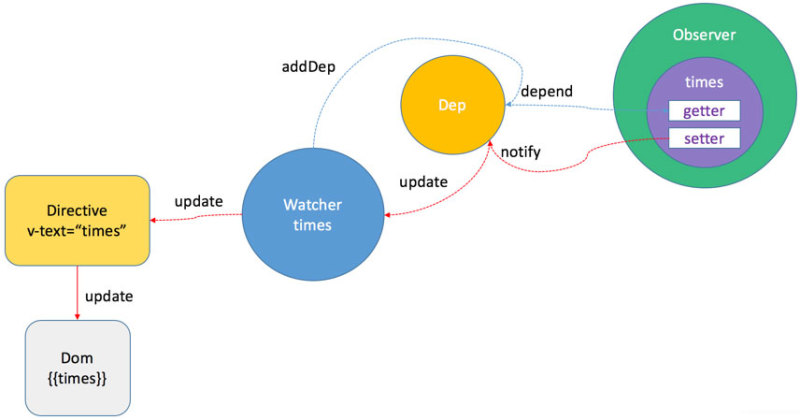
- 钩子函数beforeCreate和created之间会调用initState,初始化methods,data,props等
- 在初始化data时,会完成数据代理,vm.xx = vm._data.xx = vm.data.xx,之后会调用observe方法,初始化一个Observer实例
- 初始化Observer实例会对data的每个属性设置setter/getter,同时每个属性都会初始化一个Dep实例,用来收集订阅者。
- 模板编译中会对指令/{{}}数据绑定初始化Watcher实例,初始化时会调用get方法,触发对应属性的getter将自身添加到对应属性的对应的Dep实例dep的subs数组中。
- 属性的值变化的时候,触发setter,调用属性对应的Dep实例dep的notify()方法,notify方法会去遍历subs数组中存放的Watcher实例,通知每个实例调用update对数据变化做出反应。
能力有限,对于文中不正确的地方希望您可以给出宝贵的意见。最后感谢黄轶老师的文章,可移步老师的文章点击打开链接。

相关文章推荐
- Vue2.0 探索之路——生命周期和钩子函数的一些理解
- 模拟源码深入理解Vue数据驱动原理(1)
- Vue 响应式原理
- Vue实现双向绑定的原理以及响应式数据
- 关于session实现原理和运行机制的一点理解
- 学一点 mysql 双机异地热备份----快速理解mysql主从,主主备份原理及实践
- Vue 源码解析:深入响应式原理
- vue源码--响应式设计原理
- Vue.js每天必学之内部响应式原理探究
- Vue 2.0 的数据依赖/virtual-dom实现原理简析
- Vue 2.0的数据依赖实现原理代码简析
- Vue2.0 探索之路——生命周期和钩子函数的一些理解
- Vue 响应式原理
- 理解Vue 2.0 的ref属性及简单用法
- vue2.0使用ES6语法的箭头函数对this作用域的理解
- Vue2.0 和 Vue1.0——生命周期和钩子函数的一些理解
- 学一点 mysql 双机异地热备份----快速理解mysql主从,主主备份原理及实践
- 深入理解vue.js双向绑定的实现原理
- 浅谈Vue 数据响应式原理
- 学习 vue 源码 -- 响应式原理